Linux备份服务
备份服务
一、备份服务概述
备份服务:需要使用脚本,打包备份,定时任务
通过rsyncd服务,不同主机之间进行数据传输
rsyncd特点:
- rsync是个服务,也是命令
- 使用方便,有多种模式
- 传输数据的时候是增量传输
增量与全量:
全量:无论数据多少,全部进行传输(scp)
增量:只会把修改,新建的文件进行传输(rsync)
#使用方法:

#全量

[root@backup /data]# scp -r /etc/sysconfig/ root@10.0.0.31:/tmp/

#注:-r表示递归传输

#增量

[root@backup /data]# rsync -avz /etc/sysconfig/ root@10.0.0.31:/opt/
二、Rsync应用场景
| 应用场景(业务场景) | 应用建议 |
|---|---|
| rsync作为命令使用 | 临时拉取,推送数据 |
| 定时任务:rsync服务+定时任务 | 定时备份(定时任务进行备份+通过rsync传输备份) |
| 实时同步:rsync服务+sersync/lsyncd实现实时同步 | 解决存储服务单点问题 |
| rsync服务与异地容灾 | 找一个异地的服务器存放备份 |
三、Rsync使用模式
| 模式 | 应用场景 |
|---|---|
| 本地模式(了解) | 不推荐使用 |
| 远程模式 | 传输数据(临时使用可以使用scp替代) |
| rsync守护进程模式(daemon) | 传输数据(不需要密码),用于定时备份,定时同步 |
四、rsync不同模式
1.rsync本地模式
[root@backup ~]# rsync -a /etc/ /tmp/

[root@backup ~]# ll /tmp/

total 1092

drwxr-xr-x   3 root root      101 Jan  9 09:05 abrt

-rw-r--r--   1 root root       16 Jan  9 09:09 adjtime

-rw-r--r--   1 root root     1529 Apr  1  2020 aliases

-rw-r--r--   1 root root    12288 Jan  9 09:12 aliases.db

drwxr-xr-x   2 root root      261 Jan  9 10:15 alternatives

-rw-------   1 root root      541 Aug  9  2019 anacrontab

-rw-r--r--   1 root root       55 Aug  8  2019 asound.conf

[root@backup /tmp]# rsync -a /etc /tmp/

[root@backup /tmp]# ll

total 12

drwxr-xr-x 81 root root 8192 Jan 10 16:29 etc
注意事项:
在rsync对于目录 /etc/ /etc 是有区别的
/etc /etc 目录+目录的内容
/etc/ /etc/ 目录下面的内容
2.远程模式
1对于1远程传输数据
| 格式 | ||
|---|---|---|
| rsync -a | 源文件 | 目标 |
| 推送:rsync | /etc/hostname | root@10.0.0.31:/tmp |
| 拉取:rsync | root@10.0.0.31:/etc/hosts | /tmp/ |
#推送/etc/hostname 到10.0.0.31的/tmp/目录

[root@backup ~]# rsync -a /etc/hostname root@10.0.0.31:/tmp

The authenticity of host '10.0.0.31 (10.0.0.31)' can't be established.

ECDSA key fingerprint is SHA256:fVjvhVF2qU+PCOqsrVTrbxa/aNB4dzNmGRJTw1iIZ1s.

ECDSA key fingerprint is MD5:0f:00:32:1c:41:31:af:a2:f5:e8:64:40:2c:cf:98:98.

Are you sure you want to continue connecting (yes/no)? yes

Warning: Permanently added '10.0.0.31' (ECDSA) to the list of known hosts.

root@10.0.0.31's password:

[root@nfs ~]# ll /tmp/

total 8

-rw-r--r--  1 root root   7 Jan  9 11:04 hostname
3.守护进程模式
3.1 服务使用流程
- 部署
- 配置
- 启动,使用
- 优化
- 故障
- 自动化(监控,日志,安全,自动部署,容器)
3.2检查是否安装
#安装或更新

[root@nfs ~]# yum -y install rsync

#检查

[root@nfs ~]# rpm -qa |grep rsync

rsync-3.1.2-10.el7.x86_64

#软件包内容

[root@nfs ~]# rpm -ql rsync

/etc/rsyncd.conf                          #配置文件

/etc/sysconfig/rsyncd

/usr/bin/rsync						      #命令

/usr/lib/systemd/system/rsyncd.service    #systemctl对应的配置文件
3.3进行配置
3.3.1 配置详解
[root@backup ~]# cat /etc/rsyncd.conf

fake super =yes 					#如果不开启,则centos7传输报错(伪装成root权限)

uid = rsync							#rsync运行用户 ,是虚拟用户   (常用)

gid = rsync

use chroot = no

max connections = 2000				#最大连接数

timeout = 600						#连接超时时间

pid file = /var/run/rsyncd.pid		#存放服务的pid号

lock file = /var/run/rsync.lock		#进程/服务的锁文件 防止重复运行

log file = /var/log/rsyncd.log		#rsync服务端日志						(常用)

ignore errors						#忽略错误

read only = false					#可以进行读写

list = false						#关闭rsync服务端列表功能

#hosts allow = 10.0.0.0/24			#只准许那些ip或网段访问,相当于白名单	(常用)

#hosts deny = 0.0.0.0/32			#拒绝那些网段访问					  (常用)

auth users = rsync_backup			#rsync服务端进行验证用户:用户名 	   (常用)

secrets file = /etc/rsync.password	#rsync服务端进行密码验证:密码文件	   (常用)

#####################################

[data]								#模块名字,用户访问服务端的时候进行指定	(常用)

comment = www by wh					#注释说明						      (常用)

path = /data						#模块对应的目录						(常用)
3.3.2 进行配置
#修改rsyncd.conf  把原来的全删了,鼠标放在开头,按dG

[root@backup ~]# cat /etc/rsyncd.conf

fake super =yes

uid = rsync

gid = rsync

use chroot = no

max connections = 2000

timeout = 600

pid file = /var/run/rsyncd.pid

lock file = /var/run/rsync.lock

log file = /var/log/rsyncd.log

ignore errors

read only = false

list = false

#hosts allow = 10.0.0.0/24

#hosts deny = 0.0.0.0/32

auth users = rsync_backup

secrets file = /etc/rsync.password

#####################################

[data]

comment = www by wh

path = /data

#注:改文件后边不能接注释,要不会备份的时候会报错
3.3.3 后续配置
#1.添加虚拟用户

[root@backup ~]# useradd -s /sbin/nologin -M rsync

[root@backup ~]# id rsync

uid=1000(rsync) gid=1000(rsync) groups=1000(rsync)

#2.创建密码文件,文件名最好从配置文件复制

#密码文件格式:用户名:密码

[root@backup ~]# echo 'rsync_backup:1' >/etc/rsync.password

[root@backup ~]# cat /etc/rsync.password

rsync_backup:1

#修改密码文件权限

[root@backup ~]# chmod 600 /etc/rsync.password

[root@backup ~]# ll -d /etc/rsync.password

-rw------- 1 root root 15 Jan 10 17:16 /etc/rsync.password

#3.创建备份目录并修改属主属组

[root@backup ~]# mkdir -p /data/

[root@backup ~]# chown -R rsync.rsync /data/

[root@backup ~]# ll -d /data/

drwxr-xr-x 2 rsync rsync 6 Jan 10 17:17 /data/
3.3.4 启动服务
#启动服务

[root@backup ~]# systemctl start rsyncd

[root@backup ~]# systemctl enable rsyncd

Created symlink from /etc/systemd/system/multi-user.target.wants/rsyncd.service to /usr/lib/systemd/system/rsyncd.service.

[root@backup ~]# systemctl status rsyncd

● rsyncd.service - fast remote file copy program daemon

   Loaded: loaded (/usr/lib/systemd/system/rsyncd.service; enabled; vendor preset: disabled)

   Active: active (running) since Tue 2023-01-10 17:12:23 CST; 15s ago

 Main PID: 1891 (rsync)

   CGroup: /system.slice/rsyncd.service

           └─1891 /usr/bin/rsync --daemon --no-detach

Jan 10 17:12:23 backup systemd[1]: Started fast remote file copy program daemon.

Jan 10 17:12:23 backup rsyncd[1891]: rsyncd version 3.1.2 starting, listening on port 873

#查看进程

[root@backup ~]# ps -ef|grep rsync

root       1891      1  0 17:12 ?        00:00:00 /usr/bin/rsync --daemon --no-detach

root       1912   1712  0 17:13 pts/0    00:00:00 grep --color=auto rsync

#查看端口

tcp    LISTEN     0      5         *:873         *:*        users:(("rsync",pid=1891,fd=4))

tcp    LISTEN     0      5      [::]:873     [::]:*         users:(("rsync",pid=1891,fd=5))
3.3.5 访问测试
[root@nfs ~]# rsync -avz /etc/hosts rsync_backup@10.0.0.41::data

Password:

sending incremental file list

hosts

sent 215 bytes  received 43 bytes  172.00 bytes/sec

total size is 329  speedup is 1.28

[root@backup /data]# ll

total 4

-rw-r--r-- 1 rsync rsync 329 Jan  9 10:50 hosts

rsync -avz /etc/hosts    rsync_backup@10.0.0.41::data

						#服务端配置文件中的认证用户  #模块名字
3.3.6 免密的方式连接服务端(命令行指定客户端密码文件)必会
#这个方法仅适用于守护进程模式

#客户端创建密码文件并修改权限为600

#密码文件格式:只写密码即可

[root@nfs ~]# echo '1' > /etc/rsync.pass

[root@nfs ~]# cat /etc/rsync.pass

1

[root@nfs ~]# chmod 600 /etc/rsync.pass

[root@nfs ~]# ll -d /etc/rsync.pass

-rw------- 1 root root 2 Jan 10 17:45 /etc/rsync.pass

[root@nfs ~]# rsync -avz /etc/hostname rsync_backup@10.0.0.41::data --password-file=/etc/rsync.pass

sending incremental file list

hostname

sent 99 bytes  received 43 bytes  284.00 bytes/sec

total size is 4  speedup is 0.03

[root@backup /data]# ll

total 8

-rw-r--r-- 1 rsync rsync   4 Jan  9 11:11 hostname
3.3.7 访问控制-安全措施
hosts allow 只准许指定的ip或网段访问.
hosts deny 拒绝.
#配置只准许172.16.1.0/24 网段访问

[root@backup /data]# cat /etc/rsyncd.conf

fake super =yes

uid = rsync

gid = rsync

use chroot = no

max connections = 2000

timeout = 600

pid file = /var/run/rsyncd.pid

lock file = /var/run/rsync.lock

log file = /var/log/rsyncd.log

ignore errors

read only = false

list = false

#配置允许

hosts allow = 172.16.1.0/24

#hosts deny = 0.0.0.0/32

auth users = rsync_backup

secrets file = /etc/rsync.password

#####################################

[data]

comment = www by wh

path = /data

[root@nfs ~]# rsync -avz /etc/hostname rsync_backup@10.0.0.41::data --password-file=/etc/rsync.pass

@ERROR: Unknown module 'data'

rsync error: error starting client-server protocol (code 5) at main.c(1649) [sender=3.1.2]

[root@nfs ~]# rsync -avz /etc/hostname rsync_backup@172.16.1.41::data --password-file=/etc/rsync.pass

sending incremental file list

sent 51 bytes  received 20 bytes  142.00 bytes/sec

total size is 4  speedup is 0.06
4.uid,gid与auth user ,secert file
用户执行命令:
[root@nfs ~]# rsync -avz /etc/hosts rsync_backup@10.0.0.41::data --password-file=/etc/rsync.client
服务端收到数据:判断rsync_backup用户,然后等待输入密码
把用户名和密码与配置文件里面的进行对比
通过后,开始传输数据
数据到达服务器,所有者被修改为指定的uid和gid。(rsync)
数据写入data模块,也就是/data目录下面
五、rsync选项
| 选项 | 含义 |
|---|---|
| -a | -rlptgoD: -r 递归复制 -l 复制软链接 -p 保持权限不变 -m 保持修改时间不变 -o 保持所有者不变 -g 用户组不变 -D --devices -pecials 设备与特殊文件 |
| -v | 显示过程 |
| -z | 传输数据的时候进行压缩 |
| -P | 显示每个文件的传输过程(进度条)断点续传 |
| --bwlimit | 限速,注意不要与-z一起使用,要不会失效 |
| --exclude --exclude-from |
排除 |
| --delete | 目标目录与源目录保持一致的传输(慎用,比较危险) |
#限速并传输

[root@nfs ~]# dd if=/dev/zero of=/tmp/500m bs=1M count=500

[root@nfs ~]# rsync -aP --bwlimit=500 /tmp/500m rsync_backup@10.0.0.41::data --password-file=/etc/rsync.client

sending incremental file list

500m

        557,056   0%  500.00kB/s    0:17:27

rsync error: received SIGINT, SIGTERM, or SIGHUP (code 20) at rsync.c(638) [sender=3.1.2]

注:默认单位为kb

#传输并排除

[root@nfs ~]# touch {01..10}.txt

[root@nfs ~]# ll

total 0

-rw-r--r-- 1 root root 0 Jan 10 20:13 01.txt

-rw-r--r-- 1 root root 0 Jan 10 20:13 02.txt

-rw-r--r-- 1 root root 0 Jan 10 20:13 03.txt

-rw-r--r-- 1 root root 0 Jan 10 20:13 04.txt

-rw-r--r-- 1 root root 0 Jan 10 20:13 05.txt

-rw-r--r-- 1 root root 0 Jan 10 20:13 06.txt

-rw-r--r-- 1 root root 0 Jan 10 20:13 07.txt

-rw-r--r-- 1 root root 0 Jan 10 20:13 08.txt

-rw-r--r-- 1 root root 0 Jan 10 20:13 09.txt

-rw-r--r-- 1 root root 0 Jan 10 20:13 10.txt

[root@nfs ~]# rsync -avz . rsync_backup@10.0.0.41::data --exclude={01,03.05}.txt

Password:

sending incremental file list

./

.bash_history

.bash_logout

.bash_profile

.bashrc

.cshrc

.tcshrc

.viminfo

02.txt

03.txt

04.txt

05.txt

06.txt

07.txt

08.txt

09.txt

10.txt

.pki/

.pki/nssdb/

.ssh/

.ssh/known_hosts

sent 3,542 bytes  received 370 bytes  1,564.80 bytes/sec

total size is 8,281  speedup is 2.12

#保持源与目标数据一致

[root@nfs ~]# rsync -avP --delete    .       root@10.0.0.41:/tmp/

							     #以源为主
六、故障
1. rsync提示:"rsync: read error: Connection reset by peer (104)"
[root@nfs ~]# rsync -avz /etc/hosts rsync_backup@10.0.0.41::data

sending incremental file list

rsync: read error: Connection reset by peer (104)

rsync error: error in socket IO (code 10) at io.c(785) [sender=3.1.2]

#查看日志,日志也提示

[root@backup ~]# tail -f /var/log/rsyncd.log

tail: cannot open ‘/var/log/rsyncd.log’ for reading: No such file or directory

tail: no files remaining

#这时可以断定是/etc/rsyncd.conf出问题了

#最后cat好几遍发现,多了一行。原来是复制笔记的时候,把cat复制进去了,哈哈哈哈
2. rsync提示:"The --password-file option may only be used when accessing an rsync daemo"
[root@nfs ~]# rsync -avz /etc/hostname root@10.0.0.41:/data --password-file=/etc/rsync.pass

The --password-file option may only be used when accessing an rsync daemon.

rsync error: syntax or usage error (code 1) at main.c(1383) [sender=3.1.2]

#原因:--password file选项只能在访问rsync守护进程时使用

[root@nfs ~]# rsync -avz /etc/hostname rsync_backup@10.0.0.41::data --password-file=/etc/rsync.pass

sending incremental file list

hostname

sent 99 bytes  received 43 bytes  284.00 bytes/sec

total size is 4  speedup is 0.03
3. rsync提示:"@ERROR: Unknown module 'data'"
[root@nfs ~]# rsync -avz /etc/hostname rsync_backup@10.0.0.41::data --password-file=/etc/rsync.pass

@ERROR: Unknown module 'data'

rsync error: error starting client-server protocol (code 5) at main.c(1649) [sender=3.1.2]

#原因:10.0.0.41不在运行访问的网段
4. rsync提示:"Permission denied (13)"
[root@nfs ~]# rsync -avz /etc/hostname rsync_backup@172.16.1.41::data --password-file=/etc/rsync.pass

sending incremental file list

rsync: recv_generator: failed to stat "hostname" (in data): Permission denied (13)

sent 51 bytes  received 107 bytes  316.00 bytes/sec

total size is 4  speedup is 0.03

rsync error: some files/attrs were not transferred (see previous errors) (code 23) at main.c(1179) [sender=3.1.2]

#selinux开启

[root@backup ~]# getenforce

Enforcing

#修改/etc/selinux/config

[root@backup ~]# vim /etc/selinux/config

# This file controls the state of SELinux on the system.

# SELINUX= can take one of these three values:

#     enforcing - SELinux security policy is enforced.

#     permissive - SELinux prints warnings instead of enforcing.

#     disabled - No SELinux policy is loaded.

SELINUX=disabled   #修改为disabled

#修改文件后,重启生效
5.rsync提示:"@ERROR: auth failed on module data"
[root@nfs ~]# rsync -avz /etc/hostname rsync_backup@172.16.1.41::data --password-file=/etc/rsync.pass

@ERROR: auth failed on module data

rsync error: error starting client-server protocol (code 5) at main.c(1649) [sender=3.1.2]

#第一种:服务端配置文件

[root@backup ~]# cat /etc/rsyncd.conf

fake super =yes

uid = rsync

gid = rsync

use chroot = no

max connections = 2000

timeout = 600

pid file = /var/run/rsyncd.pid

lock file = /var/run/rsync.lock

log file = /var/log/rsyncd.log

ignore errors

read only = false

list = false

hosts allow = 172.16.1.0/24

#hosts deny = 0.0.0.0/32

auth users = rsync_backup

secrets file = /etc/rsync.password

#这个密码文件不存在或者名字错了

#第二种:secrets file 密码文件权限不是600

[root@backup ~]# ll -d /etc/rsync.password

-rw-r--r--. 1 root root 15 Jan 10 17:16 /etc/rsync.password

#第三种:secrets file 密码文件中内容不对

#服务端:

[root@backup /data]# cat /etc/rsync.password

rsync_backup:1

#服务端

[root@nfs ~]# cat /etc/rsync.pass

1
6.rsync提示:"Operation not permitted (1)"
[root@nfs ~]# rsync -avz /etc/hostname rsync_backup@172.16.1.41::data --password-file=/etc/rsync.pass

sending incremental file list

rsync: chgrp "hostname" (in data) failed: Operation not permitted (1)

sent 54 bytes  received 97 bytes  302.00 bytes/sec

total size is 4  speedup is 0.03

rsync error: some files/attrs were not transferred (see previous errors) (code 23) at main.c(1179) [sender=3.1.2]

[root@backup ~]# cat /etc/rsyncd.conf

fake super =yes   #配置文件少了这一行

uid = rsync

gid = rsync

use chroot = no

#改完记得重启服务
6.rsync提示:"rsync: mkstemp ".hostname.mgEkPz" (in data) failed: Permission denied (13)"
[root@nfs ~]# rsync -avz /etc/hostname rsync_backup@172.16.1.41::data --password-file=/etc/rsync.pass

sending incremental file list

hostname

rsync: mkstemp ".hostname.mgEkPz" (in data) failed: Permission denied (13)

sent 99 bytes  received 122 bytes  442.00 bytes/sec

total size is 4  speedup is 0.02

rsync error: some files/attrs were not transferred (see previous errors) (code 23) at main.c(1179) [sender=3.1.2]

#模板的共享目录的权限不对

[root@backup /data]# ll -d /data/

drwxr-xr-x. 2 root root 6 Jan 10 20:40 /data/

#解决方案:

[root@backup /data]# chown rsync.rsync /data

[root@backup /data]# ll -d /data/

drwxr-xr-x. 2 rsync rsync 6 Jan 10 20:40 /data/
7. rsync 提示 "chdir failed"
[backup]

comment = "备份文件夹"

path = {{ rsync_dir }}

[nfsbackup]

comment = "nfs备份文件夹"

path = {{ sersync_dir }}

[root@nfs /data]# rsync -avz /data rsync_backup@172.16.1.41::nfsbackup --password-file=/etc/rsync.client

@ERROR: chdir failed

rsync error: error starting client-server protocol (code 5) at main.c(1649) [sender=3.1.2]

#原因:

1. 备份存储目录没有建立

2. 建立的备份存储目录和配置文件定义不一致

#我的问题是用ansible的变量的时候把变量加了引号
七、案例
项目要求: 定时备份nfs01,web01配置文件(etc,定时任务) /backup/ip地址/conf-时间.tar.gz 也可以说2个备份软件包.
定时备份nfs01,web01同步到backup服务器上/backup/
定时备份nfs01,web01删除7天之前的备份
在backup服务器,每天发送邮件备份结果(find或tree)
检查:邮箱是否收到邮件,检查备份服务器上是否收到了备份
自己写的

[root@web01 /server/scripts]# cat conf_backup.sh

#!/bin/bash

#author: wh

#desc: 备份etc、定时任务备份文件

#version: V1

#1.定义变量

ip=`hostname -I|awk '{print $1}'`

date=`date +%F`

backup_dir=/backup/${ip}

#2.创建备份目录

mkdir -p ${backup_dir}

#3.备份文件

tar zcf ${backup_dir}/conf-${date}.tar.gz /etc/ /var/spool/cron/

#4.推送到备份服务器

echo '1' >/etc/rsync.pass

chmod 600 /etc/rsync.pass

rsync -az /backup rsync_backup@10.0.0.41::data --password-file=/etc/rsync.pass

#5.删除7天之前的备份

rm -rf `find ${backup_dir} -type f -mtime +7`

[root@web01 /server/scripts]# crontab -e

#2.定时备份etc和定时任务

* * * * * sh /server/scripts/conf_backup.sh &>/dev/null

[root@backup /server/scripts]# cat backup_result.sh

#!/bin/bash

#author: wh

#desc: 定时任务结果脚本

#version: V1

tree /data/backup/ |mail -s "今日备份的结果"  459086748@qq.com
八、项目案例:全网备份项目
1.项目背景
上级领导要求对网站数据进行备份
接下来进行规划:备份什么内容?如何备份?如何收集备份(统一存放备份)?保留时间?服务器都是什么系统?系统都是什么版本?
备份什么?
数据(用户) 数据库 存储
配置文件
脚本、代码
网站代码
日志收集
......
如何备份?
- 打包压缩+定时任务
如何收集?
- rsync服务收集备份(rsync客户端推送备份到rsync服务端)
2.项目流程
2.1环境准备
| 角色 | 主机 | 运行服务 |
|---|---|---|
| 存放备份 | backup | rsync服务端 |
| 生成备份 | nfs01 | rsync客户端,其他服务 |
| 生成备份 | web01 | rsync客户端,其他服务 |
2.2项目步骤
| 步骤说明 | 详细内容 |
|---|---|
| 1️⃣rsync服务端调试 | 服务端配置 |
| 2️⃣rsync客户端调试并写脚本 | 备份、推送、清理 |
| 3️⃣配置定时任务 | 定时任务运行脚本 |
| 4️⃣备份服务器检查并发送结果邮件 | 清理备份,检查备份并发送邮件 |
2.3 rsync服务端调试
#配置文件加备份文件夹模块

[root@backup ~]# vim /etc/rsyncd.conf

[backup]

comment = "备份文件夹"

path = /backup

#创建目录并修改属主属组

[root@backup ~]# mkdir -p /backup

[root@backup ~]# chown -R rsync.rsync /backup/

[root@backup ~]# ll -d /backup/

drwxr-xr-x 2 rsync rsync 6 Jan 11 14:51 /backup/

#调试

[root@nfs ~]# rsync -avz /etc/hosts rsync_backup@10.0.0.41::backup --password-file=/etc/rsync.client

sending incremental file list

hosts

sent 215 bytes  received 43 bytes  516.00 bytes/sec

total size is 329  speedup is 1.28

[root@backup /backup]# ll

total 4

-rw-r--r-- 1 rsync rsync 329 Jan  9 10:50 hosts
2.4 客户端备份脚本
#客户端准备密码文件

[root@nfs /server/scripts]# cat /etc/rsync.client

1

[root@nfs /server/scripts]# ll -d /etc/rsync.client

-rw------- 1 root root 2 Jan 11 08:45 /etc/rsync.client

#客户端准备脚本

[root@nfs ~]# cat /server/scripts/back-conf.sh

#!/bin/bash

#author: wh

#desc:   备份配置文件+定时任务+推送到rsync服务端

#定义变量

ip=`hostname -I|awk '{print $2}'`

date=`date +%F`

backup_dir=/backup/${ip}

backup_filename=conf-${date}.tar.gz

#rsync用户

rsync_authUser=rsync_backup

#rsync密码文件

rsync_passwdFile=/etc/rsync.client

#服务端ip

rsync_serviceIP=172.16.1.41

#创建备份目录

mkdir -p ${backup_dir}

#备份

tar zcf ${backup_dir}/${backup_filename} /etc/ /var/spool/cron

#生成md5sum校验文件

md5sum ${backup_dir}/${backup_filename} > ${backup_dir}/conf.md5

#推送到rsync服务端

rsync -az ${backup_dir} ${rsync_authUser}@${rsync_serviceIP}::backup --password-file=${rsync_passwdFile}

#删除7天之前的备份

rm -f `find ${backup_dir} -type f -name "*.tar.gz" -mtime +7`
2.5 服务端脚本
#发送邮件配置:参考定时任务 八.3
[root@backup /server/scripts]# cat check_backup.sh
#!/bin/bash
#author: wh
#desc: 删除备份+检查备份+发送备份结果到邮箱
#定义变量
#执行结果路径
result_file=/server/scripts/result.txt
date=`date +%F`
#删除180天之前的备份
rm -f `find /backup -type f -name "*.tar.gz" -mtime +180 `
#统计备份结果
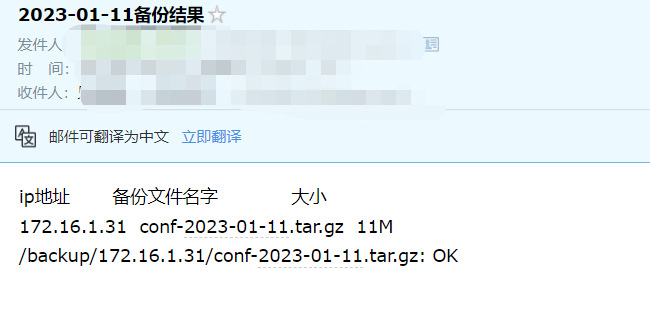
find /backup/ -type f -name "*.tar.gz" |xargs ls -lhd|awk -F '[ /]' 'BEGIN{print "ip地址 ","备份文件名字","大小"}{print $(NF-1),$NF,$5}'|column -t > ${result_file}
#md5sum校验
find /backup/ -name 'conf.md5'|xargs md5sum -c >>${result_file}
#发送邮件
mail -s "${date}备份结果" 459086748@qq.com <${result_file}
2.6 校验功能
md5sum
客户端备份的时候生成备份,创建指纹信息md5sum
安全防护措施
给命令和较为固定的配置,设置md5,定期校验
#单个文件的md5信息保存与校验

[root@backup ~]# echo '1' > oldboy.txt

[root@backup ~]# md5sum oldboy.txt >oldboy.md5

[root@backup ~]# md5sum -c oldboy.md5

oldboy.txt: OK

[root@backup ~]# echo '2' > oldboy.txt

[root@backup ~]# md5sum -c oldboy.md5

oldboy.txt: FAILED

md5sum: WARNING: 1 computed checksum did NOT match

#通过find实现多个文件md5信息保存与校验

[root@backup ~]# find /etc/ -type f |xargs md5sum >etc.md5

[root@backup ~]# md5sum -c etc.md5

[root@backup ~]# md5sum --quiet -c etc.md5

/etc/rsyncd.conf: FAILED

md5sum: WARNING: 1 computed checksum did NOT match

-c      #相当于--check,校验

--quiet #只显示有问题的数据

md5sum -c 说明 check 根据md5文件记录进行对比

md5值                             路径/名字

3fe396c01f03425cb5e2da8186eb090d oldboy.txt

#注:相同的文件内容  md5值是一样的
3.项目总结
对网站的核心数据进行备份
使用的核心栈:rsync备份服务,定时任务,md5sum,邮件,脚本,三剑客,tar,find
Linux备份服务的更多相关文章
- Linux(9):期中架构(1)--- 集群构架 & 备份服务
01. 了解集群架构服务器组成 基本架构组成:(用于让用户进行访问) # 前端服务部分: 1)顾客-用户 是一个访问者,请求访问网站页面 2)保安-防火墙设备 对访问架构用户进行策略控制,正常访问网站 ...
- Azure Backup (3) 使用Azure备份服务,备份Azure虚拟机
<Windows Azure Platform 系列文章目录> 本将介绍,如何使用Azure备份服务,备份Azure虚拟机. 我们先预先创建2台Windows VM (命名为LeiVM00 ...
- linux系统设置服务开机启动3种方法,Linux开机启动程序详解
linux系统设置服务开机启动 方法1:.利用ntsysv伪图形进行设置,利用root登陆 终端命令下输入ntsysv 回车:如下图 方法2:利用命令行chkconfig命令进行设置 简要说明 ...
- Kali Linux常用服务配置教程安装及配置DHCP服务
Kali Linux常用服务配置教程安装及配置DHCP服务 在Kali Linux中,默认没有安装DHCP服务.下面将介绍安装并配置DHCP服务的方法. 1.安装DHCP服务 在Kali Linux中 ...
- 微软Azure虚拟机备份服务在中国发布
近期,Azure虚拟机备份服务在微软智能云上发布. 相关功能阐述: Azure IaaS虚拟机备份服务针对Windows操作系统,提供了应用一致性的备份技术:同时针对Linux操作系统,提供了文件系统 ...
- Rsync备份服务实战
目录 Rsync备份服务实战 一.Rsync 二.rsync的应用场景 1.Rync的数据同步模式 2.rsync的三种模式 三.rsync配置服务端客户端 四.rsync实战 实战一 报错解决方法: ...
- day27 综合架构 rsync备份服务
sync软件使用方法: rsync命令 1v4 a 本地备份数据 cp [root@nfs01 backup]# cp /etc/hosts /tmp [root@nfs01 backup]# ll ...
- Linux基础服务——Bind DNS服务 Part2
Linux基础服务--Bind DNS服务 Part2 DNS反向解析与区域传送 实验环境延续Part1的实验环境. 反向区域配置 正向解析是域名到IP地址的映射,反向解析则是IP地址到域名的解析,在 ...
- linux jexus 服务 设置开机启动
linux的服务开机设置一般在 /etc/init.d/里 而jexus的默认安装目录在 /usr/jexus里 启动文件为 jws 参数 有start stop restart 这里贡献一个刚写好的 ...
- Azure Backup (2) Azure备份服务
<Windows Azure Platform 系列文章目录> 本文介绍的是国内由世纪互联运维的Azure China. 本文介绍的Azure管理界面是Classic Model,网址:h ...
随机推荐
- git pull与git pull --rebase
aliases: [] tags: [git] link: date: 2022-08-30 目录 git pull --rebase 等效命令 总结 参考文章 git pull --rebase 在 ...
- Eclipse Python IDE安装
时隔一年,曾经的AI工程师微专业课程也忘了大半,如今终于有闲心重温人工智能的相关知识与项目.先从Eclipse安装开始. 首先下载JDK,进入JDK官网下载最新版本的JDK并安装:https://ww ...
- laravel的_token传值 ; header中传_token
laravel框架中只要是涉及到post传值都需要传 _token ,这是框架中为了防止crsf攻击所做的安全措施,那么我们用到ajax中的post 方式传值时,也需要在所传数据中添加一个_token ...
- docker和docker-compose便捷安装
安装docker: curl -fsSL get.docker.com -o get-docker.sh&&sh get-docker.sh 或: curl -sSL https:// ...
- Day17.1:静态与非静态的详解
静态与非静态 静态方法--类方法 是以static为关键词,从属于类,与类共生 public class Students{//class修饰的是一个类,所以这是一个学生类 public static ...
- redisson分布式锁原理剖析
redisson分布式锁原理剖析 相信使用过redis的,或者正在做分布式开发的童鞋都知道redisson组件,它的功能很多,但我们使用最频繁的应该还是它的分布式锁功能,少量的代码,却实现了加锁. ...
- (C++) std::move std::forward及使用
概念 std::ref :针对std::thread,需要把实参显式转换为引用类型: std::move :无条件把参数转换为右值:但是右值赋值给新变量时,实际还要看是否满足右值条件,如const s ...
- 第2-4-6章 springboot整合规则引擎Drools-业务规则管理系统-组件化-中台
目录 7. Spring整合Drools 7.1 Spring简单整合Drools 7.1.1 以上代码均在drools_spring项目中 7.2 Spring整合Drools+web 7.2 以上 ...
- day22 存储过程 & 游标 & 事务
存储过程 是一种在数据库中存储复杂程序(复杂sql语句),以便外部程序调用的一种数据库对象 存储过程是为了完成特定功能的sql语句集,经编译创建并保存在数据库中,用户可以通过指定存储过程的名字并给定参 ...
- 爬虫笔记之xpath
目录 xpath如何取包含多个class属性 xpath获取当前标签下的所有文本(包括子标签) xpath如何取包含多个class属性 如果HTML结构是这样 <div class=" ...