
Android DecorView 与 Activity 绑定原理分析
一年多以前,曾经以为自己对 View 的添加显示逻辑已经有所了解了,事后发现也只是懂了些皮毛而已。经过一年多的实战,Android 和 Java 基础都有了提升,是时候该去看看 DecorView 的添加显示。
View 的绘制系列文章:
Android View 绘制流程之 DecorView 与 ViewRootImpl
Android View 的绘制流程之 Measure 过程详解 (一)
Android View 的绘制流程之 Layout 和 Draw 过程详解 (二)
Android View 的事件分发原理解析
概论
Android 中 Activity 是作为应用程序的载体存在,代表着一个完整的用户界面,提供了一个窗口来绘制各种视图,当 Activity 启动时,我们会通过 setContentView 方法来设置一个内容视图,这个内容视图就是用户看到的界面。那么 View 和 activity 是如何关联在一起的呢 ?
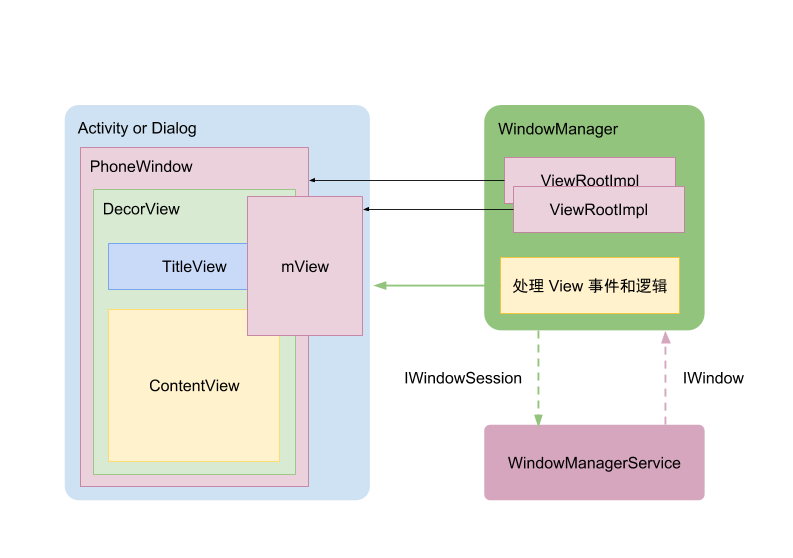
上图是 View 和 Activity 之间的关系。先解释图中一些类的作用以及相关关系:
Activity : 对于每一个 activity 都会有拥有一个 PhoneWindow。
- PhoneWindow :该类继承于 Window 类,是 Window 类的具体实现,即我们可以通过该类具体去绘制窗口。并且,该类内部包含了一个 DecorView 对象,该 DectorView 对象是所有应用窗口的根 View。
DecorView 是一个应用窗口的根容器,它本质上是一个 FrameLayout。DecorView 有唯一一个子 View,它是一个垂直 LinearLayout,包含两个子元素,一个是 TitleView( ActionBar 的容器),另一个是 ContentView(窗口内容的容器)。
ContentView :是一个 FrameLayout(android.R.id.content),我们平常用的 setContentView 就是设置它的子 View 。
- WindowManager : 是一个接口,里面常用的方法有:添加View,更新View和删除View。主要是用来管理 Window 的。WindowManager 具体的实现类是WindowManagerImpl。最终,WindowManagerImpl 会将业务交给 WindowManagerGlobal 来处理。
- WindowManagerService (WMS) : 负责管理各 app 窗口的创建,更新,删除, 显示顺序。运行在 system_server 进程。
ViewRootImpl :拥有 DecorView 的实例,通过该实例来控制 DecorView 绘制。ViewRootImpl 的一个内部类 W,实现了 IWindow 接口,IWindow 接口是供 WMS 使用的,WSM 通过调用 IWindow 一些方法,通过 Binder 通信的方式,最后执行到了 W 中对应的方法中。同样的,ViewRootImpl 通过 IWindowSession 来调用 WMS 的 Session 一些方法。Session 类继承自 IWindowSession.Stub,每一个应用进程都有一个唯一的 Session 对象与 WMS 通信。
DecorView 的创建
先从 Mainactivity 中的代码看起,首先是调用了 setContentView;
protected void onCreate(Bundle savedInstanceState) {

    super.onCreate(savedInstanceState);

    setContentView(R.layout.activity_main);

}
该方法是父类 AppCompatActivity 的方法,最终会调用 AppCompatDelegateImpl 的 setContentView 方法:
// AppCompatDelegateImpl
public void setContentView(int resId) {

        this.ensureSubDecor();

        ViewGroup contentParent = (ViewGroup)this.mSubDecor.findViewById(16908290);

        contentParent.removeAllViews();

        LayoutInflater.from(this.mContext).inflate(resId, contentParent);

        this.mOriginalWindowCallback.onContentChanged();

    }
ensureSubDecor 从字面理解就是创建 subDecorView,这个是根据主题来创建的,下文也会讲到。创建完以后,从中获取 contentParent,再将从 activity 传入的 id xml 布局添加到里面。不过大家注意的是,在添加之前先调用 removeAllViews() 方法,确保没有其他子 View 的干扰。
    private void ensureSubDecor() {

        if (!this.mSubDecorInstalled) {

            this.mSubDecor = this.createSubDecor();

            ......

        }

        ......

    }
最终会调用 createSubDecor() ,来看看里面的具体代码逻辑:
 private ViewGroup createSubDecor() {

        // 1、获取主题参数,进行一些设置,包括标题,actionbar 等

        TypedArray a = this.mContext.obtainStyledAttributes(styleable.AppCompatTheme);

        if (!a.hasValue(styleable.AppCompatTheme_windowActionBar)) {

            a.recycle();

            throw new IllegalStateException("You need to use a Theme.AppCompat theme (or descendant) with this activity.");

        } else {

            if (a.getBoolean(styleable.AppCompatTheme_windowNoTitle, false)) {

                this.requestWindowFeature(1);

            } else if (a.getBoolean(styleable.AppCompatTheme_windowActionBar, false)) {

                this.requestWindowFeature(108);

            }

            if (a.getBoolean(styleable.AppCompatTheme_windowActionBarOverlay, false)) {

                this.requestWindowFeature(109);

            }

            if (a.getBoolean(styleable.AppCompatTheme_windowActionModeOverlay, false)) {

                this.requestWindowFeature(10);

            }

            this.mIsFloating = a.getBoolean(styleable.AppCompatTheme_android_windowIsFloating, false);

            a.recycle();

            // 2、确保优先初始化 DecorView

            this.mWindow.getDecorView();

            LayoutInflater inflater = LayoutInflater.from(this.mContext);

            ViewGroup subDecor = null;

            // 3、根据不同的设置来对 subDecor 进行初始化

            if (!this.mWindowNoTitle) {

                if (this.mIsFloating) {

                    subDecor = (ViewGroup)inflater.inflate(layout.abc_dialog_title_material, (ViewGroup)null);

                    this.mHasActionBar = this.mOverlayActionBar = false;

                } else if (this.mHasActionBar) {

                    TypedValue outValue = new TypedValue();

                    this.mContext.getTheme().resolveAttribute(attr.actionBarTheme, outValue, true);

                    Object themedContext;

                    if (outValue.resourceId != 0) {

                        themedContext = new ContextThemeWrapper(this.mContext, outValue.resourceId);

                    } else {

                        themedContext = this.mContext;

                    }

                    subDecor = (ViewGroup)LayoutInflater.from((Context)themedContext).inflate(layout.abc_screen_toolbar, (ViewGroup)null);

                    this.mDecorContentParent = (DecorContentParent)subDecor.findViewById(id.decor_content_parent);

                    this.mDecorContentParent.setWindowCallback(this.getWindowCallback());

                    if (this.mOverlayActionBar) {

                        this.mDecorContentParent.initFeature(109);

                    }

                    if (this.mFeatureProgress) {

                        this.mDecorContentParent.initFeature(2);

                    }

                    if (this.mFeatureIndeterminateProgress) {

                        this.mDecorContentParent.initFeature(5);

                    }

                }

            } else {

                if (this.mOverlayActionMode) {

                    subDecor = (ViewGroup)inflater.inflate(layout.abc_screen_simple_overlay_action_mode, (ViewGroup)null);

                } else {

                    subDecor = (ViewGroup)inflater.inflate(layout.abc_screen_simple, (ViewGroup)null);

                }

                if (VERSION.SDK_INT >= 21) {

                    ViewCompat.setOnApplyWindowInsetsListener(subDecor, new OnApplyWindowInsetsListener() {

                        public WindowInsetsCompat onApplyWindowInsets(View v, WindowInsetsCompat insets) {

                            int top = insets.getSystemWindowInsetTop();

                            int newTop = AppCompatDelegateImpl.this.updateStatusGuard(top);

                            if (top != newTop) {

                                insets = insets.replaceSystemWindowInsets(insets.getSystemWindowInsetLeft(), newTop, insets.getSystemWindowInsetRight(), insets.getSystemWindowInsetBottom());

                            }

                            return ViewCompat.onApplyWindowInsets(v, insets);

                        }

                    });

                } else {

                    ((FitWindowsViewGroup)subDecor).setOnFitSystemWindowsListener(new OnFitSystemWindowsListener() {

                        public void onFitSystemWindows(Rect insets) {

                            insets.top = AppCompatDelegateImpl.this.updateStatusGuard(insets.top);

                        }

                    });

                }

            }

            if (subDecor == null) {

                throw new IllegalArgumentException("AppCompat does not support the current theme features: { windowActionBar: " + this.mHasActionBar + ", windowActionBarOverlay: " + this.mOverlayActionBar + ", android:windowIsFloating: " + this.mIsFloating + ", windowActionModeOverlay: " + this.mOverlayActionMode + ", windowNoTitle: " + this.mWindowNoTitle + " }");

            } else {

                if (this.mDecorContentParent == null) {

                    this.mTitleView = (TextView)subDecor.findViewById(id.title);

                }

                ViewUtils.makeOptionalFitsSystemWindows(subDecor);

                ContentFrameLayout contentView = (ContentFrameLayout)subDecor.findViewById(id.action_bar_activity_content);

                ViewGroup windowContentView = (ViewGroup)this.mWindow.findViewById(16908290);

                if (windowContentView != null) {

                    while(windowContentView.getChildCount() > 0) {

                        View child = windowContentView.getChildAt(0);

                        windowContentView.removeViewAt(0);

                        contentView.addView(child);

                    }

                    windowContentView.setId(-1);

                    contentView.setId(16908290);

                    if (windowContentView instanceof FrameLayout) {

                        ((FrameLayout)windowContentView).setForeground((Drawable)null);

                    }

                }

                // 将 subDecor 添加到 DecorView 中

                this.mWindow.setContentView(subDecor);

                contentView.setAttachListener(new OnAttachListener() {

                    public void onAttachedFromWindow() {

                    }

                    public void onDetachedFromWindow() {

                        AppCompatDelegateImpl.this.dismissPopups();

                    }

                });

                return subDecor;

            }

        }

    }
上面的代码总结来说就是在做一件事,就是创建 subDecor。摊开来说具体如下:
1、根据用户选择的主题来设置一些显示特性,包括标题,actionbar 等。
2、根据不同特性来初始化 subDecor;对 subDecor 内部的子 View 进行初始化。
3、最后添加到 DecorView中。
添加的具体代码如下:此处是通过调用
  // AppCompatDelegateImpl

  this.mWindow.getDecorView();

   // phoneWindow

   public final View getDecorView() {

        if (mDecor == null || mForceDecorInstall) {

            installDecor();

        }

        return mDecor;

    }

private void installDecor() {

        mForceDecorInstall = false;

        if (mDecor == null) {

            // 生成 DecorView

            mDecor = generateDecor(-1);

            mDecor.setDescendantFocusability(ViewGroup.FOCUS_AFTER_DESCENDANTS);

            mDecor.setIsRootNamespace(true);

            if (!mInvalidatePanelMenuPosted && mInvalidatePanelMenuFeatures != 0) {

                mDecor.postOnAnimation(mInvalidatePanelMenuRunnable);

            }

        } else {

            // 这样 DecorView 就持有了window

            mDecor.setWindow(this);

        }

      ......

}

   protected DecorView generateDecor(int featureId) {

        // System process doesn't have application context and in that case we need to directly use

        // the context we have. Otherwise we want the application context, so we don't cling to the

        // activity.

        Context context;

        if (mUseDecorContext) {

            Context applicationContext = getContext().getApplicationContext();

            if (applicationContext == null) {

                context = getContext();

            } else {

                context = new DecorContext(applicationContext, getContext());

                if (mTheme != -1) {

                    context.setTheme(mTheme);

                }

            }

        } else {

            context = getContext();

        }

        return new DecorView(context, featureId, this, getAttributes());

   }
到此,DecorView 的创建就讲完了。可是我们似乎并没有看到 DecorView 是被添加的,什么时候对用户可见的。
WindowManager
View 创建完以后,那 Decorview 是怎么添加到屏幕中去的呢?当然是 WindowManager 呢,那么是如何将 View 传到 WindowManager 中呢。
看 ActivityThread 中的 handleResumeActivity 方法:
// ActivityThread
public void handleResumeActivity(IBinder token, boolean finalStateRequest, boolean isForward,

            String reason) {

        ......

        final int forwardBit = isForward

                ? WindowManager.LayoutParams.SOFT_INPUT_IS_FORWARD_NAVIGATION : 0;

        // If the window hasn't yet been added to the window manager,

        // and this guy didn't finish itself or start another activity,

        // then go ahead and add the window.

        boolean willBeVisible = !a.mStartedActivity;

        if (!willBeVisible) {

            try {

                willBeVisible = ActivityManager.getService().willActivityBeVisible(

                        a.getActivityToken());

            } catch (RemoteException e) {

                throw e.rethrowFromSystemServer();

            }

        }

        if (r.window == null && !a.mFinished && willBeVisible) {

            r.window = r.activity.getWindow();

            View decor = r.window.getDecorView();

            decor.setVisibility(View.INVISIBLE);

            ViewManager wm = a.getWindowManager();

            WindowManager.LayoutParams l = r.window.getAttributes();

            a.mDecor = decor;

            l.type = WindowManager.LayoutParams.TYPE_BASE_APPLICATION;

            l.softInputMode |= forwardBit;

            ......

            if (a.mVisibleFromClient) {

                if (!a.mWindowAdded) {

                    a.mWindowAdded = true;

                    wm.addView(decor, l);

                } else {

                    // The activity will get a callback for this {@link LayoutParams} change

                    // earlier. However, at that time the decor will not be set (this is set

                    // in this method), so no action will be taken. This call ensures the

                    // callback occurs with the decor set.

                    a.onWindowAttributesChanged(l);

                }

            }

            // If the window has already been added, but during resume

            // we started another activity, then don't yet make the

            // window visible.

        } else if (!willBeVisible) {

            if (localLOGV) Slog.v(TAG, "Launch " + r + " mStartedActivity set");

            r.hideForNow = true;

        }

        // Get rid of anything left hanging around.

        cleanUpPendingRemoveWindows(r, false /* force */);

        // The window is now visible if it has been added, we are not

        // simply finishing, and we are not starting another activity.

        if (!r.activity.mFinished && willBeVisible && r.activity.mDecor != null && !r.hideForNow) {

            if (r.newConfig != null) {

                performConfigurationChangedForActivity(r, r.newConfig);

                if (DEBUG_CONFIGURATION) {

                    Slog.v(TAG, "Resuming activity " + r.activityInfo.name + " with newConfig "

                            + r.activity.mCurrentConfig);

                }

                r.newConfig = null;

            }

            if (localLOGV) Slog.v(TAG, "Resuming " + r + " with isForward=" + isForward);

            WindowManager.LayoutParams l = r.window.getAttributes();

            if ((l.softInputMode

                    & WindowManager.LayoutParams.SOFT_INPUT_IS_FORWARD_NAVIGATION)

                    != forwardBit) {

                l.softInputMode = (l.softInputMode

                        & (~WindowManager.LayoutParams.SOFT_INPUT_IS_FORWARD_NAVIGATION))

                        | forwardBit;

                if (r.activity.mVisibleFromClient) {

                    ViewManager wm = a.getWindowManager();

                    View decor = r.window.getDecorView();

                    wm.updateViewLayout(decor, l);

                }

            }

            r.activity.mVisibleFromServer = true;

            mNumVisibleActivities++;

            if (r.activity.mVisibleFromClient) {

          // 这里也会调用addview

                r.activity.makeVisible();

            }

        }

        r.nextIdle = mNewActivities;

        mNewActivities = r;

        if (localLOGV) Slog.v(TAG, "Scheduling idle handler for " + r);

        Looper.myQueue().addIdleHandler(new Idler());

    }
上面的代码主要做了以下几件事:
1、获取到 DecorView,设置不可见,然后通过 wm.addView(decor, l) 将 view 添加到 WindowManager;
2、在某些情况下,比如此时点击了输入框调起了键盘,就会调用 wm.updateViewLayout(decor, l) 来更新 View 的布局。
3、这些做完以后,会调用 activity 的 makeVisible ,让视图可见。如果此时 DecorView 没有添加到 WindowManager,那么会添加。
// Activity
 void makeVisible() {

        if (!mWindowAdded) {

            ViewManager wm = getWindowManager();

            wm.addView(mDecor, getWindow().getAttributes());

            mWindowAdded = true;

        }

        mDecor.setVisibility(View.VISIBLE);

    }
接下来,看下 addview 的逻辑。 WindowManager 的实现类是 WindowManagerImpl,而它则是通过 WindowManagerGlobal 代理实现 addView 的,我们看下 addView 的方法:
// WindowManagerGlobal

 public void addView(View view, ViewGroup.LayoutParams params,

            Display display, Window parentWindow) {

           // ......

            root = new ViewRootImpl(view.getContext(), display);

            view.setLayoutParams(wparams);

            mViews.add(view);

            mRoots.add(root);

            mParams.add(wparams);

           // do this last because it fires off messages to start doing things

            try {

                root.setView(view, wparams, panelParentView);

            } catch (RuntimeException e) {

                // BadTokenException or InvalidDisplayException, clean up.

                if (index >= 0) {

                    removeViewLocked(index, true);

                }

                throw e;

            }

}
在这里,实例化了 ViewRootImpl 。同时调用 ViewRootImpl 的 setView 方法来持有了 DecorView。此外这里还保存了 DecorView ,Params,以及 ViewRootImpl 的实例。
现在我们终于知道为啥 View 是在 OnResume 的时候可见的呢。
ViewRootImpl
实际上,View 的绘制是由 ViewRootImpl 来负责的。每个应用程序窗口的 DecorView 都有一个与之关联的 ViewRootImpl 对象,这种关联关系是由 WindowManager 来维护的。
先看 ViewRootImpl 的 setView 方法,该方法很长,我们将一些不重要的点注释掉:
   /**

     * We have one child

     */

    public void setView(View view, WindowManager.LayoutParams attrs, View panelParentView) {

        synchronized (this) {

            if (mView == null) {

                mView = view;

                ......

                mAdded = true;

                int res; /* = WindowManagerImpl.ADD_OKAY; */

                // Schedule the first layout -before- adding to the window

                // manager, to make sure we do the relayout before receiving

                // any other events from the system.

                requestLayout();

                ......

            }

        }

    }
这里先将 mView 保存了 DecorView 的实例,然后调用 requestLayout() 方法,以完成应用程序用户界面的初次布局。
 public void requestLayout() {

        if (!mHandlingLayoutInLayoutRequest) {

            checkThread();

            mLayoutRequested = true;

            scheduleTraversals();

        }

    }
因为是 UI 绘制,所以一定要确保是在主线程进行的,checkThread 主要是做一个校验。接着调用 scheduleTraversals 开始计划绘制了。
void scheduleTraversals() {

        if (!mTraversalScheduled) {

            mTraversalScheduled = true;

            mTraversalBarrier = mHandler.getLooper().getQueue().postSyncBarrier();

            mChoreographer.postCallback(

                    Choreographer.CALLBACK_TRAVERSAL, mTraversalRunnable, null);

            if (!mUnbufferedInputDispatch) {

                scheduleConsumeBatchedInput();

            }

            notifyRendererOfFramePending();

            pokeDrawLockIfNeeded();

        }

    }
这里主要关注两点:
mTraversalBarrier : Handler 的同步屏障。它的作用是可以拦截 Looper 对同步消息的获取和分发,加入同步屏障之后,Looper 只会获取和处理异步消息,如果没有异步消息那么就会进入阻塞状态。也就是说,对 View 绘制渲染的处理操作可以优先处理(设置为异步消息)。
mChoreographer: 编舞者。统一动画、输入和绘制时机。也是这章需要重点分析的内容。
mTraversalRunnable :TraversalRunnable 的实例,是一个Runnable,最终肯定会调用其 run 方法:
final class TraversalRunnable implements Runnable {

        @Override

        public void run() {

            doTraversal();

        }

    }
doTraversal,如其名,开始绘制了,该方法内部最终会调用 performTraversals 进行绘制。
  void doTraversal() {

        if (mTraversalScheduled) {

            mTraversalScheduled = false;

            mHandler.getLooper().getQueue().removeSyncBarrier(mTraversalBarrier);

            if (mProfile) {

                Debug.startMethodTracing("ViewAncestor");

            }

            performTraversals();

            if (mProfile) {

                Debug.stopMethodTracing();

                mProfile = false;

            }

        }

    }
到此,DecorView 与 activity 之间的绑定关系就讲完了,下一章,将会介绍 performTraversals 所做的事情,也就是 View 绘制流程。
附上一张流程图:
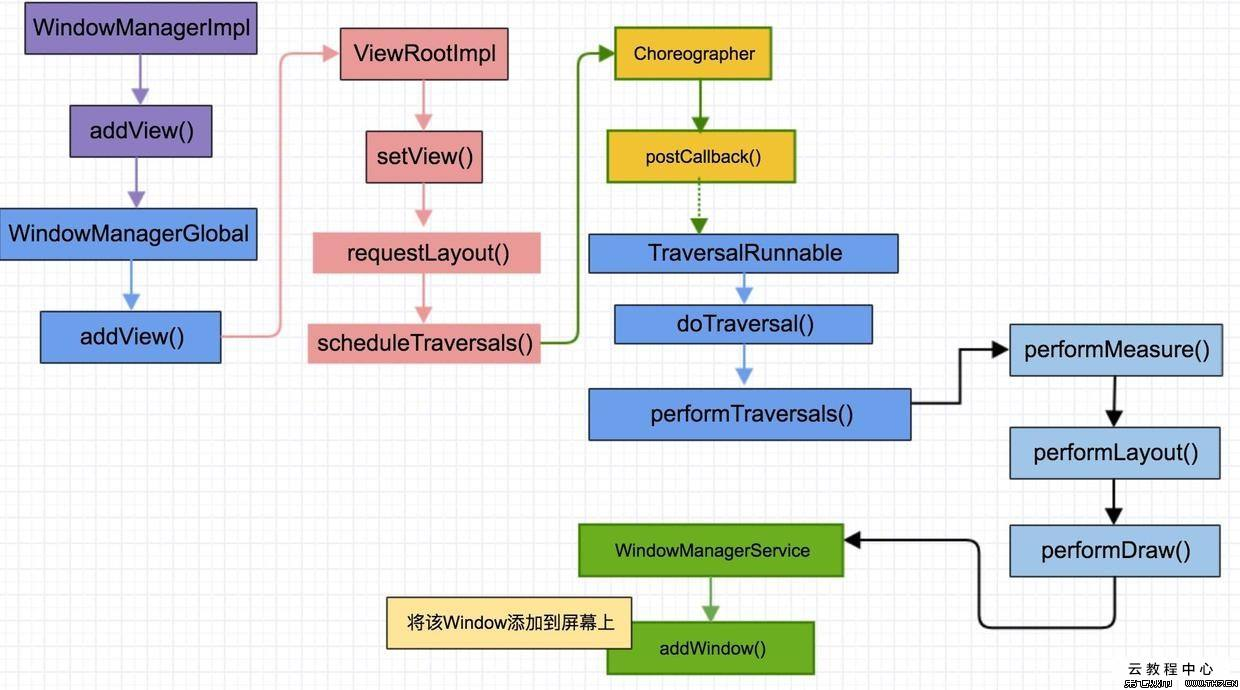
到此,DecorView 与 ViewRootImpl 之间的关系就讲的很清楚了。
点击查看下一篇 Android View 的测量流程详解
Android DecorView 与 Activity 绑定原理分析的更多相关文章
- Android视图SurfaceView的实现原理分析(示例,出错代码)
在Android系统中,有一种特殊的视图,称为SurfaceView,它拥有独立的绘图表面,即它不与其宿主窗口共享同一个绘图表面.由于拥有独立的绘图表面,因此SurfaceView的UI就可以在一个独 ...
- vue双向绑定原理分析
当我们学习angular或者vue的时候,其双向绑定为我们开发带来了诸多便捷,今天我们就来分析一下vue双向绑定的原理. 简易vue源码地址:https://github.com/jiangzhenf ...
- vue2.0 双向绑定原理分析及简单实现
Vue用了有一段时间了,每当有人问到Vue双向绑定是怎么回事的时候,总是不能给大家解释的很清楚,正好最近有时间把它梳理一下,让自己理解的更清楚,下次有人问我的时候,可以侃侃而谈. 一.首先介绍Obje ...
- Android 65K问题之Multidex原理分析及NoClassDefFoundError的解决方法
Android 65K问题相信困惑了不少人,尽管AS的出来能够通过分dex高速解决65K问题,可是同一时候也easy由于某些代码没有打包到MainDex里引起NoClassDefFoundError. ...
- Android SoundPool 的使用以及原理分析
好吧,我们今天来聊聊SoundPool这东西. 据说这个东西是冰激凌(Android4.0)里才引入的一个新东西.按照官方的意思大多数情况下是给游戏开发用的,比如一个游戏10关,它能在游戏开始前一次加 ...
- 【转载】Android 的 Handler 机制实现原理分析
handler在安卓开发中是必须掌握的技术,但是很多人都是停留在使用阶段.使用起来很简单,就两个步骤,在主线程重写handler的handleMessage( )方法,在工作线程发送消息.但是,有没有 ...
- Android中线程间通信原理分析:Looper,MessageQueue,Handler
自问自答的两个问题 在我们去讨论Handler,Looper,MessageQueue的关系之前,我们需要先问两个问题: 1.这一套东西搞出来是为了解决什么问题呢? 2.如果让我们来解决这个问题该怎么 ...
- Android视图SurfaceView的实现原理分析
http://blog.csdn.net/luoshengyang/article/details/8661317
- Android中Input型输入设备驱动原理分析(一)
转自:http://blog.csdn.net/eilianlau/article/details/6969361 话说Android中Event输入设备驱动原理分析还不如说Linux输入子系统呢,反 ...
随机推荐
- 02--Java Jshell的使用 最适合入门的Java教程
JShell JShell目标 Java Shell 工具(简称:JShell)是一个用于学习Java编程语言和构建Java代码原型的交互式工具.JShell是一个Read-Evaluate-Prin ...
- 触摸屏键盘插件Virtual Keyboard 该怎么用 Virtual Keyboard 入门指南
最近公司有个项目,这个项目的显示器是触摸屏, 所以在一些需要简单输入的input需要加一个触摸屏的软键盘, 我在github上找了很多开源项目,最后选择了Virtual Keyboard, 以下是我自 ...
- 我是如何在一周内拿到4份offer的?
前言 大概一个月没写博客了吧,这段时间事情比较多(家里有事,请了一段时间假,正好利用剩余几天时间面了几次试),也没抽出来时间写博客,还好所有的事情已经处理完了,今天闲来无事就整理一下这几次面试过程中遇 ...
- spring boot 面试题详解
1.什么是springboot 用来简化spring应用的初始搭建以及开发过程 使用特定的方式来进行配置(properties或yml文件) 创建独立的spring引用程序 main方法运行 嵌入的T ...
- 【IntelliJ IDEA】 常用快捷键列表
1.常用Shortcut F2 或Shift+F2 高亮错误或警告快速定位 Ctrl+Up/Down 光标跳转到第一行或最后一行下 Ctrl+B 快速打开光标处的类或方法 CTRL+ALT+B 找 ...
- 在线热备份数据库之innobackupex 增量备份InnoDB
在线热备份数据库之innobackupex 增量备份InnoDB 什么是增量备份?其原理是什么? 增量备份是基于上一次备份后对新增加的内容进行备份,优点相较于完整备份而言备份内容少时间短,能够节省磁盘 ...
- [考试反思]1030csp-s模拟测试94:未知
排名也未知.第1或第5. 分数也未知,300或260. 人生真是大起大落... 啊啊啊啊啊我好感动啊竟然重测了一次----- 评测机怎么测怎么RE,本机怎么测怎么AC(任意编译指令,任意评测平台) 结 ...
- 【转】python之property属性
1. 什么是property属性 一种用起来像是使用的实例属性一样的特殊属性,可以对应于某个方法 # ############### 定义 ############### class Foo: def ...
- Java基础系列5:Java代码的执行顺序
该系列博文会告诉你如何从入门到进阶,一步步地学习Java基础知识,并上手进行实战,接着了解每个Java知识点背后的实现原理,更完整地了解整个Java技术体系,形成自己的知识框架. 一.构造方法 构造方 ...
- vue , debounce 使用
有时候不想直接在methods中的方法前面加debounce, getFullName: debounce(function() { console.log('my fullname is chent ...