Redis单节点数据同步到Redis集群
一:Redis集群环境准备
1:需要先安装好Redis集群环境并配置好集群
192.168.0.113 7001-7003
192.168.0.162 7004-7006
2:检查redis集群
[root@localhost src]# ./redis-cli -c -h 192.168.0.113 -a 123456 -p 7001
192.168.0.113:7001> cluster nodes

3:确保redis集群没有数据
192.168.0.113:7001> dbsize
(integer)0
192.168.0.113:7002> dbsize
(integer) 0
192.168.0.113:7003> dbsize
(integer) 0
192.168.0.113:7004> dbsize
(integer) 0
192.168.0.113:7005> dbsize
(integer) 0
192.168.0.113:7006> dbsize
(integer) 0
4:如果有数据需要删除
47.91.110.137:7001> flushdb
二:Redis单节点环境准备
1:查看Redis单节点数据大小
[root@localhost src]# ./redis-cli -c -h 192.168.0.113 -p 6379 -a 123456
192.168.0.113:6379> dbsize
(integer) 10000

2:备份好单节点redis的 aof 数据(备注:如果开启的是 rdbcompression yes 请备份 rdb)
[root@ce redis-3.2.9]# du -h --max-depth=1 appendonly.aof

三:同步数据到Redis集群
1:查看Redis集群节点卡槽
[root@localhost src]# ./redis-cli --cluster check 192.168.0.113:7001 -a 123456
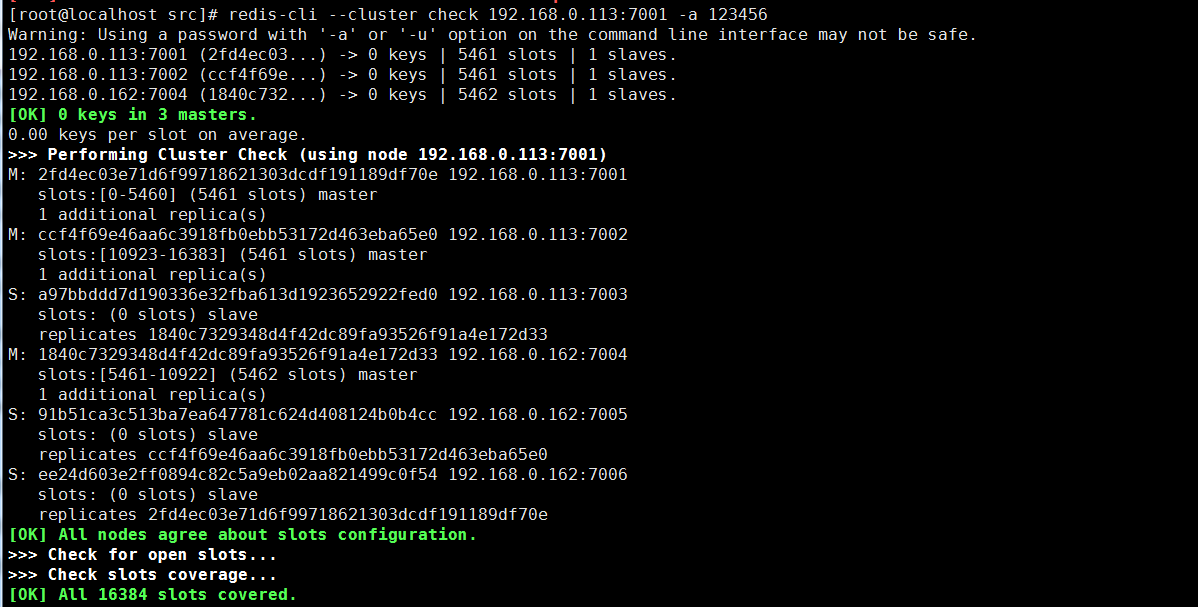
主节点对应的卡槽
7001
2fd4ec03e71d6f99718621303dcdf191189df70e 192.168.0.113:7001 slots:[0-5460] (5461 slots) master
7002
ccf4f69e46aa6c3918fb0ebb53172d463eba65e0 192.168.0.113:7002 slots:[10923-16383] (5461 slots) master
7004
1840c7329348d4f42dc89fa93526f91a4e172d33 192.168.0.162:7004 slots:[5461-10922] (5462 slots) master
2:在Redis集群上把 7002 和 7004 卡槽值迁移到7001卡槽上
7002值移动到7001
[root@localhost src]# ./redis-cli --cluster reshard 192.168.0.113:7001 --cluster-from ccf4f69e46aa6c3918fb0ebb53172d463eba65e0 --cluster-to 2fd4ec03e71d6f99718621303dcdf191189df70e --cluster-slots 5461 --cluster-yes -a 123456
7004值移动到7001
[root@localhost src]# ./redis-cli --cluster reshard 192.168.0.113:7001 --cluster-from 1840c7329348d4f42dc89fa93526f91a4e172d33 --cluster-to 2fd4ec03e71d6f99718621303dcdf191189df70e --cluster-slots 5462 --cluster-yes -a 123456
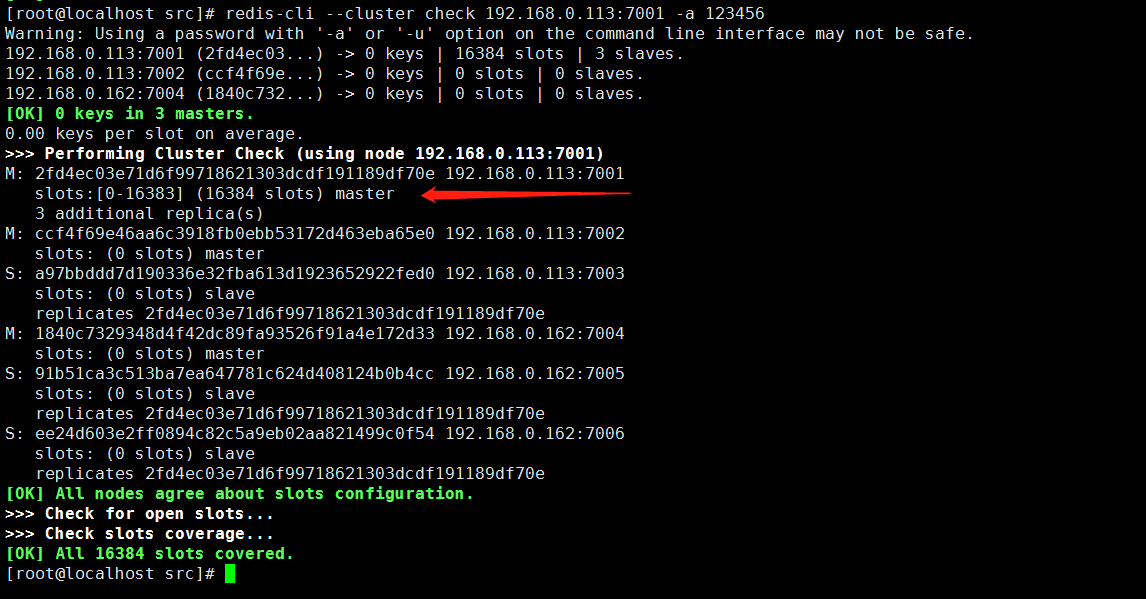
3:可以看到7001卡槽拥有了全部16384个slots,7002、7004卡槽上已经没有slots了
[root@localhost src]# ./redis-cli --cluster check 192.168.0.113:7001 -a 123456
四:把Redis单节点的aof数据导入到集群7001对应的aof目录下替换集群aof源文件
1:先备份好集群7001的aof数据
[root@localhost src]# cd /usr/local/cluster/7001/db/
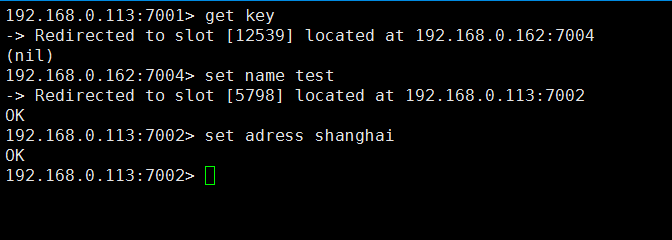
172.26.225.1:7001> set name diaocow
[root@localhost 7001]# cp appendonly.aof appendonly.aof.bwk
[root@localhost 7001]# cd /usr/local/redis-5.0.5/
[root@localhost redis-5.0.5]# cp appendonly.aof /usr/local/cluster/7001/db/
2:重启Redis集群7001节点
关闭
[root@localhost 7001]# ps -ef | grep redis
[root@localhost 7001]# kill -9 1371
启动
[root@localhost 7001]# ./redis-server redis.conf
查看redis集群7001节点是否正常启动
[root@localhost 7001]# ps -ef | grep redis

3:重启之后可以看到数据加载到7001卡槽上
[root@localhost src]# ./redis-cli -c -h 192.168.0.113 -p 7001 -a 123456
192.168.0.113:7001> dbsize
(integer) 1000

五:分配Redis集群7001卡槽值
1:7001卡槽值分配到7002
[root@localhost src]# ./redis-cli --cluster reshard 192.168.0.113:7001 -a 123456 --cluster-from 2fd4ec03e71d6f99718621303dcdf191189df70e --cluster-to ccf4f69e46aa6c3918fb0ebb53172d463eba65e0 --cluster-slots 5461 --cluster-yes
2:7001卡槽值分配到7004
[root@localhost src]# ./redis-cli --cluster reshard 192.168.0.113:7001 -a 123456 --cluster-from 2fd4ec03e71d6f99718621303dcdf191189df70e --cluster-to 1840c7329348d4f42dc89fa93526f91a4e172d33 --cluster-slots 5462 --cluster-yes
3:查看slots是否移动成功
[root@localhost src]# ./redis-cli -c -h 192.168.0.113 -a 123456 -p 7001
192.168.0.113:7001> cluster nodes

六:验证数据的完整
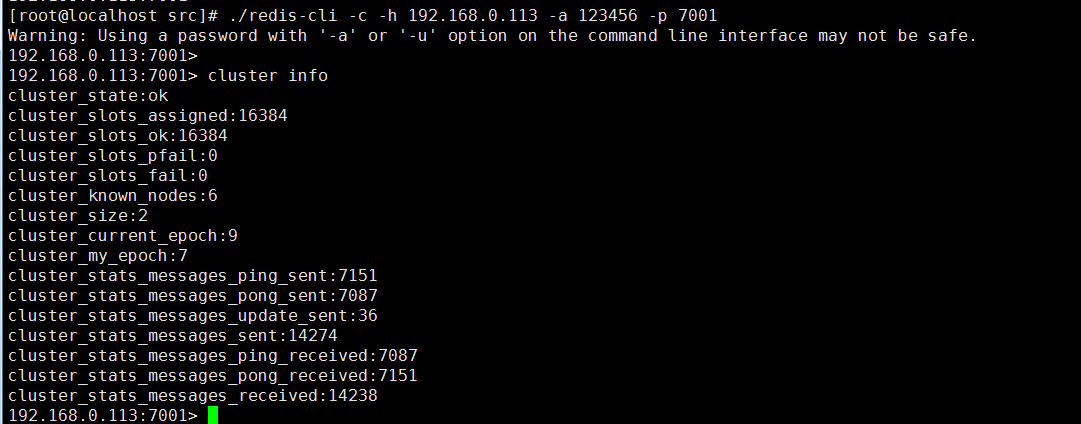
1:查看集群是否正常,slots分配是否正常(cluster_state:ok)
[root@localhost src]# ./redis-cli -c -h 192.168.0.113 -a 123456 -p 7001
192.168.0.113:7001> cluster info
cluster_state:ok
cluster_slots_assigned:16384
cluster_slots_ok:16384
cluster_slots_pfail:0
cluster_slots_fail:0
cluster_known_nodes:6
cluster_size:2 cluster_current_epoch:9
cluster_my_epoch:7
cluster_stats_messages_ping_sent:7151
cluster_stats_messages_pong_sent:7087
cluster_stats_messages_update_sent:36
cluster_stats_messages_sent:14274
cluster_stats_messages_ping_received:7087
cluster_stats_messages_pong_received:7151
cluster_stats_messages_received:14238
2:验证key的数量是否正常
192.168.0.113(7001-7003)
[root@localhost src]# ./redis-cli -c -h 192.168.0.113 -a 123456 -p 7001 dbsize
Warning: Using a password with '-a' or '-u' option on the command line interface may not be safe. (integer) 0
[root@localhost src]# ./redis-cli -c -h 192.168.0.113 -a 123456 -p 7002 dbsize
Warning: Using a password with '-a' or '-u' option on the command line interface may not be safe. (integer) 6685
[root@localhost src]# ./redis-cli -c -h 192.168.0.113 -a 123456 -p 7003 dbsize
Warning: Using a password with '-a' or '-u' option on the command line interface may not be safe. (integer) 3315
192.168.0.162(7004-7006)
[root@localhost src]#
[root@localhost src]# ./redis-cli -c -h 192.168.0.162 -a 123456 -p 7004 dbsize
Warning: Using a password with '-a' or '-u' option on the command line interface may not be safe. (integer) 3315
[root@localhost src]# ./redis-cli -c -h 192.168.0.162 -a 123456 -p 7005 dbsize
Warning: Using a password with '-a' or '-u' option on the command line interface may not be safe. (integer) 6685
[root@localhost src]# ./redis-cli -c -h 192.168.0.162 -a 123456 -p 7006 dbsize
Warning: Using a password with '-a' or '-u' option on the command line interface may not be safe. (integer) 0
192.168.0.113(7001-7003)
6685+ 3315=10000 redis单卡槽key数量10000
192.168.0.162(7004-7006)
3315+6685=10000redis单卡槽key数量10000
七:注意 如果数据量很大 slots不要一次性迁移到Redis集群 ,需要一部分一部分转移
Redis单节点数据同步到Redis集群的更多相关文章
- 集群版本升级——rolling upgrade在ES 单节点从 restart 到加入集群,大概要 100s 左右的时间。也就是说,这 100s 内,该节点上的所有分片都是 unassigned 状态
集群版本升级 Elasticsearch 作为一个新兴项目,版本更新非常快.而且每次版本更新都或多或少带有一些重要的性能优化.稳定性提升等特性.可以说,ES 集群的版本升级,是目前 ES 运维必然要做 ...
- Redis和MySQL数据同步及Redis使用场景
1.同步MySQL数据到Redis (1) 在redis数据库设置缓存时间,当该条数据缓存时间过期之后自动释放,去数据库进行重新查询,但这样的话,我们放在缓存中的数据对数据的一致性要求不是很高才能放入 ...
- Redis单台的安装部署及集群部署
Redis是一种高级key-value数据库.它跟memcached类似,不过数据可以持久化,而且支持的数据类型很丰富.有字符串,链表,集 合和有序集合.支持在服务器端计算集合的并,交和补集(diff ...
- Redis02——Redis单节点安装
Redis单节点安装 一.Redis的数据类型 string hash list set zset 二.安装 2.1.下载 wget http://download.redis.io/releases ...
- redhat6.5 redis单节点多实例3A集群搭建
在进行搭建redis3M 集群之前,首先要明白如何在单节点上完成redis的搭建. 单节点单实例搭建可以参看这个网:https://www.cnblogs.com/butterflies/p/9628 ...
- Redis:Java链接redis单节点千万级别数据 写入,读取 性能测试
本文是对Redis 单节点,针对不同的数据类型,做插入行测试. 数据总条数为:10058624 环境说明: Redis 未做任何优化, 单节点 (服务器上, 内存64G) ...
- redis如何实现数据同步
redis如何实现数据同步 两种,1全同步,2部分同步 全备份: 在slave启动时会向master发送sync消息,master收到slave这条消息之后,将启动后台备份进程,备份完成之后,将备份数 ...
- Redis源码阅读(六)集群-故障迁移(下)
Redis源码阅读(六)集群-故障迁移(下) 最近私人的事情比较多,没有抽出时间来整理博客.书接上文,上一篇里总结了Redis故障迁移的几个关键点,以及Redis中故障检测的实现.本篇主要介绍集群检测 ...
- Redis源码阅读(四)集群-请求分配
Redis源码阅读(四)集群-请求分配 集群搭建好之后,用户发送的命令请求可以被分配到不同的节点去处理.那Redis对命令请求分配的依据是什么?如果节点数量有变动,命令又是如何重新分配的,重分配的过程 ...
随机推荐
- 80%面试官不知道的dubbo → 【redis注册中心】
dubbo的redis注册中心配置和注意事项 配置provider和consumer项目的pom.xml,增加如下2个依赖: org.apache.commons commons-pool2 2.4. ...
- selenium-显式等待与隐式等待(3)
示例代码: from selenium.webdriver.support.wait import WebDriverWait as WD def find_element(self, by, loc ...
- 开源造轮子:一个简洁,高效,轻量级,酷炫的不要不要的canvas粒子运动插件库
一:开篇 哈哈哈,感谢标题党的莅临~ 虽然标题有点夸张的感觉,但实际上,插件库确实是简洁,高效,轻量级,酷炫酷炫的咯.废话不多说,先来看个标配例子吧: (codepen在线演示编辑:http://co ...
- Leetcode Tags(2)Array
一.448. Find All Numbers Disappeared in an Array 给定一个范围在 1 ≤ a[i] ≤ n ( n = 数组大小 ) 的 整型数组,数组中的元素一些出现了 ...
- 设计模式C++描述----19.命令(Command)模式
一. 举例说明 我们知道,在多线程程序中,多个用户都给系统发 Read 和 Write 命令.这里有几点需要说明: 1. 首先明确一点,所有的这些 Read 和 Write 命令都是调用一个库函数. ...
- 在线API文档管理工具Simple doc
Simple doc是一个简易的文档发布管理工具,为什么要写Simple doc呢?主要原因还是github的wiki并不好用:没有目录结构,文章没有Hx标签索引,最悲剧的是文章编辑的时候不能直接图片 ...
- 心脏滴血漏洞复现(CVE-2014-0160)
心脏滴血漏洞简述 2014年4月7日,OpenSSL发布安全公告,在OpenSSL1.0.1版本至OpenSSL1.0.1f Beta1版本中存在漏洞,该漏洞中文名称为心脏滴血,英文名称为HeartB ...
- 学习笔记63_python反射
####反射预备知识一########### __call__ 对象后面加括号,触发执行. python中,类的默认的内置方法,有一个名为__call__,如 class foo: def __in ...
- TCP/IP协议指南
分组: packet 通常用来表示任何类型的报文. 数据报: datagram 表示网络分层技术,它也经常用于表示在OSI参考模型较高层上的发送报文. 帧: frame 特别常见用于数据链路层上的报文 ...
- Ubuntu13.10编译android源码中遇到的问题
1. jdk的版本不对 我开始安装的是最新的jdk7,但是编译时会出现jdk的版本