SSM整合activiti框架
一:WorkFlow简介
1:什么是工作流工作流(Workflow),指“业务过程的部分或整体在计算机应用环境下的自动化”。是对工作流程及其各操作步骤之间业务规则的抽象、概括描述。在计算机中,工作流属于计算机支持的协同工作(CSCW)的一部分。后者是普遍地研究一个群体如何在计算机的帮助下实现协同工作的。
二:ssm整合activiti框架
 <!-- https://mvnrepository.com/artifact/org.activiti/activiti-engine -->

            <dependency>

                <groupId>org.activiti</groupId>

                <artifactId>activiti-engine</artifactId>

                <version>5.22.0</version>

            </dependency>

            <!--activiti整合ssm需要用到的jar-->

            <dependency>

                <groupId>org.activiti</groupId>

                <artifactId>activiti-spring</artifactId>

                <version>5.22.0</version>

            </dependency>
2:spring_activiti.xml文件
<?xml version="1.0" encoding="UTF-8"?>
<beans xmlns:xsi="http://www.w3.org/2001/XMLSchema-instance"
xmlns="http://www.springframework.org/schema/beans"
xsi:schemaLocation="http://www.springframework.org/schema/beans
http://www.springframework.org/schema/beans/spring-beans.xsd"> <!-- 配置数据源连接池 -->
<bean id="dataSource" class="com.alibaba.druid.pool.DruidDataSource" init-method="init" destroy-method="close">
<!-- 数据库连接属性 -->-->
<property name="url"
value="jdbc:mysql://localhost:3306/pmsdb?useUnicode=true&characterEncoding=utf-8&allowMultiQueries=true&useSSL=false"/>
<property name="driverClassName" value="com.mysql.jdbc.Driver"/>
<property name="username" value="root"/>
<property name="password" value="root"/>
<!-- 启用系统监控过滤器 -->
<property name="filters" value="stat"/>
<!-- 最大连接池数量 -->
<property name="maxActive" value="200"/>
<!-- 初始化时建立物理连接的个数-->
<property name="initialSize" value="5"/>
<!-- 最小连接池数量-->
<property name="minIdle" value="5"/>
<!-- 获取连接时最大等待时间,单位毫秒-->
<property name="maxWait" value="60000"/>
<!-- 销毁线程会检测连接的间隔时间,(单位毫秒)
如果连接空闲时间大于等于minEvictableIdleTimeMillis则关闭物理连接-->
<property name="timeBetweenEvictionRunsMillis" value="60000"/>
<!-- 连接保持空闲而不被驱逐的最小时间 -->
<property name="minEvictableIdleTimeMillis" value="300000"/>
<!--申请连接的时候检测,如果空闲时间大于timeBetweenEvictionRunsMillis,
执行validationQuery检测连接是否有效-->
<property name="testWhileIdle" value="true"/>
<!-- 申请连接时执行validationQuery检测连接是否有效 -->
<property name="testOnBorrow" value="false"/>
<!-- 归还连接时执行validationQuery检测连接是否有效-->
<property name="testOnReturn" value="false"/>
<!-- 是否缓存preparedStatement, mysql建议关闭-->
<property name="poolPreparedStatements" value="false"/>
<!-- 伪SQL,用于检查连接是否可用 -->
<property name="validationQuery" value="select 1"/>
</bean>
<!-- 装配DataSource的事务管理器-->
<bean id="txManager" class="org.springframework.jdbc.datasource.DataSourceTransactionManager">
<!-- 需要注入一个DataSource -->
<property name="dataSource" ref="dataSource"/>
</bean> <!--创建一个流程引擎的配置对象 这里我们使用的是Spring提供的流程引擎对象-->
<bean id="processEngineConfiguration" class="org.activiti.spring.SpringProcessEngineConfiguration">
<property name="dataSource" ref="dataSource"/>
<property name="transactionManager" ref="txManager"/>
<!-- 是否自动创建25张表 -->
<property name="databaseSchemaUpdate" value="true"/> <!--是否启动jobExecutor-->
<property name="jobExecutorActivate" value="false"/>
<property name="databaseType" value="mysql"/>
<property name="activityFontName" value="宋体"/>
<property name="labelFontName" value="黑体"/>
</bean> <!--<property name="xmlEncoding" value="utf-8"/>-->
<!-- 创建一个流程引擎bean -->
<bean id="processEngine" class="org.activiti.spring.ProcessEngineFactoryBean">
<property name="processEngineConfiguration" ref="processEngineConfiguration"/>
</bean> <!--配置服务Bean,定义Service服务-->
<!--工作流仓储服务,对所有atc_re开头的表进行操作-->
<bean id="repositoryService" factory-bean="processEngine" factory-method="getRepositoryService"/>
<!--工作流运行服务 对所有act_ru开头的表进行操作 -->
<bean id="runtimeService" factory-bean="processEngine" factory-method="getRuntimeService"/>
<!--工作流任务服务-->
<bean id="taskService" factory-bean="processEngine" factory-method="getTaskService"/>
<!--工作流历史数据服务 对所有的act_hi开头的表进行操作-->
<bean id="historyService" factory-bean="processEngine" factory-method="getHistoryService"/>
<!--工作流管理服务-->
<bean id="managementService" factory-bean="processEngine" factory-method="getManagementService"/>
<!--工作流唯一服务, 对所有以act_id开头的表进行增删改查-->
<bean id="identityService" factory-bean="processEngine" factory-method="getIdentityService"/>
<!--工作流管理服务-->
<bean id="formService" factory-bean="processEngine" factory-method="getFormService"/> </beans>
3:别忘了将spring.activiti.xml注入到spring容器中,交给spring容器管理
   <!--引入工作流配置文件-->

    <import resource="classpath*:spring-activiti.xml"/>
4.启动项目时,将生成25张框架自带的表

4.1:部分表的含义
|
序号 |
表名 |
说明 |
|
1 |
act_ge_bytearray |
二进制数据表 |
|
2 |
act_ge_property |
属性数据表存储整个流程引擎级别的数据,初始化表结构时,会默认插入三条记录, |
|
3 |
act_hi_actinst |
历史节点表 |
|
4 |
act_hi_attachment |
历史附件表 |
|
5 |
act_hi_comment |
历史意见表 |
|
6 |
act_hi_identitylink |
历史流程人员表 |
|
7 |
act_hi_detail |
历史详情表,提供历史变量的查询 |
|
8 |
act_hi_procinst |
历史流程实例表 |
|
9 |
act_hi_taskinst |
历史任务实例表 |
|
10 |
act_hi_varinst |
历史变量表 |
|
11 |
act_id_group |
用户组信息表 |
|
12 |
act_id_info |
用户扩展信息表 |
|
13 |
act_id_membership |
用户与用户组对应信息表 |
|
14 |
act_id_user |
用户信息表 |
|
15. |
act_re_deployment |
部署信息表 |
|
16. |
act_re_model |
流程设计模型部署表 |
|
17 |
act_re_procdef |
流程定义数据表 |
|
18 |
act_ru_event_subscr |
throwEvent、catchEvent时间监听信息表 |
|
19 |
act_ru_execution |
运行时流程执行实例表 |
|
20 |
act_ru_identitylink |
运行时流程人员表,主要存储任务节点与参与者的相关信息 |
|
21 |
act_ru_job |
运行时定时任务数据表 |
|
22 |
act_ru_task |
运行时任务节点表 |
|
23 |
act_ru_variable |
运行时流程变量数据表 |
5:测试流程,首先使用idea下载activiti插件actiBPM,下载后重启idea,画出流程图,并生成png图片
apply.bpmn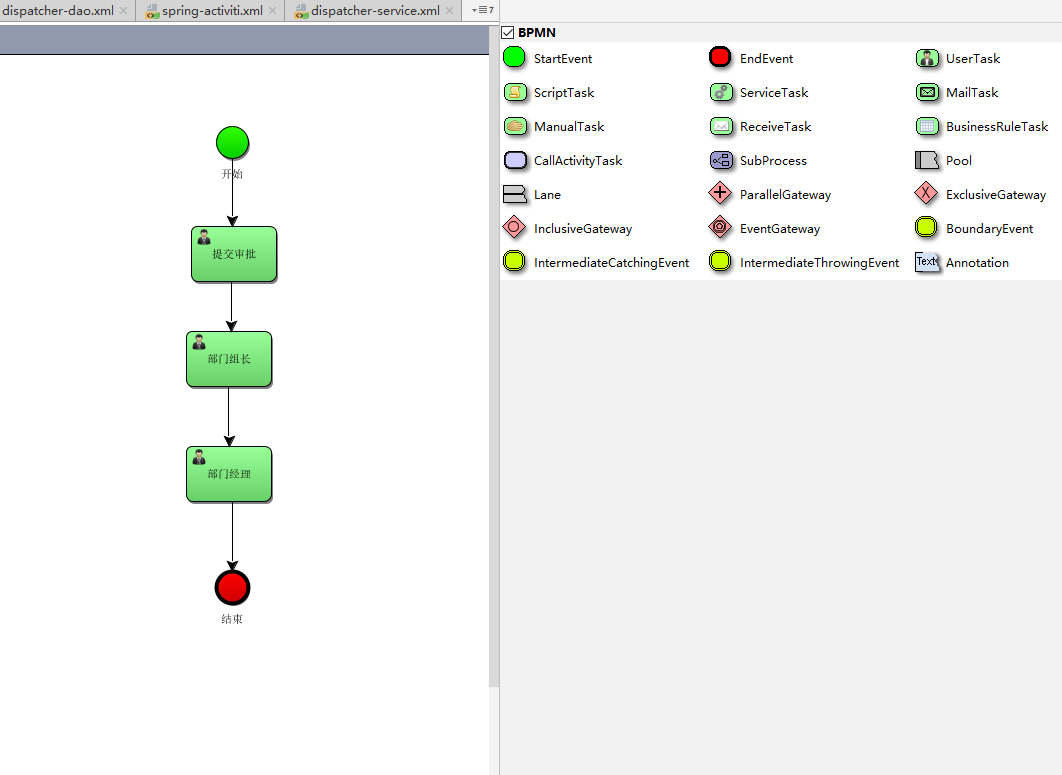
apply.png图片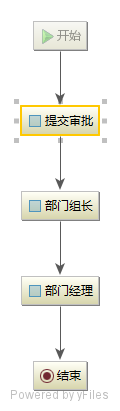
5:WorkFlowTest
package com.htzs.pms.service.address.impl;

import org.activiti.engine.*;

import org.activiti.engine.repository.Deployment;

import org.activiti.engine.task.Task;

import org.junit.Test;

import org.junit.runner.RunWith;

import org.springframework.beans.factory.annotation.Autowired;

import org.springframework.test.context.ContextConfiguration;

import org.springframework.test.context.junit4.SpringRunner;

import org.springframework.test.context.web.WebAppConfiguration;

import java.util.List;

/**

 * @author : ywb

 * @createdDate : 2019/9/18

 * @updatedDate

 */

@RunWith(SpringRunner.class)

@ContextConfiguration(locations = {"classpath:dispatcher-dao.xml", "classpath:dispatcher-service.xml"})

@WebAppConfiguration

public class WorkFlowTest {

    /**

     * 测试activiti是否与spring整合成功,成功标志如下

     * 控制台输出org.activiti.engine.impl.ProcessEngineImpl@4721ee77说明已经整合成功

     */

    @Test

    public  void test() {

        // 1.创建Activiti配置对象的实例

        ProcessEngineConfiguration configuration = ProcessEngineConfiguration

                .createStandaloneProcessEngineConfiguration();

        // 2.设置数据库连接信息

        // 设置数据库的类型

        configuration.setDatabaseType("mysql");

        // 设置数据库驱动

        configuration.setJdbcDriver("com.mysql.jdbc.Driver");

        // 设置jdbcURL

        configuration.setJdbcUrl("jdbc:mysql://localhost:3306/activiti?useUnicode=true&characterEncoding=utf-8&allowMultiQueries=true&useSSL=false");

        // 设置用户名

        configuration.setJdbcUsername("root");

        // 设置密码

        configuration.setJdbcPassword("root");

        // 设置数据库建表策略

        /**

         * DB_SCHEMA_UPDATE_TRUE:如果不存在表就创建表,存在就直接使用

         * DB_SCHEMA_UPDATE_FALSE:如果不存在表就抛出异常

         * DB_SCHEMA_UPDATE_CREATE_DROP:每次都先删除表,再创建新的表

         */

        configuration.setDatabaseSchemaUpdate(ProcessEngineConfiguration.DB_SCHEMA_UPDATE_CREATE_DROP);

        // 3.使用配置对象创建流程引擎实例(检查数据库连接等环境信息是否正确)

        ProcessEngine processEngine = configuration.buildProcessEngine();

        System.out.println(processEngine);

    }

    /**

     * 第二种创建方式 一般使用最多的就是这种创建方式

     */

    @Test

    public void initActiviti() {

        ProcessEngine processEngine = ProcessEngines.getDefaultProcessEngine();

        System.out.println(processEngine);

    }

    @Autowired

    private RepositoryService repositoryService;

    @Autowired

    private RuntimeService runtimeService;

    @Autowired

    private TaskService taskService;

    /**

     * 部署流程定义

     */

    @Test

    public void deployProcess(){

        //得到流程部署的service

        Deployment deploy = repositoryService.createDeployment().name("请假流程001")

                .addClasspathResource("apply.bpmn")

                .addClasspathResource("apply.png").deploy();

        System.out.println("部署成功,流程id:"+deploy.getId());

    }

    /**

     * 启动流程

     */

    @Test

    public void startProcess(){

        //使用key启动流程

        runtimeService.startProcessInstanceByKey("myProcess_1");

        //使用id启动流程

//        runtimeService.startProcessInstanceById("myProcess_1:1:4");

        System.out.println("流程启动成功");

    }

    /**

     * 查询流程

     */

    @Test

    public void findProcess(){

        List<Task> tasks = taskService.createTaskQuery().taskAssignee("王五").list();

        for (Task task : tasks) {

            System.out.println("任务id"+task.getId());

            System.out.println("流程实例id"+task.getProcessInstanceId());

            System.out.println("执行实例id"+task.getExecutionId());

            System.out.println("流程定义id"+task.getProcessDefinitionId());

            System.out.println("任务名称"+task.getName());

            System.out.println("任务办理人"+task.getAssignee());

        }

    }

    @Test

    public void completeProcess(){

        taskService.complete("10002");

        System.out.println("任务完成");

    }

}
三:使用SpringBoot 整合activiti框架并整合activiti流程设计器
1:需要使用的maven
<dependencies>

        <dependency>

            <groupId>org.springframework.boot</groupId>

            <artifactId>spring-boot-starter-web</artifactId>

        </dependency>

        <dependency>

            <groupId>org.springframework.boot</groupId>

            <artifactId>spring-boot-starter-thymeleaf</artifactId>

        </dependency>

        <dependency>

            <groupId>net.sourceforge.nekohtml</groupId>

            <artifactId>nekohtml</artifactId>

            <version>1.9.22</version>

        </dependency>

        <dependency>

            <groupId>mysql</groupId>

            <artifactId>mysql-connector-java</artifactId>

            <scope>runtime</scope>

        </dependency>

        <dependency>

            <groupId>org.springframework.boot</groupId>

            <artifactId>spring-boot-starter-test</artifactId>

            <scope>test</scope>

        </dependency>

        <!--activiti begin-->

        <dependency>

            <groupId>org.activiti</groupId>

            <artifactId>activiti-engine</artifactId>

            <version>${activiti.version}</version>

        </dependency>

        <dependency>

            <groupId>org.activiti</groupId>

            <artifactId>activiti-spring</artifactId>

            <version>${activiti.version}</version>

        </dependency>

        <dependency>

            <groupId>org.activiti</groupId>

            <artifactId>activiti-modeler</artifactId>

            <version>${activiti.version}</version>

        </dependency>

        <dependency>

            <groupId>org.activiti</groupId>

            <artifactId>activiti-diagram-rest</artifactId>

            <version>${activiti.version}</version>

        </dependency>

        <!--activiti end-->

    </dependencies>
2.application.yml文件
server:

  port: 8085

security:

  basic:

    enabled: false

spring:

  datasource:

    url: jdbc:mysql://localhost:3306/activiti??useUnicode=true&characterEncoding=utf8&autoReconnect=true

    username: root

    password: root

  thymeleaf:

    mode: LEGACYHTML5

    cache: false
3:java注解配置类
package edu.nf.project.config;

import org.activiti.engine.*;

import org.activiti.spring.ProcessEngineFactoryBean;

import org.activiti.spring.SpringProcessEngineConfiguration;

import org.springframework.beans.factory.annotation.Autowired;

import org.springframework.context.annotation.Bean;

import org.springframework.context.annotation.Configuration;

import org.springframework.core.io.Resource;

import org.springframework.core.io.support.PathMatchingResourcePatternResolver;

import org.springframework.transaction.PlatformTransactionManager;

import javax.sql.DataSource;

import java.io.IOException;

/**

 * @author : ywb

 * @createdDate : 2019/9/20

 * @updatedDate

 */

@Configuration

public class ActivitiConfiguration {

    @Autowired

    private DataSource dataSource;

    @Autowired

    private PlatformTransactionManager platformTransactionManager;

    /**

     *  创建一个流程引擎的配置对象 这里我们使用的是Spring提供的流程引擎对象

     *  创建一个流程引擎的配置对象  这里我摸嗯使用的事Spring提供的流程引擎对象

     * @return

     */

    @Bean

    public SpringProcessEngineConfiguration springProcessEngineConfiguration(){

        SpringProcessEngineConfiguration spec = new SpringProcessEngineConfiguration();

        spec.setDataSource(dataSource);

        spec.setTransactionManager(platformTransactionManager);

        spec.setDatabaseSchemaUpdate("true");

        Resource[] resources = null;

        // 启动自动部署流程

        try {

            resources = new PathMatchingResourcePatternResolver().getResources("classpath*:bpmn/*.bpmn");

        } catch (IOException e) {

            e.printStackTrace();

        }

        spec.setDeploymentResources(resources);

        return spec;

    }

    /**

     * 创建一个流程引擎bean

     * @return

     */

    @Bean

    public ProcessEngineFactoryBean processEngine(){

        ProcessEngineFactoryBean processEngineFactoryBean = new ProcessEngineFactoryBean();

        processEngineFactoryBean.setProcessEngineConfiguration(springProcessEngineConfiguration());

        return processEngineFactoryBean;

    }

    /**

     * 工作流仓储服务,对所有atc_re开头的表进行操作-

     * @return

     * @throws Exception

     */

    @Bean

    public RepositoryService repositoryService() throws Exception{

        return processEngine().getObject().getRepositoryService();

    }

    /**

     * 工作流运行服务 对所有act_ru开头的表进行操作

     * @return

     * @throws Exception

     */

    @Bean

    public RuntimeService runtimeService() throws Exception{

        return processEngine().getObject().getRuntimeService();

    }

    /**

     * 工作流任务服务

     * @return

     * @throws Exception

     */

    @Bean

    public TaskService taskService() throws Exception{

        return processEngine().getObject().getTaskService();

    }

    /**

     * 工作流历史数据服务 对所有的act_hi开头的表进行操作

     * @return

     * @throws Exception

     */

    @Bean

    public HistoryService historyService() throws Exception{

        return processEngine().getObject().getHistoryService();

    }

    /**

     * 工作流唯一服务,对所有以act_id开头的表进行增删改查

     * @return

     * @throws Exception

     */

    public IdentityService identityService() throws Exception{

        return processEngine().getObject().getIdentityService();

    }

    /**

     * 工作流管理服务

     * @return

     * @throws Exception

     */

    public FormService formService() throws Exception{

        return processEngine().getObject().getFormService();

    }

    /**

     * 工作流管理服务

     * @return

     * @throws Exception

     */

    public ManagementService managementService() throws Exception{

        return processEngine().getObject().getManagementService();

    }

}
SSM整合activiti框架的更多相关文章
- SSM整合Activiti
1.pom.xml <?xml version="1.0" encoding="UTF-8"?> <project xmlns="h ...
- SSM整合文件框架
1.项目架构如图 web3.0项目,tomcat9.0,自动生成web.xml文件 按照mybatis配置,先自动生成dao层,更改相应信息 我mybatis如何配置: https://www.c ...
- spring MVC框架入门(外加SSM整合)
spring MVC框架 一.什么是sping MVC Spring MVC属于SpringFrameWork的后续产品,已经融合在Spring Web Flow里面.Spring 框架提供了构建 W ...
- SSM整合框架实现ajax校验
SSM整合框架实现ajax校验 刚学习了ssm框架,ajax校验成功,分享下 1.导入jar包
- Spring框架学习笔记(4)——SSM整合以及创建Maven自定义模版
Spring+Spring MVC+MyBatis+Maven SSM整合的核心还是Spring+MyBatis的整合,回顾一下MyBatis操作数据库流程,我们是使用一个SQLSessionFact ...
- springMVC:校验框架:多规则校验,嵌套校验,分组校验;ssm整合技术
知识点梳理 课堂讲义 学习目标 能够阐述表单验证的分类和区别 能够运用表单验证的常用注解 能够编写表单验证的示例 能够编写SSM整合的应用案例 能够总结SSM整合的步骤 1 校验框架 1.1 入门-视 ...
- 阶段3 3.SpringMVC·_07.SSM整合案例_03ssm整合之编写Spring框架
做整合要保证每个框架单独使用 先搭建Spring的框架,然后再整合别的框架.Spring是业务层的框架 spring的配置文件 这就表示是spring的配置文件 默认的约束不够,需要修改. <b ...
- SSM框架整合的最新打开方式(打造最详细的SSM整合教程)
SSM整合 文章已托管到GitHub,大家可以去GitHub查看阅读,欢迎老板们前来Star!搜索关注微信公众号 [码出Offer] 领取各种学习资料! SSM 一.创建一个Maven项目 File ...
- Maven + 最新SSM整合
. 1. 开发环境搭建 参考博文:Eclipse4.6(Neon) + Tomcat8 + MAVEN3.3.9 + SVN项目完整环境搭建 2. Maven Web项目创建 2.1. 2.2. 2. ...
随机推荐
- AUTOCAD二次开发-----删除一个图层里面的所有对象
https://blog.csdn.net/aasswwe/article/details/40899759 private void Test() { // 获取当前文档和数据库 Document ...
- java 线程池newFixedThreadPool
工作中遇到一个这样的情况,List中的元素要每个遍历出来,然后作为参数传给后面通过spark做数据处理,元素太多,一个一个的遍历速度太慢,于是考虑使用多线程,代码如下:(已删除部分代码) 想了解更多线 ...
- 解决MobaXterm-SSH中文乱码问题
一般情况不用修改服务器字符集(linux或unix服务器字符集一般不会设置错误). 1.首先用命令查看当前系统的LANG是什么: >locale LANG=en_US LC_COLLATE=&q ...
- Appium+Python+Genymotion ------环境配置
前言 之前总是在找方向,也研究了很多的工具,终于找到了适合自己的一套,打算把学习的过程做一个记录,给自己加深印象,也希望能给其他人一些帮助. 一.工具准备 1.Appium // http://a ...
- mysql/mariadb 初体验
距离申请这个博客号已经过了九个月,思前想后还是把知识沉淀放这里吧,不过初心一样,依旧是 '谨以此文,见证成果'.有 兴趣的话也欢迎大家去我的csdn博客转一转.以下是正文: 1.mysql安装 win ...
- HandlerMethodArgumentResolver(二):Map参数类型和固定参数类型【享学Spring MVC】
每篇一句 黄金的导电性最好,为什么电脑主板还是要用铜? 飞机最快,为什么还有人做火车? 清华大学最好,为什么还有人去普通学校? 因为资源都是有限的,我们现实生活中必须兼顾成本与产出的平衡 前言 上文 ...
- Liunx学习总结(六)--进程
进程概述 简单来讲程序是一个包含可以执行代码的静态的文件.进程是一个开始执行但是还没有结束的程序的实例.当程序被系统调用到内存以后,系统会给程序分配一定的资源(内存,设备等等)然后进行一系列的复杂操作 ...
- ionic 页面动画 ngAnimate
git 地址: https://github.com/Augus/ngAnimate/ 使用方法: 下载后, 1.引入ngAnimate.js(依赖jquery); 2.引入 ng-animate.c ...
- Codeforces 814C
题意略. 思路: 尺取法,依然是要利用之前的结果. 感觉时间复杂度太高了,竟然也过了. #include<bits/stdc++.h> using namespace std; ; ]; ...
- MSIL实用指南-生成foreach语句
foreach可以迭代数组或者一个集合对象.foreach语句格式是它的生成步骤是foreach (<成员> in <集合>) <循环体> 一.声明三个变量,loc ...