Sample Code之Take a screenshot of a SceneView
周末事情太多了,以后就工作日发布随笔吧。周末的话,看心情,也许也会发~
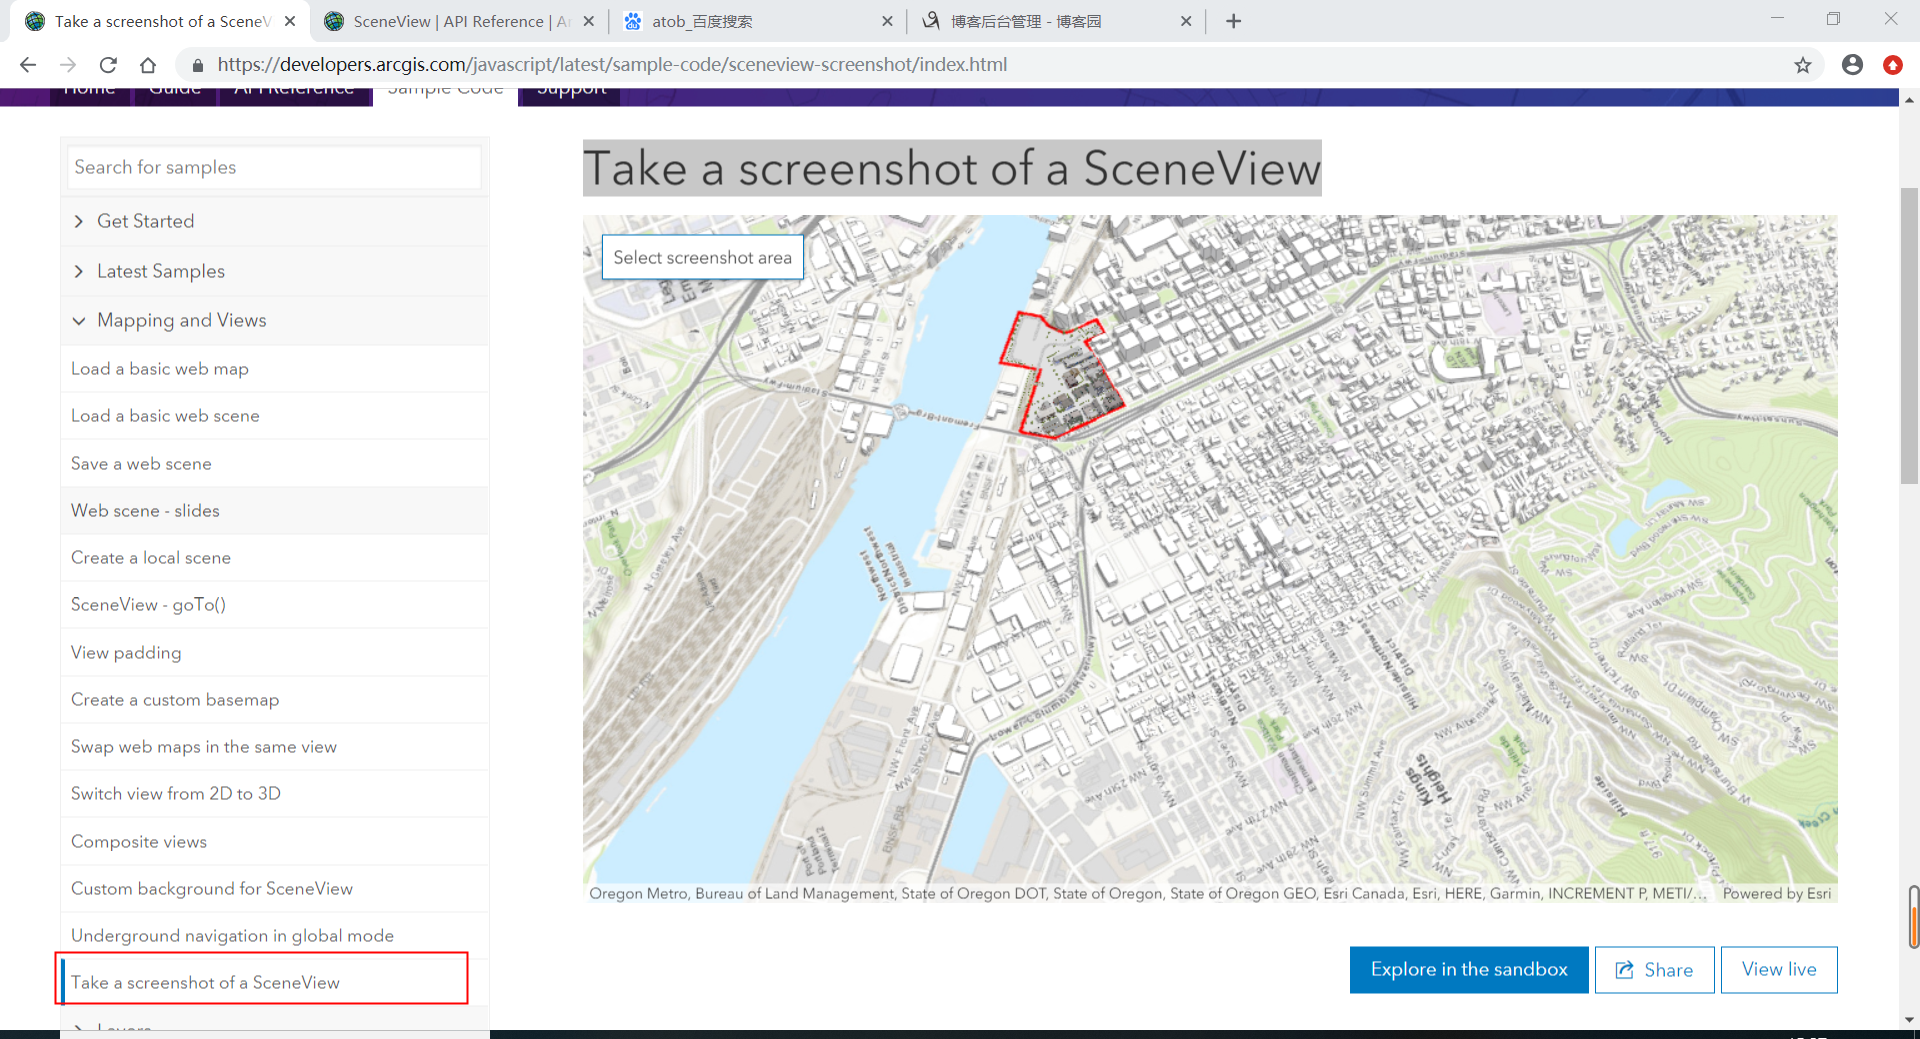
今天的实例代码解析是Take a screenshot of a SceneView,也就是获取快照,话不多说,进入正题。
首先,官方网址的位置为:https://developers.arcgis.com/javascript/latest/sample-code/sceneview-screenshot/index.html
截图:
接下来进入代码的解析部分
第一段:
这一部分没有什么难度,就是加载地图。如果还能记得SceneView是3D视图,MapView是2D视图,就足够了。

第二段:
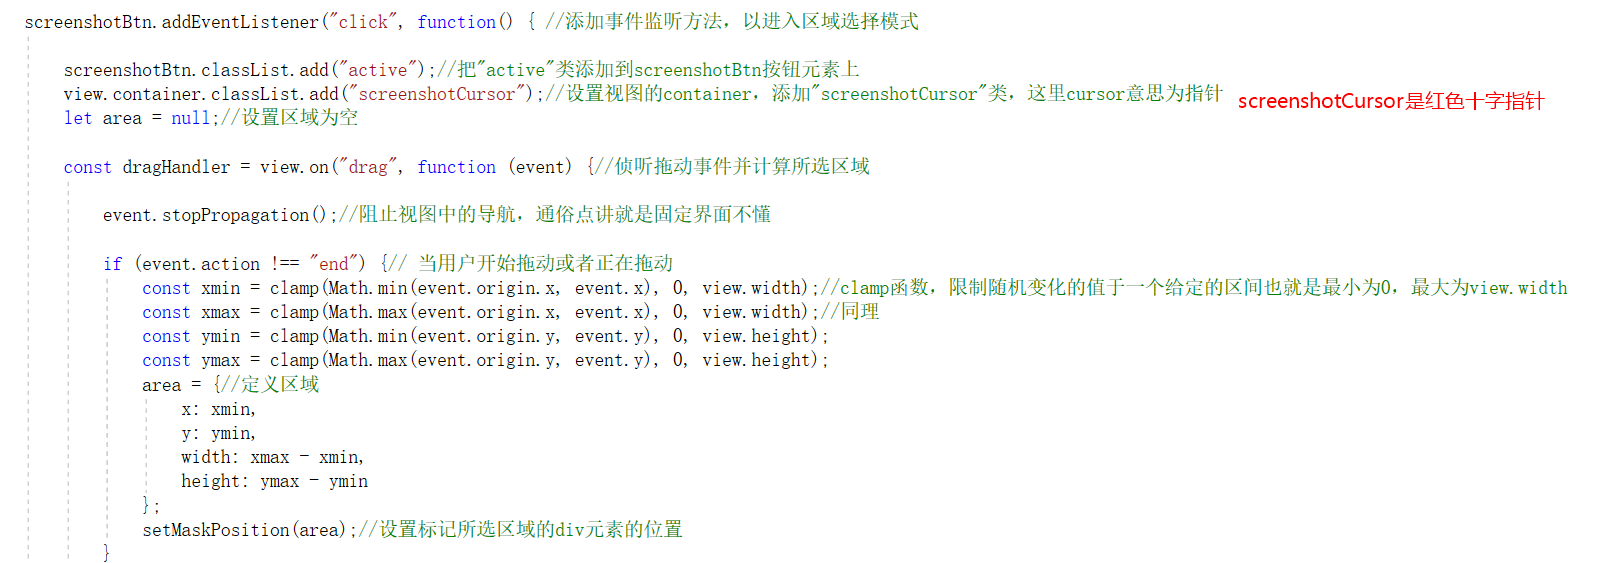
所谓蒙版,就是当用户要进行截图时所需的容器

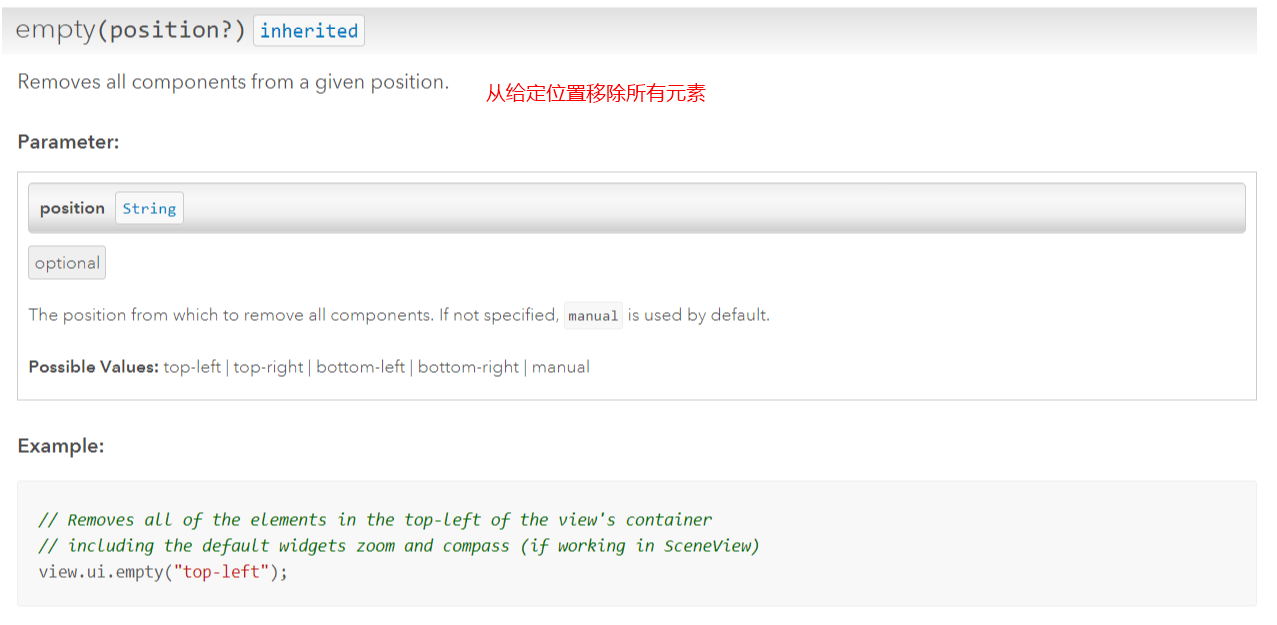
其中有一个view.ui.empty()方法,遇到不懂的方法就去API REFERENCE里面查找,很容易找到解释。这里是介绍看代码的方法。
第三段:
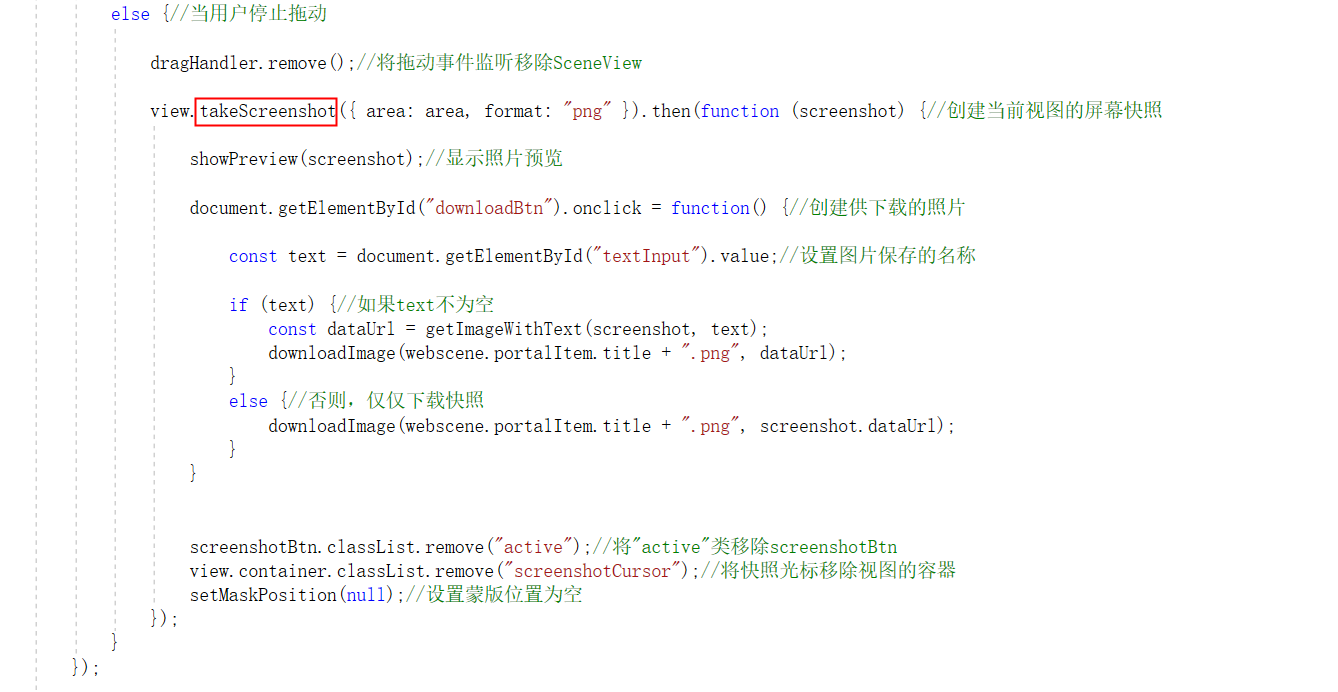
首先对快照按钮的click事件进行监听,此时开始进入截屏;然后对视图的拖动事件进行监听,对截屏的一些属性进行保存显示在预览DIv容器中
第四段:
第五段:
第六段:
最后附上全部代码:
<!DOCTYPE html>
<html>
<head>
<meta charset="utf-8">
<meta name="viewport" content="initial-scale=1,maximum-scale=1,user-scalable=no">
<title>Take a screenshot of a SceneView - 4.10</title>
<link rel="stylesheet" href="http://localhost/arcgis_js_v410_sdk/arcgis_js_api/library/4.10/esri/css/main.css">
<script src="http://localhost/arcgis_js_v410_sdk/arcgis_js_api/library/4.10/dojo/dojo.js"></script>
<script>
require([
"esri/WebScene",//网络场景
"esri/views/SceneView"//3D视图,上一篇提到:2D视图为MapView
], function(WebScene, SceneView) {//两个参数,顺序不能改变,其他的不重复
const webscene = new WebScene({
portalItem: {
id: "19dcff93eeb64f208d09d328656dd492"
}
});
const view = new SceneView({
map: webscene,
container: "viewDiv"
});
// 从这里开始要进行截图操作了
const screenshotBtn = document.getElementById("screenshotBtn");//getElementById方法用于获得HTML的元素"screenshotBtn",也就是快照按钮
const maskDiv = document.getElementById("maskDiv");//获取元素"maskdiv",用于选择区域的蒙版
const screenshotDiv = document.getElementById("screenshotDiv");//用于显示打印预览的元素
view.ui.empty("top-left");//地图默认左上角有一些小部件,比如放大缩小,这里清空这些小部件
view.ui.add(screenshotBtn, "top-left");//将快照按钮放置于左上角
screenshotBtn.addEventListener("click", function() { //添加事件监听方法,以进入区域选择模式
screenshotBtn.classList.add("active");//把"active"类添加到screenshotBtn按钮元素上
view.container.classList.add("screenshotCursor");//设置视图的container,添加"screenshotCursor"类,这里cursor意思为指针
let area = null;//设置区域为空
const dragHandler = view.on("drag", function (event) {//侦听拖动事件并计算所选区域
event.stopPropagation();//阻止视图中的导航,通俗点讲就是固定界面不懂
if (event.action !== "end") {// 当用户开始拖动或者正在拖动
, view.width);//clamp函数,限制随机变化的值于一个给定的区间也就是最小为0,最大为view.width
, view.width);//同理
, view.height);
, view.height);
area = {//定义区域
x: xmin,
y: ymin,
width: xmax - xmin,
height: ymax - ymin
};
setMaskPosition(area);//设置标记所选区域的div元素的位置
}
else {//当用户停止拖动
dragHandler.remove();//将拖动事件监听移除SceneView
view.takeScreenshot({ area: area, format: "png" }).then(function (screenshot) {//创建当前视图的屏幕快照
showPreview(screenshot);//显示照片预览
document.getElementById("downloadBtn").onclick = function() {//创建供下载的照片
const text = document.getElementById("textInput").value;//设置图片保存的名称
if (text) {//如果text不为空
const dataUrl = getImageWithText(screenshot, text);
downloadImage(webscene.portalItem.title + ".png", dataUrl);
}
else {//否则,仅仅下载快照
downloadImage(webscene.portalItem.title + ".png", screenshot.dataUrl);
}
}
screenshotBtn.classList.remove("active");//将"active"类移除screenshotBtn
view.container.classList.remove("screenshotCursor");//将快照光标移除视图的容器
setMaskPosition(null);//设置蒙版位置为空
});
}
});
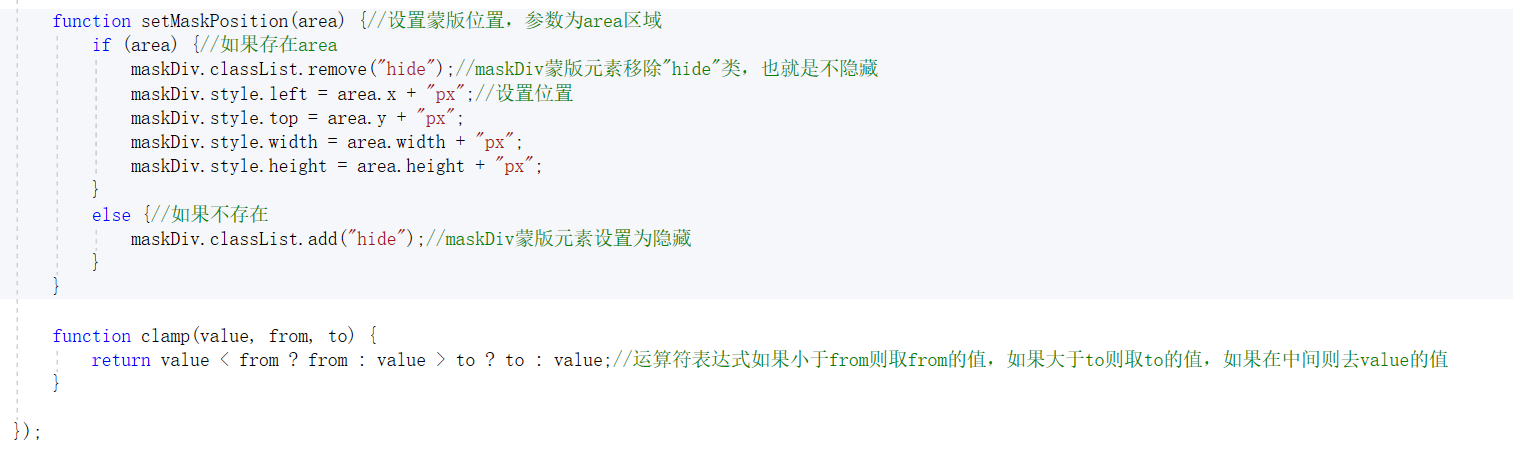
function setMaskPosition(area) {//设置蒙版位置,参数为area区域
if (area) {//如果存在area
maskDiv.classList.remove("hide");//maskDiv蒙版元素移除"hide"类,也就是不隐藏
maskDiv.style.left = area.x + "px";//设置位置
maskDiv.style.top = area.y + "px";
maskDiv.style.width = area.width + "px";
maskDiv.style.height = area.height + "px";
}
else {//如果不存在
maskDiv.classList.add("hide");//maskDiv蒙版元素设置为隐藏
}
}
function clamp(value, from, to) {
return value < from ? from : value > to ? to : value;//运算符表达式如果小于from则取from的值,如果大于to则取to的值,如果在中间则去value的值
}
});
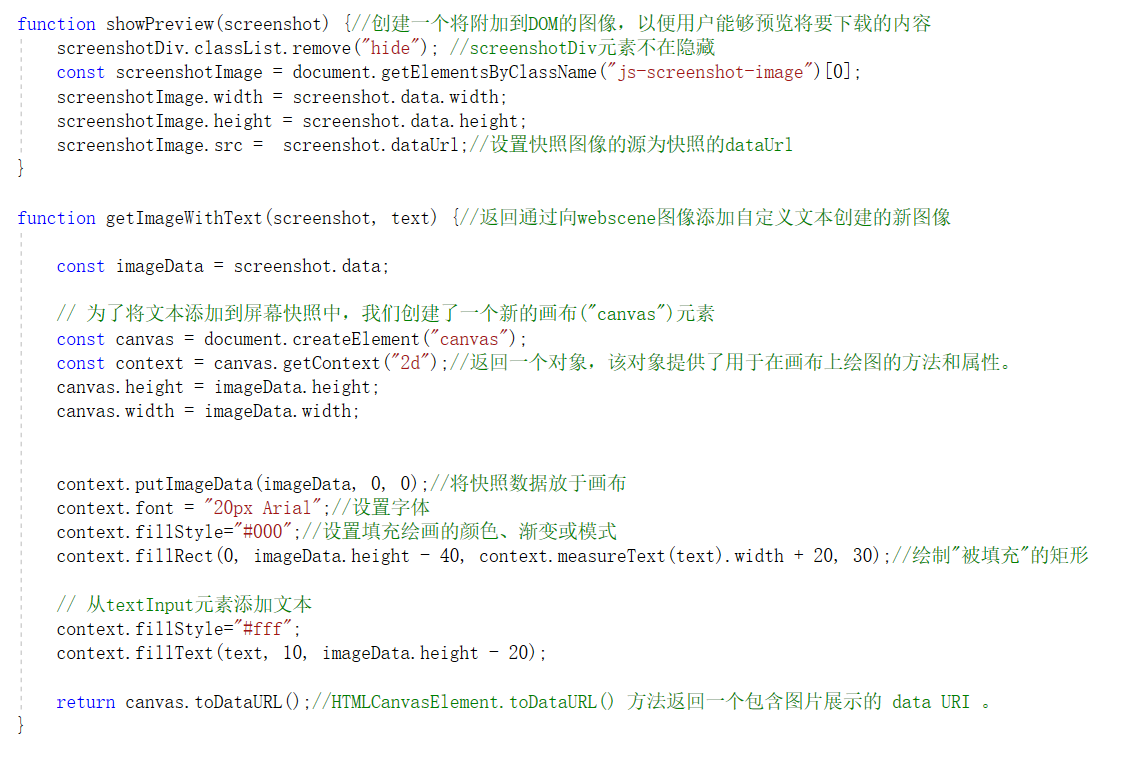
function showPreview(screenshot) {//创建一个将附加到DOM的图像,以便用户能够预览将要下载的内容
screenshotDiv.classList.remove("hide"); //screenshotDiv元素不在隐藏
];
screenshotImage.width = screenshot.data.width;
screenshotImage.height = screenshot.data.height;
screenshotImage.src = screenshot.dataUrl;//设置快照图像的源为快照的dataUrl
}
function getImageWithText(screenshot, text) {//返回通过向webscene图像添加自定义文本创建的新图像
const imageData = screenshot.data;
// 为了将文本添加到屏幕快照中,我们创建了一个新的画布("canvas")元素
const canvas = document.createElement("canvas");
const context = canvas.getContext("2d");//返回一个对象,该对象提供了用于在画布上绘图的方法和属性。
canvas.height = imageData.height;
canvas.width = imageData.width;
context.putImageData(imageData, , );//将快照数据放于画布
context.font = "20px Arial";//设置字体
context.fillStyle="#000";//设置填充绘画的颜色、渐变或模式
context.fillRect(, imageData.height - , context.measureText(text).width + , );//绘制"被填充"的矩形
// 从textInput元素添加文本
context.fillStyle="#fff";
context.fillText(text, , imageData.height - );
return canvas.toDataURL();//HTMLCanvasElement.toDataURL() 方法返回一个包含图片展示的 data URI 。
}
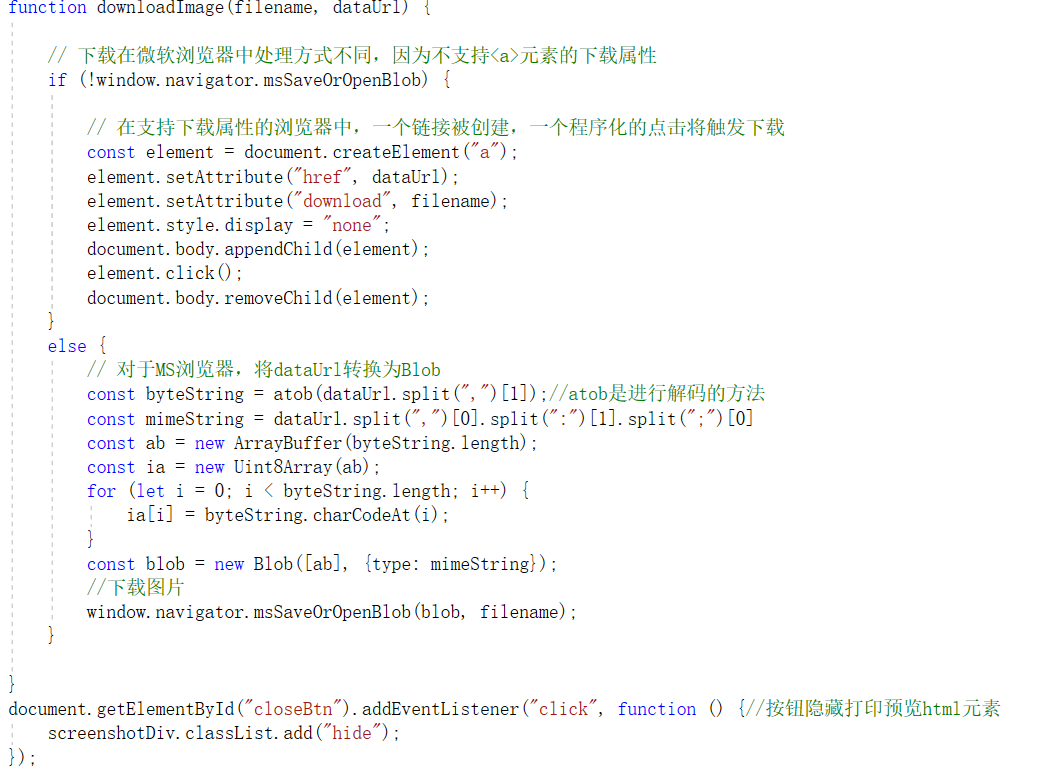
function downloadImage(filename, dataUrl) {
// 下载在微软浏览器中处理方式不同,因为不支持<a>元素的下载属性
if (!window.navigator.msSaveOrOpenBlob) {
// 在支持下载属性的浏览器中,一个链接被创建,一个程序化的点击将触发下载
const element = document.createElement("a");
element.setAttribute("href", dataUrl);
element.setAttribute("download", filename);
element.style.display = "none";
document.body.appendChild(element);
element.click();
document.body.removeChild(element);
}
else {
// 对于MS浏览器,将dataUrl转换为Blob
]);//atob是进行解码的方法
].split(].split(]
const ab = new ArrayBuffer(byteString.length);
const ia = new Uint8Array(ab);
; i < byteString.length; i++) {
ia[i] = byteString.charCodeAt(i);
}
const blob = new Blob([ab], {type: mimeString});
//下载图片
window.navigator.msSaveOrOpenBlob(blob, filename);
}
}
document.getElementById("closeBtn").addEventListener("click", function () {//按钮隐藏打印预览html元素
screenshotDiv.classList.add("hide");
});
});
</script>
<style>
html,
body,
#viewDiv {
padding: ;
margin: ;
height: %;
width: %;
font-family: Helvetica, Arial, sans-serif;
}
#screenshotDiv {
position: absolute;
top: ;
left: ;
right: ;
bottom: ;
text-align: center;
background-color: rgba(, , , 0.8);
}
.hide {
display: none;
}
img {
border: 10px solid white;
box-shadow: 2px 2px 5px rgba(, , , 0.5);
}
#screenshotDiv > * {
margin: .5em;
}
.screenshotCursor {
cursor: crosshair;
}
.action-button {
padding: .6em;
border: 1px solid #0079c1;
text-align: center;
background-color: white;
cursor: pointer;
}
.action-button:hover,
.action-button:focus {
background: #0079c1;
color: white;
}
#maskDiv {
position: absolute;
background: rgba(, , , 0.1);
border: 2px dashed rgb(, , );
}
</style>
</head>
<body>
<div id="viewDiv">
<button id="screenshotBtn" class="action-button esri-widget" aria-label="Select screenshot area"
title="Select screenshot area">
Select
screenshot area
</button>
</div>
<div id="screenshotDiv" class="hide">
<img class="js-screenshot-image">
<div>
<label>Set a text to be displayed on the image: </label><input type="text"
placeholder="Image text" id="textInput" autofocus>
</div>
<button id="downloadBtn" class="action-button" aria-label="Download image"
title="Download image">
Download image
</button>
<button id="closeBtn" class="action-button" aria-label="Back to webscene"
title="Back to webscene">
Back to webscene
</button>
</div>
<div id="maskDiv" class="hide screenshotCursor"></div>
</body>
</html>
Sample Code之Take a screenshot of a SceneView的更多相关文章
- android studio2.2 的Find Sample Code点击没有反应
1 . 出现的问题描述: 右键点击Find Sample Code后半天没有反应,然后提示 Samples are currently unavailable for :{**** ...
- 如何将经纬度利用Google Map API显示C# VS2005 Sample Code
原文 如何将经纬度利用Google Map API显示C# VS2005 Sample Code 日前写了一篇如何用GPS抓取目前所在,并回传至资料库储存,这篇将会利用这些回报的资料,将它显示在地图上 ...
- IOS开发苹果官方Sample Code及下载地址
IOS开发苹果官方Sample Code及下载地址 在线浏览地址:https://developer.apple.com/library/ios/navigation/#section=Resourc ...
- OAF Sample Code(转)
原文地址: OAF Sample Code
- Sample Code之Web scene-slides
这是我的第一篇随笔,在开始正文前说几句. 这个系列会记录我学习Arcgis js API 4.10的全过程,希望能对自己也对其他有需要的人有帮助.很多时候上网看一些大神的帖子会感到一头雾水,一是自己水 ...
- sample code java pom.xml
pom.xml <?xml version="1.0" encoding="UTF-8"?> <project xmlns="htt ...
- sqoop sample code
本文使用的数据库是mysql的sample database employees. download url:https://launchpad.net/test-db/employees-db-1/ ...
- Sample Code for Qp_preq_pub.Price_request Api to Simulate an Ask for Promotion Modifier
DECLARE p_line_tbl QP_PREQ_GRP.LINE_TBL_TYPE; p_qual_tbl QP_PREQ_GRP.QUAL_TBL_TYPE; p_line_attr_tbl ...
- 虹软人脸识别Android Sample Code
AFR_FSDKInterface engine = new AFR_FSDKEngine(); //用来存放提取到的人脸信息, face_1 是注册的人脸,face_2 是要识别的人脸 AFR_FS ...
随机推荐
- jackson中的@JsonBackReference和@JsonManagedReference,以及@JsonIgnore
jackson中的@JsonBackReference和@JsonManagedReference,以及@JsonIgnore均是为了解决对象中存在双向引用导致的无限递归(infinite recur ...
- H3C NAT的信息显示和调试
- [转]分布式监控工具Ganglia 介绍 与 集群部署.
如果你目的很明确就是冲着标题来的,不爱看我唠叨,请直接进入第二个分割线之后的内容. 其实之前就是有做Swift监控平台的打算的,但是因为没什么硬性需求么,也不要紧的,就一直搁置了.最近实验室来了个大二 ...
- redis cluster和hash slot
redis cluster介绍 从redis3.0.0开始,官方支持了redis cluster的集群模式,结束了redis没有集群的时代. redis cluster 支撑 N 个 redis ma ...
- 2018-8-10-如何在-UWP-使用-wpf-的-Trigger-
title author date CreateTime categories 如何在 UWP 使用 wpf 的 Trigger lindexi 2018-08-10 19:16:51 +0800 2 ...
- JAXB常用注解讲解(超详细)
简介: JAXB(Java Architecture for XML Binding) 是一个业界的标准,是一项可以根据XML Schema产生Java类的技术.该过程中,JAXB也提供了将XML实例 ...
- element ui 批量删除
<el-table :data="tableData" stripe border style="width: 100%" @selection-chan ...
- 性能测试基础-HTTP用例设计
JSON格式请求: web_custom_request("https://xx.xx.xx.xx:xx/pvcpappinf//msgcustomization/xinPowGenDay, ...
- 2019-8-31-dotnet-core-隐藏控制台
title author date CreateTime categories dotnet core 隐藏控制台 lindexi 2019-08-31 16:55:58 +0800 2019-2-1 ...
- Hibernate管理Session
Hibernate自身提供了三种管理Session对象的方法 Session对象的生命周期与本地线程绑定 Session对象的生命周期与JTA事务绑定 Hibernate委托程序管理Session对象 ...