DEVOPS技术实践_12:创建持续集成的管道
持续集成不仅包含了Jenkins或者相关其它的CI工具,也包含了包含代码如何控制,采用的什么分支策略等。
不同的组织可能采用不同的类型的策略来完成CI,策略类型和项目的类型的有很大的关系。
一 分支策略
1.1 本实验分支
分支能够有效的对代码较好的管理,也是能够把工作的代码和开发环境的代码隔离的有效方式。主要有三种的分支策略类型
– master分支
– integration 分支
– feature 分支
1.master分支
master分支也叫做生产分支,该分支的代码全部是经过测试OK的代码。任何没有经过测试OK的代码都不会出现在该分支上。
2. Integration分支
集成分支也叫做mainline分支,该分支存放着所有功能的集成,并进行构建和测试。开发人员不能在该分支上直接开发,然而开发人员可以在集成分支上创建feaure分支,并在上面进行开发。
3. feature分支
最后是feature分支,这也是开发人员所在的分支,可以有多个feature分支。
下图展现了常用的分支策略。

在feature分支或者集成分支上进行构建、静态代码分析、集成测试等,假如代码测试通过,那么把打好的包上传到Artifactory(二进制库)
1.2 CI的管道
在Jenkins中创建多分支管道有以下步骤:
(1)从版本控制系统中拉取代码,并触发一个事件(CI管道的初始化)
(2)执行静态分析并把结果上传到SonarQube,假如发现的bug超过在quality gate的阀值,那么管道构建将会失败。
(3)执行集成测试和在Jenkins上公布单元测试报告。
(4)上传构建的artifacts,并附加一些相关的属性信息。
持续集成的目的就是把持续构建、测试(单元测试和集成测试),静态代码性能分析,和上传构建的artifacts到二进制库,这个过程是完全自动化的。 并且报告每一步是否成功或者失败。
1.3 持续集成工具集下面是持续集成的要用到的工具
| Technology | Characteristic |
|---|---|
| Java | Primary programming language used for coding |
| Maven | Build tool |
| Junit | Unit testing and integration testing tools |
| Jenkins | Continuous Integration tool |
| GitHub | Version control system |
| SoanrQube | Static code analysis tool |
| Artifactory | Binary repository mananger |
二 构建一个集成管道
创建执行集成管道,将会执行下面步骤:
- 在GitHub上创建源代码库
- 创建Jenkinsfile去描述构建、单元测试、静态代码分析、集成测试、和上分布到构建的二进制文件到Artifactory.
- 利用Docker去产生构建的agents去运行我们的持续集成管道。
- 在jenkins中创建多分支的管道。
2.1 node块
本实验依然使用master构建
node('master'){
}
并且将会在master的节点上执行以下步骤:
- 执行构建
- 执行单元测试并推送单元测试报告
- 执行代码分析并把它的结果上传到SonarQube
- 执行集成测试并把发布集成测试报告
- 推送artifacts到Artifactory
2.2 获取源代码
从版本控制器中下载最新的源代码,代码如下
stage(‘Poll’) {

scm checkout

}
2.3 管道代码去执行构建和单元测试
sh ‘mvn clean verify -DskipITs=true’;

junit ‘**/target/surefire-reports/TEST-.xml’

archive ‘target/.jar’
-DskipITs=ture代表跳过集成测试仅执行构建和单元测试,junit ‘/target/surefire-reports/TEST-*.xml’ 命令是开启Jenkins去公布单元测试报告,‘/target/surefire-reports/TEST-*.xml’ 此处存放的是单元测试报告所存在的目录位置。
管道代码去执行静态代码分析
通过运行Maven的命令,就是一个简单的shell脚本去执行静态代码的分析,这是使用针对maven的SonarQube scanner工具来进行配置的。
sh ‘mvn clean verify sonar:sonar -Dsonar.projectName=example-project
-Dsonar.projectKey=example-project -Dsonar.projectVersion=$BUILD_NUMBER’;
-Dsonar.projectName=example-project 这是传送给SonarQube项目名称的一个选项,测试的所有结果将会显示在projectName=example-project下
相似的-Dsonar.projectKey=example-project,这个选项是针对Maven的SonarQube Sanner去确认projectkey=example-project
-Dsonar.projectVersion=$BUILD_NUMBER这个选项是指关联到Jenkins的构建分析的号码,并把它上传到SonarQube。$BUILD_NUMBER是针对构建序列的环境变量。
2.4 静态代码分析
stage('Static Code Analysis'){

    sh 'mvn clean verify sonar:sonar -Dsonar.host.url=http://192.168.132.133:9000 -Dsonar.login=278c0c5ddadca63754f0fa9ce50ba99c20214fb5';

  }
管道代码去执行集成测试
-Dsurefire.skip=true是跳过单元测试,仅执行集成测试的junit ‘/target/failsafe-reports/TEST-*.xml’ 命令是开启jenkins去发布Junit unit 测试报告到Jenkins管道页面。/target/failsafe-reports/TEST-*.xml 这是产生的集成报告所在的目录。
集成测试阶段所包含的代码如下:
stage (‘Integration Test’){

sh ‘mvn clean verify -Dsurefire.skip=true’;

junit ‘**/target/failsafe-reports/TEST-*.xml’

archive ‘target/*.jar’

}
注意:针对单元测试和集成测试必须安装Jenkins Junit Plugin.
2.5 管道代码去发布构建的artifacts到Artifactory
去上传构建的artifacts到Artifactory,使用是File Specs。代码如下
“files”: [

{

“pattern”: “[Mandatory]”,

“target”: “[Mandatory]”,

“props”: “[Optional]”,

“recursive”: “[Optional, Default: ‘true’]”,

“flat” : “[Optional, Default: ‘true’]”,

“regexp”: “[Optional, Default: ‘false’]”

}

]
上面各参数的代码解释:
| Parameters | Condition | Description |
|---|---|---|
| pattern | [Mandatory] | 指定应该上传到Artifactory的本地artifacts的的路径,可以通过反掩码或者正则表达式指定多个artifacts,假如使用正则表达式,需要使用\逃义保留的字符(比如.,?等,从版本2.9.0之后所有的路径分隔符均以/进行分隔,包含winows系统 |
| target | [Mandatory] | 指定artifactory目录的路径,格式:[repository_name]/[repository_path],假如模式的如何是以/结尾,那么b就会被认为是目录。假如repo-name/a/b,那么上传的文件就会以b在artifactory命名,上传路径建议使用{1},{2},{3}…这样代替,具体参考(https://www.jfrog.com/confluence/display/RTF/Using+File+Specs#UsingFileSpecs-UsingPlaceholders). |
| Props | [Optional] | 是以Key=value的方式指定上传属性的值,如果有多个值,用,分隔。如 key1=value1;key2=value21,value22;key3=value3 |
| flat | [Default:true] | 假如指定为true,那么上传的artifactory里面的源系统文件层级就会被忽略,设置为true,才会保留源系统的文件层级 |
| recursive | [Default:true] |如果为true,那么artifacts将会收集上传源目录的子目录,如果为faluse,仅会指定的源目录会被上传 | |
| regexp | [Default:false] | 命令将会依据模式进行解释,就是正则表达式不会生效。如果为false,将会依正则表达式进行解释 |
下面是File Specs代码示例:
def server = Artifactory.server 'Default Artifactory server'

    def uploadSpec = """{

      "files": [

        {

          "pattern": "target/hello-0.0.1.war",

          "target": "example-project/${BUILD_NUMBER}/",

          "props": "Integration-Tested=Yes;Performance-Tested=No"

        }

      ]

    }"""
下面是对代码的解释:
| Parameters | Description |
|---|---|
| def server = Artifactory.server ‘Default Artifactory Server’ | This line tells Jenkins to use the existing Artifactory server configured in Jenkins. In our example, it is the default Artifactory server. |
| Default Artifactory Server | This is the name of the Artifactory server configured inside Jenkins |
| “pattern”: “target/hello-0.0.1.war” | This line of code will look at a file named hello-0.0.1.war inside the directory target, which is again inside the Jenkins workspace directory |
| “target”: “example-project/${BUILD_NUMBER}/”, | This line of code will try to upload the build artifacts to the Artifactory repository named helloworld-greeting-project. It will place the inside a folder named after the build number inside the Artifactory repository. |
| ${BUILD_NUMBER} | The Jenkins environment variable for the build number. |
| “props”: “Integration-Tested=Yes;Performance-Testd=No” | This code creates two key-value paris and assigns them to the uploaded artifacts. These key-value paris can be used as labels for code promotion in Artifactory |
2.6 合并pipeline代码
node('master') {

  stage('Poll') {

    checkout scm

  }

  stage('Build & Unit test'){

    sh 'mvn clean verify -DskipITs=true';

    junit '**/target/surefire-reports/TEST-*.xml'

    archive 'target/*.jar'

  }

  stage('Static Code Analysis'){

    sh 'mvn clean verify sonar:sonar -Dsonar.host.url=http://192.168.132.133:9000 -Dsonar.login=278c0c5ddadca63754f0fa9ce50ba99c20214fb5';

  }

  stage ('Integration Test'){

    sh 'mvn clean verify -Dsurefire.skip=true';

    junit '**/target/failsafe-reports/TEST-*.xml'

    archive 'target/*.jar'

  }

  stage ('Publish'){

    def server = Artifactory.server 'Default Artifactory server'

    def uploadSpec = """{

      "files": [

        {

          "pattern": "target/hello-0.0.1.war",

          "target": "example-project/${BUILD_NUMBER}/",

          "props": "Integration-Tested=Yes;Performance-Tested=No"

        }

      ]

    }"""

    server.upload(uploadSpec)

  }

}
三 jenkins流水线任务
3.1 添加一个pipeline的任务

3.2 流水线配置
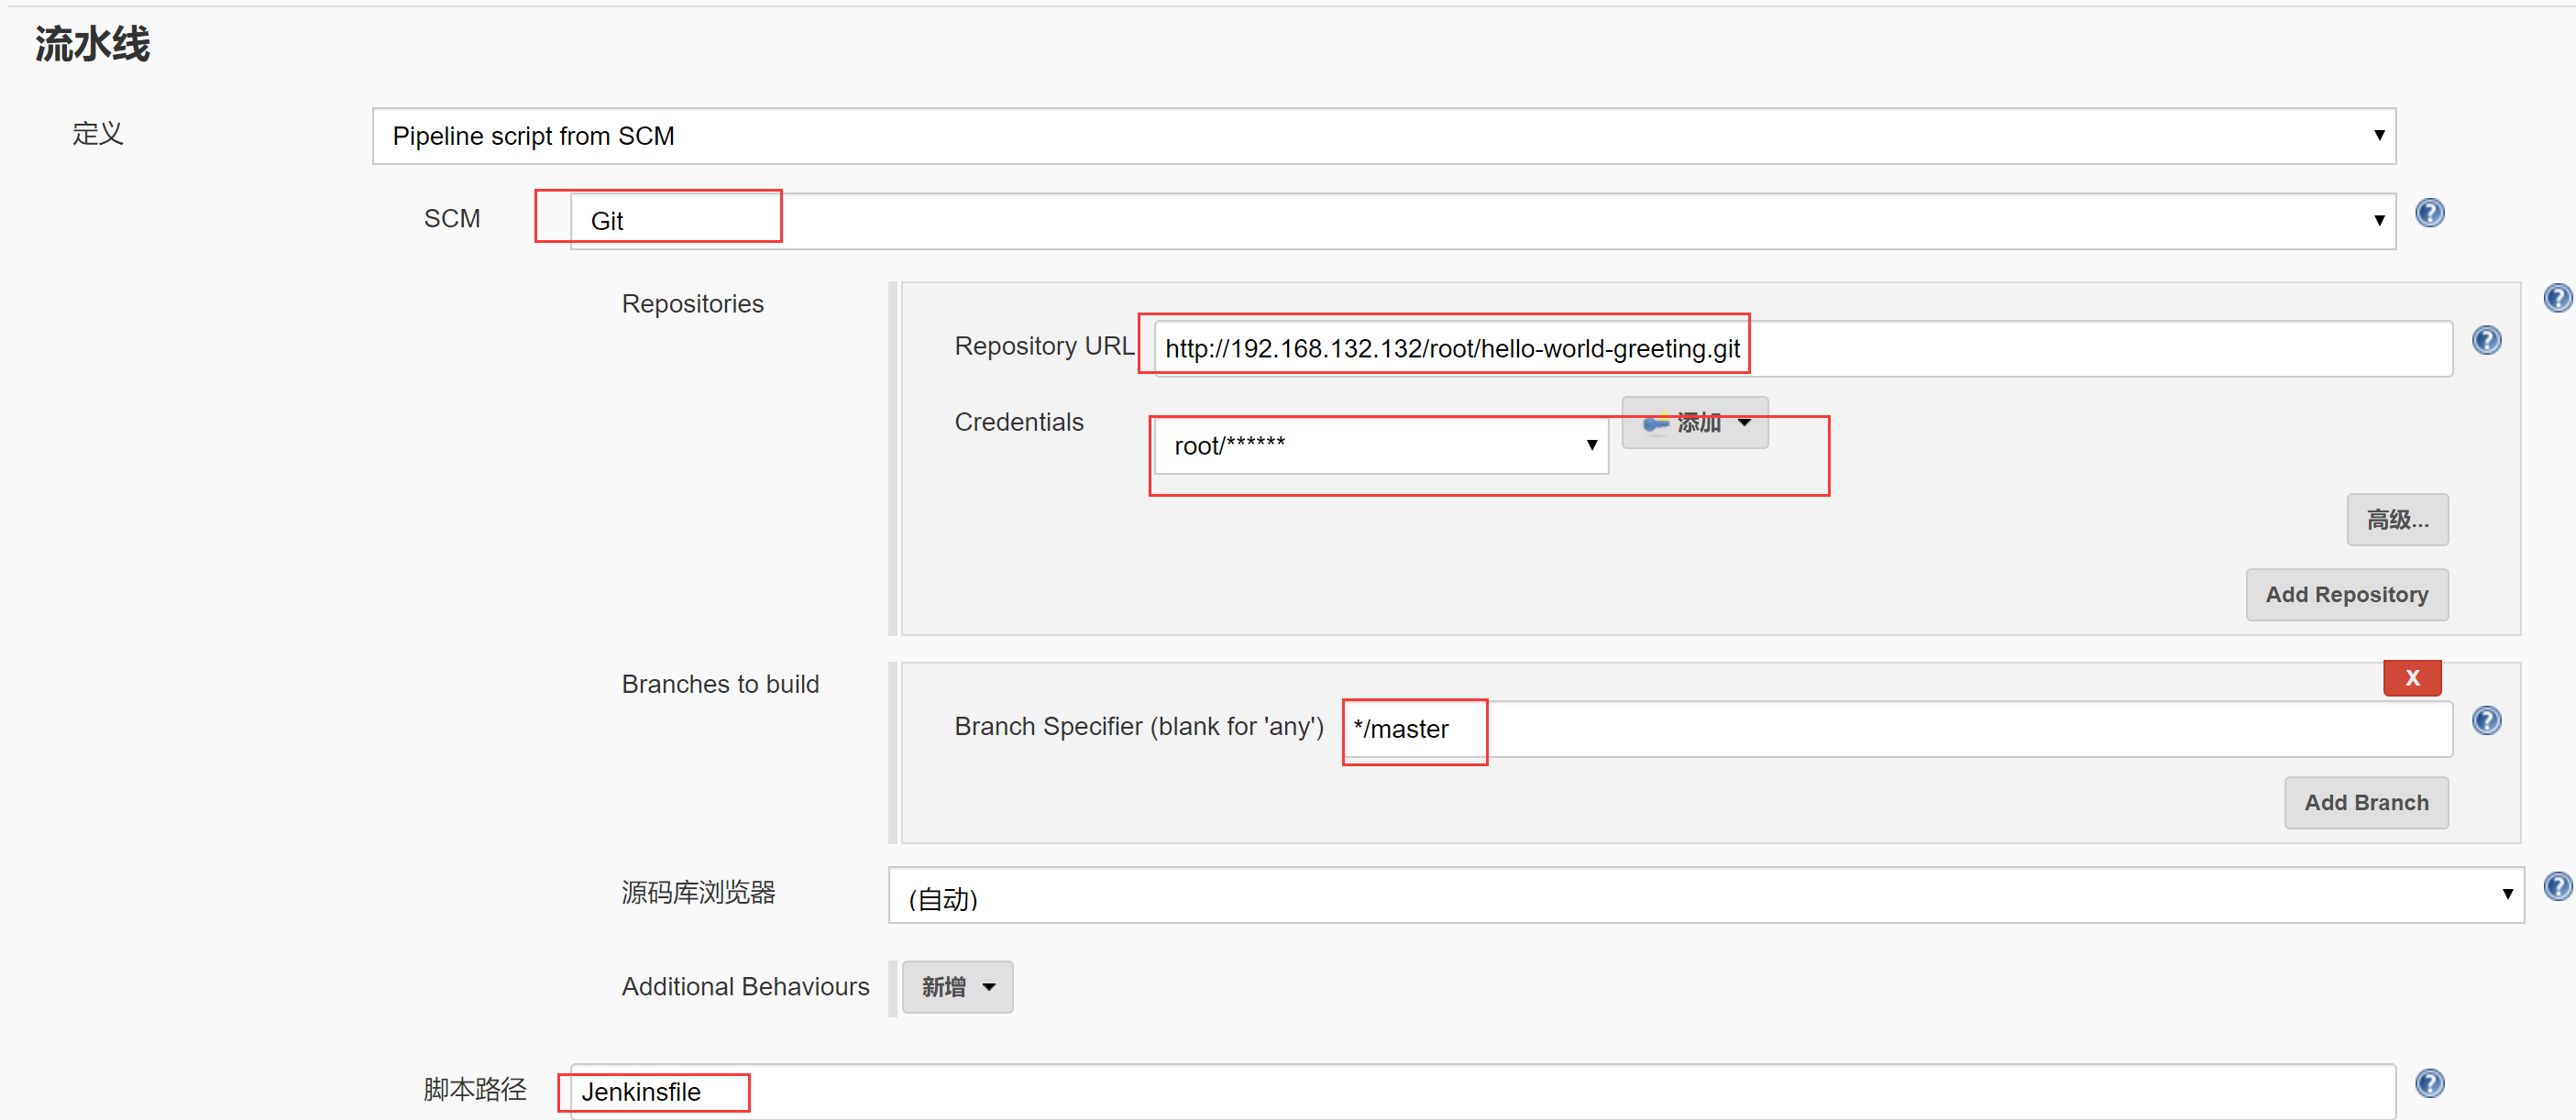
3.3 尝试构建

第一次构建失败
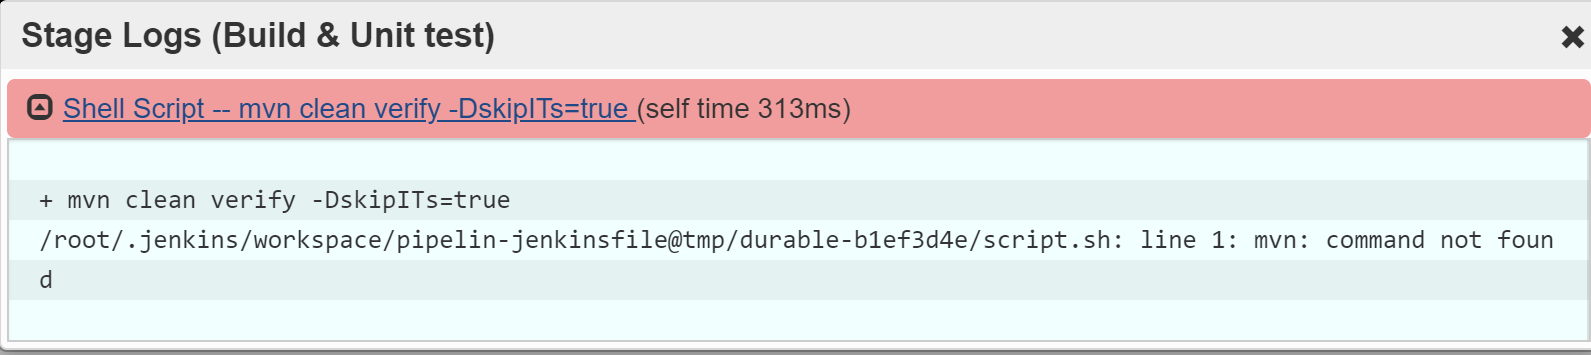
没有mvn命令,是因为master节点上,没有安装mvn工具,同时在jenkinsfile也没有使用参数调用mvn
直接安装一个mvn
3.4 再次构建

成功
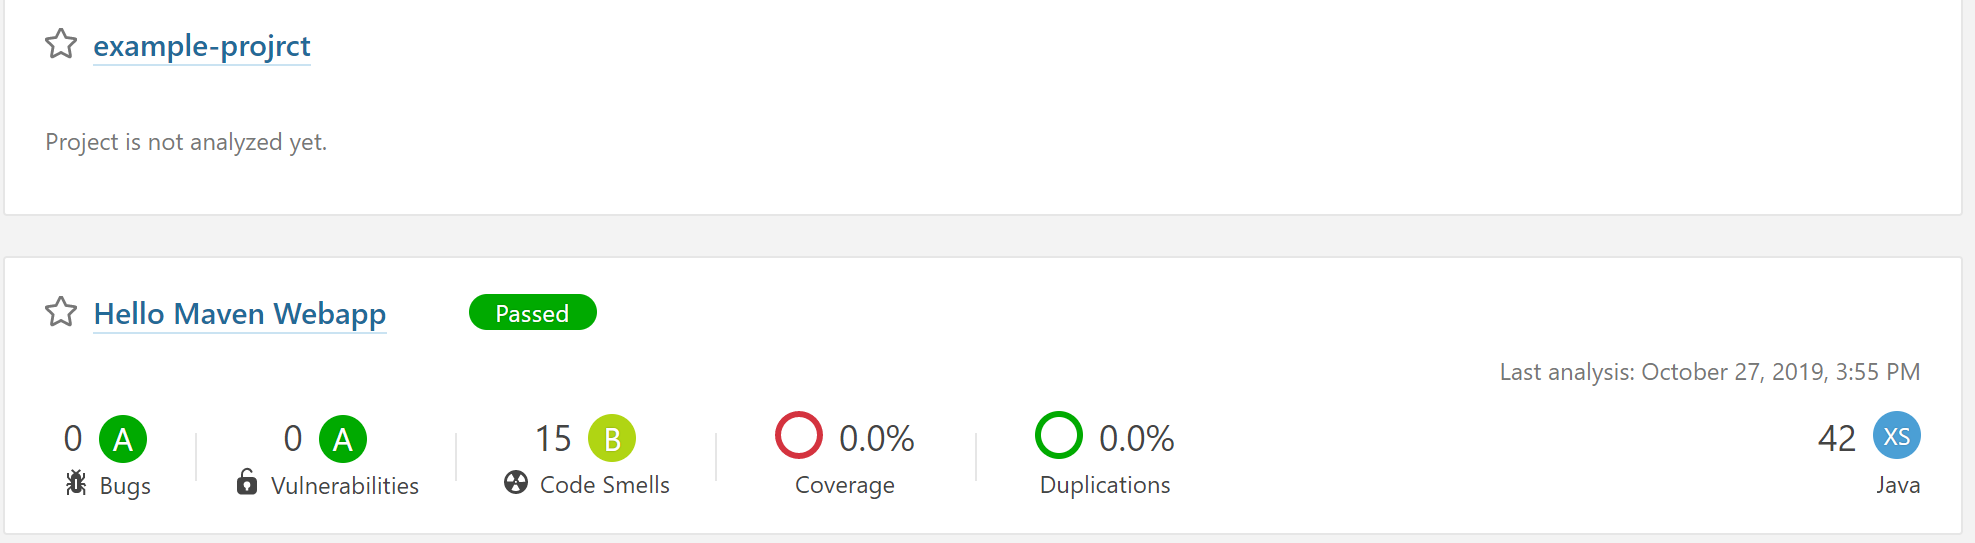
3.5 查看sonar
3.7 查看artifcatory
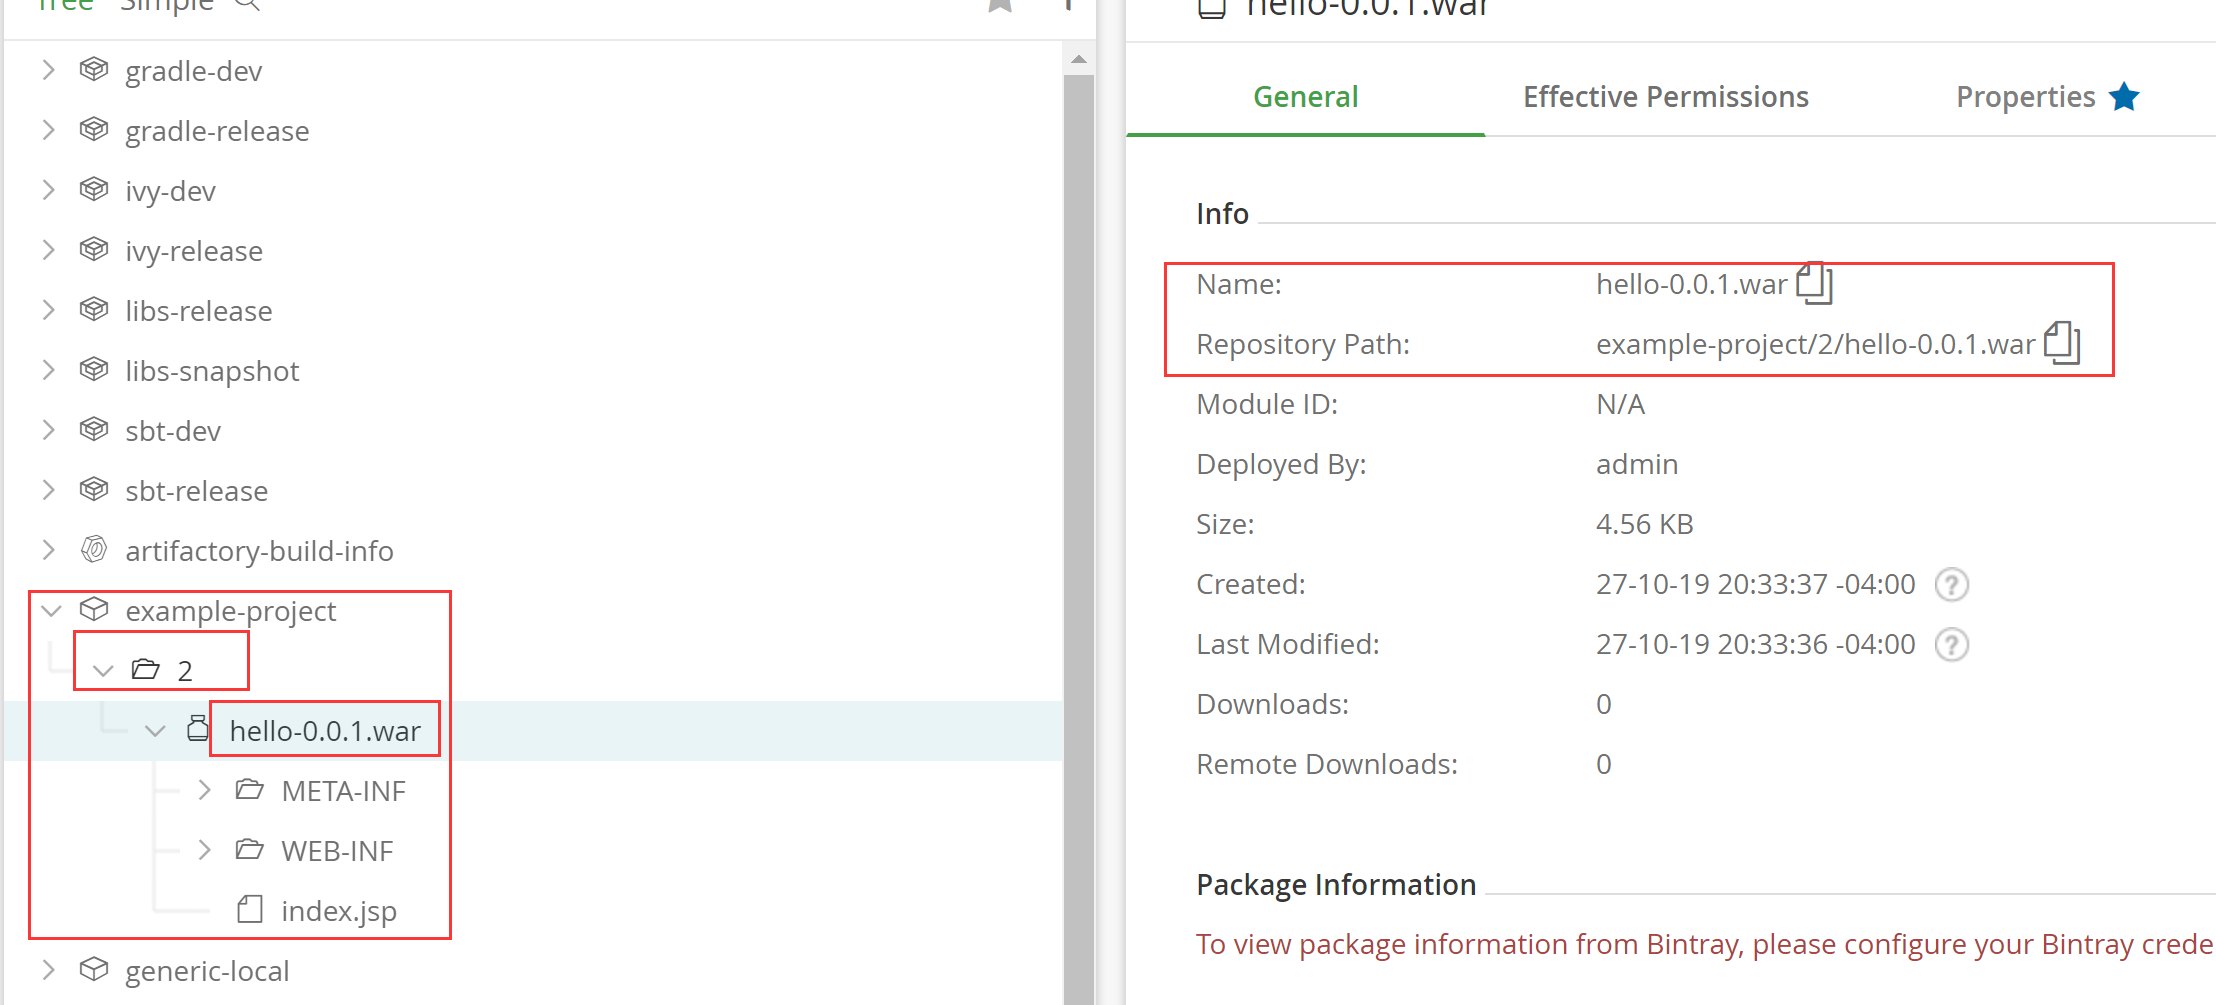
构建的管道基本满足实验要求
3.8 查看日志
Started by user darren ning

Obtained Jenkinsfile from git http://192.168.132.132/root/hello-world-greeting.git

Running in Durability level: MAX_SURVIVABILITY

[Pipeline] Start of Pipeline

[Pipeline] node

Running on Jenkins in /root/.jenkins/workspace/pipelin-jenkinsfile

[Pipeline] {

[Pipeline] stage

[Pipeline] { (Poll)

[Pipeline] checkout

using credential e3e48ed7-dbce--bb18-28e0c71ab962

 > git rev-parse --is-inside-work-tree # timeout=

Fetching changes from the remote Git repository

 > git config remote.origin.url http://192.168.132.132/root/hello-world-greeting.git # timeout=10

Fetching upstream changes from http://192.168.132.132/root/hello-world-greeting.git

 > git --version # timeout=

using GIT_ASKPASS to set credentials

 > git fetch --tags --progress http://192.168.132.132/root/hello-world-greeting.git +refs/heads/*:refs/remotes/origin/*

 > git rev-parse refs/remotes/origin/master^{commit} # timeout=

 > git rev-parse refs/remotes/origin/origin/master^{commit} # timeout=

Checking out Revision d8a642e6869e108fcada44e0dd2de7b5e882fe1d (refs/remotes/origin/master)

 > git config core.sparsecheckout # timeout=

 > git checkout -f d8a642e6869e108fcada44e0dd2de7b5e882fe1d

Commit message: "Update Jenkinsfile"

 > git rev-list --no-walk d8a642e6869e108fcada44e0dd2de7b5e882fe1d # timeout=

[Pipeline] }

[Pipeline] // stage

[Pipeline] stage

[Pipeline] { (Build & Unit test)

[Pipeline] sh

+ mvn clean verify -DskipITs=true

[INFO] Scanning for projects...

[INFO]

[INFO] ------------------------------------------------------------------------

[INFO] Building Hello Maven Webapp 0.0.

[INFO] ------------------------------------------------------------------------

。。。。。。

[INFO] Changes detected - recompiling the module!

[INFO] Compiling  source files to /root/.jenkins/workspace/pipelin-jenkinsfile/target/classes

[INFO]

[INFO] --- maven-resources-plugin:2.5:testResources (default-testResources) @ hello ---

[debug] execute contextualize

[INFO] Using 'UTF-8' encoding to copy filtered resources.

[INFO] skip non existing resourceDirectory /root/.jenkins/workspace/pipelin-jenkinsfile/src/test/resources

[INFO]

[INFO] --- maven-compiler-plugin:3.3:testCompile (default-testCompile) @ hello ---

[INFO] Changes detected - recompiling the module!

[INFO] Compiling  source files to /root/.jenkins/workspace/pipelin-jenkinsfile/target/test-classes

[INFO]

[INFO] --- maven-surefire-plugin:2.19:test (default-test) @ hello ---

。。。。。。。

-------------------------------------------------------

 T E S T S

-------------------------------------------------------

Running hello.DateTimeTest

Tests run: , Failures: , Errors: , Skipped: , Time elapsed: 0.014 sec - in hello.DateTimeTest

Running hello.MessageTest

Tests run: , Failures: , Errors: , Skipped: , Time elapsed:  sec - in hello.MessageTest

Results :

Tests run: , Failures: , Errors: , Skipped:

[INFO]

[INFO] --- maven-war-plugin:2.1.:war (default-war) @ hello ---

[INFO] Packaging webapp

[INFO] Assembling webapp [hello] in [/root/.jenkins/workspace/pipelin-jenkinsfile/target/hello-0.0.]

[INFO] Processing war project

[INFO] Copying webapp resources [/root/.jenkins/workspace/pipelin-jenkinsfile/src/main/webapp]

[INFO] Webapp assembled in [ msecs]

[INFO] Building war: /root/.jenkins/workspace/pipelin-jenkinsfile/target/hello-0.0..war

[INFO] WEB-INF/web.xml already added, skipping

[INFO]

[INFO] --- maven-failsafe-plugin:2.19:integration-test (default) @ hello ---

[INFO] Tests are skipped.

[INFO]

[INFO] --- maven-failsafe-plugin:2.19:verify (default) @ hello ---

[INFO] Tests are skipped.

[INFO] ------------------------------------------------------------------------

[INFO] BUILD SUCCESS

[INFO] ------------------------------------------------------------------------

[INFO] Total time: .640s

[INFO] Finished at: Sun Oct  :: EDT

[INFO] Final Memory: 18M/159M

[INFO] ------------------------------------------------------------------------

[Pipeline] junit

Recording test results

[Pipeline] archive

The archive step is deprecated, please use archiveArtifacts instead.

No files found to archive for pattern "target/*.jar"; continuing.

[Pipeline] }

[Pipeline] // stage

[Pipeline] stage

[Pipeline] { (Static Code Analysis)

[Pipeline] sh

+ mvn clean verify sonar:sonar -Dsonar.host.url=http://192.168.132.133:9000 -Dsonar.login=278c0c5ddadca63754f0fa9ce50ba99c20214fb5

[INFO] Scanning for projects...、

。。。。。。

[INFO]

[INFO] ------------------------------------------------------------------------

[INFO] Building Hello Maven Webapp 0.0.

[INFO] ------------------------------------------------------------------------

[INFO]

[INFO] --- maven-clean-plugin:2.4.:clean (default-clean) @ hello ---

[INFO] Deleting /root/.jenkins/workspace/pipelin-jenkinsfile/target

[INFO]

[INFO] --- maven-resources-plugin:2.5:resources (default-resources) @ hello ---

[debug] execute contextualize

[INFO] Using 'UTF-8' encoding to copy filtered resources.

[INFO] skip non existing resourceDirectory /root/.jenkins/workspace/pipelin-jenkinsfile/src/main/resources

[INFO]

[INFO] --- maven-compiler-plugin:3.3:compile (default-compile) @ hello ---

[INFO] Changes detected - recompiling the module!

[INFO] Compiling  source files to /root/.jenkins/workspace/pipelin-jenkinsfile/target/classes

[INFO]

[INFO] --- maven-resources-plugin:2.5:testResources (default-testResources) @ hello ---

[debug] execute contextualize

[INFO] Using 'UTF-8' encoding to copy filtered resources.

[INFO] skip non existing resourceDirectory /root/.jenkins/workspace/pipelin-jenkinsfile/src/test/resources

[INFO]

[INFO] --- maven-compiler-plugin:3.3:testCompile (default-testCompile) @ hello ---

[INFO] Changes detected - recompiling the module!

[INFO] Compiling  source files to /root/.jenkins/workspace/pipelin-jenkinsfile/target/test-classes

[INFO]

[INFO] --- maven-surefire-plugin:2.19:test (default-test) @ hello ---

。。。。。。。

[INFO] User cache: /root/.sonar/cache

[INFO] SonarQube version: 6.7.

[INFO] Default locale: "en_US", source code encoding: "UTF-8"

[INFO] Publish mode

[INFO] Load global settings

[INFO] Load global settings (done) | time=420ms

[INFO] Server id: 8AB2C9A6-AWyV7Ii4gK-saCFcgAZW

[INFO] User cache: /root/.sonar/cache

[INFO] Load plugins index

[INFO] Load plugins index (done) | time=123ms

。。。。。

[INFO] BUILD SUCCESS

[INFO] ------------------------------------------------------------------------

[INFO] Total time: :.733s

[INFO] Finished at: Sun Oct  :: EDT

[INFO] Final Memory: 34M/218M

[INFO] ------------------------------------------------------------------------

[Pipeline] }

[Pipeline] // stage

[Pipeline] stage

[Pipeline] { (Integration Test)

[Pipeline] sh

+ mvn clean verify -Dsurefire.skip=true

[INFO] Scanning for projects...

[INFO]

[INFO] ------------------------------------------------------------------------

[INFO] Building Hello Maven Webapp 0.0.

。。。。。。。

[Pipeline] }

[Pipeline] // stage

[Pipeline] }

[Pipeline] // node

[Pipeline] End of Pipeline

Finished: SUCCESS
参考:https://edu.csdn.net/course/play/9051/188016 臧雪园老师视频课程
DEVOPS技术实践_12:创建持续集成的管道的更多相关文章
- [持续交付实践] 开篇:持续集成&持续交付综述
前言 随着微服务架构与容器虚拟化技术的发展,持续集成与持续交付的概念又重新回到了大家的视野,越来越多的公司开始使用持续集成的系统来解决频繁发布带来的质量问题:使用持续交付的工具来实现代码在不同环境上的 ...
- DEVOPS技术实践_13:使用Jenkins持续传送设计-CD基础
1. 分支策略 持续集成中使用的分支策略包括以下三个: The master branch The integration branch The feature branch 而CD只在Integra ...
- 使用 Visual Studio Team Services 和 IIS 创建持续集成管道
若要将应用程序开发的生成.测试和部署阶段自动化,可以使用持续集成和部署 (CI/CD) 管道. 本教程介绍如何在 Azure 中使用 Visual Studio Team Services 和 Win ...
- DEVOPS技术实践_05:sonar静态代码扫描
一.SonarQube静态代码扫描平台 1.1 安装 https://www.sonarqube.org/官网 1.2 下载软件包 https://www.sonarqube.org/download ...
- DEVOPS技术实践_09:Jenkins多分支管道
简介 多分支的管道是在jenkins2.x中新增的功能 . 多分支管道允许你针对分布式的控制器的每个分支创建一个管道. 下图是对它的一个描述.使用jenkinsfile去创建多分支的管道,jenkin ...
- DEVOPS技术实践_07:Jenkins 管道工作
一 简介 由于在公司构建很多工作,都是使用的maven工作构建的,这种构建方式很大缺点就是所有的工作都需要一步一步的配置,当项目较多,需求变动时,需要很大的精力去修改配置,很费劲 Pipeline即为 ...
- DEVOPS技术实践_11:Jenkins集成Sonar
前言 前面已经有介绍sonar的安装,简单应用,下面在简答的研究一下sonar和jenkins集成的简单使用,对于sonar的安装不做介绍 一 sonar的简单介绍 持续检查避免了低质量的代码,比如S ...
- DEVOPS技术实践_06:sonar与Jenksin集成
代码质量管理平台 一.checkout和打包功能 1.1 gitlab在新建一个文件 后续在写入内容 1.2 Jenkins新建一个任务 两个参数 1.3 流水线配置 copy仓库地址: http:/ ...
- DEVOPS技术实践_01:jenkins集成平台
一.准备环境 准备三台机器 角色 IP地址 用户名 密码 jenkins-master 172.25.254.130 admin meiyoumima gitlab 172.25.254 ...
随机推荐
- Android学习:导入工程时报错The import android cannot be resolved
今天在导入别人的工程时,出现了一个这个问题The import android cannot be resolved 就是找不到import android.support.v7.app.Action ...
- Java练习 SDUT-1200_汉诺塔
汉诺塔 Time Limit: 1000 ms Memory Limit: 65536 KiB Problem Description 汉诺塔(又称河内塔)问题是印度的一个古老的传说. 开天辟地的神勃 ...
- @codeforces - 618G@ Combining Slimes
目录 @description@ @solution@ @part - 0@ @part - 1@ @part - 2@ @part - 3@ @accepted code@ @details@ @d ...
- iptables 详细使用
检查状态 先检查是否安装了iptables $ service iptables status 安装iptables $ yum install iptables 升级iptables $ yum u ...
- SpringBoot 获取properties配置文件的属性
自定义properties文件获取属性 使用 @ConfigurationProperties((prefix = "demo")) 和 @PropertySource(" ...
- C++ 第四次作业 继承
继承 继承时从新的类从已有类那里得到新的特征.继承实现了代码的重用,极大地减少了代码量,同时通过新增成员,加入了自身的独有特性,达到了程序的扩充. 派生类继承了基类的全部数据类和除了构造函数.析构函数 ...
- poj 1039 Pipe (Geometry)
1039 -- Pipe 理解错题意一个晚上._(:з」∠)_ 题意很容易看懂,就是要求你求出从外面射进一根管子的射线,最远可以射到哪里. 正解的做法是,选择上点和下点各一个,然后对于每个折点位置竖直 ...
- SuperSocket性能数据采集的应用程序接口的改动
性能数据采集的应用程序接口作了修改,两个虚方法已经被更改: protected virtual void UpdateServerSummary(ServerSummary serverSummary ...
- 2009年NOIP普及组复赛题解
题目涉及算法: 多项式输出:模拟: 分数线划定:模拟.排序: 细胞分裂:质因数分解: 道路游戏:动态规划. 多项式输出 题目链接:https://www.luogu.org/problem/P1067 ...
- H3C 帧中继网络拓扑