ESP8266 HTTP 项目(1)在刻度盘上进行ESP8266 NodeMCU模拟读取的步骤
https://circuits4you.com/2018/02/03/esp8266-nodemcu-adc-analog-value-on-dial-gauge/
ESP8266(NodeMCU)ADC表盘上的模拟值
这是它使用JavaScripts,ESP8266,CSS和HTML知识的高级教程。在此示例中,我们正在读取ADC的模拟值并将其显示在HTML网页上,该网页由ESP8266或NodeMCU Web服务器提供。要获得有关ESP8266中基本HTML页面创建的更多详细信息,请阅读此内容。
ESP8266只有一个adc频道。让我们开始阅读模拟并做一些很酷的事情
在刻度盘上进行ESP8266 NodeMCU模拟读取的步骤
步骤1:编写ESP NodeMCU代码,如下所示
此代码在ESP上创建Web服务器并连接到给定的wifi网络配置。根据您的wifi网络更改WiFi配置
代码分为多个部分让我们来了解什么是什么?
1.连接到WiFi网络
|
1
2
3
4
5
6
7
8
9
10
11
12
13
14
15
16
|
//Connect to wifi Network
WiFi.begin(ssid, password); //Connect to your WiFi router
Serial.println("");
// Wait for connection
while (WiFi.status() != WL_CONNECTED) {
delay(500);
Serial.print(".");
}
//If connection successful show IP address in serial monitor
Serial.println("");
Serial.print("Connected to ");
Serial.println(ssid);
Serial.print("IP address: ");
Serial.println(WiFi.localIP()); //IP address assigned to your ESP
|
2.在onRoot,onNotFound上创建Web服务器,最后读取ADC
Server Initializer有关此内容的更多信息,请参见此处
|
1
2
3
4
5
|
//Initialize Webserver
server.on("/",handleRoot);
server.on("/getADC",handleADC); //Reads ADC function is called from out index.html
server.onNotFound(handleWebRequests); //Set setver all paths are not found so we can handle as per URI
server.begin();
|
Web服务器主页位于root上。notFound Handler执行诸如向客户端发送javascripts,jQuery和Css文件之类的任务。 ESP重定向在这里解释
|
1
2
3
4
5
6
7
8
9
10
11
12
13
14
15
16
|
void handleWebRequests(){
if(loadFromSpiffs(server.uri())) return;
String message = "File Not Detected\n\n";
message += "URI: ";
message += server.uri();
message += "\nMethod: ";
message += (server.method() == HTTP_GET)?"GET":"POST";
message += "\nArguments: ";
message += server.args();
message += "\n";
for (uint8_t i=0; i<server.args(); i++){
message += " NAME:"+server.argName(i) + "\n VALUE:" + server.arg(i) + "\n";
}
server.send(404, "text/plain", message);
Serial.println(message);
}
|
上面的代码实际上首先解码未找到的URL,然后将这些参数传递给spiffs loader。ESP8266 SPIFFS在这里解释
|
1
2
3
4
5
6
7
8
9
10
11
12
13
14
15
16
17
18
19
20
21
22
23
24
|
bool loadFromSpiffs(String path){
String dataType = "text/plain";
if(path.endsWith("/")) path += "index.htm";
if(path.endsWith(".src")) path = path.substring(0, path.lastIndexOf("."));
else if(path.endsWith(".html")) dataType = "text/html";
else if(path.endsWith(".htm")) dataType = "text/html";
else if(path.endsWith(".css")) dataType = "text/css";
else if(path.endsWith(".js")) dataType = "application/javascript";
else if(path.endsWith(".png")) dataType = "image/png";
else if(path.endsWith(".gif")) dataType = "image/gif";
else if(path.endsWith(".jpg")) dataType = "image/jpeg";
else if(path.endsWith(".ico")) dataType = "image/x-icon";
else if(path.endsWith(".xml")) dataType = "text/xml";
else if(path.endsWith(".pdf")) dataType = "application/pdf";
else if(path.endsWith(".zip")) dataType = "application/zip";
File dataFile = SPIFFS.open(path.c_str(), "r");
if (server.hasArg("download")) dataType = "application/octet-stream";
if (server.streamFile(dataFile, dataType) != dataFile.size()) {
}
dataFile.close();
return true;
}
|
一旦你知道了所有编程技术,我们就可以转向实际的编程。
最终完整代码
将此代码复制并粘贴到arduino中。然后上传它
ESP8266(NodeMCU)ADC表盘上的模拟值

2018年2月3日ESP8266 esp,html,Javascript,NodeMCU,web服务器

这是它使用JavaScripts,ESP8266,CSS和HTML知识的高级教程。在此示例中,我们正在读取ADC的模拟值并将其显示在HTML网页上,该网页由ESP8266或NodeMCU Web服务器提供。要获得有关ESP8266中基本HTML页面创建的更多详细信息,请阅读此内容。

ESP8266只有一个adc频道。让我们开始阅读模拟并做一些很酷的事情

ESP8266-模拟读数表盘

在刻度盘上进行ESP8266 NodeMCU模拟读取的步骤

步骤1:编写ESP NodeMCU代码,如下所示

此代码在ESP上创建Web服务器并连接到给定的wifi网络配置。根据您的wifi网络更改WiFi配置

代码分为多个部分让我们来了解什么是什么?

1.连接到WiFi网络

  //Connect to wifi Network

  WiFi.begin(ssid, password);     //Connect to your WiFi router

  Serial.println("");

  // Wait for connection

  while (WiFi.status() != WL_CONNECTED) {

    delay(500);

    Serial.print(".");

  }

  //If connection successful show IP address in serial monitor

  Serial.println("");

  Serial.print("Connected to ");

  Serial.println(ssid);

  Serial.print("IP address: ");

  Serial.println(WiFi.localIP());  //IP address assigned to your ESP

1

2

3

4

5

6

7

8

9

10

11

12

13

14

15

16

  //Connect to wifi Network

  WiFi.begin(ssid, password);     //Connect to your WiFi router

  Serial.println("");

  // Wait for connection

  while (WiFi.status() != WL_CONNECTED) {

    delay(500);

    Serial.print(".");

  }

  //If connection successful show IP address in serial monitor

  Serial.println("");

  Serial.print("Connected to ");

  Serial.println(ssid);

  Serial.print("IP address: ");

  Serial.println(WiFi.localIP());  //IP address assigned to your ESP

2.在onRoot,onNotFound上创建Web服务器,最后读取ADC

Server Initializer有关此内容的更多信息,请参见此处

  //Initialize Webserver

  server.on("/",handleRoot);

  server.on("/getADC",handleADC); //Reads ADC function is called from out index.html

  server.onNotFound(handleWebRequests); //Set setver all paths are not found so we can handle as per URI

  server.begin();

1

2

3

4

5

  //Initialize Webserver

  server.on("/",handleRoot);

  server.on("/getADC",handleADC); //Reads ADC function is called from out index.html

  server.onNotFound(handleWebRequests); //Set setver all paths are not found so we can handle as per URI

  server.begin();

Web服务器主页位于root上。notFound Handler执行诸如向客户端发送javascripts,jQuery和Css文件之类的任务。  ESP重定向在这里解释

void handleWebRequests(){

  if(loadFromSpiffs(server.uri())) return;

  String message = "File Not Detected\n\n";

  message += "URI: ";

  message += server.uri();

  message += "\nMethod: ";

  message += (server.method() == HTTP_GET)?"GET":"POST";

  message += "\nArguments: ";

  message += server.args();

  message += "\n";

  for (uint8_t i=0; i<server.args(); i++){

    message += " NAME:"+server.argName(i) + "\n VALUE:" + server.arg(i) + "\n";

  }

  server.send(404, "text/plain", message);

  Serial.println(message);

}

1

2

3

4

5

6

7

8

9

10

11

12

13

14

15

16

void handleWebRequests(){

  if(loadFromSpiffs(server.uri())) return;

  String message = "File Not Detected\n\n";

  message += "URI: ";

  message += server.uri();

  message += "\nMethod: ";

  message += (server.method() == HTTP_GET)?"GET":"POST";

  message += "\nArguments: ";

  message += server.args();

  message += "\n";

  for (uint8_t i=0; i<server.args(); i++){

    message += " NAME:"+server.argName(i) + "\n VALUE:" + server.arg(i) + "\n";

  }

  server.send(404, "text/plain", message);

  Serial.println(message);

}

上面的代码实际上首先解码未找到的URL,然后将这些参数传递给spiffs loader。ESP8266 SPIFFS在这里解释

bool loadFromSpiffs(String path){

  String dataType = "text/plain";

  if(path.endsWith("/")) path += "index.htm";

  if(path.endsWith(".src")) path = path.substring(0, path.lastIndexOf("."));

  else if(path.endsWith(".html")) dataType = "text/html";

  else if(path.endsWith(".htm")) dataType = "text/html";

  else if(path.endsWith(".css")) dataType = "text/css";

  else if(path.endsWith(".js")) dataType = "application/javascript";

  else if(path.endsWith(".png")) dataType = "image/png";

  else if(path.endsWith(".gif")) dataType = "image/gif";

  else if(path.endsWith(".jpg")) dataType = "image/jpeg";

  else if(path.endsWith(".ico")) dataType = "image/x-icon";

  else if(path.endsWith(".xml")) dataType = "text/xml";

  else if(path.endsWith(".pdf")) dataType = "application/pdf";

  else if(path.endsWith(".zip")) dataType = "application/zip";

  File dataFile = SPIFFS.open(path.c_str(), "r");

  if (server.hasArg("download")) dataType = "application/octet-stream";

  if (server.streamFile(dataFile, dataType) != dataFile.size()) {

  }

  dataFile.close();

  return true;

}

1

2

3

4

5

6

7

8

9

10

11

12

13

14

15

16

17

18

19

20

21

22

23

24

bool loadFromSpiffs(String path){

  String dataType = "text/plain";

  if(path.endsWith("/")) path += "index.htm";

  if(path.endsWith(".src")) path = path.substring(0, path.lastIndexOf("."));

  else if(path.endsWith(".html")) dataType = "text/html";

  else if(path.endsWith(".htm")) dataType = "text/html";

  else if(path.endsWith(".css")) dataType = "text/css";

  else if(path.endsWith(".js")) dataType = "application/javascript";

  else if(path.endsWith(".png")) dataType = "image/png";

  else if(path.endsWith(".gif")) dataType = "image/gif";

  else if(path.endsWith(".jpg")) dataType = "image/jpeg";

  else if(path.endsWith(".ico")) dataType = "image/x-icon";

  else if(path.endsWith(".xml")) dataType = "text/xml";

  else if(path.endsWith(".pdf")) dataType = "application/pdf";

  else if(path.endsWith(".zip")) dataType = "application/zip";

  File dataFile = SPIFFS.open(path.c_str(), "r");

  if (server.hasArg("download")) dataType = "application/octet-stream";

  if (server.streamFile(dataFile, dataType) != dataFile.size()) {

  }

  dataFile.close();

  return true;

}

一旦你知道了所有编程技术,我们就可以转向实际的编程。

最终完整代码

将此代码复制并粘贴到arduino中。然后上传它
上传程序后等待你需要做更多的事情
第2步:将网页和jQuery,Javascripts和CSS上传到ESP8266 NodeMCU闪存
为此,请在草图文件夹中创建名为“ data”的文件夹,即保存上述.ino文件的位置。然后下载并解压缩这些文件ESP8266-analog-gauge-data。
文件夹结构是带有数据文件夹的.ino文件。在数据文件夹中,您有这些文件index.html,style.css,jQuery.min.js,d3-gauge.js。
不将这些文件上传到ESP8266 NodeMCU Flash文件系统。这个怎么做 ?阅读此处加载文件需要一些时间。
第3步:测试
假设您已上传程序和SPIFFS文件。打开串行监视器并重置ESP。您将获得IP地址,在Web浏览器中打开它。确保您的ESP和笔记本电脑在同一网络中
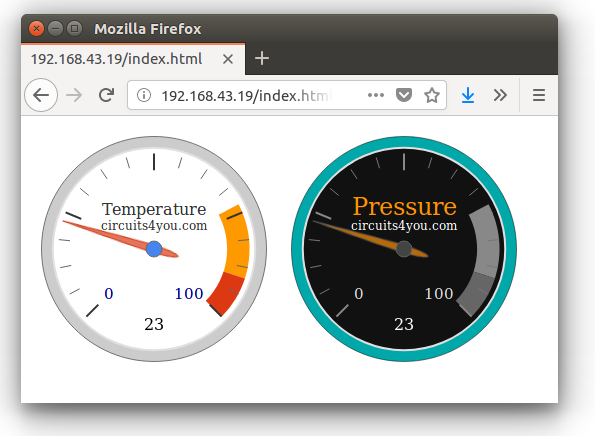
你会得到漂亮的界面。正如我们在开始时所展示的那样。
ESP8266 HTTP 项目(1)在刻度盘上进行ESP8266 NodeMCU模拟读取的步骤的更多相关文章
- Android项目,从web上取下汉字,中文部分乱码
Android项目,从web上取下汉字,中文部分乱码. 常见问题,搜索一下,网上有很多办法解决.如果还没有试过这个办法,可以尝试一下. BufferedReader in = new Buffered ...
- 如何部署Java_web项目到云服务器上
步骤 1:购买 Linux 实例(略) 步骤2:安装JDK 本节介绍如何安装java jdk. 软件包中包含的软件及版本如下: Tomcat:1.8.0_121 说明:这是写文档时参考的软件版本.您下 ...
- javaWeb开发中关于eclipse等ide重新部署或重启项目等原因造成上传文件丢失问题解决方案
在开发项目时,有时候需要用到上传功能,比如头像上传等,其文件会保存到服务器中.但是我发现在用eclipse做项目的过程中,每次重新部署项目,原来上传的文件就会丢失. 其原因是因为每次项目修改后,ecl ...
- Springboot项目如何把项目运行在服务器上
作为一个开发者,不可避免的要把本地项目变成可以接入外网的上线项目,今天来记录下springboot框架下如果把项目打包放在服务器上运行 第一步,首先要买个服务器,这个一般甲方会提供 第二步,导入jar ...
- 用eclipse怎样将本地的项目打成jar包上传到maven仓库
使用maven的项目中,有时需要把本地的项目打成jar包上传到mevan仓库. 操作如下: 前提:pom文件中配置好远程库的地址,否则会报错 1.将maven 中的settings文件配置好用户名和密 ...
- git操作+一个本地项目推到github上+注意
git init 创建新文件夹,打开,然后执行以创建新的 git 仓库. git config --global user.name "xxx" git config --glob ...
- 将项目添加到服务上时报web modules的错误
将项目添加到服务上时报web modules的错误如下图: 这是tomcat的版本和web modules的版本不支持造成的,如果在如下地方修改不了: 这时候就要在项目的根目录修改如下图: 用工具打开 ...
- 把项目挂载到composer上
1.打开composer的安装包列表网站,点击submit 2.把刚才初始化了composer的项目push到github上(至于怎么push,最简单就是用git了) 3.然后把github的网址复制 ...
- 微服务开发有道之把项目迁移到Kubernetes上的5个小技巧
我们将在本文中提供5个诀窍帮你将项目迁移到Kubernetes上,这些诀窍来源于过去12个月中OpenFaas社区的经验.下文的内容与Kubernetes 1.8兼容,并且已经应用于OpenFaaS ...
随机推荐
- linux 下修改mysql下root 权限来允许远程连接
MySQL默认只允许root帐户在本地登录,如果要在其它机器上连接mysql,必须修改root允许远程连接. 其操作简单,如下所示: 1. 进入mysql: /usr/local/mysql/bin/ ...
- crontab命令行和日志查看
1.基本命令行模式 注意:非root用户 systemctl restart crond 失效,请使用最底层的驱动重启 2.crontab日志 cron日志保存在系统目录/var/log/cron 命 ...
- thinkphp 3.2 去除调试模式后报错,怎么解决
1.案例一: 最近用ThinkPHP开发一个项目,本地开发测试完成上传到服务器后,第一次打开正常,再刷新页面时就出现 “页面调试错误,无法找开页面,请重试”的错误. 我就郁闷啦,明明本地设置defin ...
- vue2+webpack 移动生态 常用依赖
1.脚手架:官方的vue-cli已经很方便了 2.路由:vue-router : https://router.vuejs.org/zh-cn/essentials/named-routes.html ...
- 真实世界的脉络].(英)戴维.多伊奇.pdf
[真实世界的脉络].(英)戴维.多伊奇.pdf 宇宙.时间.生命.等等,如果用量子物理学.计算机科学.进化论.认识论将这些最基本而又复杂的问题纠缠在一起时,那将会是一幅什么样的图景呢?也许,我们穷尽一 ...
- 鼠标滑过侧边弹出内容(JS)
效果展示 实现原理 1. html结构: <div id="contain"> <span id="share">分享</span ...
- Java 开源博客 Solo 1.9.0 发布 - 新皮肤
这个版本主要是改进了评论模版机制,让大家更方便皮肤制作,并发布了一款新皮肤:9IPHP. Solo 是一款一个命令就能搭建好的 Java 开源博客系统,并内置了 15+ 套精心制作的皮肤.除此之外,S ...
- 直接插入排序算法的C++实现
直接插入算法:每趟将一个待排序的关键字按照其值的大小插入到已经排好的部分有序序列的适当位置上,直到所有待排序的关键字都被插入到有序序列中为止. 理论上,在直接插入排序中第二层循环是可以提前结束的,即某 ...
- Future FutrueTask Callable类源码说明以及原理使用
1.Future Callable FutureTask 源码说明 JDK内置的Future主要使用到了Callable接口和FutureTask类. Callable是类似于Runnable的接口, ...
- 2018-05-27-computer-using-hints-电脑使用帮助[持续更新]
layout: post title: 2018-05-27-computer-using-hints-电脑使用帮助 key: 20180527 tags: ubuntu cuda cudnn ten ...