Android中ListView结合CheckBox判断选中项
本文主要实现在自定义的ListView布局中加入CheckBox控件,通过判断用户是否选中CheckBox来对ListView的选中项进行相应的操作。通过一个Demo来展示该功能,选中ListView中的某一项,然后点击Button按钮来显示选中了哪些项。
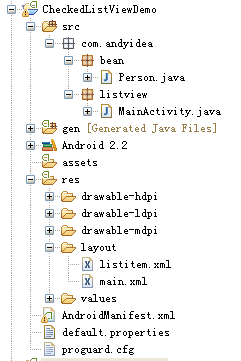
[1] 程序结构图如下:
listitem.xml:
<?xml version="1.0" encoding="utf-8"?>

<LinearLayout

  xmlns:android="http://schemas.android.com/apk/res/android"

  android:orientation="vertical"

  android:layout_width="fill_parent"

  android:layout_height="fill_parent">

  <LinearLayout

     android:layout_width="fill_parent"

     android:layout_height="wrap_content"

     android:orientation="horizontal"

     android:descendantFocusability="blocksDescendants">

      <CheckBox

         android:id="@+id/list.select"

         android:layout_width="wrap_content"

         android:layout_height="wrap_content"/>

      <TextView

         android:id="@+id/list.name"

         android:layout_width="fill_parent"

         android:layout_height="wrap_content"

         android:layout_weight="1"

         android:text="Name"

         android:layout_gravity="center"

         android:textSize="20dp"

         android:layout_marginLeft="10dp"/>

      <TextView

         android:id="@+id/list.address"

         android:layout_width="fill_parent"

         android:layout_height="wrap_content"

         android:layout_weight="1"

         android:text="Address"

         android:layout_gravity="center"

         android:textSize="20dp"/>

  </LinearLayout>

</LinearLayout>
main.xml:
<?xml version="1.0" encoding="utf-8"?>

<LinearLayout xmlns:android="http://schemas.android.com/apk/res/android"

    android:orientation="vertical"

    android:layout_width="fill_parent"

    android:layout_height="fill_parent">

    <Button

       android:id="@+id/show"

       android:layout_width="fill_parent"

       android:layout_height="wrap_content"

       android:text="Show"/>

    <ListView

       android:id="@+id/lvperson"

       android:layout_width="fill_parent"

       android:layout_height="fill_parent"/>

</LinearLayout>
Person.java:
package com.andyidea.bean;

public class Person {

    private String name;

    private String address;

    public String getName() {

        return name;

    }

    public void setName(String name) {

        this.name = name;

    }

    public String getAddress() {

        return address;

    }

    public void setAddress(String address) {

        this.address = address;

    }

}
MainActivity.java:
package com.andyidea.listview;

import java.util.ArrayList;

import java.util.HashMap;

import java.util.List;

import com.andyidea.bean.Person;

import android.app.Activity;

import android.app.AlertDialog;

import android.content.Context;

import android.os.Bundle;

import android.util.Log;

import android.view.LayoutInflater;

import android.view.View;

import android.view.ViewGroup;

import android.widget.BaseAdapter;

import android.widget.Button;

import android.widget.CheckBox;

import android.widget.ListView;

import android.widget.TextView;

public class MainActivity extends Activity {

    Button show;

    ListView lv;

    List<Person> persons = new ArrayList<Person>();

    Context mContext;

    MyListAdapter adapter;

    List<Integer> listItemID = new ArrayList<Integer>();

    /** Called when the activity is first created. */

    @Override

    public void onCreate(Bundle savedInstanceState) {

        super.onCreate(savedInstanceState);

        setContentView(R.layout.main);

        mContext = getApplicationContext();

        show = (Button)findViewById(R.id.show);

        lv = (ListView)findViewById(R.id.lvperson);

        initPersonData();

        adapter = new MyListAdapter(persons);

        lv.setAdapter(adapter);

        show.setOnClickListener(new View.OnClickListener() {

            @Override

            public void onClick(View v) {

                listItemID.clear();

                for(int i=0;i<adapter.mChecked.size();i++){

                    if(adapter.mChecked.get(i)){

                        listItemID.add(i);

                    }

                }

                if(listItemID.size()==0){

                    AlertDialog.Builder builder1 = new AlertDialog.Builder(MainActivity.this);

                    builder1.setMessage("没有选中任何记录");

                    builder1.show();

                }else{

                    StringBuilder sb = new StringBuilder();

                    for(int i=0;i<listItemID.size();i++){

                        sb.append("ItemID="+listItemID.get(i)+" . ");

                    }

                    AlertDialog.Builder builder2 = new AlertDialog.Builder(MainActivity.this);

                    builder2.setMessage(sb.toString());

                    builder2.show();

                }

            }

        });

    }

    /**

     * 模拟数据

     */

    private void initPersonData(){

        Person mPerson;

        for(int i=1;i<=12;i++){

            mPerson = new Person();

            mPerson.setName("Andy"+i);

            mPerson.setAddress("GuangZhou"+i);

            persons.add(mPerson);

        }

    }

    //自定义ListView适配器

    class MyListAdapter extends BaseAdapter{

        List<Boolean> mChecked;

        List<Person> listPerson;

        HashMap<Integer,View> map = new HashMap<Integer,View>();

        public MyListAdapter(List<Person> list){

            listPerson = new ArrayList<Person>();

            listlistPerson = list;

            mChecked = new ArrayList<Boolean>();

            for(int i=0;i<list.size();i++){

                mChecked.add(false);

            }

        }

        @Override

        public int getCount() {

            return listPerson.size();

        }

        @Override

        public Object getItem(int position) {

            return listPerson.get(position);

        }

        @Override

        public long getItemId(int position) {

            return position;

        }

        @Override

        public View getView(int position, View convertView, ViewGroup parent) {

            View view;

            ViewHolder holder = null;

            if (map.get(position) == null) {

                Log.e("MainActivity","position1 = "+position);

                LayoutInflater mInflater = (LayoutInflater) mContext

                        .getSystemService(Context.LAYOUT_INFLATER_SERVICE);

                view = mInflater.inflate(R.layout.listitem, null);

                holder = new ViewHolder();

                holder.selected = (CheckBox)view.findViewById(R.id.list_select);

                holder.name = (TextView)view.findViewById(R.id.list_name);

                holder.address = (TextView)view.findViewById(R.id.list_address);

                final int p = position;

                map.put(position, view);

                holder.selected.setOnClickListener(new View.OnClickListener() {

                    @Override

                    public void onClick(View v) {

                        CheckBox cb = (CheckBox)v;

                        mChecked.set(p, cb.isChecked());

                    }

                });

                view.setTag(holder);

            }else{

                Log.e("MainActivity","position2 = "+position);

                view = map.get(position);

                holder = (ViewHolder)view.getTag();

            }

            holder.selected.setChecked(mChecked.get(position));

            holder.name.setText(listPerson.get(position).getName());

            holder.address.setText(listPerson.get(position).getAddress());

            return view;

        }

    }

    static class ViewHolder{

        CheckBox selected;

        TextView name;

        TextView address;

    }

}
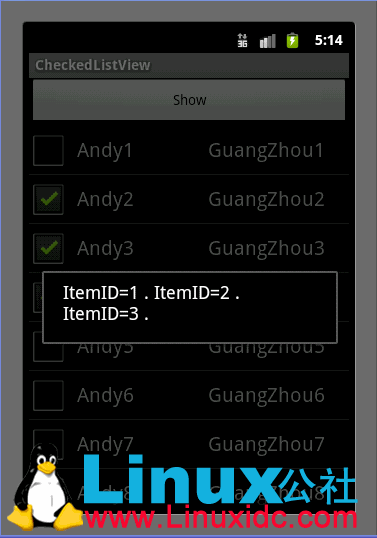
运行结果:
Android中ListView结合CheckBox判断选中项的更多相关文章
- Android中Listview点击item不变颜色以及设置listselector 无效
Android中Listview点击item不变颜色以及设置listselector 无效 这是同一个问题,Listview中点击item是会变颜色的,因为listview设置了默认的listsele ...
- Android中ListView控件的使用
Android中ListView控件的使用 ListView展示数据的原理 在Android中,其实ListView就相当于web中的jsp,Adapter是适配器,它就相当于web中的Servlet ...
- android中ListView控件&&onItemClick事件中获取listView传递的数据
http://blog.csdn.net/aben_2005/article/details/6592205 本文转载自:android中ListView控件&&onItemClick ...
- android中ListView点击和里边按钮点击不能同时生效问题解决
今天遇到一个问题:android中ListView点击和里边button点击不能同时生效问题解决. 原因是: listView 在开始绘制的时候,系统首先调用getCount()函数,根据他的返回值得 ...
- Android中ListView无法点击
Android中ListView无法点击 转自:http://xqjay19910131-yahoo-cn.iteye.com/blog/1319502 问题描述: ListView中Item加入 ...
- Android中 ListView 详解(二)
本文版权归 csdn noTice501 所有,转载请详细标明原作者及出处,以示尊重! 作者:noTice501 原文:http://blog.csdn.net/notice520/article/d ...
- android中listview分页载入数据
前段时间做的新浪微博项目一直想实现listview分页载入数据,今天最终实现了,哈哈!感觉挺好的,今天又写了个demo给大家分享下. 首先说下listview的优化方案,这也是面试中常考的题目.优化方 ...
- Android中ListView的几种常见的优化方法
Android中的ListView应该算是布局中几种最常用的组件之一了,使用也十分方便,下面将介绍ListView几种比较常见的优化方法: 首先我们给出一个没有任何优化的Listview的Adapte ...
- android中listview的item滑动删除效果(已解决listview点击问题)
领导看到iphone上tableview有个滑动删除的效果,要求在android上也实现,搜了下资料,实现起来比较简单,可弄到后面,居然不能点击了,把一篇文章中的代码修改了一下,捣鼓了一番,搞定,下面 ...
随机推荐
- scrapy item处理----cooperator和parallel()函数
twisted的task之cooperator和scrapy的parallel()函数 本文是关于下载结果返回后调用item处理的过程实现研究. 从scrapy的结果处理说起 def handle_s ...
- python安装MySQLclient
直接使用pip命令安装mysqlclient : pip3 install mysqlclient 如果windows安装不了MySQL-python mysqlclient 参考以下解决方案: 这个 ...
- 吴裕雄 python 神经网络——TensorFlow 自定义损失函数
import tensorflow as tf from numpy.random import RandomState batch_size = 8 x = tf.placeholder(tf.fl ...
- 卷积神经网络(CNN)_相关知识
斯坦福公开课 CS231n Convolutional Neural Networks for Visual Recognition : http://cs231n.stanford.edu/syll ...
- Rect Native 使用
参见 Rect Native 中文官网. 依赖环境: Homebrew.npm.Node.js.Watchman(监测Bug和文件变化,触发指定操作).flow(JS静态类型检查仪,以方便找出代码中错 ...
- sftp和FTP
sftp 是一个交互式安全文件传输协议的传输程式.它类似于 ftp也叫internet网络文件协议, 但它进行加密传输,比FTP有更高的安全性.下边就简单介绍一下如何远程连接主机,进行文件的上传和下 ...
- 入门项目数字手写体识别:使用Keras完成CNN模型搭建(重要)
摘要: 本文是通过Keras实现深度学习入门项目——数字手写体识别,整个流程介绍比较详细,适合初学者上手实践. 对于图像分类任务而言,卷积神经网络(CNN)是目前最优的网络结构,没有之一.在面部识别. ...
- nginx 缓存
浏览器缓存与nginx缓存 浏览器缓存 优点:使用有效缓存时,没有网络消耗,速度快:即使有网络消耗,但对失效缓存使用304响应做到网络消耗最小化 缺点:仅提升一个用户的体验 nginx 缓存 优点:提 ...
- centos将celery写入系统服务
第一步: 在/etc/下创建目录 celery/celery.conf 代码如下: CELERYD_NODES='w1 w2 w3' # 启动的celery进程的进程名 CELERY_BIN='/ro ...
- Python环境搭建-3 Python下载
python环境搭建 Python是一个跨平台.可移植的编程语言,因此可在windows.Linux和Mac OS X系统中安装使用. 安装完成后,你会得到Python解释器环境,可以通过终端输入py ...