iOS开发——极光推送
1.到极光官网 https://www.jpush.cn/ 下载极光推送SDK。
具体如何集成最好参考官网的文档,以及一些失败的原因。文档非常详细,我也是参考集成的。
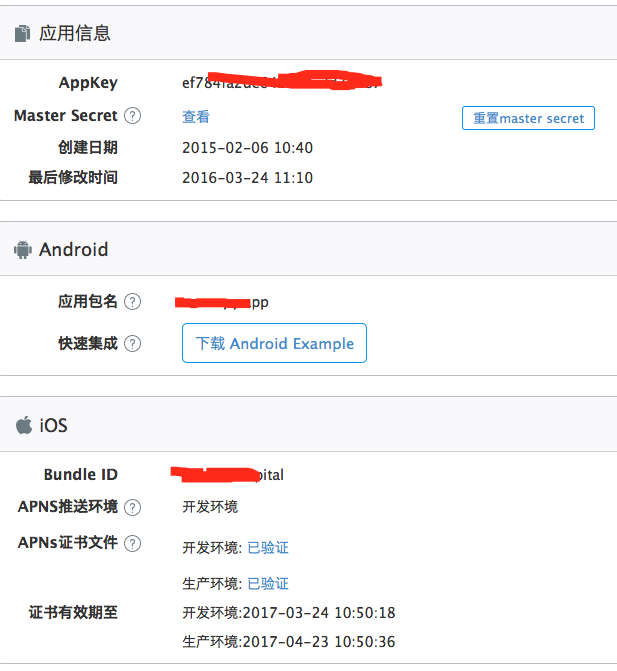
2.到极光推送官网注册自己的应用信息,关键是参考官网文档把推送证书p12文件上传好。http://docs.jpush.io/client/ios_tutorials/#ios_1
3.将下载好的SDK解压的文件拖到项目中,并添加一下框架
- CFNetwork.framework
- CoreFoundation.framework
- CoreTelephony.framework
- SystemConfiguration.framework
- CoreGraphics.framework
- Foundation.framework
- UIKit.framework
- Security.framework
- Xcode7需要的是libz.tbd;Xcode7以下版本是libz.dylib

4.可以参考我的其他博客,设置XCode7支持Http传输方法。
5.还需入下图配置下项目


6.在AppDelegate中,导入#import "JPUSHService.h"
建议在- (BOOL)application:(UIApplication *)application didFinishLaunchingWithOptions:(NSDictionary *)launchOptions方法中单独设置一个方法调用,防止和其他的设置混乱
// 极光推送设置
[self JPush:launchOptions];
7.以下是AppDelegate.m中主要需要实现的代码。包括设置AppKey
- (void)JPush:(NSDictionary *)launchOptions{

    // 程序未运行时,接收消息启动app

    NSDictionary *remoteNotification = [launchOptions objectForKey: UIApplicationLaunchOptionsRemoteNotificationKey];

    NSLog(@"未运行收到的消息%@",remoteNotification);

//#ifdef __IPHONE_8_0

    if ([[UIDevice currentDevice].systemVersion floatValue] >= 8.0) {

        //可以添加自定义categories

        [JPUSHService registerForRemoteNotificationTypes:(UIUserNotificationTypeBadge |

                                                          UIUserNotificationTypeSound |

                                                          UIUserNotificationTypeAlert)

                                              categories:nil];

    } else {

        //categories 必须为nil

        [JPUSHService registerForRemoteNotificationTypes:(UIRemoteNotificationTypeBadge |

                                                          UIRemoteNotificationTypeSound |

                                                          UIRemoteNotificationTypeAlert)

                                              categories:nil];

    }

//#endif

    // Required

    [JPUSHService setupWithOption:launchOptions appKey:@"ef7**********3d87" channel:@"Publish channel" apsForProduction:YES]; //如需兼容旧版本的方式,请继续使用[JPUSHService setupWithOption:launchOptions]初始化方法和添加pushConfig.plist文件声明AppKey等配置内容。

    // 开启调试模式debug

    [JPUSHService setDebugMode];

    //  接受自定义消息

    NSNotificationCenter *defaultCenter = [NSNotificationCenter defaultCenter];

    [defaultCenter addObserver:self selector:@selector(networkDidReceiveMessage:) name:kJPFNetworkDidReceiveMessageNotification object:nil];

    NSNotificationCenter *defaultCenter1 = [NSNotificationCenter defaultCenter];

    [defaultCenter addObserver:self selector:@selector(JPushID:) name:kJPFNetworkDidLoginNotification object:nil];

}

- (void)application:(UIApplication *)application didRegisterForRemoteNotificationsWithDeviceToken:(NSData *)deviceToken {

    // Required

    [JPUSHService registerDeviceToken:deviceToken];

    NSLog(@"注册的token%@",deviceToken);

}

- (void)application:(UIApplication *)application didFailToRegisterForRemoteNotificationsWithError:(NSError *)error {

    //Optional

    NSLog(@"注册远程通知失败did Fail To Register For Remote Notifications With Error: %@", error);

}

- (void)application:(UIApplication *)application didReceiveLocalNotification:(UILocalNotification *)notification{

    NSLog(@"++++本地收到的消息====%@",notification);

}

// 应程序在前台或后台运行时接收消息

- (void)application:(UIApplication *)application didReceiveRemoteNotification:(NSDictionary *)userInfo fetchCompletionHandler:(void (^)(UIBackgroundFetchResult))completionHandler {

     NSLog(@"获取到的APN推送内容: %@",userInfo);

    // IOS 7 Support Required

    [JPUSHService handleRemoteNotification:userInfo];

    completionHandler(UIBackgroundFetchResultNewData);

}

// 获取极光返回的用户ID

- (void)JPushID:(NSNotification *)notification{

    NSLog(@"获取到的registrationID===:%@",[JPUSHService registrationID]);

}

// 通知方法回调:接受自定义消息

- (void)networkDidReceiveMessage:(NSNotification *)notification {

    NSDictionary * userInfo = [notification userInfo];

    NSString *content = [userInfo valueForKey:@"content"];

    NSDictionary *extras = [userInfo valueForKey:@"extras"];

    NSString *customizeField1 = [extras valueForKey:@"customizeField1"]; //自定义参数,key是自己定义的

   // NSString *JPushID       = [];

    NSLog(@"接收自定义消息:%@",content);

}
8.这样可以单独在极光官网测试推送,最好单独获取到的registrationID单个推送测试。
我开始可以内网推送,但走苹果APNS失败,最后还是推送证书的问题。重新做的并上传到极光推送逛网。
iOS开发——极光推送的更多相关文章
- iOS开发极光推送显示 开发证书没有通过验证 是否重新上传证书?解决方法
1.证书密码错误 2证书环境不匹 3导证书时因手误把私钥导出来了,而不是证书 1.当前上传的p12证书密码输入有误: 2. 证书导出的时候展开了证书,把个人私钥导了出来,导证书的时候请不要展开证书: ...
- iOS开发 iOS10推送必看
iOS10更新之后,推送也是做了一些小小的修改,下面我就给大家仔细说说.希望看完我的这篇文章,对大家有所帮助. 一.简单入门篇---看完就可以简单适配完了 相对简单的推送证书以及环境的问题,我就不在这 ...
- iOS开发 iOS10推送必看(基础篇)
iOS10更新之后,推送也是做了一些小小的修改,下面我就给大家仔细说说.希望看完我的这篇文章,对大家有所帮助. 原文链接 一.简单入门篇---看完就可以简单适配完了相对简单的推送证书以及环境的 ...
- iOS开发——消息推送跳转
项目开发用集成是极光推送JPush 这里主要是消息推送过来处理对应界面跳转 同时看到两篇写的不错的相关博客分享一下: http://www.jianshu.com/ ...
- iOS开发 iOS10推送必看(基础篇)-转
iOS10更新之后,推送也是做了一些小小的修改,下面我就给大家仔细说说.希望看完我的这篇文章,对大家有所帮助. 一.简单入门篇---看完就可以简单适配完了 相对简单的推送证书以及环境的问题,我就不在这 ...
- iOS 集成极光推送
最近极光推送更新到V3版本之后,推送又不成功!配合服务器联调了半天,发现是服务器环境配置有问题. 想着就把极光推送的步骤给记录下来. 一.配置push证书 这个可以到极光文档里写,很详细 二.导入必要 ...
- iOS:极光推送控制器跳转
在前面已经做完了极光消息的推送,那么有消息了,如何跳转到需要的控制器呢?其实,主要还是在userInfo这个消息里面做判断来处理,具体如下: 下面这两个是远程推送时接收消息的方法,这是应用程序提供的方 ...
- 制作IOS 后台极光推送时,遇到的小问题
推送广义上分为两种, 一种是 程序在前台的时候,不想在任务栏里面显示通知,直接在app中进行某种操作.这个叫做自定义消息.这个是在前台时,app与极光后台建立了一个长链接. 另一种是 程序处于前. ...
- iOS开发,推送消息 steps
概述:推送过程简介 一.App启动过程中,使用UIApplication::registerForRemoteNotificationTypes函数与苹果的APNS服务器通信,发出注册远程推送的申请. ...
随机推荐
- [iOS基础控件 - 3.5] NSBundle, UIImageView和UIButton的区别, 模拟器和文档
1.NSBundle1> 一个NSBundle代表一个文件夹,利用NSBundle能访问对应的文件夹2> 利用mainBundle就可以访问软件资源包中的任何资源3> 模拟器应用程序 ...
- jsDoc注释的规范
注释以/** 开始 */结束 JSDoc 命令属性 命令名 描述 @param @argument 指定参数名和说明来描述一个函数参数. @return @returns 描述函数的返回值. ...
- OpenCV学习笔记:MAT解析
在2001年刚刚出现的时候,OpenCV基于 C 语言接口而建.为了在内存(memory)中存放图像,当时采用名为 IplImage 的C语言结构体,时至今日这仍出现在大多数的旧版教程和教学材料.但这 ...
- 将string转换成UTF8在进行请求
在请求服务器时,如果参数中带有中文字符.就会报参数格式错误,需要将其转换成UTF8 @interface NSString (NSURLUtilities) /* Adds all percent e ...
- 【22】将成员变量声明为private
1.为什么要将成员变量声明为private,语法一致性,只通过方法暴露接口. 2.使用方法,可以对成员变量更精确的控制.比如:为所有可能的实现提供弹性,不同实现可以替换:控制可读可写:验证约束条件:处 ...
- HDU 5071 Chat(2014鞍山B,模拟)
http://acm.hdu.edu.cn/showproblem.php?pid=5071 Chat Time Limit: 2000/1000 MS (Java/Others) Memory ...
- IOS开发之类和对象
IOS开发之类和对象 OC和Java一样都是一种面向对象的语言,从今天開始我和大家一起来系统学习这样的面向对象的语言oc,欢迎大家什么问题和我一起探讨和学习. OC定义类有两个步骤:1.接口部分(通俗 ...
- 在artTemplate的标签中使用外部函数的方法
第一步,声明函数,并将函数作为data对象的属性.例如: var resArray = new Array(); function beforeRender(data) { //addToArray为 ...
- yarn的基本组成和工作流程
yarn是负责资源管理的,协调各个应用程序的资源使用情况 一.基本组成 yarn主要由以下几个部分组成 1.resourcemanager 主要负责资源的调度和应用程序的管理 (1)调度器 调度器是将 ...
- SharePoint 2013+ Sqlserver 2014 Kerberos 配置传奇, 最终的解决方案 验证。
SharePoint 2013+ Sqlserver 2014 Kerberos 配置传奇. 1,安装数据库,我就不多说安装,客户一定要注意. 我将参照以下实施例和账户. 2,建立DNS,假设没有DN ...