深度理解springboot集成cache缓存之源码解析
一、案例准备
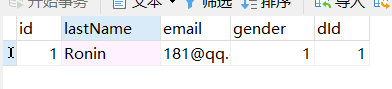
1.创建数据表(employee表)
2.创建Employee实体类封装数据库中的数据
@AllArgsConstructor

@NoArgsConstructor

@Data

@ToString

public class Employee {

    private Integer id;

    private String lastName;

    private String email;

    private Integer gender;     //1.男   2.女

    private Integer dId;

}
3.编写EmployeeMapper接口(DAO测通)
@Mapper

public interface EmployeeMapper {

    @Select("select * from employee where id=#{id}")

    Employee getEmpById(Integer id);

}
4.编写EmployeeService接口及其EmployeeServiceImpl实现类
@Service

public class EmployeeServiceImpl implements EmployeeService {

    @Autowired

    private EmployeeMapper employeeMapper;

    @Override

    @Cacheable(cacheNames = "emp",key = "#id",condition = "#id>0")

    public Employee getEmp(Integer id) {

        System.out.println("正在查询id为"+id+"号的员工");

        Employee emp = employeeMapper.getEmpById(id);

        return emp;

    }

}
5.编写EmployeeController类
@RestController

public class EmpController {

    @Autowired

    private EmployeeService employeeService;

    @GetMapping("/emp/{id}")

    public Employee getEmployee(@PathVariable("id") Integer id){

        Employee emp = employeeService.getEmp(id);

        return emp;

    }

}
6.启动访问http://localhost:8080/emp/1
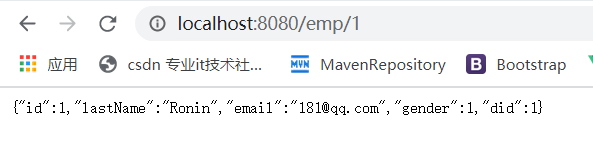
成功!
-----------------------------------------------分割线-------------------------------------------------------------
二、工作原理分析
1.查看springboot启动时,导入了哪些缓存组件
通过以往springboot相关的自动配置类可知与缓存相关的自动配置类为CacheAutoConfiguration

@Import:向容器中导入一些组件(通常导入的选择器以ImportSelector结尾)
ctrl+右键查看CacheConfigurationImportSelector源码
	static class CacheConfigurationImportSelector implements ImportSelector {

		@Override

		public String[] selectImports(AnnotationMetadata importingClassMetadata) {

			CacheType[] types = CacheType.values();

			String[] imports = new String[types.length];

			for (int i = 0; i < types.length; i++) {

				imports[i] = CacheConfigurations.getConfigurationClass(types[i]);

			}

			return imports;

		}

	}

}
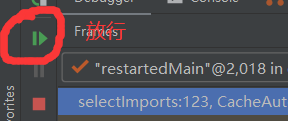
打上断点,debug模式下运行

放行,查看return imports的结果

导入的组件如下
 	* "org.springframework.boot.autoconfigure.cache.GenericCacheConfiguration"

     * "org.springframework.boot.autoconfigure.cache.JCacheCacheConfiguration"

     * "org.springframework.boot.autoconfigure.cache.EhCacheCacheConfiguration"

     * "org.springframework.boot.autoconfigure.cache.HazelcastCacheConfiguration"

     * "org.springframework.boot.autoconfigure.cache.InfinispanCacheConfiguration"

     * "org.springframework.boot.autoconfigure.cache.CouchbaseCacheConfiguration"

     * "org.springframework.boot.autoconfigure.cache.RedisCacheConfiguration"

     * "org.springframework.boot.autoconfigure.cache.CaffeineCacheConfiguration"

     * "org.springframework.boot.autoconfigure.cache.NoOpCacheConfiguration"

     * "org.springframework.boot.autoconfigure.cache.SimpleCacheConfiguration"
2.是哪个缓存配置类生效呢?根据当前的场景进行分析
有两种方法可以得出哪个缓存配置类生效
第一种:源码分析(该方法只做简单说明)
随便打开一个缓存配置类,例如第一个GenericCacheConfiguration,查看源码如下
@Configuration(proxyBeanMethods = false)

@ConditionalOnBean(Cache.class)

@ConditionalOnMissingBean(CacheManager.class)

@Conditional(CacheCondition.class)

class GenericCacheConfiguration {

	@Bean

	SimpleCacheManager cacheManager(CacheManagerCustomizers customizers, Collection<Cache> caches) {

		SimpleCacheManager cacheManager = new SimpleCacheManager();

		cacheManager.setCaches(caches);

		return customizers.customize(cacheManager);

	}

}
根据类上的
@ConditionalOnBean(Cache.class)
@ConditionalOnMissingBean(CacheManager.class)
@Conditional(CacheCondition.class)
注解进行判断该类是否生效
这些都是@Conditional注解的衍生注解,该注解是Spring4新推出的注解,判断是否满足某种条件,如果满足则给容器注册bean
第二种:查看自动配置报告
在application.properties配置文件中添加
debug=true
运行发现这几个组件中只有SimpleCacheConfiguration生效了

3.分析核心类的作用
进去查看SimpleCacheConfiguration的源码
@Configuration(proxyBeanMethods = false)

@ConditionalOnMissingBean(CacheManager.class)

@Conditional(CacheCondition.class)

class SimpleCacheConfiguration {

	@Bean

	ConcurrentMapCacheManager cacheManager(CacheProperties cacheProperties,

			CacheManagerCustomizers cacheManagerCustomizers) {

		ConcurrentMapCacheManager cacheManager = new ConcurrentMapCacheManager();

		List<String> cacheNames = cacheProperties.getCacheNames();

		if (!cacheNames.isEmpty()) {

			cacheManager.setCacheNames(cacheNames);

		}

		return cacheManagerCustomizers.customize(cacheManager);

	}

}
可以看出给容器中注册了一个ConcurrentMapCacheManager缓存管理器
查看源码分析创建Cache的具体细节

这一段代码是创建Cache的核心
#首先通过该类中的cacheMap属性获取缓存,参数为缓存名字(key-value)
#然后进行判断,如果cache为null,则上锁;再次获取如果为null,则根据本类中的createConcurrentMapCache方法创建Cache,然后将其放到缓存中

  protected Cache createConcurrentMapCache(String name) {

        SerializationDelegate actualSerialization = this.isStoreByValue() ? this.serialization : null;

        return new ConcurrentMapCache(name, new ConcurrentHashMap(256), this.isAllowNullValues(), actualSerialization);

    }

}
可以看出返回时创建了ConcurrentMapCache对象,进去查看源码
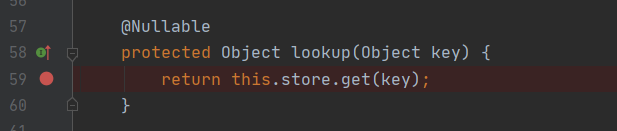
lookup方法的作用是从缓存中获取数据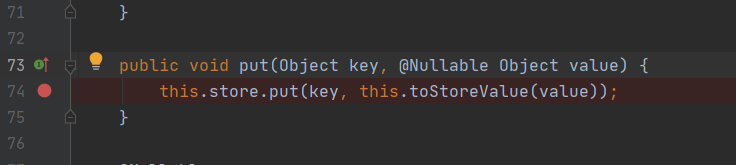
put方法的作用是是保存数据到缓存中
自此我们可以猜一下,ConcurrentMapCache该类的作用就是对缓存中的数据进行操作,如果缓存中没有数据,则从数据库查询,一并放到缓存中
总的来说ConcurrentMapCacheManager类的作用就是,先判断是否有某缓存,如果没有就创建该缓存,ConcurrentMapCache类从数据库中进行查询,一并将数据存储到ConcurrentMap集合中
4.运行流程

根据上面打上的四个断点,debug模式下启动

发现程序刚开始并没有走EmployeeServiceImpl的断点,而是走到了这个getCache方法,寻找name=emp的缓存

因为没有名为emp的缓存,所以会创建名为emp的缓存,继续放行
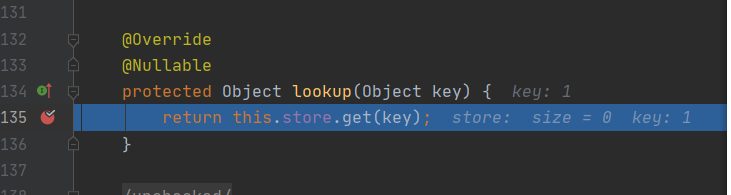
使用key去缓存中查找内容(key默认是方法的参数,浏览器访问的是1号员工信息,id=1即key=1),size=0,缓存中的数据为空

继续放行

直接调用业务方法去数据库中查询数据了,这是为什么呢,因为上个步骤在缓存中没有查询到数据,所以需要向数据库中要数据;继续放行

上一步从数据库中查询出数据之后,将数据传回前端页面展示并使用put方法将其放入到缓存中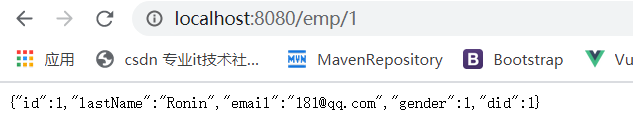
此时缓存中已经有数据了,当我再次debug运行 就不会再从数据库中查询数据了
该博客仅为了记录自己的学习过程,理清技术点思路
深度理解springboot集成cache缓存之源码解析的更多相关文章
- Springboot集成RabbitMQ之MessageConvert源码解析
问题 最近在使用RabbitMq时遇到了一个问题,明明是转换成json发送到mq中的数据,消费者接收到的却是一串数字也就是byte数组,但是使用mq可视化页面查看数据却是正常的,之前在使用过程中从未遇 ...
- 详解SpringBoot集成jsp(附源码)+遇到的坑
本文介绍了SpringBoot集成jsp(附源码)+遇到的坑 ,分享给大家 1.大体步骤 (1)创建Maven web project: (2)在pom.xml文件添加依赖: (3)配置applica ...
- SpringBoot集成jsp(附源码)+遇到的坑
1.大体步骤 (1) 创建Maven web project: (2) 在pom.xml文件添加依赖: (3) 配置application.properties支持 ...
- SpringBoot(1.5.6.RELEASE)源码解析
转自 https://www.cnblogs.com/dylan-java/p/7450914.html 启动SpringBoot,需要在入口函数所在的类上添加@SpringBootApplicati ...
- springboot ---> spring ioc 注册流程 源码解析 this.prepareContext 部分
现在都是在springboot 中 集成 spirng,那我们就从springboot 开始. 一:springboot 启动main 函数 public static void main(Strin ...
- springboot自动扫描添加的BeanDefinition源码解析
1. springboot启动过程中,首先会收集需要加载的bean的定义,作为BeanDefinition对象,添加到BeanFactory中去. 由于BeanFactory中只有getBean之类获 ...
- Springboot集成cache的key生成策略
代码接上文:深度理解springboot集成redis缓存之源码解析 ## 1.使用SpEL表达式 @Cacheable(cacheNames = "emp",key = &quo ...
- [源码解析] PyTorch 流水线并行实现 (6)--并行计算
[源码解析] PyTorch 流水线并行实现 (6)--并行计算 目录 [源码解析] PyTorch 流水线并行实现 (6)--并行计算 0x00 摘要 0x01 总体架构 1.1 使用 1.2 前向 ...
- [源码解析] PyTorch 分布式(1)------历史和概述
[源码解析] PyTorch 分布式(1)------历史和概述 目录 [源码解析] PyTorch 分布式(1)------历史和概述 0x00 摘要 0x01 PyTorch分布式的历史 1.1 ...
随机推荐
- MYSQL安装后自带用户的作用
user表中host列的值的意义% 匹配所有主机localhost localhost不会被解析成IP地址,直接通过UNIXsocket连接127.0.0 ...
- SoftwareTeacher直播自我感想
今天老师发布了一个链接直播是关于:同学们聊聊学习软件工程,CS 课程的问题下面是我的个人感悟和笔记 一.编程技术的提升 编程并不是一件很难的事情,就如开车一样,只有多加练习,自己的技术才能提升上去.拿 ...
- Go值类型和引用类型+作用域+空白标识符+常量
值类型和引用类型 所有像 int.float.bool 和 string 这些基本类型都属于值类型,使用这些类型的变量直接指向存在内存中的值: 当使用等号 = 将一个变量的值赋值给另一个变量时,如:j ...
- sql中数据统计
今天来说一下使用sql统计数据. 用的H2数据库,用的是DBeaver连接工具.有三表,打印表PRINT_JOB,复印表COPY_JOB和扫描表SCANNER_JOB (这段可以忽略)任务是要统计相同 ...
- CF1486X Codeforces Round #703
C2 Guessing the Greatest (二分+构造) 题目大意:交互题,每次可以询问一个子区间次大值的位置,最多询问20次,问全局最大值的位置.n=1e5 40次的情况大力二分,20次需要 ...
- 搭建分布式事务组件 seata 的Server 端和Client 端详解(小白都能看懂)
一,server 端的存储模式为:Server 端 存 储 模 式 (store-mode) 支 持 三 种 : file: ( 默 认 ) 单 机 模 式 , 全 局 事 务 会 话 信 息 内 存 ...
- 什么是原子操作?在 Java Concurrency API 中有哪些原 子类(atomic classes)?
原子操作(atomic operation)意为"不可被中断的一个或一系列操作" . 处理器使用基于对缓存加锁或总线加锁的方式来实现多处理器之间的原子操作. 在 Java 中可以通 ...
- Vue部署到云服务器时,访问Nginx代理出现We're sorry but books doesn't work properly without JavaScript enabled. Please enable it to continue.
出现这个的原因,我这边的是Nginx的问题,因为没有匹配到静态文件的原因 第一个location是始终将访问的url请求定向到 index.html这个主页面 第二个location块是将index. ...
- 什么是通知Advice?
特定 JoinPoint 处的 Aspect 所采取的动作称为 Advice.Spring AOP 使用一个 Advice 作为拦截器,在 JoinPoint "周围"维护一系列的 ...
- 阿里低代码引擎 | LowCodeEngine - 如何配置并调用请求
首发于 语雀文档@blueju 前言 发送请求是前端中很重要也很常见的一部分,阿里低代码引擎自然也不会缺少这一块.在阿里低代码引擎中,请求是在数据源中配置,数据源位置如下图: 配置 配置界面如下图:其 ...