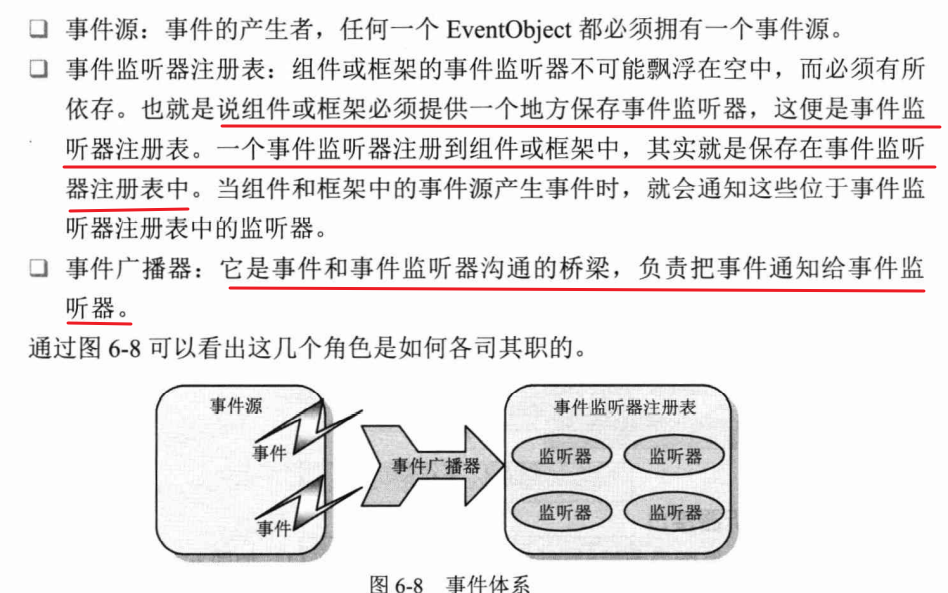
Spring学习笔记(4)Spring 事件原理及其应用
在 JDK 中已经提供相应的自定义事件发布功能的基础类:
java.util.EventObject类 :自定义事件类型java.util.EventListener接口:事件的监听器
首先了解几个概念:
Spring 事件类结构
1. 事件类
事件类也就是定义发送的内容,比如可以通过继承ApplicationContextEvent来自定义一个特定事件类。

1.1 ApplicationEvent类
首先是继承 EventObject的ApplicationEvent,通过source来指定事件源:
public abstract class ApplicationEvent extends EventObject {

    /**

     * Constructs a prototypical Event.

     *

     * @param source The object on which the Event initially occurred.

     * @throws IllegalArgumentException if source is null.

     */

    public ApplicationEvent(Object source) {

        super(source);

    }

}
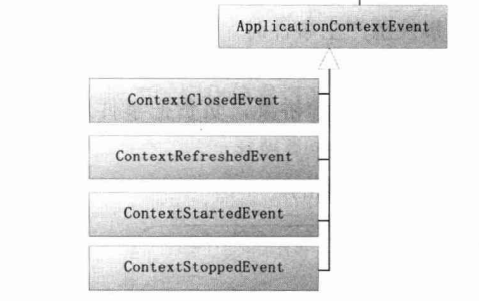
1.2 ApplicationContextEvent类
是主要的容器事件,它有容器启动、刷新、停止以及关闭各种事件的子类。
public class ApplicationContextEvent extends ApplicationEvent {

    /**

     * Constructs a prototypical Event.

     *

     * @param source The object on which the Event initially occurred.

     * @throws IllegalArgumentException if source is null.

     */

    public ApplicationContextEvent(Object source) {

        super(source);

    }

    /**

     * Get the <code>ApplicationContext</code> that the event was raised for.

     */

    public final ApplicationContext getApplicationContext() {

        return (ApplicationContext) getSource();

    }

}

public class ContextClosedEvent extends ApplicationContextEvent{

    /**

     * Constructs a prototypical Event.

     *

     * @param source The object on which the Event initially occurred.

     * @throws IllegalArgumentException if source is null.

     */

    public ContextClosedEvent(Object source) {

        super(source);

    }

}

public class ContextRefreshedEvent extends ApplicationContextEvent{

    /**

     * Constructs a prototypical Event.

     *

     * @param source The object on which the Event initially occurred.

     * @throws IllegalArgumentException if source is null.

     */

    public ContextRefreshedEvent(Object source) {

        super(source);

    }

}
我们可以通过继承该类来实现,特定的事件类型需求,比如要实现一个邮件发送事件。只需要继承ApplicationContextEvent即可:
public class MailSendEvent extends ApplicationContextEvent {

    private String msg;

    public MailSendEvent(Object source, String msg) {

        super(source);

        this.msg = msg;

    }

    public String getMsg() {

        return msg;

    }

    public void setMsg(String msg) {

        this.msg = msg;

    }

}
同时ApplicationContextEvent也有特定的几个子类,来表示容器启动、刷新、停止以及关闭事件:
2.事件监听器
事件监听器接口中,只定义了一个方法:onApplicationEvent(E event)该方法接收ApplicationEvent事件对象,在该方法中编写事件的响应处理逻辑。
public interface ApplicationListener<E extends ApplicationEvent> extends EventListener {

    /**

     * 接收ApplicationEvent 事件对象

     * 在该方法中编写事件的响应处理逻辑

     * @param event

     */

    void onApplicationEvent(E event);

}
我们同样也可以实现该接口来实现特定的事件监听器功能,比如邮件发送的监听器:
public class MailSenderListener implements ApplicationListener<MailSendEvent> {

    @Override

    public void onApplicationEvent(MailSendEvent event) {

        System.out.println("邮件发送器的 resource:" + event.getSource() + "邮件发送器的 msg:" + event.getMsg());

    }

}
3.事件广播器
事件广播器负责将事件通知监听器注册表中的事件监听器,然后再由事件监听器分别对事件进行响应。Spring中定义了如下接口:
public interface ApplicationEventMulticaster {

    /**

     * 添加事件监听器

     * @param listener

     */

    void addApplicationListener(ApplicationListener<?> listener);

    /**

     * 移除事件监听器

     * @param listener

     */

    void removeApplicationListener(ApplicationListener<?> listener);

    /**

     * 广播事件

     * @param event

     */

    void multicastEvent(ApplicationEvent event);

}
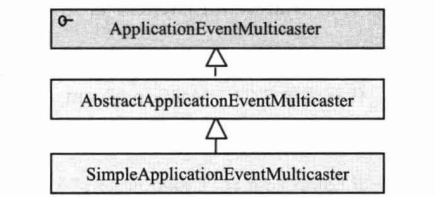
及其简单实现类SimpleApplicationEventMulticaster:
public class SimpleApplicationEventMulticaster extends AbstractApplicationEventMulticaster{

    public SimpleApplicationEventMulticaster(BeanFactory beanFactory) {

        setBeanFactory(beanFactory);

    }

    /**unchecked 表示告诉编译器忽略指定的警告,不用再编译完成后出现警告信息*/

    @SuppressWarnings("unchecked")

    @Override

    public void multicastEvent(ApplicationEvent event) {

        for (ApplicationListener applicationListener : getApplicationListeners(event)) {

            applicationListener.onApplicationEvent(event);

        }

    }

}
4.事件发布者
它本身作为事件源,会在合适的时点,将相应事件发布给对应的事件监听器:
public interface ApplicationEventPublisher {

    /**

     * 通知监听者并发布事件

     * @param event

     */

    void publishEvent(ApplicationEvent event);

}
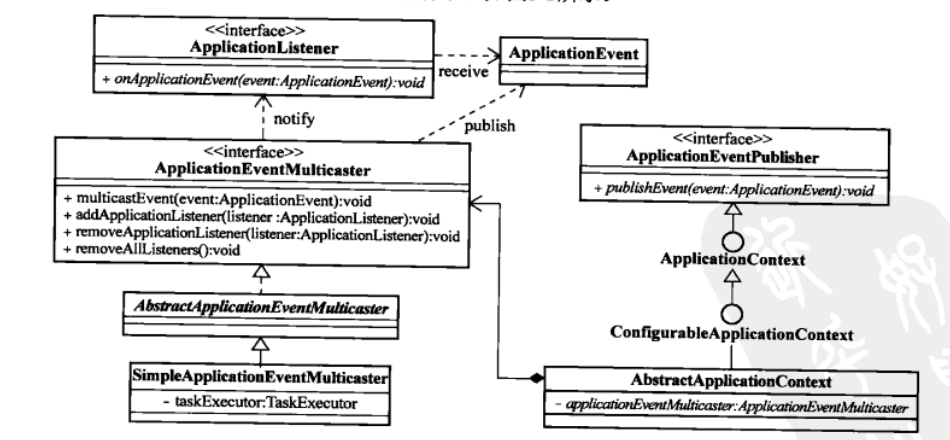
在Spring容器事件中,ApplicationContext接口定义继承了ApplicationEventPublisher接口,所以实际上AbstractApplicationContext在事件中承担了事件发布者的角色。
但是在实际上具体实现事件的发布和事件监听器注册方面,将功能转接给ApplicationEventMulticaster接口,最终具体实现则放在AbstractApplicationEventMulticaster的实现类中:

Spring 事件类的应用
那么在Spring中,事件类到底是如何运行的呢?首先我们会在xml配置文件中配置相应的ApplicationListener类型的监听器,因此在容器启动后,这些类型的bean会被ApplicationContext容器所识别,它们负责监听容器内发布的对应的ApplicationEvent类型的事件。
<bean class="cn.ethan.springframework.test.event.ContextRefreshedEventListener"/>

<bean class="cn.ethan.springframework.test.event.MailSenderListener"/>

<bean class="cn.ethan.springframework.test.event.ContextClosedEventListener"/>
在AbstractApplicationContext的refresh()方法中可以看到自动注册的内容:
public void refresh() throws BeansException {

        // 6. 初始化事件发布者

        initApplicationEventMulticaster();

        // 7. 注册事件监听器

        registerListeners();

        // 9. 发布容器刷新完成事件

        finishRefresh();

}

private void initApplicationEventMulticaster() {

    ConfigurableListableBeanFactory beanFactory = getBeanFactory();

    applicationEventMulticaster = new SimpleApplicationEventMulticaster(beanFactory);

    beanFactory.registerSingleton(APPLICATION_EVENT_MULTICASTER_BEAN_NAME, applicationEventMulticaster);

}

private void registerListeners() {

    Collection<ApplicationListener> applicationListeners = getBeansOfType(ApplicationListener.class).values();

    for (ApplicationListener listener : applicationListeners) {

        applicationEventMulticaster.addApplicationListener(listener);

    }

}

private void finishRefresh() {

    publishEvent(new ContextRefreshedEvent(this));

}

public void publishEvent(ApplicationEvent event) {

    applicationEventMulticaster.multicastEvent(event);

}
所以在ApplicationContext容器启动时,会自动注册EventListener类型的 Bean,一旦检测到有ApplicationContextEvent类型的事件发布,将通知这些注册到容器的EventListener
应用实例
下面将构建一个发送邮件的Spring事件实例:
1. 邮件发送事件MailSendEvent
public class MailSendEvent extends ApplicationContextEvent {

    private String msg;

    public MailSendEvent(Object source, String msg) {

        super(source);

        this.msg = msg;

    }

    public String getMsg() {

        return msg;

    }

}
2.邮件发送事件监听器MailSendListener(邮件发送事件)、ContextRefreshedEventListener(容器刷新事件) 和 ContextClosedEventListener(容器关闭事件)
public class MailSenderListener implements ApplicationListener<MailSendEvent> {

    @Override

    public void onApplicationEvent(MailSendEvent event) {

        System.out.println("邮件发送器的 resource:" + event.getSource() + "邮件发送器的 msg:" + event.getMsg());

    }

}

public class ContextClosedEventListener implements ApplicationListener<ContextClosedEvent> {

    @Override

    public void onApplicationEvent(ContextClosedEvent event) {

        System.out.println("关闭事件:" + this.getClass().getName());

    }

}

public class ContextRefreshedEventListener implements ApplicationListener<ContextRefreshedEvent> {

    @Override

    public void onApplicationEvent(ContextRefreshedEvent event) {

        System.out.println("刷新/打开事件:" + this.getClass().getName());

    }

}
这时,将监听器们注入xml文件中:
<bean class="cn.ethan.springframework.test.event.ContextRefreshedEventListener"/>

<bean class="cn.ethan.springframework.test.event.MailSenderListener"/>

<bean class="cn.ethan.springframework.test.event.ContextClosedEventListener"/>
3.邮件发送事件发布者
事件发布者ApplicationEventPublisher,因为前面提到,applicationContext继承了ApplicationEventPublisher,而applicationContext将事件发布功能委托给了ApplicationEventMulticaster,容器在启动开始就会检查是否存在名称为applicationEventMulticaster的 ApplicationEventMulticaster对象实例,如果有就使用提供的实现,没有则默认初始化一个SimpleApplicationEventMulticaster作为将会使用的ApplicationEventMulticaster
/**

 * @description: 实现了事件监听器的管理功能

 * @author: wjw

 * @date: 2022/7/9

 */

public abstract class AbstractApplicationEventMulticaster implements ApplicationEventMulticaster, BeanFactoryAware  {

    public final Set<ApplicationListener<ApplicationEvent>> applicationListeners = new LinkedHashSet<>();

    private BeanFactory beanFactory;

    @Override

    public void addApplicationListener(ApplicationListener<?> listener) {

        applicationListeners.add((ApplicationListener<ApplicationEvent>) listener);

    }

    @Override

    public void removeApplicationListener(ApplicationListener<?> listener) {

        applicationListeners.remove(listener);

    }

    @Override

    public void setBeanFactory(BeanFactory beanFactory) throws BeansException {

        this.beanFactory = beanFactory;

    }

    /**

     * 获得监听器

     * @param event

     * @return

     */

    protected Collection<ApplicationListener> getApplicationListeners(ApplicationEvent event) {

        LinkedList<ApplicationListener> allListeners = new LinkedList<>();

        for (ApplicationListener<ApplicationEvent> listener : allListeners) {

            if (supportsEvent(listener, event)) {

                allListeners.add(listener);

            }

        }

        return allListeners;

    }

    protected boolean supportsEvent(ApplicationListener<ApplicationEvent> applicationListener, ApplicationEvent event) {

        Class<? extends ApplicationListener> listenerClass = applicationListener.getClass();

        /**根据不同实例化类型,判断后获取对应目标 class*/

        Class<?> targetClass = ClassUtils.isCglibProxyClass(listenerClass) ? listenerClass.getSuperclass() : listenerClass;

        Type genericInterface = targetClass.getGenericInterfaces()[0];

        Type actualTypeArgument = ((ParameterizedType) genericInterface).getActualTypeArguments()[0];

        String className = actualTypeArgument.getTypeName();

        Class<?> eventClassName;

        try {

            eventClassName = Class.forName(className);

        } catch (ClassNotFoundException e) {

            throw new BeansException("wrong event class name: " + className);

        }

        return eventClassName.isAssignableFrom(event.getClass());

    }

}

public class SimpleApplicationEventMulticaster extends AbstractApplicationEventMulticaster{

    public SimpleApplicationEventMulticaster(BeanFactory beanFactory) {

        setBeanFactory(beanFactory);

    }

    /**unchecked 表示告诉编译器忽略指定的警告,不用再编译完成后出现警告信息*/

    @SuppressWarnings("unchecked")

    @Override

    public void multicastEvent(ApplicationEvent event) {

        for (ApplicationListener applicationListener : getApplicationListeners(event)) {

            applicationListener.onApplicationEvent(event);

        }

    }

}
4.测试验证
public void test_event() {

    ClassPathXmlApplicationContext applicationContext = new ClassPathXmlApplicationContext("classpath:spring.xml");

    applicationContext.publishEvent(new CustomEvent(applicationContext, 110L, "test!"));

    System.out.println("-----------------------------------------------------------------");

    applicationContext.publishEvent(new MailSendEvent(applicationContext, "邮件发送测试"));

    applicationContext.registerShutdownHook();

}

刷新/打开事件:cn.ethan.springframework.test.event.ContextRefreshedEventListener$$EnhancerByCGLIB$$2e5c458

-----------------------------------------------------------------

邮件发送器的 resource:cn.ethan.springframework.context.support.ClassPathXmlApplicationContext@5f2050f6邮件发送器的 msg:邮件发送测试

关闭事件:cn.ethan.springframework.test.event.ContextClosedEventListener$$EnhancerByCGLIB$$fbc2c978
Spring学习笔记(4)Spring 事件原理及其应用的更多相关文章
- Java架构师之路 Spring学习笔记(一) Spring介绍
前言 这是一篇原创的Spring学习笔记.主要记录我学习Spring4.0的过程.本人有四年的Java Web开发经验,最近在面试中遇到面试官总会问一些简单但我不会的Java问题,让我觉得有必要重新审 ...
- spring学习笔记(一) Spring概述
博主Spring学习笔记整理大部分内容来自Spring实战(第四版)这本书. 强烈建议新手购入或者需要电子书的留言. 在学习Spring之前,我们要了解这么几个问题:什么是Spring?Spring ...
- Spring 学习笔记(2) Spring Bean
一.IoC 容器 IoC 容器是 Spring 的核心,Spring 通过 IoC 容器来管理对象的实例化和初始化(这些对象就是 Spring Bean),以及对象从创建到销毁的整个生命周期.也就是管 ...
- [Spring学习笔记 4 ] AOP 概念原理以及java动态代理
一.Spring IoC容器补充(1) Spring IoC容器,DI(依赖注入): 注入的方式:设值方法注入setter(属性注入)/构造子注入(构造函数传入依赖的对象)/字段注入Field(注解) ...
- Spring学习笔记之Spring概述
概述 Spring是一个java应用最广的开源框架,它是于2003 年兴起的一个轻量级的Java 开发框架,由Rod Johnson 在其著作Expert One-On-One J2EE Deve ...
- [Spring学习笔记 5 ] Spring AOP 详解1
知识点回顾:一.IOC容器---DI依赖注入:setter注入(属性注入)/构造子注入/字段注入(注解 )/接口注入 out Spring IOC容器的使用: A.完全使用XML文件来配置容器所要管理 ...
- 1.1(Spring学习笔记)Spring基础(BeanFactory、ApplicationContext 、依赖注入)
1.准备工作 下载Spring:http://repo.spring.io/libs-release-local/org/springframework/spring/ 选择需要下载的版本 ...
- Spring学习笔记-Hello Spring
实现原理 采用XML方式配置Bean的时候,Bean的定义和实现分离的,采用注解的方式可以将两者合为一体,Bean的定义信息直接以注解形式定义在实现类中,从而实现了零配置. 控制反转是一种通过描述(X ...
- Spring学习笔记之五----Spring MVC
Spring MVC通常的执行流程是:当一个Web请求被发送给Spring MVC Application,Dispatcher Servlet接收到这个请求,通过HandlerMapping找到Co ...
- Spring学习笔记之 Spring IOC容器(二) 之注入参数值,自动组件扫描方式,控制Bean实例化方式,使用注解方式
本节主要内容: 1. 给MessageBean注入参数值 2. 测试Spring自动组件扫描方式 3. 如何控制ExampleBean实例化方式 4. 使用注解方式重构Jdb ...
随机推荐
- Bugku练习题---Crypto---聪明的小羊
Bugku练习题---Crypto---聪明的小羊 flag:flag{6fde4163df05d900} 解题步骤: 1.观察题目,下载附件 2.根据题目描述,判断是栅栏密码,位移2位,白给题,上网 ...
- /proc/meminfo 解释
- CSS预编译器
零.CSS预编译器 CSS预处理器是指对生成CSS前的某一语法的处理.CSS预处理器用一种专门的编程语言,进行Web页面样式设计,然后再编译成正常的CSS文件,供项目使用 CSS预处理器为CSS增加一 ...
- 网络协议OSI模型-TCP/IP-三次握手
OSI模型 在制定计算机网络标准方面,起着重大作用的两大国际组织是:国际电信联盟电信标准化部门,与国际 标准组织(ISO),虽然它们工作领域不同,但随着科学技术的发展,通信与信息处理之间的界限开始 变 ...
- 文件传输协议:FTP、TFTP、SFTP有什么区别?
一个执着于技术的公众号 FTP 提供一种在服务器和客户机之间上传和下载文件的有效方式:是基于TCP的传输,FTP采用双TCP连接方式:支持授权与认证机制,提供目录列表功能. ---控制连接使用TCP端 ...
- 2┃音视频直播系统之浏览器中通过 WebRTC 拍照片加滤镜并保存
一.拍照原理 好多人小时候应该都学过,在几张空白的纸上画同一个物体,并让物体之间稍有一些变化,然后连续快速地翻动这几张纸,它就形成了一个小动画,音视频播放器就是利用这样的原理来播放音视频文件的 播放器 ...
- hashlib加密模块和logging模块,购物车项目
hashlib加密模块 简介 hashlib模块是一个提供了字符串加密功能的模块,包含MD5和SHA的加密算法.具体的加密支持有: MD5,sha1,sha224,sha256, sha384, sh ...
- 通过CSS让图片变的清楚
image { width: 100%; height: 100%; border-radius: 10upx; //让图片变清楚 image-rendering: -moz-crisp-edges; ...
- 关于SpringBoot Admin server 监控注意事项
当你导入了依赖 <dependency> <groupId>de.codecentric</groupId> <artifactId>spring-bo ...
- Hadoop配置与安装
基础配置 1.关闭防火墙 systemctl stop firewalld.service #停止firewall systemctl disable firewalld.service #禁止fir ...