手动制作openstack CentOS 镜像
https://docs.openstack.org/image-guide/centos-image.html
This example shows you how to install a CentOS image and focuses mainly on CentOS 7. Because the CentOS installation process might differ across versions, the installation steps might differ if you use a different version of CentOS.
Download a CentOS install ISO
- Navigate to the CentOS mirrors page.
- Click one of the
HTTPlinks in the right-hand column next to one of the mirrors. - Click the folder link of the CentOS version that you want to use. For example,
7/. - Click the
isos/folder link. - Click the
x86_64/folder link for 64-bit images. - Click the netinstall ISO image that you want to download. For example,
CentOS-7-x86_64-NetInstall-1611.isois a good choice because it is a smaller image that downloads missing packages from the Internet during installation.
Start the installation process
Start the installation process using either the virt-manager or the virt-install command as described previously. If you use the virt-install command, do not forget to connect your VNC client to the virtual machine.
Assume that:
- The name of your virtual machine image is
centos; you need this name when you use virsh commands to manipulate the state of the image. - You saved the netinstall ISO image to the
/data/isosdirectory.
If you use the virt-install command, the commands should look something like this:
需要先开启CPU的虚拟化
安装kvm
yum -y install qemu-kvm qemu-system libvirt-bin bridge-utils virt-install libvirt
systemctl start libvirtd && systemctl enable libvirtd
virt-manager 这是图形化管理工具
# qemu-img create -f qcow2 /tmp/centos.qcow2 10G

# virt-install --virt-type kvm --name centos --ram 1024 \

  --disk /tmp/centos.qcow2,format=qcow2 \

  --network network=default \

  --graphics vnc,listen=0.0.0.0 --noautoconsole \

  --os-type=linux --os-variant=centos7.0 \

  --location=/data/isos/CentOS-7-x86_64-NetInstall-1611.iso
Step through the installation
如果系统盘使用LVM,新建的虚拟机实例 /分区不会自动扩容,但硬盘是按选择的大小尺寸分配的。
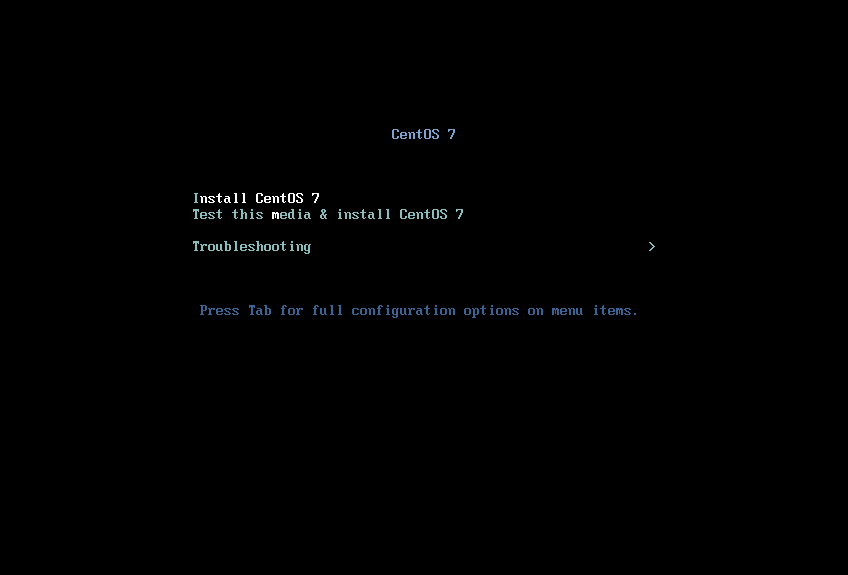
At the initial Installer boot menu, choose the Install CentOS 7 option. After the installation program starts, choose your preferred language and click Continue to get to the installation summary. Accept the defaults.
Change the Ethernet status
The default Ethernet setting is OFF. Change the setting of the Ethernet form OFF to ON. In particular, ensure that IPv4 Settings'Method is Automatic (DHCP), which is the default.
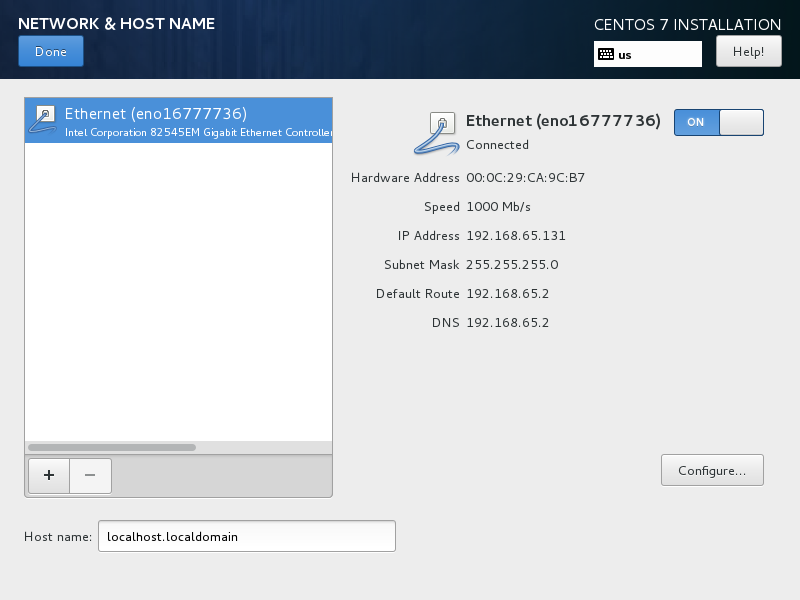
Hostname
The installer allows you to choose a host name. The default (localhost.localdomain) is fine. You install the cloud-init package later, which sets the host name on boot when a new instance is provisioned using this image.
Point the installer to a CentOS web server
Depending on the version of CentOS, the net installer requires the user to specify either a URL or the web site and a CentOS directory that corresponds to one of the CentOS mirrors. If the installer asks for a single URL, a valid URL might behttp://mirror.umd.edu/centos/7/os/x86_64.
Note
Consider using other mirrors as an alternative to mirror.umd.edu.
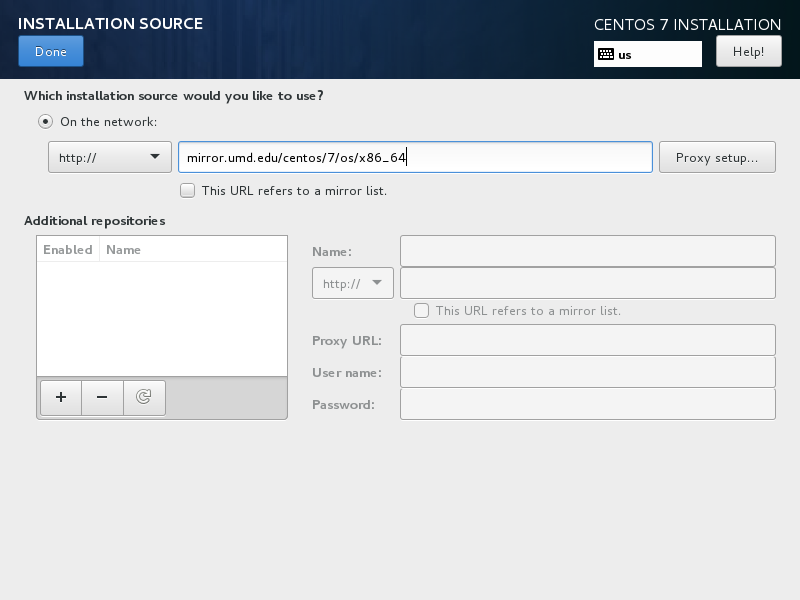
If the installer asks for web site name and CentOS directory separately, you might enter:
- Web site name:
mirror.umd.edu - CentOS directory:
centos/7/os/x86_64
See CentOS mirror page to get a full list of mirrors, click on the HTTP link of a mirror to retrieve the web site name of a mirror.
Storage devices
If prompted about which type of devices your installation uses, choose Virtio Block Device.
Partition the disks
There are different options for partitioning the disks. The default installation uses LVM partitions, and creates three partitions (/boot, /, swap), which works fine. Alternatively, you might want to create a single ext4 partition that is mounted to /, which also works fine.
If unsure, use the default partition scheme for the installer. While no scheme is inherently better than another, having the partition that you want to dynamically grow at the end of the list will allow it to grow without crossing another partition’s boundary.
Select installation option
Step through the installation, using the default options. The simplest thing to do is to choose the Minimal Install install, which installs an SSH server.
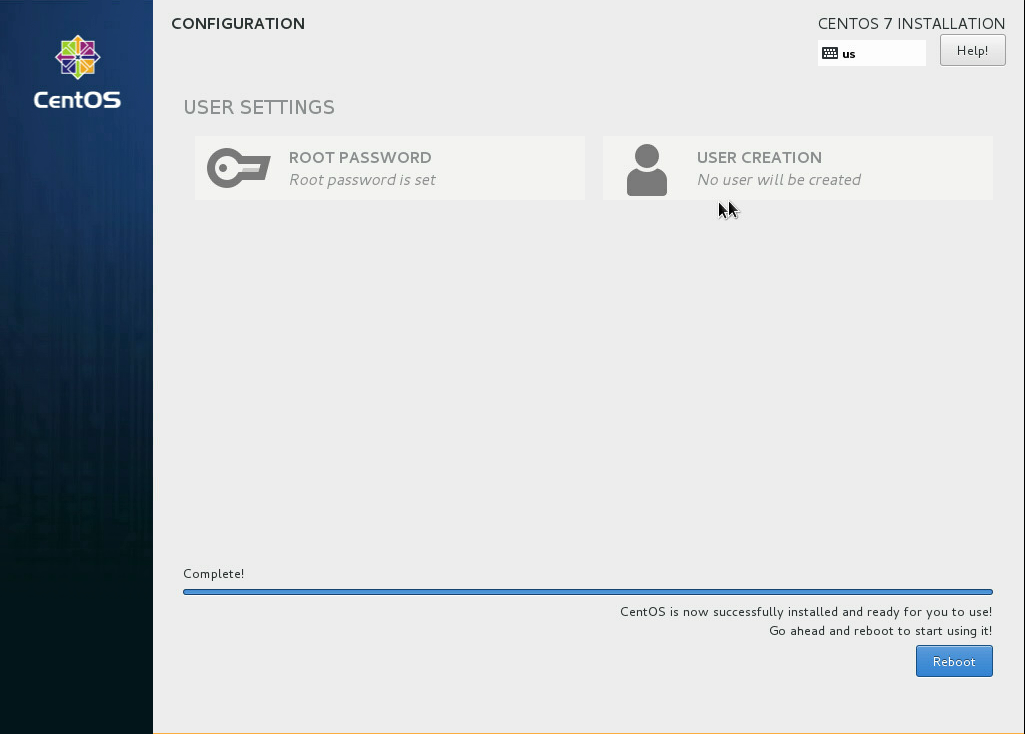
Set the root password
During the installation, remember to set the root password when prompted.
Detach the CD-ROM and reboot
Wait until the installation is complete.
To eject a disk by using the virsh command, libvirt requires that you attach an empty disk at the same target that the CD-ROM was previously attached, which may be hda. You can confirm the appropriate target using the virsh dumpxml vm-image command.
# virsh dumpxml centos

<domain type='kvm' id='19'>

  <name>centos</name>

...

    <disk type='block' device='cdrom'>

      <driver name='qemu' type='raw'/>

      <target dev='hda' bus='ide'/>

      <readonly/>

      <address type='drive' controller='0' bus='1' target='0' unit='0'/>

    </disk>

...

</domain>
Run the following commands from the host to eject the disk and reboot using virsh, as root. If you are using virt-manager, the commands below will work, but you can also use the GUI to detach and reboot it by manually stopping and starting.
# virsh attach-disk --type cdrom --mode readonly centos "" hda

# virsh reboot centos
Install the ACPI service
To enable the hypervisor to reboot or shutdown an instance, you must install and run the acpid service on the guest system.
Log in as root to the CentOS guest and run the following commands to install the ACPI service and configure it to start when the system boots:
# yum install acpid

# systemctl enable acpid
Configure to fetch metadata
An instance must interact with the metadata service to perform several tasks on start up. For example, the instance must get the ssh public key and run the user data script. To ensure that the instance performs these tasks, use one of these methods:
- Install a
cloud-initRPM, which is a port of the Ubuntu cloud-init package. This is the recommended approach. - Modify the
/etc/rc.localfile to fetch desired information from the metadata service, as described in the next section.
Use cloud-init to fetch the public key
The cloud-init package automatically fetches the public key from the metadata server and places the key in an account. Install cloud-init inside the CentOS guest by running:
# yum install cloud-init
The account varies by distribution. On CentOS-based virtual machines, the account is called centos.
You can change the name of the account used by cloud-init by editing the /etc/cloud/cloud.cfg file and adding a line with a different user. For example, to configure cloud-init to put the key in an account named admin, use the following syntax in the configuration file:
users:

  - name: admin

    (...)

设置启动时自动把没ssh key添加到root用户,并对root用户开启密码认证,密码是你当前系统root密码,可以修改好,再上传镜像
cat /etc/cloud/cloud.cfg

users:

 - default

disable_root:

ssh_pwauth:

mount_default_fields: [~, ~, 'auto', 'defaults,nofail', '', '']

resize_rootfs_tmp: /dev

ssh_deletekeys:

ssh_genkeytypes:  ~

syslog_fix_perms: ~

cloud_init_modules:

 - migrator

 - bootcmd

 - write-files

 - growpart

 - resizefs

 - set_hostname

 - update_hostname

 - update_etc_hosts

 - rsyslog

 - users-groups

 - ssh

cloud_config_modules:

 - mounts

 - locale

 - set-passwords

 - rh_subscription

 - yum-add-repo

 - package-update-upgrade-install

 - timezone

 - puppet

 - chef

 - salt-minion

 - mcollective

 - disable-ec2-metadata

 - runcmd

cloud_final_modules:

 - rightscale_userdata

 - scripts-per-once

 - scripts-per-boot

 - scripts-per-instance

 - scripts-user

 - ssh-authkey-fingerprints

 - keys-to-console

 - phone-home

 - final-message

 - power-state-change

system_info:

  default_user:

    name: root

    lock_passwd: false

    gecos: Cloud User

    groups: [wheel, adm, systemd-journal]

    sudo: ["ALL=(ALL) NOPASSWD:ALL"]

    shell: /bin/bash

  distro: rhel

  paths:

    cloud_dir: /var/lib/cloud

    templates_dir: /etc/cloud/templates

  ssh_svcname: sshd

# vim:syntax=yaml
Install cloud-utils-growpart to allow partitions to resize
In order for the root partition to properly resize, install the cloud-utils-growpart package, which contains the proper tools to allow the disk to resize using cloud-init.
# yum install cloud-utils-growpart
Write a script to fetch the public key (if no cloud-init)
If you are not able to install the cloud-init package in your image, to fetch the ssh public key and add it to the root account, edit the /etc/rc.d/rc.local file and add the following lines before the line touch /var/lock/subsys/local:
if [ ! -d /root/.ssh ]; then

  mkdir -p /root/.ssh

  chmod 700 /root/.ssh

fi

# Fetch public key using HTTP

ATTEMPTS=30

FAILED=0

while [ ! -f /root/.ssh/authorized_keys ]; do

  curl -f http://169.254.169.254/latest/meta-data/public-keys/0/openssh-key \

    > /tmp/metadata-key 2>/dev/null

  if [ \$? -eq 0 ]; then

    cat /tmp/metadata-key >> /root/.ssh/authorized_keys

    chmod 0600 /root/.ssh/authorized_keys

    restorecon /root/.ssh/authorized_keys

    rm -f /tmp/metadata-key

    echo "Successfully retrieved public key from instance metadata"

    echo "*****************"

    echo "AUTHORIZED KEYS"

    echo "*****************"

    cat /root/.ssh/authorized_keys

    echo "*****************"

  fi

done
Note
Some VNC clients replace the colon (:) with a semicolon (;) and the underscore (_) with a hyphen (-). Make sure to specify http:and not http;. Make sure to specify authorized_keys and not authorized-keys.
Note
The previous script only gets the ssh public key from the metadata server. It does not get user data, which is optional data that can be passed by the user when requesting a new instance. User data is often used to run a custom script when an instance boots.
As the OpenStack metadata service is compatible with version 2009-04-04 of the Amazon EC2 metadata service, consult the Amazon EC2 documentation on Using Instance Metadata for details on how to get user data.
Disable the zeroconf route
For the instance to access the metadata service, you must disable the default zeroconf route:
# echo "NOZEROCONF=yes" >> /etc/sysconfig/network
Configure console
For the nova console-log command to work properly on CentOS 7, you might need to do the following steps:
Edit the
/etc/default/grubfile and configure theGRUB_CMDLINE_LINUXoption. Delete therhgb quietand addconsole=tty0 console=ttyS0,115200n8to the option.For example:
...

GRUB_CMDLINE_LINUX="crashkernel=auto rd.lvm.lv=cl/root rd.lvm.lv=cl/swap console=tty0 console=ttyS0,115200n8"
Run the following command to save the changes:
# grub2-mkconfig -o /boot/grub2/grub.cfg

Generating grub configuration file ...

Found linux image: /boot/vmlinuz-3.10.0-229.14.1.el7.x86_64

Found initrd image: /boot/initramfs-3.10.0-229.14.1.el7.x86_64.img

Found linux image: /boot/vmlinuz-3.10.0-229.4.2.el7.x86_64

Found initrd image: /boot/initramfs-3.10.0-229.4.2.el7.x86_64.img

Found linux image: /boot/vmlinuz-3.10.0-229.el7.x86_64

Found initrd image: /boot/initramfs-3.10.0-229.el7.x86_64.img

Found linux image: /boot/vmlinuz-0-rescue-605f01abef434fb98dd1309e774b72ba

Found initrd image: /boot/initramfs-0-rescue-605f01abef434fb98dd1309e774b72ba.img

done
Clean up (remove MAC address details)
The operating system records the MAC address of the virtual Ethernet card in locations such as /etc/sysconfig/network-scripts/ifcfg-eth0 during the instance process. However, each time the image boots up, the virtual Ethernet card will have a different MAC address, so this information must be deleted from the configuration file.
There is a utility called virt-sysprep, that performs various cleanup tasks such as removing the MAC address references. It will clean up a virtual machine image in place:
安装 libguestfs-tools
yum -y install libguestfs-tools
# virt-sysprep -d centos
Undefine the libvirt domain
Now that you can upload the image to the Image service, you no longer need to have this virtual machine image managed by libvirt. Use the virsh undefine vm-image command to inform libvirt:
# virsh undefine centos

上传镜像:
. /etc/kolla/admin-openrc.sh
openstack image create "CentOS-7.5" --file /tmp/centos.qcow2 --disk-format qcow2 --container-format bare --public

ImportError: No module named 'requests.packages.urllib3'
解决方法:
pip install --upgrade --force-reinstall 'requests==2.6.0' urllib3
手动制作openstack CentOS 镜像的更多相关文章
- 手动制作openstack windows镜像
https://docs.openstack.org/image-guide/windows-image.html 这里以 windows 2008为例: 准备工作: 1准备好windows 2008 ...
- 制作 OpenStack Linux 镜像 - 每天5分钟玩转 OpenStack(151)
这是 OpenStack 实施经验分享系列的第 1 篇. OpenStack 的 instance 是通过 Glance 镜像部署的,所以准备镜像是必须要做的工作.本节介绍 Linux 镜像的制作方法 ...
- 制作 OpenStack Windows 镜像 - 每天5分钟玩转 OpenStack(152)
这是 OpenStack 实施经验分享系列的第 2 篇. OpenStack 通过 Glance 镜像部署 instance,上一节我们介绍了 linux 镜像制作方法,windows 镜像与 lin ...
- 修改openstack Centos镜像的默认用户的密码
Ubuntu官方提供的OpenStack镜像是用Key来登录的,太麻烦,可以改成用密码来登录. 修改image的工具叫:guestfish. yum install libguestfs-tools ...
- 使用ISO文件制作openstack使用的coreOS镜像
OpenStack源码交流群: 538850354 本篇文章是使用coreOS ISO文件手动制作openstack使用的qcow2镜像文件,关于coreOS的介绍,可以看这里 使用服务器:cento ...
- 完整部署CentOS7.2+OpenStack+kvm 云平台环境(4)--用OZ工具制作openstack镜像
在部署openstack云平台环境的时候,需要上传镜像到glance. 首先下载iso镜像,这里下载了centos6.5镜像,放到/usr/local/src目录下然后用OZ工具制作openstack ...
- 用OZ工具制作openstack镜像
在部署openstack云平台环境的时候,需要上传镜像到glance. 首先下载iso镜像,这里下载了centos7.2镜像,放到/iso目录下 然后用OZ工具制作openstack的镜像 1.安装l ...
- openstack导入镜像
本文以制作CentOS7.2镜像为例,详细介绍手动制作OpenStack镜像详细步骤,解释每一步这么做的原因.镜像上传到OpenStack glance,支持以下几个功能: 支持密码注入功能(nova ...
- OpenStack手动制作CentOS 7 KVM镜像
在前面讲解KVM的时候,我们已经学习了如何制作KVM镜像,那么制作OpenStack使用的镜像和KVM是有一些区别的. 1. 下载CentOS 7官方ISO安装镜像这里使用国内阿里云的镜像源进行 ...
随机推荐
- MVC4实现批量更新数据
Html: @using (Html.BeginForm("Edit", "Home")) { <div> <input type=" ...
- 关于urls 的基础
1 普通正则 2 分组正则 url(r'/blog/(\d+)/(\d+)',views.blog) blog(request,arq1,arq2) 按照位置传参 3 分组命名 url(r'/ ...
- 初识linux------用户和用户组
事先说明 本Linux的版本为Ubuntu. 为避免一些初学者由于权限问题特此事先说明,在非root权限下时,所有的代码加sudo:如下 (1)不在root权限 sudo useradd -m 用户名 ...
- 读取文件时,使用file.eof()判断结尾注意事项
今天写一个小功能需要读取文件,在判断文件结尾时使用了以下语句: while(infile.eof() && infile.good()) { infile.read((); encod ...
- javascript性能优化之Dom编程性能调优总结
1.最小化的Dom访问,在一次Dom访问做尽可能多的操作: 2.使用局部变量存放指向反复访问的元素节点的Dom引用,原则上js代码中不应该重复获取同一个元素节点,除非它在运行过程中发生改变: 3.对元 ...
- 中文字符utf-8编码原则
UTF-8是一种变长字节编码方式.对于某一个字符的UTF-8编码,如果只有一个字节则其最高二进制位为0:如果是 多字节,其第一个字节从最高位开始,连续的二进制位值为1的个数决定了其编码的位数,其余各字 ...
- Java实现循环链表
本案例需要完成的任务定义如下:实现一个循环链表(单链表),具备增加元素.删除元素.打印循环链表等功能. 网上许多同类问题的实现方式过于复杂.难懂,本文旨在提出一种实现循环链表的简单.易懂的方法. 定义 ...
- C# 解压
需要ICSharpCode.SharpZipLib.dll 网上有很多 先添加文件引用 再添加引用 using ICSharpCode.SharpZipLib.Zip; #region 解压 /// ...
- HDU 6059 17多校3 Kanade's trio(字典树)
Problem Description Give you an array A[1..n],you need to calculate how many tuples (i,j,k) satisfy ...
- python3:利用SMTP协议发送QQ邮件+附件
转载请表明出处:https://www.cnblogs.com/shapeL/p/9115887.html 1.发送QQ邮件,首先必须知道QQ邮箱的SMTP服务器 http://service.mai ...