springboot(三 使用mybatis +springboot 完成简单的增删改查)
先说一些注解:
@EnableAutoConfiguration 可以帮助SpringBoot应用将所有符合条件的@Configuration配置都加载到当前SpringBoot创建并使用的IoC容器。
@ComponentScan 扫包
@Configuration 用于定义配置类,可替换xml配置文件
使用以上是三个注解 则可以实现 springboot 的启动类的功能,不过每次 写的太得 所以 可以使用@SpringBootApplication 代替三个注解,实现启动类功能
@Target(ElementType.TYPE)

@Retention(RetentionPolicy.RUNTIME)

@Documented

@Inherited

@SpringBootConfiguration

@EnableAutoConfiguration

@ComponentScan(excludeFilters = {

        @Filter(type = FilterType.CUSTOM, classes = TypeExcludeFilter.class),

        @Filter(type = FilterType.CUSTOM, classes = AutoConfigurationExcludeFilter.class) })

public @interface SpringBootApplication
@SringBootApplication只能作用于同级目录之下,其余目录之下无法扫描不起作用
使用springboot搭建mybatis
第一步:导入 mybatis 所需要的依赖
<?xml version="1.0" encoding="UTF-8"?>

<project xmlns="http://maven.apache.org/POM/4.0.0"

    xmlns:xsi="http://www.w3.org/2001/XMLSchema-instance"

    xsi:schemaLocation="http://maven.apache.org/POM/4.0.0 http://maven.apache.org/xsd/maven-4.0.0.xsd">

    <modelVersion>4.0.0</modelVersion>

    <parent>

        <groupId>org.springframework.boot</groupId>

        <artifactId>spring-boot-starter-parent</artifactId>

        <version>2.1.2.RELEASE</version>

        <relativePath /> <!-- lookup parent from repository -->

    </parent>

    <groupId>com.example</groupId>

    <artifactId>springboot-mybatis-demo</artifactId>

    <version>0.0.1-SNAPSHOT</version>

    <name>springboot-mybatis-demo</name>

    <description>Demo project for Spring Boot</description>

    <properties>

        <java.version>1.8</java.version>

    </properties>

    <dependencies>

        <dependency>

            <groupId>org.springframework.boot</groupId>

            <artifactId>spring-boot-starter</artifactId>

        </dependency>

        <dependency>

            <groupId>org.springframework.boot</groupId>

            <artifactId>spring-boot-starter-web</artifactId>

        </dependency>

        <dependency>

            <groupId>org.springframework.boot</groupId>

            <artifactId>spring-boot-starter-test</artifactId>

            <scope>test</scope>

        </dependency>

        <!-- 添加 mybatis所需要的依赖 -->

        <dependency>

            <groupId>org.mybatis.spring.boot</groupId>

            <artifactId>mybatis-spring-boot-starter</artifactId>

            <version>1.1.1</version>

        </dependency>

        <!-- 引入数据库连接 注意版本,版本低了 执行的时候 报错 -->

        <dependency>

            <groupId>mysql</groupId>

            <artifactId>mysql-connector-java</artifactId>

            <version>5.1.46</version>

        </dependency>

    </dependencies>

    <build>

        <plugins>

            <plugin>

                <groupId>org.springframework.boot</groupId>

                <artifactId>spring-boot-maven-plugin</artifactId>

            </plugin>

        </plugins>

    </build>

</project>
第二步:创建数据库表
CREATE TABLE `users` (
`name` varchar(50) DEFAULT NULL,
`age` int(50) DEFAULT NULL
) ENGINE=InnoDB DEFAULT CHARSET=utf8mb4 COLLATE=utf8mb4_0900_ai_ci

创建一个名为users的表,有两个字段name和age
第三步:编写mapper类 创建一个 名为com.example.mapper的包,并创建 UserMapper接口
package com.example.mpper;

import java.util.List;

import org.apache.ibatis.annotations.Delete;

import org.apache.ibatis.annotations.Insert;

import org.apache.ibatis.annotations.Mapper;

import org.apache.ibatis.annotations.Param;

import org.apache.ibatis.annotations.Select;

import org.apache.ibatis.annotations.Update;

@Mapper//如果不用mapper注解 则需要在启动类中配置@MapperScan(basePackages = { "包名" })

public interface UserMapper {

    @Select("SELECT * FROM USERS WHERE NAME = #{name}")

    List<com.example.entity.User> findByName(@Param("name") String name);

    @Insert("INSERT INTO USERS(NAME, AGE) VALUES(#{name}, #{age})")

    int insert(@Param("name") String name, @Param("age") Integer age);

    @Delete("DELETE FROM USERS WHERE AGE=#{age}")

    void delete(@Param("age") int age);

    @Update("UPDATE  USERS SET AGE=#{age}  WHERE NAME=#{name}")

    void update(@Param("name") String name, @Param("age") int age);

}
@Mapper注解:mybatis的注解,不用像以前那样配置 xml文件,然后在xml文件里面 写 sql语句了

第四步:创建 UserService类,
package com.example.service;

import java.util.List;

import org.springframework.beans.factory.annotation.Autowired;

import org.springframework.stereotype.Controller;

import com.example.entity.User;

import com.example.mpper.UserMapper;

@Controller

public class UserService {

    @Autowired

    public UserMapper mapper;

    public List<User> findUser(String name) {

        return mapper.findByName(name);

    }

    public void insertUser(String name, int age) {

        mapper.insert(name, age);

    }

    public void delet(int age) {

        mapper.delete(age);

    }

    public void update(String name, int age) {

        mapper.update(name, age);

    }

}
第五步: 编写 controller类
package com.example.controller;

import java.util.List;

import org.springframework.beans.factory.annotation.Autowired;

import org.springframework.stereotype.Controller;

import org.springframework.web.bind.annotation.RequestMapping;

import org.springframework.web.bind.annotation.ResponseBody;

import com.example.entity.User;

import com.example.service.UserService;

@Controller

public class UserController {

    @Autowired

    public UserService service;

    @RequestMapping("/selectUser")

    @ResponseBody

    public List<User> selectUser(String name) {

        List<User> users = service.findUser(name);

        return users;

    }

    @RequestMapping("/insertUser")

    public String insertUser(String name, int age) {

        service.insertUser(name, age);

        return "success";

    }

    @RequestMapping("/deletUser")

    @ResponseBody

    public String deletUser(int age) {

        service.delet(age);

        return "success";

    }

    @RequestMapping("/updateUser")

    @ResponseBody

    public String updateUser(String name, int age) {

        service.update(name, age);

        return "success";

    }

}
第六步:编写启动类

编写启动类的时候 选择用的是@SpringBootApplication注解启动,所以 要保证所有的都再同一目录结构
package com.example;

import org.springframework.boot.SpringApplication;

import org.springframework.boot.autoconfigure.SpringBootApplication;

@SpringBootApplication

public class SpringbootMybatisDemoApplication {

    public static void main(String[] args) {

        SpringApplication.run(SpringbootMybatisDemoApplication.class, args);

    }

}
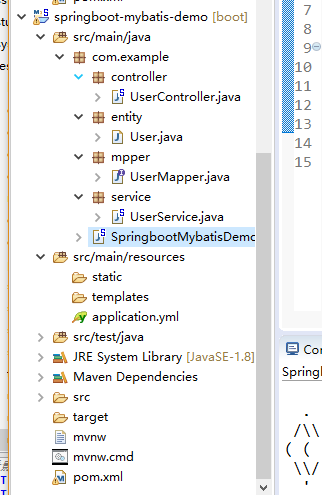
完整项目包结构:
如果只是这样,启动的时候会报错,找不到 数据源,所以我们还需要配置数据源
第七步:配置 数据源 springboot 的配置文件 有两种 一种是properties文件 一种 是yml文件,原来一直用的是properties文件,没有yml文件好用。可读性,编写的时候都要方便些
spring:

  datasource:

   url: jdbc:mysql://localhost:3306/test?useUnicode=true&characterEncoding=utf8

   driver-class-name: com.mysql.jdbc.Driver

   username: root

   password: root
这里如果 使用yml文件没有自动提示 或者补全的话 可以升级或者安装sts插件,在抛出一个问题 如果有多个数据源的时候springboot如何处理多个数据源,按照上面步骤就可以简单的完成一个 spring boot+mybatis的crud
如果哪里有问题的,有人到了这个文章 则留言 改正...........
springboot(三 使用mybatis +springboot 完成简单的增删改查)的更多相关文章
- ElasticSearch6(三)-- Java API实现简单的增删改查
基于ElasticSearch6.2.4, Java API创建索引.查询.修改.删除,pom依赖和获取es连接 可查看此文章. package com.xsjt.learn; import java ...
- SSM框架之MyBatis框架实现简单的增删改查
MyBatis框架介绍 MyBatis是一个优秀的数据持久层框架,在实体类和SQL语句之间建立映射关系是一种半自动化的ORM实现,其封装性要低于Hibernate,性能优越,并且小巧,简单易学,应用也 ...
- Mybatis的简介+简单实现增删改查案例
@ 目录 总结内容 1. 基本概念 2. Mybatis的使用 需求 配置文件简介 总结 总结内容 1. 基本概念 Mybatis是一款优秀的持久层框架,它支持定制化SQL.存储过程以及高级映射.My ...
- Golang中map的三种声明方式和简单实现增删改查
package main import ( "fmt" ) func main() { test3 := map[string]string{ "one": & ...
- mybatis实现最简单的增删改查
1.数据库设计 2.项目结构(针对User不用管Blogger) User.java package com.yunqing.mybatis.bean; public class User { pri ...
- MyBatis学习--简单的增删改查
jdbc程序 在学习MyBatis的时候先简单了解下JDBC编程的方式,我们以一个简单的查询为例,使用JDBC编程,如下: Public static void main(String[] args) ...
- SpringBoot+Mybatis+Maven+MySQL逆向工程实现增删改查
SpringBoot+Mybatis+MySQL+MAVEN逆向工程实现增删改查 这两天简单学习了下SpringBoot,发现这玩意配置起来是真的方便,相比于SpringMVC+Spring的配置简直 ...
- 小D课堂-SpringBoot 2.x微信支付在线教育网站项目实战_3-2.使用Mybatis注解开发视频列表增删改查
笔记 2.使用Mybatis注解开发视频列表增删改查 讲解:使用Mybatis3.x注解方式 增删改查实操, 控制台打印sql语句 1.控制台打印sql语句 ...
- MyBatis简单的增删改查以及简单的分页查询实现
MyBatis简单的增删改查以及简单的分页查询实现 <? xml version="1.0" encoding="UTF-8"? > <!DO ...
- SpringMVC之简单的增删改查示例(SSM整合)
本篇文章主要介绍了SpringMVC之简单的增删改查示例(SSM整合),这个例子是基于SpringMVC+Spring+Mybatis实现的.有兴趣的可以了解一下. 虽然已经在做关于SpringMVC ...
随机推荐
- mod libs 课堂
name1= input("请输入一个名字:") name2 = input("再输入一个名字:") print("{}刚化妆完\n就被路过的{}拍照 ...
- MySQL Replication--复制异常1
============================================== 问题描述: 1.从库环境:MySQL 5.7.19,主从都开启GTID模式 2.MySQL数据目录所有者被 ...
- CONTINUOUS MIGRATION
转自:https://pgloader.io/blog/continuous-migration/ After having been involved in many migration proje ...
- src-d engine 强大的git 历史分析工具
src-d engine 包含了Babelfish ,同时可以看作是Babelfish 的升级版本,我们可以使用sql 进行代码分析 备注: 注意运行的时候需要容器支持 使用 安装docker 参 ...
- 实现一个函数,可以左旋字符串中的k个字符
ABCD左旋一个字符得到BCDAABCD左旋两个字符得到CDAB ABCD BACD BCAD BCDA CBDA CDBA CDAB 发现规律: 如果左旋一个字符则可以将第一个字符依次与后面的字符交 ...
- C# Monitor的Wait和Pulse方法使用详解
[转载]http://blog.csdn.net/qqsttt/article/details/24777553 Monitor的Wait和Pulse方法在线程的同步锁使用中是比较复杂的,理解稍微困难 ...
- 如何让你的 KiCad 在缩放时不眩晕?
如何让你的 KiCad 在缩放时不眩晕? 使用 KiCAD 第一感觉是打开速度非常快,而且 PCB 拉线也非常快,封装库又多. 但有一个问题,缩放时总给人一种眩晕,原来是因为鼠标自动跑到屏幕中间去了, ...
- LOJ 2587 「APIO2018」铁人两项——圆方树
题目:https://loj.ac/problem/2587 先写了 47 分暴力. 对于 n<=50 的部分, n3 枚举三个点,把图的圆方树建出来,合法条件是 c 是 s -> f 路 ...
- dojo Datagrid 实现数据删除功能
DataGrid实现数据动态刷新功能见前一个帖子:http://www.cnblogs.com/qq552048250/p/4447103.html 实现数据删除只需要向表格中动态添加按钮,并为按钮的 ...
- mac os x 安装mysql 5.7
一 下载MySQL 访问MySQL的官网http://www.mysql.com/downloads/ 然后在页面中会看到“MySQL Community Server”下方有一个“download” ...