Java多线程系列 JUC线程池06 线程池原理解析(五)
ScheduledThreadPoolExecutor解析
ScheduledThreadPoolExecutor适用于延时执行,或者周期性执行的任务调度,ScheduledThreadPoolExecutor在实现上继承了ThreadPoolExecutor,所以依然可以将ScheduledThreadPoolExecutor当成ThreadPoolExecutor来使用,但是ScheduledThreadPoolExecutor的功能要强大得多,因为ScheduledThreadPoolExecutor可以根据设定的参数来周期性调度运行,下面是四个和周期性相关的方法:
1.scheduled()
public class ScheduledThreadPoolExecutor extends ThreadPoolExecutor implements ScheduledExecutorService {

    public ScheduledFuture<?> schedule(Runnable command,  long delay, TimeUnit unit) {

        if (command == null || unit == null)

       throw new NullPointerException();

        RunnableScheduledFuture<?> t = decorateTask(command, new ScheduledFutureTask<Void>(command, null, triggerTime(delay, unit)));

        delayedExecute(t);

        return t;

    }

    public <V> ScheduledFuture<V> schedule(Callable<V> callable,  long delay, TimeUnit unit) {

        if (callable == null || unit == null)

            throw new NullPointerException();

        RunnableScheduledFuture<V> t = decorateTask(callable,

            new ScheduledFutureTask<V>(callable, triggerTime(delay, unit)));

        delayedExecute(t);

        return t;

    }

}
2.scheduleAtFixedRate()
public ScheduledFuture<?> scheduleAtFixedRate(Runnable command,  long initialDelay,  long period, TimeUnit unit)

        if (command == null || unit == null)

            throw new NullPointerException();

        if (period <= 0)

            throw new IllegalArgumentException();

        ScheduledFutureTask<Void> sft =  new ScheduledFutureTask<Void>(command, null, triggerTime(initialDelay, unit), unit.toNanos(period));

        RunnableScheduledFuture<Void> t = decorateTask(command, sft);

        sft.outerTask = t;

        delayedExecute(t);

        return t;

}
说明: 该方法会延时一段时间,然后根据设定的参数周期执行Runnable,在执行时将严格按照规划的时间路径来执行,比如周期为2,延时为0,那么执行的序列为0,2,4,6,8....,
3.scheduleWithFixedDelay()
public ScheduledFuture<?> scheduleWithFixedDelay(Runnable command, long initialDelay, long delay, TimeUnit unit){

        if (command == null || unit == null)

            throw new NullPointerException();

        if (delay <= 0)

            throw new IllegalArgumentException();
        //保证了任务的延时执行 或周期执行

        ScheduledFutureTask<Void> sft = new ScheduledFutureTask<Void>(command, null, triggerTime(initialDelay, unit), unit.toNanos(-delay));

        RunnableScheduledFuture<Void> t = decorateTask(command, sft);

        sft.outerTask = t;

        delayedExecute(t);

        return t;

}
说明:该方法会延时一段时间,然后根据设定的参数周期执行Runnable,在执行时将基于上次执行时间来规划下次的执行,也就是在上次执行完成之后再次执行。比如上面的执行序列0,2,4,6,8...,如果第2秒没有被调度执行,而在第三秒的时候才被调度,那么下次执行的时间不是4,而是5,以此类推。
通过上面的代码我们可以发现,前两个方法是类似的,后两个方法也是类似的。前两个方法属于一次性调度,所以period都为0,区别在于参数不同,一个是Runnable,而一个是Callable,它们最后都变为了Callable了,以上四个方法最后都会调用一个方法: delayedExecute(t),下面看一下这个方法:
4.delayedExecute()
private void delayedExecute(RunnableScheduledFuture<?> task) {

        if (isShutdown())

            reject(task);

        else {

            super.getQueue().add(task);

            if (isShutdown() &&

                !canRunInCurrentRunState(task.isPeriodic()) &&

                remove(task))

                task.cancel(false);

            else

                ensurePrestart();

        }

 }
说明:该方法先判断线程池是否被关闭了,如果被关闭了,则拒绝任务的提交,否则将任务加入到任务队列中去等待被调度执行。最后的ensurePrestart的意思是需要确保线程池已经被启动起来了。下面是这个方法:
5.ensurePrestart()
    void ensurePrestart() {

        int wc = workerCountOf(ctl.get());

        if (wc < corePoolSize)

            addWorker(null, true);

        else if (wc == 0)

            addWorker(null, false);

    }
说明:该方法主要是增加了一个没有任务的worker,有什么用呢?我们还记得Worker的逻辑吗?addWorker方法的执行,会触发Worker的run方法的执行,然后runWorker方法就会被执行,而runWorker方法是循环从workQueue中取任务执行的,所以确保线程池被启动起来是重要的,而只需要简单的执行addWorker便会触发线程池的启动流程。对于调度线程池来说,只要执行了addWorker方法,那么线程池就会一直在后台周期性的调度执行任务。
6. ScheduledFutureTask.java
ScheduledFutureTask类图
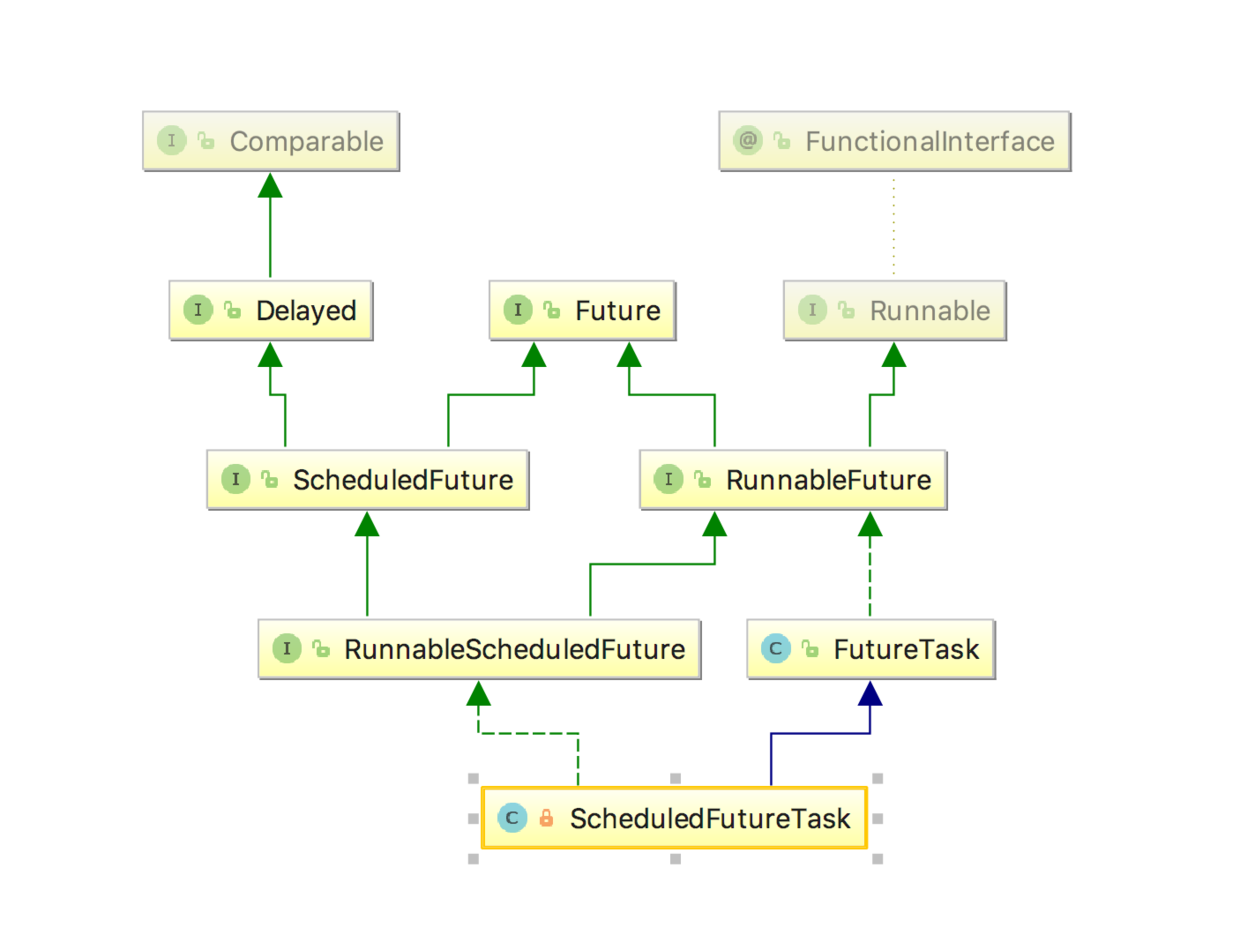
ScheduledFutureTask是ScheduledThreadPoolExecutor的内部类,它实现了Runnable接口,并重写run方法,而这个run方法是整个类的核心,下面来看一下这个run方法的内容:
public void run() {

        boolean periodic = isPeriodic();

        if (!canRunInCurrentRunState(periodic))

            cancel(false);

        else if (!periodic)

            ScheduledFutureTask.super.run();

        else if (ScheduledFutureTask.super.runAndReset()) {

            setNextRunTime();

            reExecutePeriodic(outerTask);

        }

    }

}

private void setNextRunTime() {

    long p = period;

    if (p > 0)

        time += p;

    else

        time = triggerTime(-p);

}
说明:该方法首先判断是否是周期性的任务,如果不是,则直接执行(一次性),否则执行,然后设置下次执行的时间,然后重新调度,等待下次执行。这里有一个方法需要注意,也就是setNextRunTime,上面我们提到scheduleAtFixedRate和scheduleWithFixedDelay在传递参数时不一样,后者将delay值变为了负数,所以此处的处理正好印证了前文所述。
7.reExecutePeriodic方法
reExecutePeriodic方法会将任务再次被调度执行,下面的代码展示了这个功能的实现:
RunnableScheduledFuture<V> outerTask = this;

void reExecutePeriodic(RunnableScheduledFuture<?> task) {

    if (canRunInCurrentRunState(true)) {

        super.getQueue().add(task);

        if (!canRunInCurrentRunState(true) && remove(task))

            task.cancel(false);

        else

            ensurePrestart();

    }

}
说明:可以看到,这个方法就是将我们的任务再次放到了workQueue里面,那这个参数是什么?在上面的run方法中我们调用了reExecutePeriodic方法,参数为outerTask,而这个变量是什么?这个变量指向了自己,而this的类型是什么?是ScheduledFutureTask,也就是可以被调度的task,这样就实现了循环执行任务了。
8.ScheduledThreadPoolExecutor
上面的分析已经到了循环执行,但是ScheduledThreadPoolExecutor的功能是周期性执行,所以我们接着分析ScheduledThreadPoolExecutor是如何根据我们的参数走走停停的。这个时候,是应该看一下ScheduledThreadPoolExecutor的构造函数了,我们来看一个最简单的构造函数:
 public ScheduledThreadPoolExecutor(int corePoolSize) {
   super(corePoolSize, Integer.MAX_VALUE, 0, NANOSECONDS, new DelayedWorkQueue());
 }
9.DelayedWorkQueue
DelayedWorkQueue是ScheduledThreadPoolExecutor的内部类,
1. take()方法代码如下
public RunnableScheduledFuture<?> take() throws InterruptedException {

           final ReentrantLock lock = this.lock;

           lock.lockInterruptibly();

           try {

               for (;;) {

                   RunnableScheduledFuture<?> first = queue[0];

                   if (first == null)

                       available.await();

                   else {

                       long delay = first.getDelay(NANOSECONDS);

                       if (delay <= 0)

                           return finishPoll(first);

                       first = null; // don't retain ref while waiting

                       if (leader != null)

                           available.await();

                       else {

                           Thread thisThread = Thread.currentThread();

                           leader = thisThread;

                           try {

                               available.awaitNanos(delay);

                           } finally {

                               if (leader == thisThread)

                                   leader = null;

                           }

                       }

                   }

               }

           } finally {

               if (leader == null && queue[0] != null)

                   available.signal();

               lock.unlock();

           }

       }
在for循环里面,首先从queue中获取第一个任务,然后从任务中取出延迟时间,而后使用available变量来实现延迟效果。
private final Condition available = lock.newCondition();
queue队列它是一个RunnableScheduledFuture类型的数组
private RunnableScheduledFuture<?>[] queue = new RunnableScheduledFuture<?>[INITIAL_CAPACITY];
2.add()方法
public boolean add(Runnable e) {

    return offer(e);

}

 public boolean offer(Runnable x) {

    if (x == null)

        throw new NullPointerException();

    RunnableScheduledFuture<?> e = (RunnableScheduledFuture<?>)x;

    final ReentrantLock lock = this.lock;

    lock.lock();

    try {

        int i = size;

        if (i >= queue.length)

            grow();

        size = i + 1;

        if (i == 0) {

            queue[0] = e;

            setIndex(e, 0);

        } else {

            siftUp(i, e);

        }

        if (queue[0] == e) {

            leader = null;

            available.signal();

        }

    } finally {

        lock.unlock();

    }

    return true;

}
说明:add方法直接转到了offer方法,该方法中,首先判断数组的容量是否足够,如果不够则grow,增长的策略如下:
int newCapacity = oldCapacity + (oldCapacity >> 1); // grow 50%
每次增长50%,入戏下去。增长完成后,如果这是第一个元素,则放在坐标为0的位置,否则,使用siftUp操作,下面是该方法的内容:
3.siftUp()
private void siftUp(int k, RunnableScheduledFuture<?> key) {

    while (k > 0) {

        int parent = (k - 1) >>> 1;

        RunnableScheduledFuture<?> e = queue[parent];

        if (key.compareTo(e) >= 0)

            break;

        queue[k] = e;

        setIndex(e, k);

        k = parent;

    }

    queue[k] = key;

    setIndex(key, k);

}
这个数组实现了堆这种数据结构,使用对象比较将最需要被调度执行的RunnableScheduledFuture放到数组的前面,而这得力于compareTo方法,下面是RunnableScheduledFuture类的compareTo方法的实现,主要是通过延迟时间来做比较。
RunnableScheduledFuture.compareTo()
public int compareTo(Delayed other) {

    if (other == this) // compare zero if same object

        return 0;

    if (other instanceof ScheduledFutureTask) {

        ScheduledFutureTask<?> x = (ScheduledFutureTask<?>)other;

        long diff = time - x.time;

        if (diff < 0)

            return -1;

        else if (diff > 0)

            return 1;

        else if (sequenceNumber < x.sequenceNumber)

            return -1;

        else

            return 1;

    }

    long diff = getDelay(NANOSECONDS) - other.getDelay(NANOSECONDS);

    return (diff < 0) ? -1 : (diff > 0) ? 1 : 0;

}
上面是生产元素,下面来看一下消费数据。在上面我们提到的take方法中,使用了一个方法如下:
private RunnableScheduledFuture<?> finishPoll(RunnableScheduledFuture<?> f) {

    int s = --size;

    RunnableScheduledFuture<?> x = queue[s];

    queue[s] = null;

    if (s != 0)

        siftDown(0, x);

    setIndex(f, -1);

    return f;

}
这个方法中调用了一个方法siftDown,这个方法如下:
private void siftDown(int k, RunnableScheduledFuture<?> key) {

    int half = size >>> 1;

    while (k < half) {

        int child = (k << 1) + 1;

        RunnableScheduledFuture<?> c = queue[child];

        int right = child + 1;

        if (right < size && c.compareTo(queue[right]) > 0)

            c = queue[child = right];

        if (key.compareTo(c) <= 0)

            break;

        queue[k] = c;

        setIndex(c, k);

        k = child;

    }

    queue[k] = key;

    setIndex(key, k);

}
Replaces first element with last and sifts it down. Call only when holding lock.在上面的take方法里面,首先获取了delay,然后再使用available来做延迟效果,其中delay是通过RunnableScheduledFuture类的getDelay方法获取,RunnableScheduledFuture类实现了Delayed接口,而Delayed接口里面的唯一方法是getDelay,我们到RunnableScheduledFuture里面看一下这个方法的具体实现:
public long getDelay(TimeUnit unit) {

     return unit.convert(time - now(), NANOSECONDS);

 }
time是我们设定的下次执行的时间,所以延迟就是(time - now()),
到此为止,我们梳理了ScheduledThreadPoolExecutor是如何实现周期性调度的,首先分析了它的循环性,然后分析了它的延迟效果。
Java多线程系列 JUC线程池06 线程池原理解析(五)的更多相关文章
- Java多线程系列--“JUC线程池”06之 Callable和Future
概要 本章介绍线程池中的Callable和Future.Callable 和 Future 简介示例和源码分析(基于JDK1.7.0_40) 转载请注明出处:http://www.cnblogs.co ...
- Java多线程系列--“JUC线程池”02之 线程池原理(一)
概要 在上一章"Java多线程系列--“JUC线程池”01之 线程池架构"中,我们了解了线程池的架构.线程池的实现类是ThreadPoolExecutor类.本章,我们通过分析Th ...
- Java多线程系列--“JUC线程池”03之 线程池原理(二)
概要 在前面一章"Java多线程系列--“JUC线程池”02之 线程池原理(一)"中介绍了线程池的数据结构,本章会通过分析线程池的源码,对线程池进行说明.内容包括:线程池示例参考代 ...
- Java多线程系列--“JUC线程池”04之 线程池原理(三)
转载请注明出处:http://www.cnblogs.com/skywang12345/p/3509960.html 本章介绍线程池的生命周期.在"Java多线程系列--“基础篇”01之 基 ...
- Java多线程系列--“JUC线程池”05之 线程池原理(四)
概要 本章介绍线程池的拒绝策略.内容包括:拒绝策略介绍拒绝策略对比和示例 转载请注明出处:http://www.cnblogs.com/skywang12345/p/3512947.html 拒绝策略 ...
- Java多线程系列--“JUC锁”06之 Condition条件
概要 前面对JUC包中的锁的原理进行了介绍,本章会JUC中对与锁经常配合使用的Condition进行介绍,内容包括:Condition介绍Condition函数列表Condition示例转载请注明出处 ...
- Java多线程系列--“基础篇”07之 线程休眠
概要 本章,会对Thread中sleep()方法进行介绍.涉及到的内容包括:1. sleep()介绍2. sleep()示例3. sleep() 与 wait()的比较 转载请注明出处:http:// ...
- Java多线程系列--“基础篇”10之 线程优先级和守护线程
概要 本章,会对守护线程和线程优先级进行介绍.涉及到的内容包括:1. 线程优先级的介绍2. 线程优先级的示例3. 守护线程的示例 转载请注明出处:http://www.cnblogs.com/skyw ...
- Java多线程系列--“JUC集合”06之 ConcurrentSkipListSet
概要 本章对Java.util.concurrent包中的ConcurrentSkipListSet类进行详细的介绍.内容包括:ConcurrentSkipListSet介绍ConcurrentSki ...
- Java多线程系列--“JUC锁”09之 CountDownLatch原理和示例
概要 前面对"独占锁"和"共享锁"有了个大致的了解:本章,我们对CountDownLatch进行学习.和ReadWriteLock.ReadLock一样,Cou ...
随机推荐
- Application provided invalid, non monotonically increasing dts to muxer in stream
很多同学在使用Ffmpeg过程中都遇到Application provided invalid, non monotonically increasing dts to muxer in stream ...
- MATLAB squeeze 函数
squeeze 除去size为1的维度 B = squeeze(A) 描述: B = squeeze(A),B与A有相同的元素,但所有只有一行或一列的维度(a singleton dimension ...
- 解决长时间计划任务rsync同步进程数过多
用rsync同步远程服务器,由于设置的的同步间隔较短(5分钟),这样一旦网速问题导致5分钟内同步不完.就会倒是同步紊乱,导致系统中很多rsync进程(# ps -aux | grep rsync) ...
- nginx 根据参数选择文档根目录
server { listen 80; server_name testmanage.h5.91wan.com; index index.html index.htm ...
- 初识C++之虚函数
1.什么是虚函数 在基类中用virtual关键字修饰.并在一个或多个派生类中被又一次定义的成员函数.使用方法格式为: virtual 函数返回类型 函数名(參数表) { 函数体 } 虚函数是实现多态性 ...
- Android使用ImageView显示网络图片
本案例使用ImageView 简单的实现了网络图片的调用.当中注意事项.由于用到了网络,这里採用了HttpClient方法訪问网络联接,关于怎样使用,可參照文章 Android中使用HttpClien ...
- nexus5刷机
1.下载需要的刷机包,hammerhead-mra58k-factory-52364034.tgz 2.解压包到某个文件下,如D:\Download 3.重启手机进入fastboot模式下,也叫boo ...
- vmstat 命令
vmstat是Virtual Meomory Statistics(虚拟内存统计)的缩写,可对操作系统的虚拟内存.进程.CPU活动进行监控.他是对系统的整体情况进行统计,不足之处是无法对某个进程进行深 ...
- poj 2367
Genealogical tree Time Limit: 1000MS Memory Limit: 65536K Total Submissions: 3658 Accepted: 2433 ...
- 【Python + selenium】之BSTestRunner:NameError: name 'unicode' is not defined
参考文章:<python3.6 :NameError: name 'unicode' is not defined>