物联网架构成长之路(35)-利用Netty解析物联网自定义协议
一、前言
前面博客大部分介绍了基于EMQ中间件,通信协议使用的是MQTT,而传输的数据为纯文本数据,采用JSON格式。这种方式,大部分一看就知道是熟悉Web开发、软件开发的人喜欢用的方式。由于我也是做web软件开发的,也是比较喜欢这种方式。阿里的物联网平台,也是推荐这种方式。但是,但是做惯硬件开发,嵌入式开发就比较喜欢用裸TCP-Socket连接。采用的是二进制协议。基于此大部分应用场合为了兼容旧设备,就需要单独开发一个TCP服务器的网关。这里使用以前学过的,也是比较流行的Netty框架。
话不多说,下面就开始了。
二、协议
|
定义 |
描述 |
|
|
启动符‘@@’ (2字节) |
数据包的第1、2字节,为固定值 64,64。 |
|
|
控制单元 |
业务流水号 (2字节) |
数据包的第3、4字节。发送/确认模式下,业务流水号由发送端在发送新的数据包时按顺序加一,确认方按发送包的业务流水号返回;请求/应答模式下,业务流水号由请求端在发送新的请求命令时按顺序加一,应答方按请求包的业务流水号返回。低字节传输在前。业务流水号是一个2字节的正整数,由通信双方第一次建立网络连接时确定,初始值为0。业务流水号由业务发起方(业务发起方指发送/确认模式下的发送端或者请求/应答模式下的请求端)独立管理。业务发起方负责业务流水号的分配和回收,保证在业务存续期间业务流水号的唯一性。 |
|
协议版本号 (2字节) |
协议版本号包含主版本号(第5字节)和用户版本号(第6字节)。主版本号为固定值1,用户版本号由用户自行定义。 |
|
|
时间标签 (6字节) |
数据包的第7~12字节,为数据包发出的时间,具体定义表2。 |
|
|
源地址 (6字节) |
数据包的第13~18字节,为数据包的源地址(监控中心或用户信息传输装置地址)。低字节传输在前。 |
|
|
目的地址 (6字节) |
数据包的第19~24字节,为数据包的目的地址(监控中心或用户信息传输装置地址)。低字节传输在前。 |
|
|
应用数据单元长度 (2字节) |
数据包的第25、26字节,为应用数据单元的长度,长度不应大于1024;低字节传输在前。 |
|
|
命令字节 (1字节) |
数据包的第27字节,为控制单元的命令字节,具体定义见表3。 |
|
|
应用数据单元 (最大1024字节) |
应用数据单元,基本格式见表3,对于确认/否认等命令包,此单元可为空。 |
|
|
校验和 (1字节) |
控制单元中各字节数据(第3~第27字节)及应用数据单元的算术校验和,舍去8位以上的进位位后所形成的1字节二进制数。 |
|
|
结束符‘##’ (2字节) |
为固定值 35,35。 |
|
上面这个是本次需要处理的二进制数据格式。
三、代码部分
3.0 Pom.xml
 <?xml version="1.0" encoding="UTF-8"?>

 <project xmlns="http://maven.apache.org/POM/4.0.0" xmlns:xsi="http://www.w3.org/2001/XMLSchema-instance"

     xsi:schemaLocation="http://maven.apache.org/POM/4.0.0 http://maven.apache.org/xsd/maven-4.0.0.xsd">

     <modelVersion>4.0.0</modelVersion>

     <parent>

         <groupId>org.springframework.boot</groupId>

         <artifactId>spring-boot-starter-parent</artifactId>

         <version>2.1.1.RELEASE</version>

         <relativePath/> <!-- lookup parent from repository -->

     </parent>

     <groupId>com.wunaozai.iot.nettyplatform</groupId>

     <artifactId>NettyPlatform</artifactId>

     <version>0.0.1-SNAPSHOT</version>

     <name>IoTNettyPlatForm</name>

     <description>基于自定义协议,使用Netty,物联网通信平台</description>

     <properties>

         <java.version>1.8</java.version>

     </properties>

     <dependencies>

         <dependency>

             <groupId>org.springframework.boot</groupId>

             <artifactId>spring-boot-starter</artifactId>

         </dependency>

         <!-- https://mvnrepository.com/artifact/io.netty/netty-all -->

         <dependency>

             <groupId>io.netty</groupId>

             <artifactId>netty-all</artifactId>

         </dependency>

         <dependency>

             <groupId>org.springframework.boot</groupId>

             <artifactId>spring-boot-configuration-processor</artifactId>

             <optional>true</optional>

         </dependency>

     <!-- web项目必要的依赖 -->

     <dependency>

         <groupId>org.springframework.boot</groupId>

         <artifactId>spring-boot-starter-web</artifactId>

     </dependency>

     <!-- 热启动devtools -->

     <dependency>

         <groupId>org.springframework.boot</groupId>

         <artifactId>spring-boot-devtools</artifactId>

         <optional>true</optional>

         <scope>true</scope>

     </dependency>

         <dependency>

             <groupId>org.springframework.boot</groupId>

             <artifactId>spring-boot-starter-test</artifactId>

             <scope>test</scope>

         </dependency>

     </dependencies>

     <build>

         <plugins>

             <plugin>

                 <groupId>org.springframework.boot</groupId>

                 <artifactId>spring-boot-maven-plugin</artifactId>

                 <configuration>

                     <fork>true</fork>

                 </configuration>

             </plugin>

         </plugins>

     </build>

 </project>
3.1 SmartIotProtocol.java
这个主要对通信协议模型进行简单封装
 package com.wunaozai.iot.nettyplatform.code;

 /**

  * 自定义协议

  * @author Administrator

  * @see https://www.cnblogs.com/sidesky/p/6913109.html

  */

 public class SmartIotProtocol {

     /**

      * 协议最短长度 30 字节

      */

     public static int MIN_LEN = 30;

     /**

      * 数据包启动符号 @@

      */

     public static short START = 25700;

     /**

      * 业务流水号

      */

     private short flowid;

     /**

      * 主版本

      */

     private byte version_major;

     /**

      * 次版本

      */

     private byte version_minor;

     /**

      * 秒

      */

     private byte second;

     /**

      * 分钟

      */

     private byte minute;

     /**

      * 小时

      */

     private byte hour;

     /**

      * 日

      */

     private byte day;

     /**

      * 月

      */

     private byte month;

     /**

      * 年

      */

     private byte year;

     /**

      * 数据包的源地址

      */

     private byte[] src;

     /**

      * 数据包的目的地址

      */

     private byte[] dest;

     /**

      * 应用数据单元长度 长度不应大于1024;低字节传输在前

      */

     private short data_len;

     /**

      * 命令字节 为控制单元的命令字节

      */

     private byte cmd;

     /**

      * 应用数据单元  对于确认/否认等命令包,此单元可为空

      */

     private byte[] data;

     /**

      * 校验和 控制单元中各字节数据(第3~第27字节)及应用数据单元的算术校验和,舍去8位以上的进位位后所形成的1字节二进制数

      */

     private byte checksum;

     /**

      * 协议结束符号 ##

      */

     public static short END = 13621;

     /**

      * 打印调试信息

      */

     public void printDebugInfo(){

         System.out.println("---------完整数据包开始------------");

         System.out.println("|开始标志: " + printHexShort(START));

         System.out.println("|业务流水: " + printHexShort(flowid) + "\tFlowID:" + flowid);

         System.out.println("|协议版本: " + printHexByte(version_major) + printHexByte(version_minor));

         System.out.println("|时间标签: " + "20" + year + "-" + month + "-" + day + " " + hour + ":" + minute + ":" + second);

         System.out.println("|源地址  : " + printHexBytes(src));

         System.out.println("|目的地址: " + printHexBytes(dest));

         System.out.println("|数据长度: " + data_len);

         System.out.println("|命令字节: " + printHexByte(cmd));

         System.out.println("|应用数据: " + printHexBytes(data));

         System.out.println("|校验字节: " + printHexByte(checksum));

         System.out.println("|结束标志: " + printHexShort(END));

         System.out.println("---------------------------------");

     }

     private String printHexByte(byte b){

         return String.format("%02X", b);

     }

     private String printHexBytes(byte[] bytes){

         String str = "";

         for(int i=0; i<bytes.length; i++){

             str += String.format("%02X", bytes[i]);

         }

         return str;

     }

     private String printHexShort(int s){

         byte[] bytes = hexShort(s);

         return printHexBytes(bytes);

     }

     private byte[] hexShort(int s){

         byte[] bytes = new byte[2];

         bytes[0] = (byte)((s << 24) >> 24);

         bytes[1] = (byte)((s << 16) >> 24);

         return bytes;

     }

     private byte[] hexInt(int n){

         byte[] bytes = new byte[4];

         bytes[3] = (byte) ((n      ) >> 24);

         bytes[2] = (byte) ((n <<  8) >> 24);

         bytes[1] = (byte) ((n << 16) >> 24);

         bytes[0] = (byte) ((n << 24) >> 24);

         return bytes;

     }

     public short getFlowid() {

         return flowid;

     }

     public void setFlowid(short flowid) {

         this.flowid = flowid;

     }

     public byte getVersion_major() {

         return version_major;

     }

     public void setVersion_major(byte version_major) {

         this.version_major = version_major;

     }

     public byte getVersion_minor() {

         return version_minor;

     }

     public void setVersion_minor(byte version_minor) {

         this.version_minor = version_minor;

     }

     public byte getSecond() {

         return second;

     }

     public void setSecond(byte second) {

         this.second = second;

     }

     public byte getMinute() {

         return minute;

     }

     public void setMinute(byte minute) {

         this.minute = minute;

     }

     public byte getHour() {

         return hour;

     }

     public void setHour(byte hour) {

         this.hour = hour;

     }

     public byte getDay() {

         return day;

     }

     public void setDay(byte day) {

         this.day = day;

     }

     public byte getMonth() {

         return month;

     }

     public void setMonth(byte month) {

         this.month = month;

     }

     public byte getYear() {

         return year;

     }

     public void setYear(byte year) {

         this.year = year;

     }

     public byte[] getSrc() {

         return src;

     }

     public void setSrc(byte[] src) {

         this.src = src;

     }

     public byte[] getDest() {

         return dest;

     }

     public void setDest(byte[] dest) {

         this.dest = dest;

     }

     public short getData_len() {

         return data_len;

     }

     public void setData_len(short data_len) {

         this.data_len = data_len;

     }

     public byte getCmd() {

         return cmd;

     }

     public void setCmd(byte cmd) {

         this.cmd = cmd;

     }

     public byte[] getData() {

         return data;

     }

     public void setData(byte[] data) {

         this.data = data;

     }

     public byte getChecksum() {

         return checksum;

     }

     public void setChecksum(byte checksum) {

         this.checksum = checksum;

     }

 }
3.2 SmartIotDecoder.java
解码器,这个是本次的重点,这个解码器最主要是解决TCP粘包拆包问题,如果有不清楚的,要重点理解一下。
 package com.wunaozai.iot.nettyplatform.code;

 import java.util.List;

 import org.slf4j.Logger;

 import org.slf4j.LoggerFactory;

 import io.netty.buffer.ByteBuf;

 import io.netty.channel.ChannelHandlerContext;

 import io.netty.handler.codec.ByteToMessageDecoder;

 /**

  * 自定义协议解析

  * @author Administrator

  *

  */

 public class SmartIotDecoder extends ByteToMessageDecoder {

     private static final Logger log = LoggerFactory.getLogger(SmartIotDecoder.class);

     @Override

     protected void decode(ChannelHandlerContext ctx, ByteBuf buffer, List<Object> out) throws Exception {

         log.debug("启动解码器...");

         log.debug("目前数据缓存大小: " + buffer.readableBytes());

         // 刻度长度必须大于基本最小长度

         if(buffer.readableBytes() >= SmartIotProtocol.MIN_LEN){

             log.debug("符合最小长度,进行解析");

             //防止socket字节流攻击、客户端传来的数据过大,这里需要对数据进行过滤掉

             if(buffer.readableBytes() >= 4096){

                 buffer.skipBytes(buffer.readableBytes());

                 return ;

             }

             //记录包头开始位置

             int beginReader = 0;

             while(true){

                 beginReader = buffer.readerIndex(); //记录包头开始位置

                 buffer.markReaderIndex(); //标记包头开始index

                 //读取协议开始标志

                 if(buffer.readShort() == SmartIotProtocol.START){

                     break; //如果是开始标记,那么就结束查找

                 }

                 //如果找不到包头,这里要一个一个字节跳过

                 buffer.resetReaderIndex();

                 buffer.readByte();

                 //当跳过后,如果数据包又不符合长度的,结束本次协议解析

                 if(buffer.readableBytes() < SmartIotProtocol.MIN_LEN){

                     return ;

                 }

             }

             short flowid = buffer.readShort();

             byte version_major = buffer.readByte();

             byte version_minor = buffer.readByte();

             byte second = buffer.readByte();

             byte minute = buffer.readByte();

             byte hour = buffer.readByte();

             byte day = buffer.readByte();

             byte month = buffer.readByte();

             byte year = buffer.readByte();

             byte[] src = new byte[6];

             src[0] = buffer.readByte();

             src[1] = buffer.readByte();

             src[2] = buffer.readByte();

             src[3] = buffer.readByte();

             src[4] = buffer.readByte();

             src[5] = buffer.readByte();

             byte[] dest = new byte[6];

             dest[0] = buffer.readByte();

             dest[1] = buffer.readByte();

             dest[2] = buffer.readByte();

             dest[3] = buffer.readByte();

             dest[4] = buffer.readByte();

             dest[5] = buffer.readByte();

             short data_len = buffer.readShort();

             if(buffer.readableBytes() < data_len + 4){

                 //还原读指针

                 buffer.readerIndex(beginReader);

                 return ;

             }

             byte cmd = buffer.readByte();

             byte[] data = null;

             if(data_len > 0){

                 //读取应用数据单元

                 data = new byte[data_len];

                 buffer.readBytes(data);

             }

             byte checksum = buffer.readByte();

             short end = buffer.readShort();

             if(end == SmartIotProtocol.END){

                 log.debug("完成解析,并输出.");

                 SmartIotProtocol iot = new SmartIotProtocol();

                 iot.setFlowid(flowid);

                 iot.setVersion_major(version_major);

                 iot.setVersion_minor(version_minor);

                 iot.setSecond(second);

                 iot.setMinute(minute);

                 iot.setHour(hour);

                 iot.setDay(day);

                 iot.setMonth(month);

                 iot.setYear(year);

                 iot.setSrc(src);

                 iot.setDest(dest);

                 iot.setData_len(data_len);

                 iot.setCmd(cmd);

                 if(data_len > 0){

                     iot.setData(data);

                 }else{

                     iot.setData(null);

                 }

                 iot.setChecksum(checksum);

                 out.add(iot);

             }

         }

     }

 }
3.3 SmartIotEncoder.java
相对于解码,这个编码器,就相对简单了,按照协议,一个byte一本byte进行发送即可。
 package com.wunaozai.iot.nettyplatform.code;

 import io.netty.buffer.ByteBuf;

 import io.netty.channel.ChannelHandlerContext;

 import io.netty.handler.codec.MessageToByteEncoder;

 /**

  * 自定义协议数据解析

  * @author Administrator

  *

  */

 public class SmartIotEncoder extends MessageToByteEncoder<SmartIotProtocol> {

     @Override

     protected void encode(ChannelHandlerContext ctx, SmartIotProtocol msg, ByteBuf out) throws Exception {

         //写入消息SmartIot具体内容

         out.writeShort(SmartIotProtocol.START);

         out.writeShort(msg.getFlowid());

         out.writeByte(msg.getVersion_major());

         out.writeByte(msg.getVersion_minor());

         out.writeByte(msg.getSecond());

         out.writeByte(msg.getMinute());

         out.writeByte(msg.getHour());

         out.writeByte(msg.getDay());

         out.writeByte(msg.getMonth());

         out.writeByte(msg.getYear());

         out.writeBytes(msg.getSrc());

         out.writeBytes(msg.getDest());

         out.writeShort(msg.getData_len());

         out.writeByte(msg.getCmd());

         out.writeBytes(msg.getData());

         out.writeByte(msg.getChecksum());

         out.writeShort(SmartIotProtocol.END);

     }

 }
3.4 SmartIotHandler.java
这个是工程里面的主要业务操作类,用户Handler处理所有业务操作,这里也可以理解为是一个入口、网关。所有命令都从这里进行分发到子模块。
 package com.wunaozai.iot.nettyplatform.code;

 import java.net.InetSocketAddress;

 import org.slf4j.Logger;

 import org.slf4j.LoggerFactory;

 import io.netty.channel.ChannelHandlerContext;

 import io.netty.channel.SimpleChannelInboundHandler;

 /**

  * 服务Handler 处理

  * @author Administrator

  *

  */

 public class SmartIotHandler extends SimpleChannelInboundHandler<SmartIotProtocol> {

     private static final Logger log = LoggerFactory.getLogger(SmartIotHandler.class);

     @Override

     protected void channelRead0(ChannelHandlerContext ctx, SmartIotProtocol iot)

             throws Exception {

         log.info("收到设备数据包: " + iot.getFlowid());

         iot.printDebugInfo();

         ctx.write("ok");

     }

     @Override

     public void channelActive(ChannelHandlerContext ctx) throws Exception {

         InetSocketAddress socket = (InetSocketAddress) ctx.channel().remoteAddress();

         String ip = socket.getAddress().getHostAddress();

         log.info("收到客户端IP: " + ip);

     }

     @Override

     public void exceptionCaught(ChannelHandlerContext ctx, Throwable cause) throws Exception {

         ctx.close();

     }

 }
3.5 NettyServerInitializer.java
这个就是初始化本次Netty框架中,使用的编解码器,还有对应的处理类。
 package com.wunaozai.iot.nettyplatform.config;

 import com.wunaozai.iot.nettyplatform.code.SmartIotDecoder;

 import com.wunaozai.iot.nettyplatform.code.SmartIotEncoder;

 import com.wunaozai.iot.nettyplatform.code.SmartIotHandler;

 import io.netty.channel.ChannelInitializer;

 import io.netty.channel.ChannelPipeline;

 import io.netty.channel.socket.SocketChannel;

 /**

  * 服务器初始化

  * @author Administrator

  *

  */

 public class NettyServerInitializer extends ChannelInitializer<SocketChannel> {

     @Override

     protected void initChannel(SocketChannel ch) throws Exception {

 //        ChannelPipeline pipeline = ch.pipeline();

 //        //自定义切割符

 //        //ByteBuf delimiter = Unpooled.copiedBuffer(new byte[] {16});

 //        ByteBuf delimiter = Unpooled.copiedBuffer("$_".getBytes());

 //

 //        pipeline.addLast(new DelimiterBasedFrameDecoder(8192, delimiter));

 //        pipeline.addLast(new StringDecoder(CharsetUtil.UTF_8));

 //        pipeline.addLast(new StringEncoder(CharsetUtil.UTF_8));

 //        pipeline.addLast(new NettyServerHandler());

         ChannelPipeline pipeline = ch.pipeline();

         //添加自定义编解码器

         pipeline.addLast(new SmartIotEncoder());

         pipeline.addLast(new SmartIotDecoder());

         //处理网络IO

         pipeline.addLast(new SmartIotHandler());

     }

 }
3.6 NettyServer.java
Netty功能的入口类,所有Netty框架初始化步骤都在这里进行简单处理。
 package com.wunaozai.iot.nettyplatform.config;

 import org.slf4j.Logger;

 import org.slf4j.LoggerFactory;

 import org.springframework.stereotype.Component;

 import io.netty.bootstrap.ServerBootstrap;

 import io.netty.channel.ChannelFuture;

 import io.netty.channel.ChannelOption;

 import io.netty.channel.EventLoopGroup;

 import io.netty.channel.nio.NioEventLoopGroup;

 import io.netty.channel.socket.nio.NioServerSocketChannel;

 import io.netty.handler.logging.LogLevel;

 import io.netty.handler.logging.LoggingHandler;

 /**

  * Netty 服务器

  * @author Administrator

  *

  */

 @Component

 public class NettyServer {

     private static final Logger log = LoggerFactory.getLogger(NettyServer.class);

     private int port = 7777;

     public void run(){

         EventLoopGroup bossGroup = new NioEventLoopGroup();

         EventLoopGroup workerGroup = new NioEventLoopGroup();

         try {

             ServerBootstrap serverBootstrap = new ServerBootstrap();

             serverBootstrap.group(bossGroup, workerGroup);

             serverBootstrap.channel(NioServerSocketChannel.class);

             serverBootstrap.option(ChannelOption.SO_BACKLOG, 1024);

             serverBootstrap.handler(new LoggingHandler(LogLevel.INFO));

             serverBootstrap.childOption(ChannelOption.TCP_NODELAY, true);

             serverBootstrap.childOption(ChannelOption.SO_KEEPALIVE, true);

             serverBootstrap.childHandler(new NettyServerInitializer());

             // 绑定端口,开始接收进来的连接

             ChannelFuture channelFuture = serverBootstrap.bind(port).sync();

             log.info("netty服务启动: [port:" + port + "]");

             // 等待服务器socket关闭

             channelFuture.channel().closeFuture().sync();

         } catch (Exception e) {

             log.error("Netty 服务启动失败: " + e.getMessage());

         }finally {

             bossGroup.shutdownGracefully();

             workerGroup.shutdownGracefully();

         }

     }

 }
3.7 IotNettyPlatFormApplication.java
这个是Spring Boot项目的入口函数。在这里调用Netty的入口函数。
 package com.wunaozai.iot.nettyplatform;

 import org.slf4j.Logger;

 import org.slf4j.LoggerFactory;

 import org.springframework.boot.SpringApplication;

 import org.springframework.boot.autoconfigure.SpringBootApplication;

 import org.springframework.context.annotation.ComponentScan;

 import org.springframework.web.servlet.config.annotation.EnableWebMvc;

 import com.wunaozai.iot.nettyplatform.config.NettyServer;

 @SpringBootApplication

 public class IoTNettyPlatFormApplication {

     private static final Logger log = LoggerFactory.getLogger(IoTNettyPlatFormApplication.class);

     public static void main(String[] args) {

         SpringApplication.run(IoTNettyPlatFormApplication.class, args);

         run();

     }

     private static NettyServer nettyServer = new NettyServer();

     private static void run(){

         Thread thread = new Thread(new Runnable() {

             @Override

             public void run() {

                 nettyServer.run();

             }

         });

         thread.start();

     }

 }
我这里通过在@SpringBootApplication 这里调用NettyServer。同时还有其他方式:
1) 通过实现ApplicationListener
 import org.slf4j.Logger;

 import org.slf4j.LoggerFactory;

 import org.springframework.context.ApplicationListener;

 import org.springframework.context.event.ContextRefreshedEvent;

 import org.springframework.stereotype.Component;

 /**

  * 项目初始化

  * @author wunaozai

  * @date 2018-05-24

  */

 @Component

 public class OnStartListener implements ApplicationListener<ContextRefreshedEvent> {

     private static final Logger log = LoggerFactory.getLogger(OnStartListener.class);

     @Override

     public void onApplicationEvent(ContextRefreshedEvent arg0) {

         log.info("Run on Start Listener.");

     }

 }
2) 通过实现CommandLineRunner
 import org.slf4j.Logger;

 import org.slf4j.LoggerFactory;

 import org.springframework.boot.CommandLineRunner;

 import org.springframework.core.annotation.Order;

 import org.springframework.stereotype.Component;

 /**

  * 项目启动时初始化资源<br>

  * 如 一些初始化操作,提前加载加密证书,初始化线程池等

  * @author wunaozai

  * @date 2018-05-24

  */

 @Component

 @Order(value = 1) //执行顺序

 public class Runner implements CommandLineRunner {

     private static final Logger log = LoggerFactory.getLogger(Runner.class);

     @Override

     public void run(String... args) throws Exception {

         log.info("The Runner start to Initialize.");

     }

 }
三、协议测试

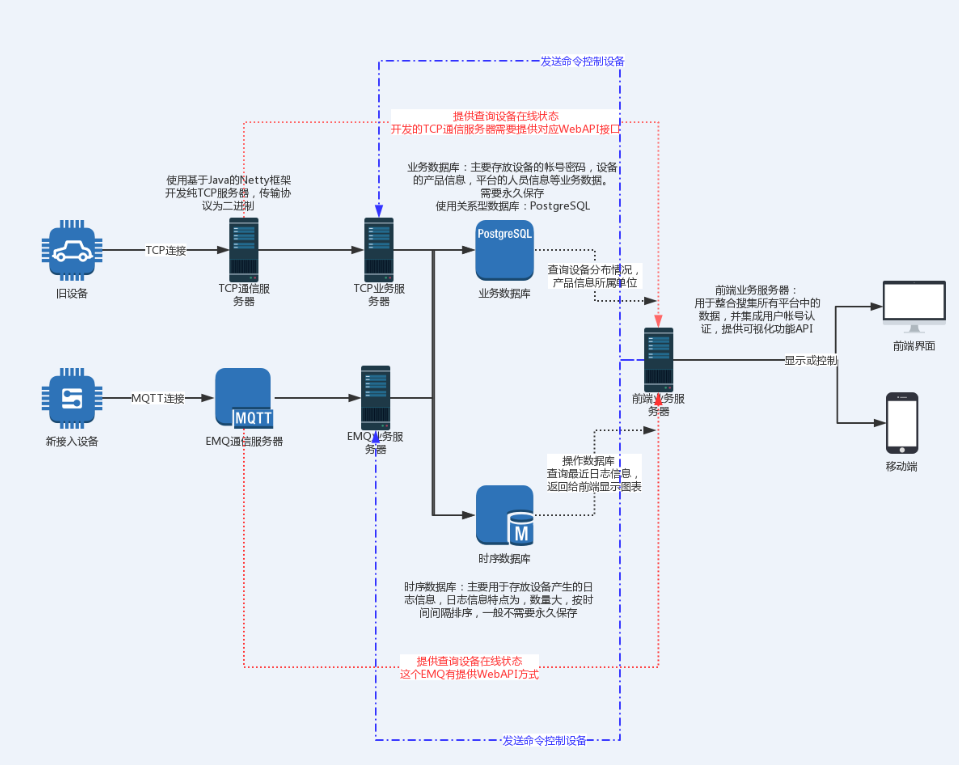
四、简单架构
由于引入了自定义协议,所以需要对原先的流程进行简单的改造,下面这个图是某项目的架构图。
参考资料:
https://www.cnblogs.com/sidesky/p/6913109.html
架构系列: https://www.cnblogs.com/wunaozai/p/8067577.html
本文地址: https://www.cnblogs.com/wunaozai/p/11403015.html
物联网架构成长之路(35)-利用Netty解析物联网自定义协议的更多相关文章
- 物联网架构成长之路(47)-利用GitLab实现CI持续集成
0.前言 前段时间,考虑到要练习部署一套CI/CD的系统.一开始考虑到Jenkins,随着这两天的了解,发现最新版的GitLab已经提供有CI/CD集成了.所以本次博客,干脆一步到位,直接用GitLa ...
- 物联网架构成长之路(25)-Docker构建项目用到的镜像1
0. 前言 现在项目处于初级阶段,按照规划,先构建几个以后可能会用到的Image,并上传到阿里云的Docker仓库.以后博客中用到的Image,大部分都会用到这几个基础的Image,构建一个简单的物联 ...
- 物联网架构成长之路(31)-EMQ基于HTTP权限验证
看过之前的文章就知道,我之前是通过搞插件,或者通过里面的MongoDB来进行EMQ的鉴权登录和权限验证.但是前段时间发现,还是通过HTTP WebHook 方式来调用鉴权接口比较适合实际使用.还是实现 ...
- 物联网架构成长之路(24)-Docker练习之Compose容器编排
0.前言 一开始学的之后,是想一步到位直接上Kubernetes(K8s)的,后面没想到,好像有点复杂,有些概念不是很懂.因此学习东西还是要循序渐进,慢慢来.先了解单机编排技术Docker Compo ...
- 物联网架构成长之路(33)-EMQ数据存储到influxDB
一.前言 时隔一年半,技术变化特别快,学习也要跟上才行.以前写过EMQ数据转存问题,当时用了比较笨的方法,通过写插件的方式,把MQTT里面的数据发送到数据库进行存储.当时也是为了学习erlang和em ...
- 物联网架构成长之路(29)-Jenkins环境搭建
0. 说明 哈哈,前面中间插入了一篇Eclipse增加Git插件,在此之前真的没有用过GIT. 1. 运行Jenkins 这里为了方便,还是用Docker方式安装,由于这个是标准的war报,不对Doc ...
- 物联网架构成长之路(16)-SpringCloud从入门到吹水
1.前言 Spring Cloud 现在比较流行,版本更新也是蛮快的,网上资料也是很多.很多参考网上资料就可以学到了.这里给个 http://blog.csdn.net/forezp/article/ ...
- 物联网架构成长之路(22)-Docker练习之Etcd服务搭建
0. 前言 时隔多日,前段时间忙完一个可有可无的项目后,又进入摸鱼时间,没有办法,非互联网公司,就是闲得蛋疼.又开始了自学之路.以前入门过Docker,然后又很久没有看了,最近重新看了一下,推荐一下这 ...
- 物联网架构成长之路(32)-SpringBoot集成MQTT客户端
一.前言 这里虽然是说MQTT客户端.其实对于服务器来说,这里的一个具有超级权限的MQTT客户端,就可以做很多事情.比如手机APP或者网页或者第三方服务需要发送数据到设备,但是这些又不是设备,又不能让 ...
随机推荐
- "One or more types required to compile a dynamic expression cannot be found. Are you missing references to Microsoft.CSharp.dll and System.Core.dll?"的解决方法
#事故现场: 在一个.net 4.0 的项目中使用dynamic,示例代码如下: private static void Main(string[] args) { dynamic obj; obj ...
- 02-Git远程仓库Github
1.Git远程仓库 (Gitgub网站作为远程代码仓库时的操作和本地代码仓库一样的,只是仓库位置不同而已) 需要准备的东西: 1.准备Git源代码仓库https://github.com/ 2.准备李 ...
- consolidate.js 一个Node.js 模板引擎的集合
consolidate是一个模板引擎的结合体.包括了常用的jade和ejs.通过配置我们就可以使用多种模板引擎. consolidate.js安装 npm install consolidate co ...
- pymongo和mongoengine安装和使用教程 包含常用命令行和代码示例 | pymongo and mongoengine tutorial on ubuntu 16.04
本文首发于个人博客https://kezunlin.me/post/e88f04e5/,欢迎阅读最新内容! pymongo and mongoengine tutorial on ubuntu 16. ...
- Dubbo从入门到实战:实战篇
一.加入 zookeeper 作为注册中心 在前面的案例中,我们没有使用任何的注册中心,而是用一种直连的方式进行的.但是,实际上很多时候,我们都是使用 dubbo + zookeeper 的方式,使用 ...
- Zabbix 预警问题-预警对应的用户报警媒介收不到
问题背景 公司现在有这种需求,需要我们对关键的预警发送到对应的项目组负责人,比如 保险项目组的服务器预警大于警告的预警发送到保险负责人的邮箱(也会发送给运维的,背锅逃不掉的). 进行创建一个 用户群组 ...
- 死磕 java同步系列之ReentrantLock源码解析(一)——公平锁、非公平锁
问题 (1)重入锁是什么? (2)ReentrantLock如何实现重入锁? (3)ReentrantLock为什么默认是非公平模式? (4)ReentrantLock除了可重入还有哪些特性? 简介 ...
- Python【day 17】面向对象-成员
类的变量分成2种: 1.成员变量 概念:在构造方法中的变量,前面带有self 作用:可以在类中不同的方法间使用 2.类变量-静态变量 概念:在类中,构造方法和普通方法之外,定义的变量 作用: 1.调用 ...
- DataGridView中实现点击单元格Cell动态添加自定义控件
场景 鼠标点击DataGridView的某个单元格时,此单元格添加一个自定义的控件,这里以 添加下拉框为例 效果 注: 博客主页: https://blog.csdn.net/badao_liuman ...
- Android开发利器之pidcat
介绍pidcat: pidcat 是Android届JakeWharton大神开发的一款命令行工具,堪称Android开发利器,它能方便Android程序猿捕获日志,过滤日志,定位程序问题,超级好用. ...