Installing Hyperledger Fabric v1.1 on Ubuntu 16.04 — Part I

There is an entire library of Blockchain APIs which you can select according to the needs that suffice your application. Some libraries are open-sourced and some are private. For examples, IBM’s Hyperledger Fabric Project, Ethereum, OpenChain, MultiChain are few of the open sourced models which are popular in the industry today.
This tutorial aims to help you get started and setup your development environment for a blockchain application using the IBM-Hyperledger Fabric API.
In this tutorial, we will be setting Hyperledger Fabric v1.1 on Ubuntu 16.04 on a localhost server. This tutorial can be applied to Ubuntu 14.04 too, but would involve certain changes to the commands due to the difference in the OS versions.
This tutorial is broken into 2 parts so that it is easier for you to understand and follow through the steps without making the article too long. The 1st part focuses on installing the prerequisites for the API and the 2nd part will focus on installing and running of Hyperledger API itself.
Prerequisites
- Go Language v1.10.x
- Docker CE (Community Edition)
Go Language v1.10.x
Go Language has been developed by Google and the IBM Hyperledger Fabric API uses Go for compiling and building. Go integrates the properties of C++ and Python into one language. It has fast run-time because it is a compiled language, similar to C++, as compared to an interpreted language like Python. It is also written in a similar way to Python so it benefits from having a simpler syntax when compared to C++. So, we get the faster speed and easiness of syntax under one hood, Go.
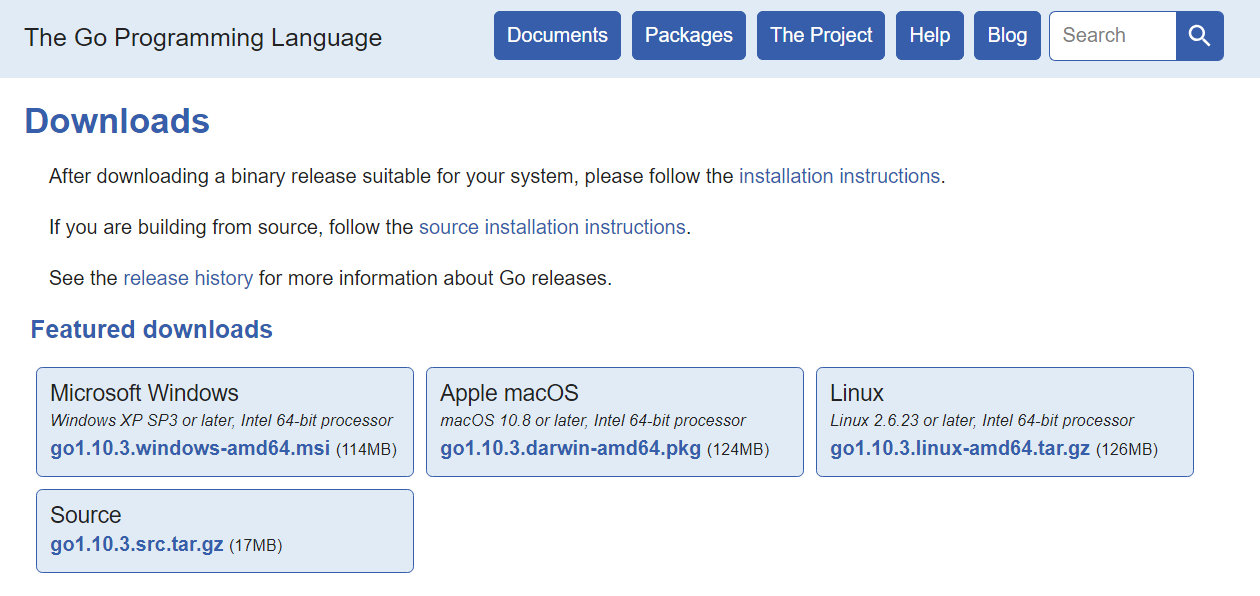
To install the Go Language, we need to download the package from the official Go Download Page. To follow along with this tutorial, select the option in the Linux section, as described in the screenshot below (xx.tar.gz package).
Once the package is downloaded, we need to extract it and move it to /usr/local/ directory, so that our application can access it and more importantly, the Go files are situated at a safe place, where you don’t accidentally delete them.
To extract the Go package, use the command:
tar -xvzf go1.10.3.linux-amd64.tar.gz
Upon successful extraction of the archive, you shall see a new directory has been created with the name: “go”, in the same directory as your downloaded archive. Now, we need to move it to another location, or “/usr/local/”. For this to work, you need to be a `sudo` user of the machine, or else it would throw an error of `Permission Denied`.
The command to transfer the go files into /usr/local/ directory is:
sudo mv go /usr/local/
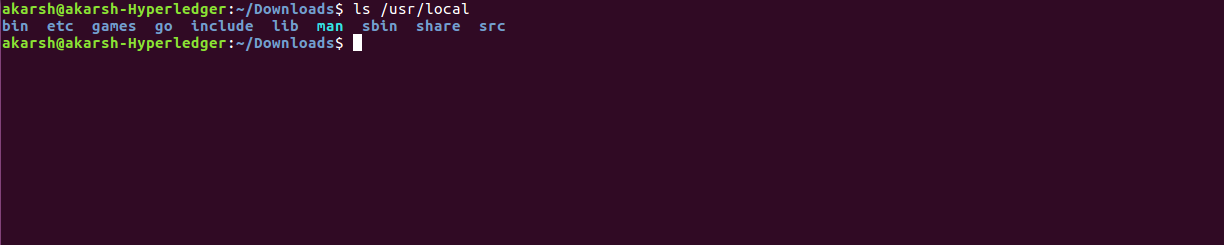
When you see the directory (`/usr/local/`), you should now see that there is a new folder named “go”, in your directory. This shows that the go files have been correctly placed in the desired location. Here is, a screen shot for you to verify and check whether you have something similar to this or not.
Now that we have the Go files in the correct place, we want to configure the terminal to locate the files when we want to execute any Go command. We need to include it into our environment variables. For this, we need to edit the `~/.bashrc` file of the system, which keeps track of the environment variables of your system. To edit that file, we use the command:
sudo nano ~/.bashrc
Include the following lines at the end of the file:
#GO VARIABLES
export GOROOT=/usr/local/go
export PATH=$PATH:$GOROOT/bin
#END GO VARIABLES
The `PATH` variable is the environment Path variable. The `GOROOT` variable defines where are your Go files situated in the system.
To reload the environment variables, we use the following command:
source ~/.bashrc
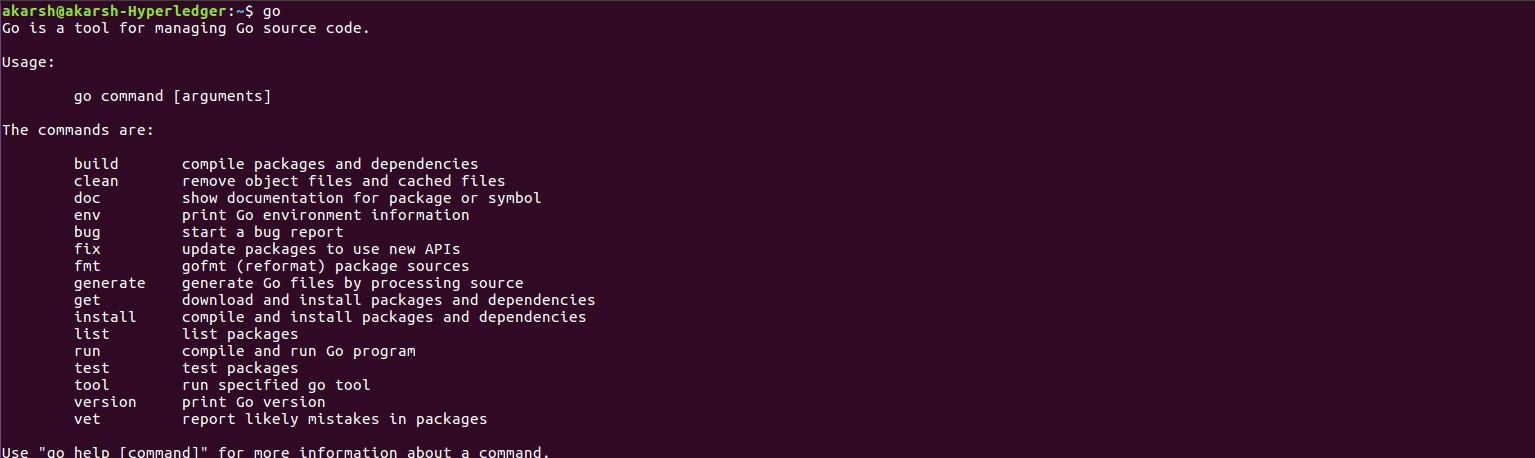
This command gives no output, but just simply reloads all the environment variable in background. Now, we can check the installation of Go in our terminal by typing:
go
If the installation was successful, you should see the following output.
If you see any other output except this, maybe you might have done some mistake. Please go through the steps again above.
Now we have installed the Go language on the host machine and we are halfway through setup of prerequisites for the Hyperledger API, Congrats!.
Docker Engine
Docker is the container where you will be running your instances which makes sure that the blockchain application you run is available. Consider docker as a Virtual Machine Box, which runs images which have specific functionalities, just like Windows and Ubuntu, however each Docker image is smaller in size as compared to an Operating System. Each docker images will run a service associated with the Hyperledger network in your localhost. We shall cover two such services absolutely required by the Blockchain Network to run your application, in the next part of the tutorial. We will see how to install docker in this part.
We need to install docker on your system to be able to understand the beauty that lies within. So, let’s get started!
To install docker through CLI or Terminal, we will need to install two packages: docker-ce and docker-compose. Docker-ce is like the base package which makes all the necessary files available for the docker container to run properly. Docker-compose configures your docker images according to the specific configuration you provide, which will enable the Blockchain service.
To install docker-ce, enter the following command in the terminal.
$ curl -fsSL https://download.docker.com/linux/ubuntu/gpg | sudo apt-key add -
$ sudo add-apt-repository "deb [arch=amd64] https://download.docker.com/linux/ubuntu $(lsb_release -cs) stable"
$ sudo apt-get update
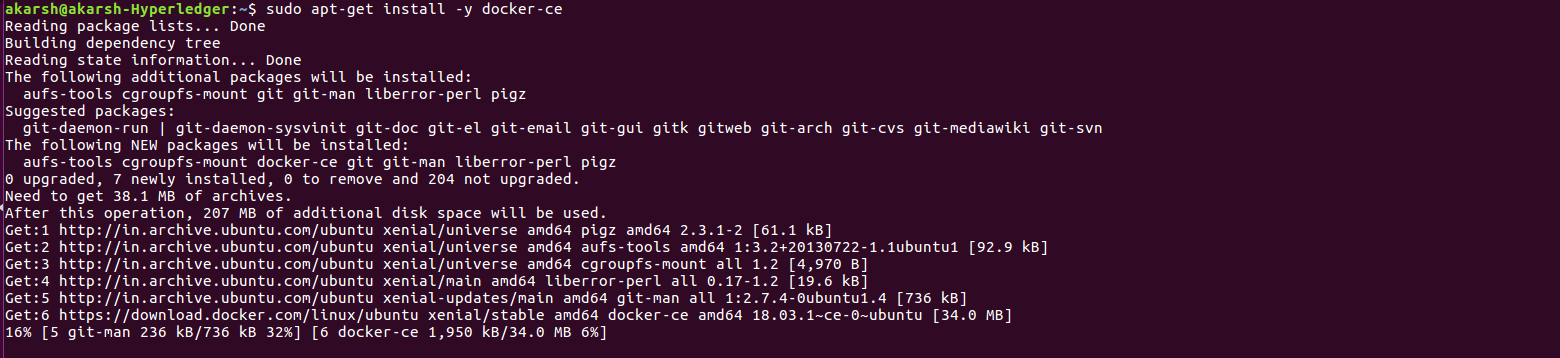
$ sudo apt-get install -y docker-ce
Your output might differ from me. But there is no error in the console, which ensures that it has been installed correctly. After you run the above command, docker should be installed on your system.
Now, we need to enable the docker service at startup of the system. We write the following commands:
To start the docker service:
sudo service docker start
If all goes well, there will be no output. If you get an error, please consider re-installing the docker-ce again.
To enable the docker to start at startup of the system, we use the following command:
sudo systemctl enable docker
If all goes well, each time you reboot your system, your docker container will be reloaded automatically.
To check if the docker service is running, just type:
docker
And you should get a similar output as mine.
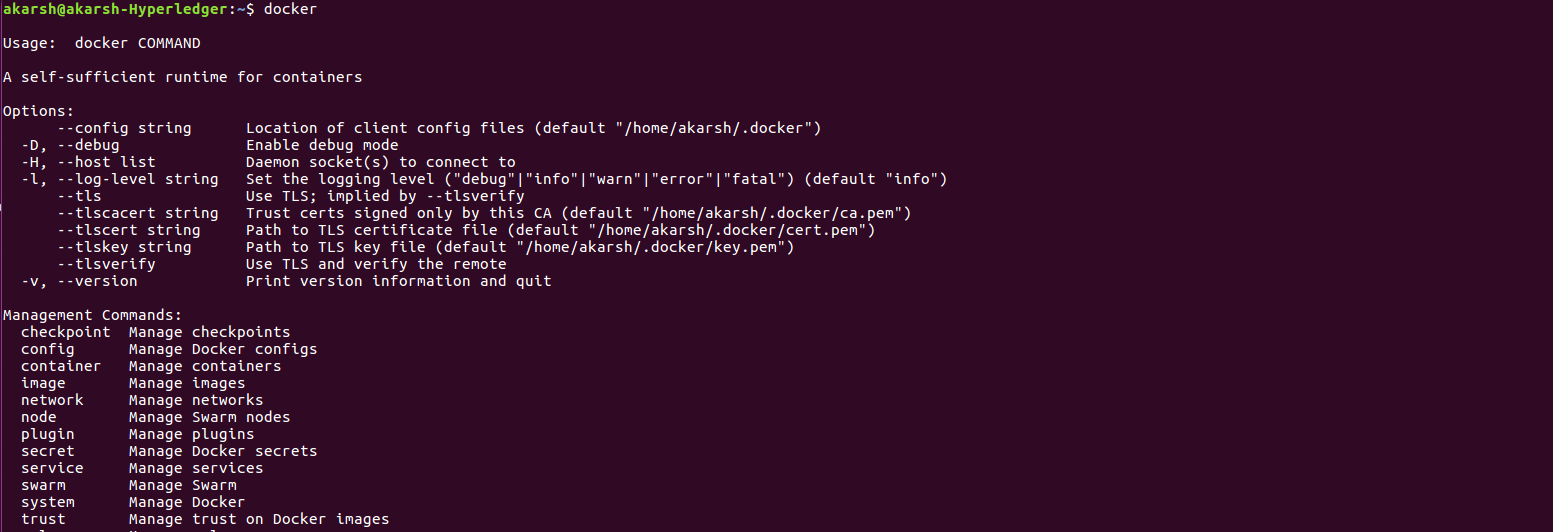
If you get anything else, please consider re-installing the docker-ce.
Now, the second part of docker-ce is the docker-compose function, which is needed to configure the docker images you are calling.
For that, we use python’s `pip`. You can use the following command to install docker-compose:
sudo pip install docker-compose
The installation should complete without any red text at the bottom. This makes sure that we have our docker-ce and docker-compose properly installed in our system. But to work with the docker images, you need to add your user to the docker group, which was created during installation of docker-ce as a part of setup.
sudo usermod -aG docker ${USER}
This command will provide no output. If any output is displayed, maybe there is something wrong with the command you just typed into your console. Please check if you have written the same line of code. After successfully completing, this adds your current logged in user to the docker group, which will enable you to run docker images.
So, at this point, we have setup our two essential packages, Go Language and Docker-ce, which are required to run the Hyperledger Fabric API. The setup and installation part of Hyperledger Fabric API will be presented in the next part of the tutorial.
Last Update Date: 2018–06–29
Installing Hyperledger Fabric v1.1 on Ubuntu 16.04 — Part I的更多相关文章
- Installing Hyperledger Fabric v1.1 on Ubuntu 16.04 — Part II & Part III
This entire tutorial is the second part of the installation of Hyperledger Fabric v1.1. In the previ ...
- Ubuntu下搭建Hyperledger Fabric v1.0环境
多次尝试才正常启动了Fabric,如遇到各种莫名错误,请参考如下一步步严格安装,特别用户权限需要注意. 一.安装Ubuntu16 虚拟机或双系统,虚拟机有VirtualBox或者VMware,Ub ...
- Hyperledger Fabric(v1.1.0)编译时遇到的问题
Hyperledger Fabric(v1.1.0)编译时遇到的问题 0. 编译过程的坑 编译时,按照如下顺序编译 make release,编译源码生成二进制文件 make docker,生成一系列 ...
- 解决Ubuntu 16.04 上Android Studio2.3上面运行APP时提示DELETE_FAILED_INTERNAL_ERROR Error while Installing APKs的问题
本人工作环境:Ubuntu 16.04 LTS + Android Studio 2.3 AVD启动之后,运行APP,报错提示: DELETE_FAILED_INTERNAL_ERROR Error ...
- 三、主流区块链技术特点及Hyperledger Fabric V1.0版本特点
一.Hyperledger fabric V1.0 架构 1.逻辑架构: 2.区块链网络 3.运行时架构 二.架构总结 1.架构要点 分拆Peer的功能,将Blockchain的数据维护和共识服务进行 ...
- Installing Moses on Ubuntu 16.04
Installing Moses on Ubuntu 16.04 The process of installation To install requirements sudo apt-get in ...
- 阿里云容器服务区块链解决方案全新升级 支持Hyperledger Fabric v1.1
摘要: 全球开源区块链领域影响最为广泛的Hyperledger Fabric日前宣布了1.1版本的正式发布,带来了一系列丰富的新功能以及在安全性.性能与扩展性等方面的显著提升.阿里云容器服务区块链解决 ...
- Hyperledger Fabric(v1.2.0)代码分析1——channel创建
Hyperledger Fabric(v1.2.0)代码分析1--channel创建 0. e2e_cli Hyperledger Fabric提供了一个e2e的例子,该例中创建了一个基础的区块链网络 ...
- 003-主流区块链技术特点及Hyperledger Fabric V1.0版本特点
一.Hyperledger fabric V1.0 架构 1.逻辑架构: 2.区块链网络 3.运行时架构 二.架构总结 1.架构要点 分拆Peer的功能,将Blockchain的数据维护和共识服务进行 ...
随机推荐
- Codeforces Round #257 (Div. 1) D - Jzzhu and Numbers 容斥原理 + SOS dp
D - Jzzhu and Numbers 这个容斥没想出来... 我好菜啊.. f[ S ] 表示若干个数 & 的值 & S == S得 方案数, 然后用这个去容斥. 求f[ S ] ...
- spark sql中保存数据的几种方式
从官网来copy过来的几种模式描述: Scala/Java Python Meaning SaveMode.ErrorIfExists(default) "error"(defau ...
- 001.etcd简介及单节点使用
一 etcd简介 1.1 概述 etcd 是 CoreOS 团队发起的开源项目,是一个管理配置信息和服务发现(service discovery)的项目,它的目标是构建一个高可用的分布式键值(key- ...
- mybatis generator修改默认生成的sql模板
相关连接: mybatis-generator扩展教程系列 -- 自定义sql xml文件 git项目地址
- 在多线程中使用spring的bean
由于spring在java开发中的广泛运用大大的方便了开发的同时,当运用一些技术比如多线程等 在由spring管理的配置文件中,可以通过封装spring提供工具,手动获得spring管理的bean,这 ...
- JavaScript 的装饰器:它们是什么及如何使用
请访问我的独立博客地址:https://imsense.site/2017/06/js-decorator/ 装饰器的流行应该感谢在Angular 2+中使用,在Angular中,装饰器因TypeSc ...
- 【BZOJ-4016】最短路径树问题 Dijkstra + 点分治
4016: [FJOI2014]最短路径树问题 Time Limit: 5 Sec Memory Limit: 512 MBSubmit: 1092 Solved: 383[Submit][Sta ...
- 精益软件研发的秘密 IT大咖说 - 大咖干货,不再错过
精益软件研发的秘密 IT大咖说 - 大咖干货,不再错过 http://www.itdks.com/dakashuo/new/dakalive/detail/3662
- spy++使用指南
很多朋友都对窗口句柄比较迷糊,这篇短文就以spy++这个软件为主,介绍下窗体句柄和使用按键插件时,如果对这个句柄发送消息,即所谓的后台挂机.spy++这个软件来自VC++,装好VC后,就可以在工具中看 ...
- MongoDB+MongoVUE安装及入门
前言及概念 据说nodejs和mongoDB是一对好基友,于是就忍不住去学习了解了一下MongoDB相关的一些东西, 那么,MongoDB是什么?这里的五件事是每个开放人员应该知道的: MongoDB ...