
Spring Boot Mybatis整合
Spring Boot是由Pivotal团队提供的全新框架,其设计目的是用来简化新Spring应用的初始搭建以及开发过程。该框架使用了特定的方式来进行配置,从而使开发人员不再需要定义样板化的配置。
特点
环境搭建
用IDEA创建一个新项目File-->New Project-->Spring Initializr

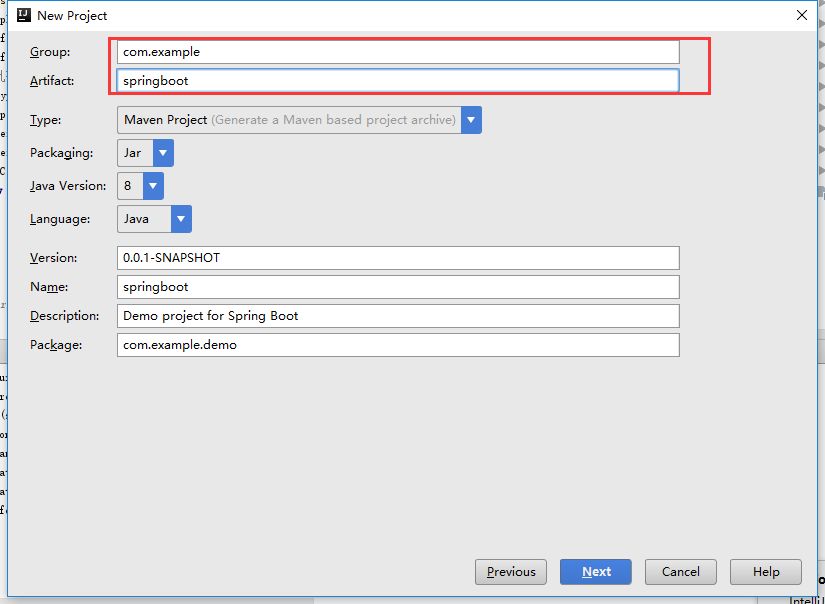
Next-->填写Group和Artifact
Next-->选择项目需要的依赖
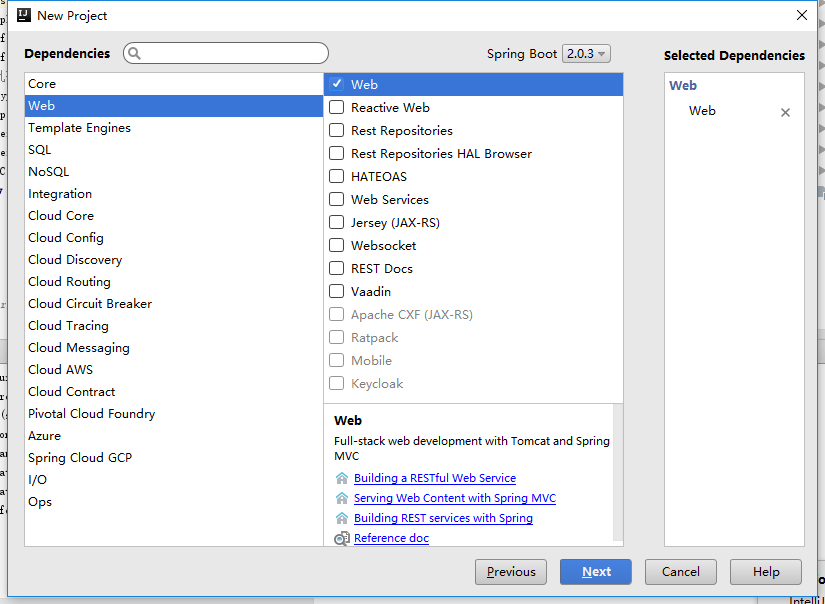
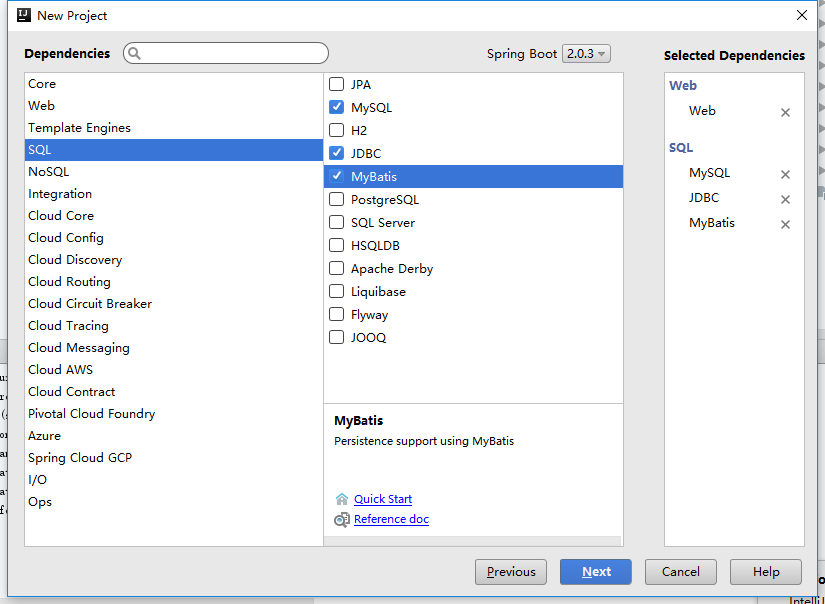
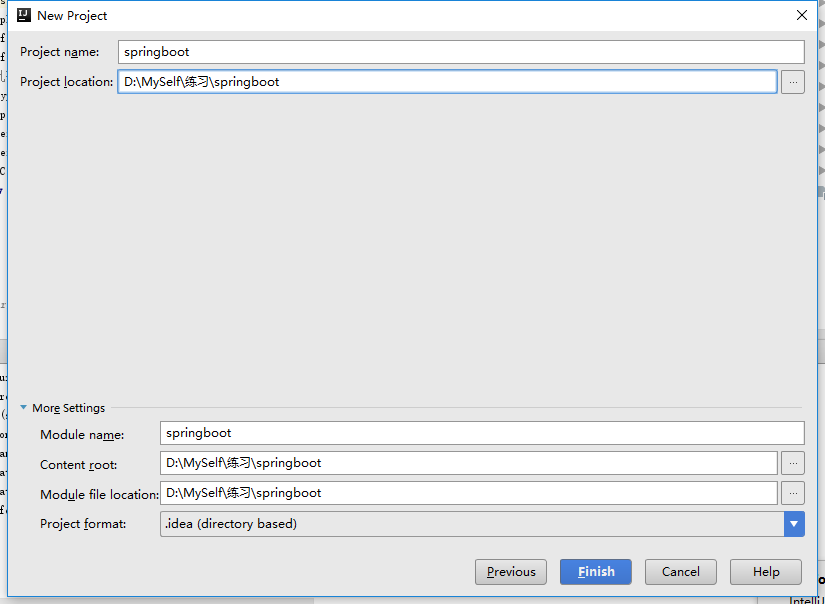
Next-->填写完项目名称和选择项目位置之后点击Finish
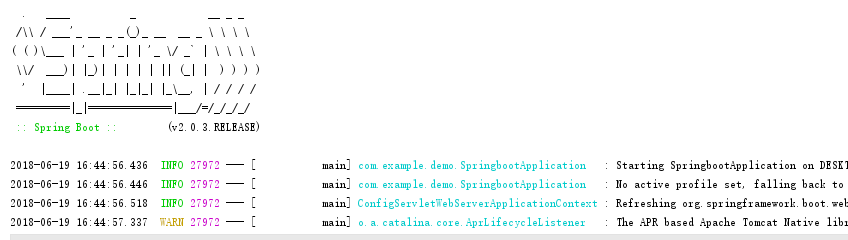
等待编译完成,运行,出现如下图说明搭建成功
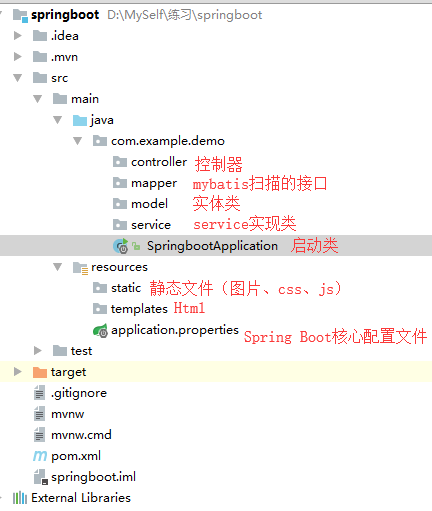
完善一下目录结构:
创建一个Hello World Controller作为项目的入口
 @Controller

 @EnableAutoConfiguration

 public class HelloWorld {

     @RequestMapping("/")

     @ResponseBody

     String home(){

         return "Hello World!";

     }

 }
运行http://localhost:8080/出现

JDBC连接数据库
项目不使用application.properties文件 而使用更加简洁的application.yml文件:
将原有的resource文件夹下的application.properties文件删除,创建一个新的application.yml配置文件,
文件的内容如下:
server:

    port:

spring:

    datasource:

        url: jdbc:mysql://127.0.0.1:3306/test?useSSL=false&characterEncoding=UTF-8

        password: root

        username: root

        driver-class-name: com.mysql.jdbc.Driver

        type: com.alibaba.druid.pool.DruidDataSource

mybatis:

    type-aliases-package: com.example.demo.model

    mapper-locations: classpath:mappers/*.xml
application.yml
pom.xml
<?xml version="1.0" encoding="UTF-8"?>

<project xmlns="http://maven.apache.org/POM/4.0.0" xmlns:xsi="http://www.w3.org/2001/XMLSchema-instance"

    xsi:schemaLocation="http://maven.apache.org/POM/4.0.0 http://maven.apache.org/xsd/maven-4.0.0.xsd">

    <modelVersion>4.0.</modelVersion>

    <groupId>com.example</groupId>

    <artifactId>springbootdemo</artifactId>

    <version>0.0.-SNAPSHOT</version>

    <packaging>jar</packaging>

    <name>springbootdemo</name>

    <description>Demo project for Spring Boot</description>

    <parent>

        <groupId>org.springframework.boot</groupId>

        <artifactId>spring-boot-starter-parent</artifactId>

        <version>2.0..RELEASE</version>

        <relativePath/> <!-- lookup parent from repository -->

    </parent>

    <properties>

        <project.build.sourceEncoding>UTF-</project.build.sourceEncoding>

        <project.reporting.outputEncoding>UTF-</project.reporting.outputEncoding>

        <java.version>1.8</java.version>

    </properties>

    <dependencies>

        <dependency>

            <groupId>org.springframework.boot</groupId>

            <artifactId>spring-boot-starter-aop</artifactId>

        </dependency>

        <dependency>

            <groupId>org.springframework.boot</groupId>

            <artifactId>spring-boot-starter-jdbc</artifactId>

        </dependency>

        <dependency>

            <groupId>org.springframework.boot</groupId>

            <artifactId>spring-boot-starter-web</artifactId>

        </dependency>

        <dependency>

            <groupId>org.mybatis.spring.boot</groupId>

            <artifactId>mybatis-spring-boot-starter</artifactId>

            <version>1.3.</version>

        </dependency>

        <dependency>

            <groupId>com.alibaba</groupId>

            <artifactId>druid</artifactId>

            <version>1.1.</version>

        </dependency>

        <dependency>

            <groupId>com.alibaba</groupId>

            <artifactId>fastjson</artifactId>

            <version>1.2.</version>

        </dependency>

        <dependency>

            <groupId>mysql</groupId>

            <artifactId>mysql-connector-java</artifactId>

            <scope>runtime</scope>

        </dependency>

        <!--Mybatis逆向生成 -->

        <dependency>

            <groupId>org.mybatis.generator</groupId>

            <artifactId>mybatis-generator-maven-plugin</artifactId>

            <version>1.3.</version>

        </dependency>

        <dependency>

            <groupId>org.springframework.boot</groupId>

            <artifactId>spring-boot-starter-test</artifactId>

            <scope>test</scope>

        </dependency>

    </dependencies>

    <build>

        <plugins>

            <plugin>

                <groupId>org.springframework.boot</groupId>

                <artifactId>spring-boot-maven-plugin</artifactId>

            </plugin>

        </plugins>

    </build>

</project>
pom.xml
使用mybatis generator 自动生成代码:/src/main/resources/generator/generatorConfig.xml
<?xml version="1.0" encoding="UTF-8"?>
<!DOCTYPE generatorConfiguration
PUBLIC "-//mybatis.org//DTD MyBatis Generator Configuration 1.0//EN"
"http://mybatis.org/dtd/mybatis-generator-config_1_0.dtd"> <generatorConfiguration>
<context id="DB2Tables" targetRuntime="MyBatis3">
<commentGenerator>
<property name="suppressAllComments" value="true"/>
</commentGenerator> <jdbcConnection driverClass="com.mysql.jdbc.Driver"
connectionURL="jdbc:mysql://127.0.0.1:3306/test?useSSL=false&characterEncoding=UTF-8"
userId="root"
password="root">
</jdbcConnection> <!-- 实体类生成位置 -->
<javaModelGenerator targetPackage="com.example.demo.model" targetProject=".\src\main\java">
<property name="enableSubPackages" value="true" />
<property name="trimStrings" value="true" />
</javaModelGenerator> <!-- Mappers 文件生成位置 -->
<sqlMapGenerator targetPackage="mappers" targetProject=".\src\main\resources">
<property name="enableSubPackages" value="true" />
</sqlMapGenerator> <!-- 接口生成位置 -->
<javaClientGenerator type="XMLMAPPER" targetPackage="com.example.demo.mapper" targetProject=".\src\main\java">
<property name="enableSubPackages" value="true" />
</javaClientGenerator> <!-- 生成表目录 --> <table tableName="ie_green_indexsystemtable" schema="ie_green_indexsystemtable" domainObjectName="GreenIndexSystem" enableUpdateByExample="false" enableSelectByExample="false" enableDeleteByExample="false" enableCountByExample="false" enableUpdateByPrimaryKey="false"
enableDeleteByPrimaryKey="false" enableInsert="false">
</table>
</context>
</generatorConfiguration>
generatorConfig.xml
Mybatisgenerator
public class MybatisGenerator {

    public static void main(String[] args) throws Exception{

        generator("D:\\springbootdemo\\src\\main\\resources\\generator\\generatorConfig.xml");

    }

    public static void generator(String path) throws Exception{

        List<String> warnings = new ArrayList<String>();

        boolean overwrite = true;

        File configFile = new File(path);

        ConfigurationParser cp = new ConfigurationParser(warnings);

        Configuration config = cp.parseConfiguration(configFile);

        DefaultShellCallback callback = new DefaultShellCallback(overwrite);

        MyBatisGenerator myBatisGenerator = new MyBatisGenerator(config, callback, warnings);

        myBatisGenerator.generate(null);

    }

}
MybatisGenerator
运行Mybatisgenerator

项目启动类
@SpringBootApplication

@MapperScan("com.example.demo.mapper")

public class SpringbootdemoApplication {

    public static void main(String[] args) {

        SpringApplication.run(SpringbootdemoApplication.class, args);

    }

}
Mapper
public interface GreenIndexSystemMapper {

    GreenIndexSystem selectByPrimaryKey(Integer id);

    List<GreenIndexSystem> selectAll();

}
映射文件Mapper.xml
  <select id="selectAll" resultMap="BaseResultMap">

    select

    <include refid="Base_Column_List" />

    from ie_green_indexsystemtable

  </select>
Service
public interface GreenIndexService {

    List<GreenIndexSystem> selectAll();

}
ServiceImpl
@Service(value = "greenService")

public class GreenIndexServiceImpl implements GreenIndexService {

    @Autowired

    private GreenIndexSystemMapper greenIndexSystemMapper;

    @Override

    public List<GreenIndexSystem> selectAll() {

        return greenIndexSystemMapper.selectAll();

    }

}
Controller
@RestController

@RequestMapping("/green/")

public class GreenIndexController {

    @Autowired

    private GreenIndexService greenService;

@RequestMapping("getinfo")

public List<GreenIndexSystem> getGreenAll(){return greenService.selectAll();}

}
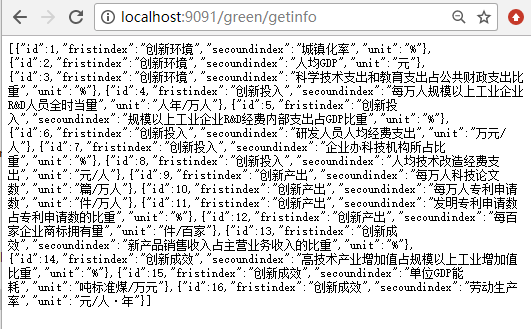
运行启动类查询到结果
Spring Boot Mybatis整合的更多相关文章
- Spring boot Mybatis 整合(完整版)
个人开源项目 springboot+mybatis+thymeleaf+docker构建的个人站点开源项目(集成了个人主页.个人作品.个人博客) 朋友自制的springboot接口文档组件swagge ...
- Spring boot Mybatis 整合
PS: 参考博客 PS: spring boot配置mybatis和事务管理 PS: Spring boot Mybatis 整合(完整版) 这篇博客里用到了怎样 生成 mybatis 插件来写程 ...
- Spring boot Mybatis 整合(注解版)
之前写过一篇关于springboot 与 mybatis整合的博文,使用了一段时间spring-data-jpa,发现那种方式真的是太爽了,mybatis的xml的映射配置总觉得有点麻烦.接口定义和映 ...
- Spring boot Mybatis整合构建Rest服务(超细版)
Springboot+ Mybatis+MySql整合构建Rest服务(涵盖增.删.改.查) 1.概要 1.1 为什么要使用Spring boot? 1.1.1 简单方便.配置少.整合了大多数框架 ...
- spring boot +mybatis 整合 连接数据库测试(从0到1)
spring boot 整合mybatis 1.打开idea创建一个项目 2.在弹出的窗口中选择spring initializr(初始化项目),点击next 3.接下来填写group 与artifa ...
- spring boot mybatis 整合教程
本项目使用的环境: 开发工具:Intellij IDEA 2017.1.3 springboot: 1.5.6 jdk:1.8.0_161 maven:3.3.9 额外功能 PageHelper 分页 ...
- Spring Boot + MyBatis + Druid + Redis + Thymeleaf 整合小结
Spring Boot + MyBatis + Druid + Redis + Thymeleaf 整合小结 这两天闲着没事想利用**Spring Boot**加上阿里的开源数据连接池**Druid* ...
- Spring Boot:整合MyBatis框架
综合概述 MyBatis 是一款优秀的持久层框架,它支持定制化 SQL.存储过程以及高级映射.MyBatis 避免了几乎所有的 JDBC 代码和手动设置参数以及获取结果集.MyBatis 可以使用简单 ...
- Spring boot Mybatis
最近刚接触Spring boot,正是因为他的及简配置方便开发,促使我下定决心要用它把之前写的项目重构,那么问题来了,spring boot怎么整合mybatis呢,下面几个配置类来搞定. 在我的代码 ...
随机推荐
- json文件格式详解
JSON(JavaScript Object Notation) 是一种轻量级的数据交换格式. 易于人阅读和编写.同时也易于机器解析和生成. 它基于JavaScript Programming Lan ...
- Maven 建立的项目resource对应的实际位置
如图,springmvc-servlet.xml在项目中实际位置为: WEB-INF/classes/config/springmvc/springmvc-servlet.xml 在配置项 ...
- Python——高阶函数——map filter zip
一.map函数 1.作用:它接收一个函数 f 和一个 list,并通过把函数 f 依次作用在 list 的每个元素上,得到一个新的 list 并返回. 2.实例 def f(x): return x* ...
- SVD/SVD++实现推荐算法
奇异值分解(Singular Value Decomposition,以下简称SVD)是在机器学习领域广泛应用的算法,它不仅可以用于降维算法中的特征分解,还可以用于推荐系统,以及自然语言处理等领域. ...
- iOS 高德自定义坐标轨迹绘制动画 类似与Keep的轨迹绘制
2. 自定义 线的图片,只需要在 rendererForOverlay 方法中,设置: polylineRenderer.strokeImage = [UIImage imageNamed:@&quo ...
- linux 定时下载github最新代码
场景:网站的代码在github上托管,静态网站部署在服务器上,每次自己修改完本地代码后,提交到github上,需要自己去服务器上执行git pull 拉取最新代码, 为了解决这种操作,自己再服务器上 ...
- SSL 证书生成与转化
1.windows 的keytool工具 2.如何将jks文件转换为pfx格式并导入客户端 https://jingyan.baidu.com/article/a65957f4c69dfc24e67f ...
- 测试常用Linux命令
大家应该经常在网络上看到下图吧,虽然我们不会去执行下面图片中的命令,但是linux常用的命令对于测试人员来说,还是必须掌握的,不管是做功能测试还是性能测试,最常用的就是看日志了. sudo是linux ...
- pm2自动部署
配置pm2自动部署前,请确保已经能够ssh免密登录服务器. 一.创建ecosystem.json { "apps" : [{ "name" : "HT ...
- 关于学习Linux的基本命令操作
常用的Linux 命令 scp root/1.txt root@127.0.0.1:/home rpm 安装软件 systemctl start service 启动服务 systemctl res ...