实现Canvas2D绘图 使元素绕中心居中旋转
我之前用canvas写了个头像剪切的demo,但是关于让载入的图片旋转是个问题,虽然通过其它方法实现了,但是感觉并不太好,于是查了些资料,想试着重新做一下canvas的旋转。
在开始之前,先让我们来做一些准备工作:
 (function () {

     // 设置画布的宽高

     var width = 300,

         heigh = 100,

         cache = {}; // 存储canvas上下文

     // 获取绘图上下文

     function getCtx(name, w, h) {

         var cv = document.getElementById(name),

             ctx = cv.getContext('2d'),

             wh = getWH(w, h);

         w = wh[0];

         h = wh[1];

         cv.width = w;

         cv.height = h;

         ctx && (cache['name'] = ctx);

         init(ctx);

         return ctx;

     }

     // 设置角度

     function (ctx, deg) {

         ctx.rotate(deg / 180 * Math.PI); // 转成角度值

     }

     // 填充画布

     function fill(ctx, color, arr) {

         ctx.fillStyle = color;

         ctx.fillRect(arr[0], arr[1], arr[2], arr[3]);

     }

     // 格式化画布

     function init(ctx, w, h) {

         var color = '#333', // 填充背景色

             wh = getWH(w, h);

         w = wh[0];

         h = wh[1];

         fill(ctx, color, [0, 0, w, h]);

     }

     // 进行位移

     function translate(ctx, x, y) {

         ctx.translate(x, y);

     }

     function getWH(w, h) {

         w = w || width;

         h = h || height;

         return [w, h];

     }

 })();
准备完毕,先来绘制一个简单的矩形

// d1 var cv1 = getCtx('cv1'); fill(cv1, '#fff', [125, 25, 50, 50]);
然后,我们试着让它旋转10deg

 // d2

     var cv2 = getCtx('cv2');

     rotate(cv2, 10);

     fill(cv2, '#fff', [125, 25, 50, 50]);
再看看旋转30deg会变成什么样

 // d3

     var cv3 = getCtx('cv3');

     rotate(cv3, 30);

     fill(cv3, '#fff', [125, 25, 50, 50]);
现在已经可以看出了,canvas旋转rotate是以画布左上角为中心点旋转的,由此我们可以想象得到90deg的样子
 (图片已死)

 .box2 {

         margin: 0 auto;

         width: 300px;

         line-height: 100px;

         background: #333;

         text-align: center;

         color: #fff;

     }

     .box3 {

         margin: 0 auto;

         width: 300px;

         line-height: 100px;

         background: #666;

         text-align: center;

         color: #fff;

         transform: rotate(90deg) translate(0, 200px);

     }
因此,就像css3通过transform-origin来修改旋转的中心一样的道理,我们使用translate为canvas修改旋转中心即可 ctx.translate(canvas.width / 2, canvas.height / 2);
使左上角偏移到宽高的一半的位置(中点)

 //d4

     var cv4 = getCtx('cv4');

     translate(cv4, width / 2, height / 2);

     fill(cv4, '#fff', [0, 0, width, height]);
那么现在再一次旋转90deg会得到我们想要的效果吗?

 //d5

     var cv5 = getCtx('cv5');

     translate(cv5, width / 2, height / 2);

     rotate(cv5, 90);

     fill(cv5, '#fff', [0, 0, width, height]);
事实证明,还不行,但是已经靠近了,从现在看来只要再偏移一次回到原来的点就可以了就可以了

 //d6

     var cv6 = getCtx('cv6');

     translate(cv6, width / 2, height / 2);

     rotate(cv6, 90);

     translate(cv6, -width / 2, -height / 2);

     fill(cv6, '#fff', [0, 0, width, height]);
至于为什么会这样,请看下图:
 (图片已死)
或者猛戳这里看示例!!
所以现在实现了围绕中心旋转,而实现元素居中就简单了,正如以上的示例所展示的,正中的正方形已然居中,因为我在一开始就给它定好了刚好居中的开始坐标:
fill(cv3, '#fff', [125, 25, 50, 50]);
就好像position居中定位一样,这里的居中定位也一样计算:
(默认宽高为300 * 100) (width / 2) - (50 / 2) = 125; (height / 2) - (50 / 2) = 25;
我们把旋转和居中这些来封装一下,方便使用,代码如下:
 RotateCenter.prototype = {

         constructor: RotateCenter,

         init: function (id, w, h) {

             this.width = w = w || this.width;

             this.height = h = h || this.height;

             var canvas = this.getContext(id, '2d');

             // 设置宽高

             this.setSize(canvas, w, h);

         },

         // 获取上下文

         getContext: function (id, type) {

             var canvas = document.getElementById(id),

                 nowCtx = canvas.getContext(type);

             this.cache[id] = nowCtx;

             return canvas;

         },

         // 填充画布

         fill: function (arr, color) {

             this.nowCtx.fillStyle = color;

             this.nowCtx.fillRect(arr[0], arr[1], arr[1] ? arr[1] : this.width, arr[2] ? arr[2] : this.height);

         },

         setSize: function (c, w, h) {

             c.width = w;

             c.height = h;

         },

         // 旋转

         rotate: function (deg) {

             this.nowCtx.rotate(deg / 180 * Math.PI);

         },

         // 位移

         translate: function (x, y) {

             this.nowCtx.translate(x, y);

         },

         // 切换上下文

         checkout: function (id) {

             this.nowCtx = this.cache[id];

         },

         // 绘制不居中绕中心旋转矩形

         rotateRect: function (arr, color, deg) {

             var w = this.width / 2,

                 h = this.height / 2;

             this.translate(w, h);

             this.rotate(deg);

             this.translate(-w, -h);

             this.fill(arr, color);

         },

         // 绘制居中不绕中心旋转矩形

         centerRect: function (width, height, color) {

             var w = this.width / 2,

                 h = this.height / 2,

                 w1 = width / 2,

                 h1 = height / 2;

             this.fill([w - w1, h - h1, width, height], color);

         },

         // 绘制居中同时绕中心旋转矩形

         centerRotateRect: function (width, height, deg, color) {

             var w = this.width / 2,

                 h = this.height / 2,

                 w1 = width / 2,

                 h1 = height / 2;

             this.translate(w, h);

             this.rotate(deg);

             this.translate(-w, -h);

             this.fill([w - w1, h - h1, width, height], color);

         }

     };
现在来测试一下:
绘制居中同时绕中心旋转矩形
45deg

 // d7

     var rc = new RotateCenter();

     rc.init('cv7');

     rc.centerRotateRect(50, 50, 45, '#fff');
163deg

// d8 rc.init('cv8'); rc.centerRotateRect(50, 50, 163, '#fff');
绘制居中不绕中心旋转矩形

// d9 rc.init('cv9'); rc.centerRect(60, 60, '#fff');
绘制不居中绕中心旋转矩形
30deg

278deg

 // d10

     rc.init('cv10');

     rc.rotateRect([50, 50, 50, 50], '#fff', 30);

     // d11

     rc.init('cv11');

     rc.rotateRect([50, 50, 50, 50], '#fff', 278);
从示例来看,rotateRect方法有点不太理想,而在这里想要的就是centerRotateRect方法的效果,所以到此OVER。
如有不正确的地方,欢迎指出!!!
/******************************************************** 优美的分割线 ********************************************************/
/************************************************ 更新时间:2019-01-24 ************************************************/
之前写的内容只能实现中心旋转,而由于在前阵子写的一个关于canvas的封装中又需要实现旋转,而且是任意位置/任意角度的随意旋转,又找了不少资料和测试才实现了,所以在这里更新一下这篇文章!!!
先看效果:


这次的实现主要修改了一下需要绘制的每个元素的偏移,还有为了实现多个元素的不同角度旋转,调用了save与restore这两个函数
主要代码如下:
ctx.save();

ctx.beginPath();

ctx.fillStyle = '#fff';

ctx.translate(x + (width / 2), y + (height) / 2);

ctx.rotate(deg * Math.PI / 180);

ctx.translate(-x - (width / 2), -y -(height / 2));

ctx.fillRect(x, y, width, height);

ctx.closePath();

ctx.fill();

ctx.restore();
完整代码:
<!DOCTYPE html>
<html>
<head>
<meta charset="utf-8">
<title></title>
<script type="text/javascript" src="./1.js"></script>
<style type="text/css">
canvas {
background: #333;
} strong {
color: #f00;
}
</style>
</head>
<body>
<h1>Canvas Rotate</h1>
<h3>#1 <strong>不居中旋转30deg</strong></h3>
<canvas id="cv"></canvas>
<h3>#2 <strong>不居中旋转60deg</strong></h3>
<canvas id="cv1"></canvas>
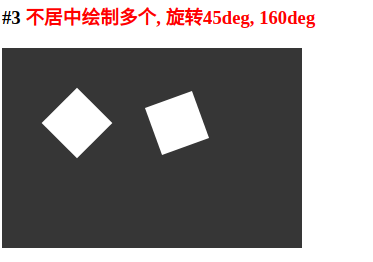
<h3>#3 <strong>不居中绘制多个, 旋转45deg, 160deg</strong></h3>
<canvas id="cv2"></canvas>
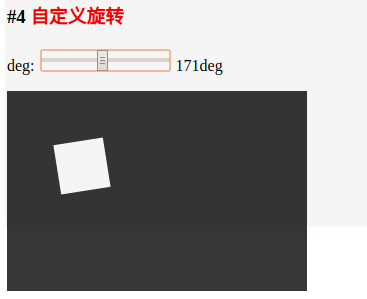
<h3>#4 <strong>自定义旋转</strong></h3>
<p>
<span>deg:</span>
<input type="range" id="range" max="360" min="0" value="45">
<span id="nowDeg">45deg</span>
</p>
<canvas id="cv3"></canvas>
<script type="text/javascript">
{
function Rotate(id, x, y, width, height, deg) {
if (!Rotate.initer) {
Rotate.initer = new Rotate.init();
Rotate.initer.fill(id, x, y, width, height, deg);
} Rotate.initer.fill(id, x, y, width, height, deg);
return Rotate.initer;
} Rotate.init = function () {
this.defaultWidth = 300;
this.defaultHeight = 200;
this.ctx = null;
}; Rotate.prototype = {
constrcutor: Rotate,
fill: function (id, x, y, width, height, deg, add) {
!add && this.getCanvas(id);
let ctx = this.getContext(); ctx.save();
ctx.beginPath();
ctx.fillStyle = '#fff';
ctx.translate(x + (width / 2), y + (height) / 2);
ctx.rotate(deg * Math.PI / 180);
ctx.translate(-x - (width / 2), -y -(height / 2));
ctx.fillRect(x, y, width, height);
ctx.closePath();
ctx.fill();
ctx.restore();
},
addFill: function (x, y, width, height, deg) {
this.fill(null, x, y, width, height, deg, true);
},
getCanvas: function (id) {
this.canvas = document.getElementById(id);
this.canvas.width = this.defaultWidth;
this.canvas.height = this.defaultHeight;
},
getContext: function () {
this.ctx = this.canvas.getContext('2d');
return this.ctx;
},
clear: function () {
this.ctx.clearRect(0, 0, this.defaultWidth, this.defaultHeight);
}
}; Rotate.init.prototype = Rotate.prototype; Rotate('cv', 50, 50, 50, 50, 30); // 不居中旋转30deg
Rotate('cv1', 50, 50, 50, 50, 60); // 不居中旋转60deg
Rotate('cv2', 50, 50, 50, 50, 45).addFill(150, 50, 50, 50, 160); // 不居中绘制多个, 旋转45deg, 160deg /*
* 自定义旋转
*/
let nowDeg = document.getElementById('nowDeg'),
cv3 = Rotate('cv3', 50, 50, 50, 50, 45); document.getElementById('range').addEventListener('change', function (e) {
nowDeg.innerHTML = `${this.value}deg`;
cv3.clear();
cv3.addFill(50, 50, 50, 50, parseInt(this.value));
}, false);
}
</script>
</body>
</html>
关于canvas的封装,有兴趣的可以来看看: https://gitee.com/nowtd/cnavas_engine
实现Canvas2D绘图 使元素绕中心居中旋转的更多相关文章
- CSS3 : transform 与 transform-origin 属性可以使元素样式发生转变
CSS3 : transform 用于元素样式的转变,比如使元素发生位移.角度变化.拉伸缩小.按指定角度歪斜 transform结合transition可实现各类动画效果 transform : tr ...
- css 使元素居中
css使元素水平居中 1.对于行内元素的水平居中 给父元素设置text-align:center <div style="text-align:center;">居中显 ...
- css3种方法实现元素的绝对居中
元素的绝对居中应该是很多人熟悉的一个小应用,我记得很多年前去神州数码面试的时候就遇到过这个面试题.方法比较简单,代码如下: .node{ width : 300px; height : 400px; ...
- 编写程序输入一个5x5的矩阵,将最大元素与中心元素交换,并按行列对齐输出。
编写程序输入一个5x5的矩阵,将最大元素与中心元素交换,并按行列对齐输出. 题目描述 编写程序输入一个5x5的矩阵,将最大元素与中心元素交换,并按行列对齐输出. 输入描述 编写程序输入一个5x5的矩阵 ...
- 实现图标Icon+文字在div里自动中心居中(水平垂直居中)
已知div行高设置text-align:center文字会自动居中. 通过:before来设置icon的地址和高宽. 需要设置图片默认的垂直居中条件,与文字一致,为text-bottom. 设置图片行 ...
- transform: translate(-50%, -50%) 实现块元素百分比下居中
<!doctype html> <html> <head> <meta charset="utf-8"> <title> ...
- jquery中使元素显示和隐藏方法之间的区别
在实际的项目开发中,要使一个元素隐藏的方法有很多,比如css的多种属性和jquery的多种方法,虽然他们的作用都是使元素不可见,但是各个方法实现的原理是不一样的.下面主要介绍jquery各个元素隐藏方 ...
- Qt QGraphicsItem 绕中心旋转、放缩
最近用到了QGraphicsItem,可以通过QGraphicsItemAnimation使其产生动画效果. QGraphicsItemAnimation自带了setPosAt().setRotati ...
- CSS visibility 属性 使元素占位,但不可见
CSS visibility 属性 使元素占位,但不可见 h2 { visibility:hidden; } 浏览器支持 所有主流浏览器都支持 visibility 属性. 注释:任何的版本的 Int ...
随机推荐
- 1.3 PCI总线的存储器读写总线事务
总线的基本任务是实现数据传送,将一组数据从一个设备传送到另一个设备,当然总线也可以将一个设备的数据广播到多个设备.在处理器系统中,这些数据传送都要依赖一定的规则,PCI总线并不例外. PCI总线使用单 ...
- Ubuntu 11.10下GRUB 2 1.99版编译安装笔记
Ubuntu 11.10下GRUB 2 1.99版编译安装笔记 以下的安装笔记,都是QLi自己学习grub2 时,所整理的,还是新手,有错误的话,请大家帮忙就别提出来了. 最新版grub V1.99官 ...
- PHP stream_context_create()作用和用法分析
stream_content_create 创建并返回一个文本数据流并应用各种选项,可用于fopen(),filegetcontents()等过程的超时设置.代理服务器.请求方式.头信息设置的特殊过程 ...
- php学习笔记位运算
位运算 源码:用二进制表示一个数,这个码就是源码. 比如2====00000000 00000000 0000000 00000010 正数的反码 源码 补码都一样 负数的源码是符号位取反.第一个位 ...
- printk优先级
printk是在内核中运行的向控制台输出显示的函数,Linux内核首先在内核空间分配一个静态缓冲区,作为显示用的空间,然后调用sprintf,格式化显示字符串,最后调用tty_write向终端进行信息 ...
- 芝麻HTTP:批量部署Splash负载集群
安装Ansible: 看官方文档去:http://www.ansible.com.cn/index.html 好像这个主控端不支持Windows? 大家虚拟机装个Ubuntu吧. 闲话少扯直接上干货: ...
- tp5时间戳转日期的方法
{:date('Y-m-d H:i',$vo['create_time'])}
- 教你如何制作网页上的友情链接--JavaScript基础
大部分网站的首页都有友情链接的功能,此功能可通过location对象的href属性来实现…… href属性:设置或检索完整的url字符串 1."友情链接制作"示例代码: <! ...
- SpringMVC 框架系列之组件概述与配置详解
在上一篇文章 SpringMVC 框架系列之初识与入门实例 的实例中,我们已经知道,SpringMVC 框架是一个 web 层的框架,本篇文章就详细解释一下 SpringMVC 框架具体文件的配置以及 ...
- as版本切换导致项目损坏,无法启动。环境依赖混乱
以下方法都不管用, 新建一个项目setting的 把main拷过去就行了!!!! Error:(5, 0) Gradle DSL method not found: 'google()'Possibl ...