cassandra 在window上的demo
Cassandra window使用
1. 下载:http://cassandra.apache.org/download/。
2. 解压后,bin目录下,cassandra.bat 直接启动。 Cassandra-cli.bat进入cassandra。
3. 安装python2.7.10 版本太高,可能会不兼容,安装python 使用 CQL 操作cassandra数据库。
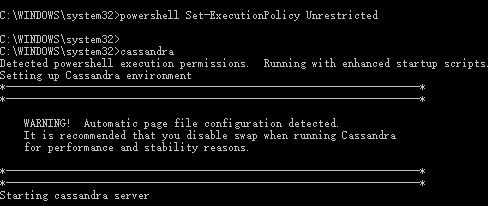
4. 配置环境变量后,以管理员方式运行 cmd :
powershell Set-ExecutionPolicy Unrestricted 成功如下:
5. cmd cqlsh.bat进入cql编辑;(没有安装python 无法使用cqlsh.bat)
CREATE KEYSPACE IF NOT EXISTS pimin_net
WITH REPLICATION = {'class': 'SimpleStrategy','replication_factor':1};
USE pimin_net;
CREATE TABLE IF NOT EXISTS users (
id uuid,
first_name varchar,
last_name varchar,
age int,
emails set<text>,
avatar blob,
PRIMARY KEY (id)
);
SELECT * FROM users;
用户表(users)包含了主键、firest_name、last_name、年龄、多个邮箱地址以及头像。关于使用java驱动,建议使用eclipse+maven创建,比如我们创建一个cassandra.test的工程。在pom.xml里面加入
<dependency>
<groupId>com.datastax.cassandra</groupId>
<artifactId>cassandra-driver-core</artifactId>
<version>2.1.0</version>
</dependency>
|
1 2 3 4 5 |
<dependency> <groupId>com.datastax.cassandra</groupId> <artifactId>cassandra-driver-core</artifactId> <version>2.1.0</version> </dependency> |
如果环境不允许使用maven,那么就自己找依赖包吧:cassandra-driver-core-2.1.0.jar、netty-3.9.0.Final.jar、guava-16.0.1.jar、metrics-core-3.0.2.jar和slf4j-api-1.7.5.jar。
解压目录 lib和 apache-cassandra-2.1.16\tools\lib 下,有jar包。
下面是所有java测试代码:实现连接Cassandra集群,新增数据,查询数据。其他的情况类似。
如果需要远程连接,那么cassandra.yaml里面的rpc_address就需要改变为您当前环境实际的IP地址,否则会报错! 本地:client.connect("127.0.0.1");
package cassandra;
import java.io.File;
import java.io.FileInputStream;
import java.io.FileNotFoundException;
import java.io.FileOutputStream;
import java.io.IOException;
import java.nio.ByteBuffer;
import java.nio.channels.FileChannel;
import java.util.HashSet;
import java.util.Set;
import java.util.UUID;
import com.datastax.driver.core.BoundStatement;
import com.datastax.driver.core.Cluster;
import com.datastax.driver.core.Host;
import com.datastax.driver.core.Metadata;
import com.datastax.driver.core.PreparedStatement;
import com.datastax.driver.core.ResultSet;
import com.datastax.driver.core.Row;
import com.datastax.driver.core.Session;
public class TestJava {
private Cluster cluster;
private Session session;
public Cluster getCluster() {
return cluster;
}
public void setCluster(Cluster cluster) {
this.cluster = cluster;
}
public Session getSession() {
return session;
}
public void setSession(Session session) {
this.session = session;
}
/**
* 连接节点
*
* @param node
*/
public void connect(String node) {
cluster = Cluster.builder().addContactPoint(node).build();
Metadata metadata = cluster.getMetadata();
System.out.printf("Connected to cluster: %s\n", metadata.getClusterName());
for (Host host : metadata.getAllHosts()) {
System.out.printf("Datatacenter: %s; Host: %s; Rack: %s\n", host.getDatacenter(), host.getAddress(), host.getRack());
}
this.session = cluster.connect();
}
public void insertData() {
PreparedStatement insertStatement = getSession().prepare(
"INSERT INTO pimin_net.users "
+ "(id, first_name, last_name, age, emails,avatar) "
+ "VALUES (?, ?, ?, ?, ?, ?);");
BoundStatement boundStatement = new BoundStatement(insertStatement);
Set<String> emails = new HashSet<String>();
emails.add("xxx@qq.com");
emails.add("xxx@163.com");
java.nio.ByteBuffer avatar = null;
try {
avatar = toByteBuffer("f:\\user.png");
avatar.flip();
System.out.println("头像大小:" + avatar.capacity());
} catch (IOException e) {
// TODO Auto-generated catch block
e.printStackTrace();
}
getSession().execute(boundStatement.bind(UUID.fromString("756716f7-2e54-4715-9f00-91dcbea6cf50"),
"pi", "min", 10, emails, avatar));
}
public void loadData() {
ResultSet resultSet = getSession().execute(
"SELECT first_name,last_name,age,avatar FROM pimin_net.users;");
System.out
.println(String
.format("%-30s\t%-20s\t%-20s\n%s", "first_name","last_name", "age",
"-------------------------------+-----------------------+--------------------"));
for (Row row : resultSet) {
System.out.println(String.format("%-30s\t%-20s\t%-20s",
row.getString("first_name"), row.getString("last_name"),
row.getInt("age")));
ByteBuffer byteBuffer = row.getBytes("avatar");
System.out.println("头像大小:" + (byteBuffer.limit() - byteBuffer.position()));
FileOutputStream fileOutputStream = null;
try {
fileOutputStream = new FileOutputStream("f:\\2.png");
} catch (FileNotFoundException e) {
// TODO Auto-generated catch block
e.printStackTrace();
}
try {
fileOutputStream.write(byteBuffer.array(),
byteBuffer.position(),
byteBuffer.limit() - byteBuffer.position());
fileOutputStream.close();
} catch (IOException e) {
// TODO Auto-generated catch block
e.printStackTrace();
}
}
System.out.println();
}
public void close() {
cluster.close();
}
/**
* 读取文件
*
* @param filename
* @return
* @throws IOException
*/
public static ByteBuffer toByteBuffer(String filename) throws IOException {
File f = new File(filename);
if (!f.exists()) {
throw new FileNotFoundException(filename);
}
FileChannel channel = null;
FileInputStream fs = null;
try {
fs = new FileInputStream(f);
channel = fs.getChannel();
ByteBuffer byteBuffer = ByteBuffer.allocate((int) channel.size());
while ((channel.read(byteBuffer)) > 0) {
// do nothing
// System.out.println("reading");
}
return byteBuffer;
} catch (IOException e) {
e.printStackTrace();
throw e;
} finally {
try {
channel.close();
} catch (IOException e) {
e.printStackTrace();
}
try {
fs.close();
} catch (IOException e) {
e.printStackTrace();
}
}
}
public static void main(String[] args) {
TestJava client = new TestJava();
client.connect("127.0.0.1");
client.insertData();
client.loadData();
client.session.close();
client.close();
}
}
cassandra 在window上的demo的更多相关文章
- jquery.form 和MVC4做无刷新上传DEMO
jquery.form 和MVC4做无刷新上传DEMO HTML: <script src="~/Scripts/jquery-1.10.2.min.js"></ ...
- TensorFlow 在android上的Demo(1)
转载时请注明出处: 修雨轩陈 系统环境说明: ------------------------------------ 操作系统 : ubunt 14.03 _ x86_64 操作系统 内存: 8GB ...
- window上利用pip安装pandas
官网推荐的是直接使用Anoconda,它集成了pandas,可以直接使用.安装挺简单的,有windows下的安装包.如果不想安装庞大的Anoconda,那就一步一步用pip来安装pandas.下面我主 ...
- 在window上安装pandas
之前在ubuntu上安装pandas,用的easy_install.这次在window上同样方法装遇到"unable to find vcvarsall.bat",看一些网上帖子好 ...
- iOS UIButton加在window上点击无效果问题
UIButton加在window上,点击没有效果,找了很久,原来是没有加上这名:[self.window makeKeyAndVisible]; self.window = [[UIWindow al ...
- 【原】window上安装elasticserach
[window上安装elasticserach] 系统环境:2008R2 x64测试安装用的服务器IP:192.168.12.52elasticsearch版本:2.3.4JDK版本:jdk 1.8. ...
- 往github上传demo
一直在github上寻找demo,但怎么传demo上githun呢? http://www.2cto.com/kf/201504/390397.html 首先在github上 new一个reposit ...
- 关于Windows高DPI的一些简单总结(Window上一般默认是96 dpi 作为100% 的缩放比率)
我们知道,关于高DPI的支持, Windows XP时代就开始有了, 那时关于高DPI的支持比较简单, 但是从Vista/Win7 到现在Win8 /Win8.1, Windows关于高DPI的支持已 ...
- Jetson TX2上的demo(原创)
Jetson TX2上的demo 一.快速傅里叶-海动图 sample The CUDA samples directory is copied to the home directory on th ...
随机推荐
- obj-c在Xcode之外如何使用@import关键字
在Xcode中@import可以很方便的代替#import的功能,具体区别和便利请自行google之. 这里简单介绍下在Xcode之外如何使用@import.直接以 @import Foundatio ...
- Spring Boot缓存应用实践
缓存是最直接有效提升系统性能的手段之一.个人认为用好用对缓存是优秀程序员的必备基本素质. 本文结合实际开发经验,从简单概念原理和代码入手,一步一步搭建一个简单的二级缓存系统. 一.通用缓存接口 1.缓 ...
- SNMP相关的RFC建议和链接
1. SNMP Books or Articleshttp://www.faqs.org/faqs/snmp-faq/part1/http://www.faqs.org/faqs/snmp-faq/p ...
- ambari2.6.1汉化记录
1.1测试机 Apache hadoop2.6Apache ambari 2.6.1集群规模:单节点操作系统 CentOS7以下所有操作均在root用户下执行 1.2安装环境 安装Maventar - ...
- PBCS项目总结
PBCS项目已经成功地Product,终于可以缓解一下紧张的心情,最近连续四五个月紧张地工作,头都要大了.如今比较清闲,是时候总结一下整个项目了.(古人云:成功在于总结嘛) 整个项目是二个人开发的,由 ...
- 模仿天猫实战【SSM】——总结
第一篇文章链接:模仿天猫实战[SSM版]--项目起步 第二篇文章链接:模仿天猫实战[SSM版]--后台开发 总结:项目从4-27号开始写,到今天5-7号才算真正的完工,有许多粗糙的地方,但总算完成了, ...
- 多层嵌套的json数据
很多时候我们见到的json数据都是多层嵌套的,就像下面这般: {"name":"桔子桑", "sex":"男", , & ...
- 如何利用Python网络爬虫抓取微信朋友圈的动态(上)
今天小编给大家分享一下如何利用Python网络爬虫抓取微信朋友圈的动态信息,实际上如果单独的去爬取朋友圈的话,难度会非常大,因为微信没有提供向网易云音乐这样的API接口,所以很容易找不到门.不过不要慌 ...
- JavaScript函数节流和函数防抖之间的区别
一.概念解释 函数节流和函数防抖,两者都是优化高频率执行js代码的一种手段. 大家大概都知道旧款电视机的工作原理,就是一行行得扫描出色彩到屏幕上,然后组成一张张图片.由于肉眼只能分辨出一定频率的变 ...
- DevOps之四 Jenkins的安装与配置
CentOS 上 Jenkins 安装 一.添加yum repos,然后安装 sudo wget -O /etc/yum.repos.d/jenkins.repo http://pkg.jenkins ...