
Jetson TX2上的demo(原创)
Jetson TX2上的demo
一、快速傅里叶-海动图 sample
The CUDA samples directory is copied to the home directory on the device by JetPack. The built binaries are in the following directory:
/home/ubuntu/NVIDIA_CUDA-<version>_Samples/bin/armv7l/linux/release/gnueabihf/
这里的version需要看你自己安装的CUDA版本而定
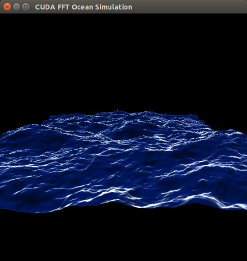
Run the samples at the command line or by double-clicking on them in the file browser. For example, when you run the oceanFFT sample, the following screen is displayed.
二、车辆识别加框sample
nvidia@tegra-ubuntu:~/tegra_multimedia_api/samples/backend$
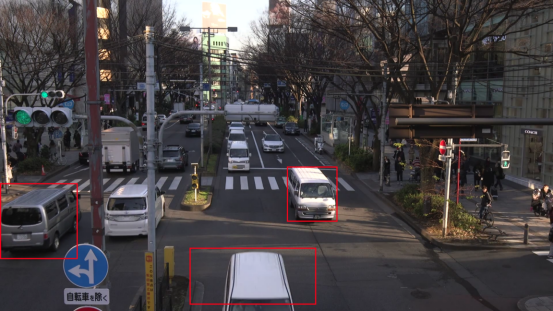
./backend 1 ../../data/Video/sample_outdoor_car_1080p_10fps.h264 H264
--trt-deployfile ../../data/Model/GoogleNet_one_class/GoogleNet_modified_oneClass_halfHD.prototxt
--trt-modelfile ../../data/Model/GoogleNet_one_class/GoogleNet_modified_oneClass_halfHD.caffemodel --trt-forcefp32 0 --trt-proc-interval 1 -fps 10
三、GEMM(通用矩阵乘法)测试
nvidia@tegra-ubuntu:/usr/local/cuda/samples/7_CUDALibraries/batchCUBLAS$ ./batchCUBLAS -m1024 -n1024 -k1024
batchCUBLAS Starting...
GPU Device 0: "NVIDIA Tegra X2" with compute capability 6.2
==== Running single kernels ====
Testing sgemm#### args: ta=0 tb=0 m=1024 n=1024 k=1024 alpha = (0xbf800000, -1) beta= (0x40000000, 2)#### args: lda=1024 ldb=1024 ldc=1024
^^^^ elapsed = 0.00372291 sec GFLOPS=576.83@@@@ sgemm test OK
Testing dgemm#### args: ta=0 tb=0 m=1024 n=1024 k=1024 alpha = (0x0000000000000000, 0) beta= (0x0000000000000000, 0)#### args: lda=1024 ldb=1024 ldc=1024
^^^^ elapsed = 0.10940003 sec GFLOPS=19.6296@@@@ dgemm test OK
==== Running N=10 without streams ====
Testing sgemm#### args: ta=0 tb=0 m=1024 n=1024 k=1024 alpha = (0xbf800000, -1) beta= (0x00000000, 0)#### args: lda=1024 ldb=1024 ldc=1024
^^^^ elapsed = 0.03462315 sec GFLOPS=620.245@@@@ sgemm test OK
Testing dgemm#### args: ta=0 tb=0 m=1024 n=1024 k=1024 alpha = (0xbff0000000000000, -1) beta= (0x0000000000000000, 0)#### args: lda=1024 ldb=1024 ldc=1024
^^^^ elapsed = 1.09212208 sec GFLOPS=19.6634@@@@ dgemm test OK
==== Running N=10 with streams ====
Testing sgemm#### args: ta=0 tb=0 m=1024 n=1024 k=1024 alpha = (0x40000000, 2) beta= (0x40000000, 2)#### args: lda=1024 ldb=1024 ldc=1024
^^^^ elapsed = 0.03504515 sec GFLOPS=612.776@@@@ sgemm test OK
Testing dgemm#### args: ta=0 tb=0 m=1024 n=1024 k=1024 alpha = (0xbff0000000000000, -1) beta= (0x0000000000000000, 0)#### args: lda=1024 ldb=1024 ldc=1024
^^^^ elapsed = 1.09177494 sec GFLOPS=19.6697@@@@ dgemm test OK
==== Running N=10 batched ====
Testing sgemm#### args: ta=0 tb=0 m=1024 n=1024 k=1024 alpha = (0x3f800000, 1) beta= (0xbf800000, -1)#### args: lda=1024 ldb=1024 ldc=1024
^^^^ elapsed = 0.03766394 sec GFLOPS=570.17@@@@ sgemm test OK
Testing dgemm#### args: ta=0 tb=0 m=1024 n=1024 k=1024 alpha = (0xbff0000000000000, -1) beta= (0x4000000000000000, 2)#### args: lda=1024 ldb=1024 ldc=1024
^^^^ elapsed = 1.09389901 sec GFLOPS=19.6315@@@@ dgemm test OK
Test Summary0 error(s)
四、内存带宽测试
nvidia@tegra-ubuntu:/usr/local/cuda/samples/1_Utilities/bandwidthTest$ ./bandwidthTest
[CUDA Bandwidth Test] - Starting...
Running on...
Device 0: NVIDIA Tegra X2
Quick Mode
Host to Device Bandwidth, 1 Device(s)
PINNED Memory Transfers
Transfer Size (Bytes) Bandwidth(MB/s)
33554432 20215.8
Device to Host Bandwidth, 1 Device(s)
PINNED Memory Transfers
Transfer Size (Bytes) Bandwidth(MB/s)
33554432 20182.2
Device to Device Bandwidth, 1 Device(s)
PINNED Memory Transfers
Transfer Size (Bytes) Bandwidth(MB/s)
33554432 35742.8
Result = PASS
NOTE: The CUDA Samples are not meant for performance measurements. Results may vary when GPU Boost is enabled.
五、设备查询
nvidia@tegra-ubuntu:~/work/TensorRT/tmp/usr/src/tensorrt$ cd /usr/local/cuda/samples/1_Utilities/deviceQuery
nvidia@tegra-ubuntu:/usr/local/cuda/samples/1_Utilities/deviceQuery$ ls
deviceQuery deviceQuery.cpp deviceQuery.o Makefile NsightEclipse.xml readme.txt
nvidia@tegra-ubuntu:/usr/local/cuda/samples/1_Utilities/deviceQuery$ ./deviceQuery
./deviceQuery Starting...
CUDA Device Query (Runtime API) version (CUDART static linking)
Detected 1 CUDA Capable device(s)
Device 0: "NVIDIA Tegra X2"
CUDA Driver Version / Runtime Version 8.0 / 8.0
CUDA Capability Major/Minor version number: 6.2
Total amount of global memory: 7851 MBytes (8232062976 bytes)
( 2) Multiprocessors, (128) CUDA Cores/MP: 256 CUDA Cores
GPU Max Clock rate: 1301 MHz (1.30 GHz)
Memory Clock rate: 1600 Mhz
Memory Bus Width: 128-bit
L2 Cache Size: 524288 bytes
Maximum Texture Dimension Size (x,y,z) 1D=(131072), 2D=(131072, 65536), 3D=(16384, 16384, 16384)
Maximum Layered 1D Texture Size, (num) layers 1D=(32768), 2048 layers
Maximum Layered 2D Texture Size, (num) layers 2D=(32768, 32768), 2048 layers
Total amount of constant memory: 65536 bytes
Total amount of shared memory per block: 49152 bytes
Total number of registers available per block: 32768
Warp size: 32
Maximum number of threads per multiprocessor: 2048
Maximum number of threads per block: 1024
Max dimension size of a thread block (x,y,z): (1024, 1024, 64)
Max dimension size of a grid size (x,y,z): (2147483647, 65535, 65535)
Maximum memory pitch: 2147483647 bytes
Texture alignment: 512 bytes
Concurrent copy and kernel execution: Yes with 1 copy engine(s)
Run time limit on kernels: No
Integrated GPU sharing Host Memory: Yes
Support host page-locked memory mapping: Yes
Alignment requirement for Surfaces: Yes
Device has ECC support: Disabled
Device supports Unified Addressing (UVA): Yes
Device PCI Domain ID / Bus ID / location ID: 0 / 0 / 0
Compute Mode:
< Default (multiple host threads can use ::cudaSetDevice() with device simultaneously) >
deviceQuery, CUDA Driver = CUDART, CUDA Driver Version = 8.0, CUDA Runtime Version = 8.0, NumDevs = 1, Device0 = NVIDIA Tegra X2Result = PASS
六、大型项目的测试
详情查看https://developer.nvidia.com/embedded/jetpack
这里面还有一些项目
Jetson TX2上的demo(原创)的更多相关文章
- 在Jetson TX2上显示摄像头视频并使用python进行caffe推理
参考文章:How to Capture Camera Video and Do Caffe Inferencing with Python on Jetson TX2 与参考文章大部分都是相似的,如果 ...
- 在Jetson TX2上捕获、显示摄像头视频
参考文章:How to Capture and Display Camera Video with Python on Jetson TX2 与参考文章大部分都是相似的,如果不习惯看英文,可以看看我下 ...
- 在Jetson TX2上安装caffe和PyCaffe
caffe是Nvidia TensorRT最支持的深度学习框架,因此在Jetson TX2上安装caffe很有必要.顺便说一句,下面的安装是支持python3的. 先决条件 在Jetson TX2上完 ...
- 在Jetson TX2上安装OpenCV(3.4.0)
参考文章:How to Install OpenCV (3.4.0) on Jetson TX2 与参考文章大部分都是相似的,如果不习惯看英文,可以看看我下面的描述 在我们使用python3进行编程时 ...
- Jetson TX2安装tensorflow(原创)
Jetson TX2安装tensorflow 大致分为两步: 一.划分虚拟内存 原因:Jetson TX2自带8G内存这个内存空间在安装tensorflow编译过程中会出现内存溢出引发的安装进程奔溃 ...
- Jetson TX2 安装JetPack3.3教程
Jetson TX2 刷机教程(JetPack3.3版本) 参考网站:https://blog.csdn.net/long19960208/article/details/81538997 版权声明: ...
- 02-NVIDIA Jetson TX2 通过JetPack 3.1刷机完整版(踩坑版)
未经允许,不得擅自改动和转载 文 | 阿小庆 2018-1-20 本文继第一篇文章:01-NVIDIA Jetson TX2开箱上电显示界面 TX2 出厂时,已经自带了 Ubuntu 16.04 系统 ...
- Jetson TX2火力全开
Jetson Tegra系统的应用涵盖越来越广,相应用户对性能和功耗的要求也呈现多样化.为此NVIDIA提供一种新的命令行工具,可以方便地让用户配置CPU状态,以最大限度地提高不同场景下的性能和能耗. ...
- 在TX2上多线程读取视频帧进行caffe推理
参考文章:Multi-threaded Camera Caffe Inferencing TX2之多线程读取视频及深度学习推理 背景 一般在TX2上部署深度学习模型时,都是读取摄像头视频或者传入视频文 ...
随机推荐
- Vivado常见问题集锦
5. Vivado软件更新新版后更新IP 当更新到新版本的Vivado后,之前的一些工程的IP是不能直接打开使用的,这个时候我们只需要使用新版本的Vivado更新一下每个工程的IP即可,使用新版本Vi ...
- Nginx常用配置实例(4)
Nginx作为一个HTTP服务器,在功能实现方面和性能方面都表现得非常卓越,完全可以与Apache相媲美,几乎可以实现Apache的所有功能,下面就介绍一些Nginx常用的配置实例,具体包含虚拟主机配 ...
- 近期热门微信小程序demo源码下载汇总
近期微信小程序demo源码下载汇总,乃小程序学习分析必备素材!点击标题即可下载: 即速应用首发!原创!电商商场Demo 优质微信小程序推荐 -秀人美女图 图片下载.滑动翻页 微信小程序 - 新词 GE ...
- 声音变调算法PitchShift(模拟汤姆猫) 附完整C++算法实现代码
上周看到一个变调算法,挺有意思的,原本计划尝试用来润色TTS合成效果的. 实测感觉还需要进一步改进,待有空再思考改进方案. 算法细节原文,移步链接: http://blogs.zynaptiq.com ...
- Java Socket获取本机的InetAddress实例
package com.immooc;/* * InetAddress类 */import java.net.InetAddress;import java.net.UnknownHostExcept ...
- JXLS 2.4.0系列教程(四)——拾遗 如何做页面小计
注:阅读本文前,请先阅读第四篇文章. http://www.cnblogs.com/foxlee1024/p/7619845.html 前面写了第四篇教程,发现有些东西忘了讲了,这里补回来. 忘了讲两 ...
- Linux文件链接hard link与symbolic link
Linux中文件链接有两种方式,一种是hard link,又称为硬链接:另一种是symbolic link,又称为符号链接.要区分两者的不同要回顾Linux常用的ext2文件系统.这种文件系统使用in ...
- mysql 手册关于修改列字符编码的一个bug
项目因为历史原因使用了 GBK编码,遇到非GBK编码字符时出现乱码问题,情况比较严重,暂时先打算修改 列的字符编码为 utf8mb4. 查看 mysql 手册: 用 GBK 编码转 utf8 进行说明 ...
- debian 9 双显卡安装NVIDIA显卡驱动
最近用debian,给debian装n卡驱动折腾了好几天了,主要还是网络不好,官方wiki的方法下载经常卡死..摸索了几天感觉已经摸到了头绪,决定写下来供大家参考参考 先提供单显卡NVIDIA驱动的安 ...
- 图tp delDataById问题