C#(Wpf)实现小键盘
花了一天时间小键盘基本功能已完成,先看看效果图吧!

默认: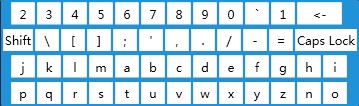
Shift: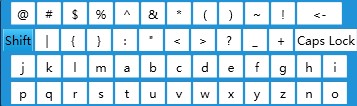
Caps Lock: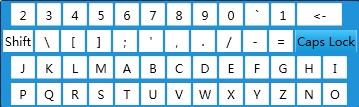
Button style
<Style x:Key="KeyButton" TargetType="Button">

        <Setter Property="Background" Value="White"/>

        <Setter Property="Margin" Value="1,2"/>

        <Setter Property="Width" Value="24"/>

        <Setter Property="Height" Value="24"/>

        <Setter Property="BorderThickness" Value=".5"/>

        <Setter Property="Template">

            <Setter.Value>

                <ControlTemplate TargetType="Button">

                    <Grid>

                        <VisualStateManager.VisualStateGroups>

                            <VisualStateGroup x:Name="CommonStates">

                                <VisualState x:Name="Normal"/>

                                <VisualState x:Name="MouseOver">

                                    <Storyboard>

                                        <ColorAnimation Duration="0" Storyboard.TargetName="BackgroundGradient" Storyboard.TargetProperty="(Rectangle.Fill).(GradientBrush.GradientStops)[0].(GradientStop.Color)" To="#47C9FB"/>

                                        <ColorAnimation Duration="0" Storyboard.TargetName="BackgroundGradient" Storyboard.TargetProperty="(Rectangle.Fill).(GradientBrush.GradientStops)[1].(GradientStop.Color)" To="#2BA8E8"/>

                                        <ColorAnimation Duration="0" Storyboard.TargetName="BackgroundGradient" Storyboard.TargetProperty="(Rectangle.Fill).(GradientBrush.GradientStops)[2].(GradientStop.Color)" To="#1097D7"/>

                                    </Storyboard>

                                </VisualState>

                                <VisualState x:Name="Pressed">

                                    <Storyboard>

                                        <ColorAnimation Duration="0" Storyboard.TargetName="BackgroundGradient" Storyboard.TargetProperty="(Rectangle.Fill).(GradientBrush.GradientStops)[0].(GradientStop.Color)" To="#1097D7"/>

                                        <ColorAnimation Duration="0" Storyboard.TargetName="BackgroundGradient" Storyboard.TargetProperty="(Rectangle.Fill).(GradientBrush.GradientStops)[1].(GradientStop.Color)" To="#2BA8E8"/>

                                        <ColorAnimation Duration="0" Storyboard.TargetName="BackgroundGradient" Storyboard.TargetProperty="(Rectangle.Fill).(GradientBrush.GradientStops)[2].(GradientStop.Color)" To="#47C9FB"/>

                                    </Storyboard>

                                </VisualState>

                                <VisualState x:Name="Disabled" />

                            </VisualStateGroup>

                            <VisualStateGroup x:Name="FocusStates">

                                <VisualState x:Name="Focused" />

                                <VisualState x:Name="Unfocused" />

                            </VisualStateGroup>

                        </VisualStateManager.VisualStateGroups>

                        <Border x:Name="Background"  Background="White" BorderThickness="{TemplateBinding BorderThickness}" BorderBrush="{TemplateBinding BorderBrush}">

                            <Grid Background="{TemplateBinding Background}">

                                <Rectangle x:Name="BackgroundGradient" >

                                    <Rectangle.Fill>

                                        <LinearGradientBrush StartPoint=".5,0" EndPoint=".5,1">

                                            <GradientStop Color="White" Offset="0" />

                                            <GradientStop Color="White"  Offset="0.4" />

                                            <GradientStop Color="White" Offset="1" />

                                        </LinearGradientBrush>

                                    </Rectangle.Fill>

                                </Rectangle>

                            </Grid>

                        </Border>

                        <ContentPresenter

                              x:Name="contentPresenter"

                              Content="{TemplateBinding Content}"

                              ContentTemplate="{TemplateBinding ContentTemplate}"

                              VerticalAlignment="{TemplateBinding VerticalContentAlignment}"

                              HorizontalAlignment="{TemplateBinding HorizontalContentAlignment}"

                              Margin="{TemplateBinding Padding}"/>

                    </Grid>

                </ControlTemplate>

            </Setter.Value>

        </Setter>

    </Style>
Window style
<Style TargetType="{x:Type local:KeyBoard}">
<Setter Property="Width" Value="360px"></Setter>
<Setter Property="Height" Value="108px"></Setter>
<Setter Property="AllowsTransparency" Value="true"/>
<Setter Property="ResizeMode" Value="NoResize"/>
<Setter Property="WindowStyle" Value="None"/>
<Setter Property="Template">
<Setter.Value>
<ControlTemplate TargetType="{x:Type local:KeyBoard}">
<Border Background="#2092D8"
BorderBrush="#043150"
BorderThickness="1" CornerRadius="2">
<Grid>
<Grid.RowDefinitions>
<RowDefinition />
<RowDefinition />
<RowDefinition />
<RowDefinition />
</Grid.RowDefinitions>
<StackPanel Orientation="Horizontal">
<Button x:Name="btnNum2" Margin="10,2,1,2" Style="{StaticResource KeyButton}">2</Button>
<Button x:Name="btnNum3" Style="{StaticResource KeyButton}">3</Button>
<Button x:Name="btnNum4" Style="{StaticResource KeyButton}">4</Button>
<Button x:Name="btnNum5" Style="{StaticResource KeyButton}">5</Button>
<Button x:Name="btnNum6" Style="{StaticResource KeyButton}">6</Button>
<Button x:Name="btnNum7" Style="{StaticResource KeyButton}">7</Button>
<Button x:Name="btnNum8" Style="{StaticResource KeyButton}">8</Button>
<Button x:Name="btnNum9" Style="{StaticResource KeyButton}">9</Button>
<Button x:Name="btnNum0" Style="{StaticResource KeyButton}">0</Button>
<Button x:Name="btnDot" Style="{StaticResource KeyButton}">`</Button>
<Button x:Name="btnNum1" Style="{StaticResource KeyButton}">1</Button>
<Button x:Name="btnDelete" Style="{StaticResource KeyButton}" Width="45"><-</Button>
</StackPanel>
<StackPanel Orientation="Horizontal" Grid.Row="1">
<Button x:Name="btnShift" Margin="2,2,1,2" Style="{StaticResource KeyButton}" Width="30">Shift</Button>
<Button x:Name="btnBackslant" Style="{StaticResource KeyButton}">\</Button>
<Button x:Name="btnLParenthesis" Style="{StaticResource KeyButton}">[</Button>
<Button x:Name="btnRParenthesis" Style="{StaticResource KeyButton}">]</Button>
<Button x:Name="btnSemicolon" Style="{StaticResource KeyButton}">;</Button>
<Button x:Name="btnSQuotes" Style="{StaticResource KeyButton}">'</Button>
<Button x:Name="btnComma" Style="{StaticResource KeyButton}">,</Button>
<Button x:Name="btnPeriod" Style="{StaticResource KeyButton}">.</Button>
<Button x:Name="btnSlant" Style="{StaticResource KeyButton}">/</Button>
<Button x:Name="btnSub" Style="{StaticResource KeyButton}">-</Button>
<Button x:Name="btnEquip" Style="{StaticResource KeyButton}">=</Button>
<Button x:Name="btnCapsLock" Style="{StaticResource KeyButton}" Width="62">Caps Lock</Button>
</StackPanel>
<StackPanel Orientation="Horizontal" Grid.Row="2">
<Button x:Name="btnj" Margin="10,2,1,2" Style="{StaticResource KeyButton}">j</Button>
<Button x:Name="btnk" Style="{StaticResource KeyButton}">k</Button>
<Button x:Name="btnl" Style="{StaticResource KeyButton}">l</Button>
<Button x:Name="btnm" Style="{StaticResource KeyButton}">m</Button>
<Button x:Name="btna" Style="{StaticResource KeyButton}">a</Button>
<Button x:Name="btnb" Style="{StaticResource KeyButton}">b</Button>
<Button x:Name="btnc" Style="{StaticResource KeyButton}">c</Button>
<Button x:Name="btnd" Style="{StaticResource KeyButton}">d</Button>
<Button x:Name="btne" Style="{StaticResource KeyButton}">e</Button>
<Button x:Name="btnf" Style="{StaticResource KeyButton}">f</Button>
<Button x:Name="btng" Style="{StaticResource KeyButton}">g</Button>
<Button x:Name="btnh" Style="{StaticResource KeyButton}">h</Button>
<Button x:Name="btni" Style="{StaticResource KeyButton}">i</Button>
</StackPanel>
<StackPanel Orientation="Horizontal" Grid.Row="3">
<Button x:Name="btnp" Margin="10,2,1,2" Style="{StaticResource KeyButton}">p</Button>
<Button x:Name="btnq" Style="{StaticResource KeyButton}">q</Button>
<Button x:Name="btnr" Style="{StaticResource KeyButton}">r</Button>
<Button x:Name="btns" Style="{StaticResource KeyButton}">s</Button>
<Button x:Name="btnt" Style="{StaticResource KeyButton}">t</Button>
<Button x:Name="btnu" Style="{StaticResource KeyButton}">u</Button>
<Button x:Name="btnv" Style="{StaticResource KeyButton}">v</Button>
<Button x:Name="btnw" Style="{StaticResource KeyButton}">w</Button>
<Button x:Name="btnx" Style="{StaticResource KeyButton}">x</Button>
<Button x:Name="btny" Style="{StaticResource KeyButton}">y</Button>
<Button x:Name="btnz" Style="{StaticResource KeyButton}">z</Button>
<Button x:Name="btnn" Style="{StaticResource KeyButton}">n</Button>
<Button x:Name="btno" Style="{StaticResource KeyButton}">o</Button>
</StackPanel>
</Grid>
</Border>
</ControlTemplate>
</Setter.Value>
</Setter>
</Style>
存在的问题:还不能自动定位,弹出键盘需要手动控制,这些以后会解决的
周末愉快!
C#(Wpf)实现小键盘的更多相关文章
- WPF 触摸屏小键盘样式
WPF程序,用于平板时,一些输入数量的地方我们需要弹出小键盘输入,这个键盘可以调系统的,也可以自己写. 分享个我现在用的一个数字键盘界面. <Window xmlns:dxe="htt ...
- WinForm数字小键盘/WPF数字小键盘
模仿原本的WinForm触摸屏小键盘制作WPF触摸屏小键盘 原WinForm触摸屏小键盘样式(WinForm采用Krypton系列控件)如下图: Designer代码如下: // // BtnNum1 ...
- 在WPF中使用依赖注入的方式创建视图
在WPF中使用依赖注入的方式创建视图 0x00 问题的产生 互联网时代桌面开发真是越来越少了,很多应用都转到了浏览器端和移动智能终端,相应的软件开发上的新技术应用到桌面开发的文章也很少.我之前主要做W ...
- MVVM框架从WPF移植到UWP遇到的问题和解决方法
MVVM框架从WPF移植到UWP遇到的问题和解决方法 0x00 起因 这几天开始学习UWP了,之前有WPF经验,所以总体感觉还可以,看了一些基础概念和主题,写了几个测试程序,突然想起来了前一段时间在W ...
- MVVM模式解析和在WPF中的实现(六) 用依赖注入的方式配置ViewModel并注册消息
MVVM模式解析和在WPF中的实现(六) 用依赖注入的方式配置ViewModel并注册消息 系列目录: MVVM模式解析和在WPF中的实现(一)MVVM模式简介 MVVM模式解析和在WPF中的实现(二 ...
- MVVM模式解析和在WPF中的实现(五)View和ViewModel的通信
MVVM模式解析和在WPF中的实现(五) View和ViewModel的通信 系列目录: MVVM模式解析和在WPF中的实现(一)MVVM模式简介 MVVM模式解析和在WPF中的实现(二)数据绑定 M ...
- MVVM设计模式和WPF中的实现(四)事件绑定
MVVM设计模式和在WPF中的实现(四) 事件绑定 系列目录: MVVM模式解析和在WPF中的实现(一)MVVM模式简介 MVVM模式解析和在WPF中的实现(二)数据绑定 MVVM模式解析和在WPF中 ...
- MVVM模式解析和在WPF中的实现(三)命令绑定
MVVM模式解析和在WPF中的实现(三) 命令绑定 系列目录: MVVM模式解析和在WPF中的实现(一)MVVM模式简介 MVVM模式解析和在WPF中的实现(二)数据绑定 MVVM模式解析和在WPF中 ...
- MVVM模式和在WPF中的实现(二)数据绑定
MVVM模式解析和在WPF中的实现(二) 数据绑定 系列目录: MVVM模式解析和在WPF中的实现(一)MVVM模式简介 MVVM模式解析和在WPF中的实现(二)数据绑定 MVVM模式解析和在WPF中 ...
随机推荐
- 小程序 当button遇上Flex布局
当需要将button按行排列,当超过一行时,可以换行,从左到右排列,想实现如下效果(实现的比较粗糙,能说明问题就行,呵~~~): 使用Flex布局,在设置主轴方向上对齐方式,使用justify-con ...
- 【numpy】
ndarray在某个维度上堆叠,np.stack() np.hstack() np.vstack() https://blog.csdn.net/csdn15698845876/article/det ...
- Java-小技巧-004-jdk时间,jdk8时间,joda,calendar,获取当前时间前一周、前一月、前一年的时间
1.推荐使用java8 localdate等 线程安全 支持较好 地址 2.joda 一.简述 查看SampleDateFormat源码,叙述有: * Date formats are not syn ...
- Linux下多个.c文件的编译和Makefile文件
在编程的时候,我们可以把一个完整程序的每个函数分离出来,写成.c文件,最后再一起编译和链接.这样有利于程序功能模块化,也方便检查代码错误. .h文件:里面编辑该程序需要引用的头文件. #ifndef ...
- mysql 提示符显示用户,数据库等信息
命令: mysql -uroot -p --prompt="\\u@\\h:\\d \\r:\\m:\\s>" 效果: root@localhost:(mysql) 02:2 ...
- IOS中程序如何进行推送消息(本地推送,远程推送)2(下)
内容中包含 base64string 图片造成字符过多,拒绝显示
- WEB前端研发工程师编程能力成长之路(1)
[背景] 如果你是刚进入WEB前端研发领域,想试试这潭水有多深,看这篇文章吧: 如果你是做了两三年WEB产品前端研发,迷茫找不着提高之路,看这篇文章吧: 如果你是四五年的前端开发高手,没有难题能难得住 ...
- web前端基础——初识HTML
1 HTML概念 HTML(Hypertext Markup Language)即超文本标记语言,是网页的描述语言.它其实是一种描述网页的标准,它通过给需要描述的内容加上标签,浏览器按照HTML语言的 ...
- 如何建立DB2分区数据库?(转)
欢迎和大家交流技术相关问题:邮箱: jiangxinnju@163.com博客园地址: http://www.cnblogs.com/jiangxinnjuGitHub地址: https://gith ...
- message from server: "Host '192.168.6.68' is blocked because of many connection errors; unblock with 'mysqladmin flush-hosts
系统或者程序连接数据报错 null, message from server: "Host '192.168.6.68' is blocked because of many connect ...