
Bert-vits2最终版Bert-vits2-2.3云端训练和推理(Colab免费GPU算力平台)

对于深度学习初学者来说,JupyterNoteBook的脚本运行形式显然更加友好,依托Python语言的跨平台特性,JupyterNoteBook既可以在本地线下环境运行,也可以在线上服务器上运行。GoogleColab作为免费GPU算力平台的执牛耳者,更是让JupyterNoteBook的脚本运行形式如虎添翼。
本次我们利用Bert-vits2的最终版Bert-vits2-v2.3和JupyterNoteBook的脚本来复刻生化危机6的人气角色艾达王(ada wong)。
本地调试JupyterNoteBook
众所周知,GoogleColab虽然可以免费提供GPU让用户用于模型训练和推理,但是每一个JupyterNoteBook文件脚本最多只能运行12小时,随后就会被限制,所以为了避免浪费宝贵的GPU使用时间,我们可以在线下调试自己的JupyterNoteBook脚本,调试成功后,就可以把脚本直接上传到GoogleColab平台。
首先通过pip命令进行本地安装:
python3 -m pip install jupyter
随后运行启动命令:
jupyter notebook
此时,访问本地的notebook地址:
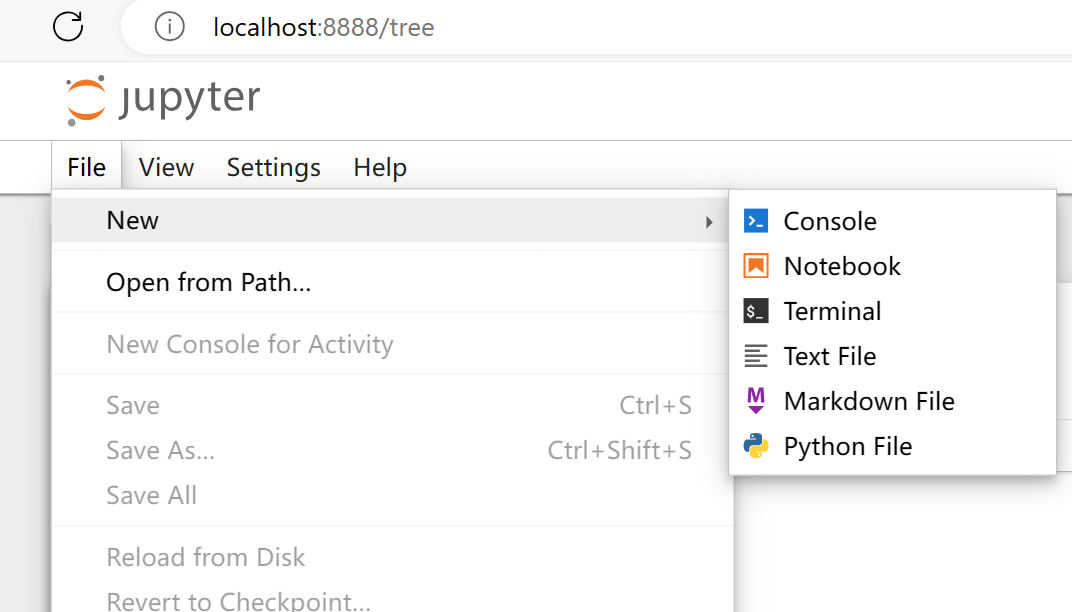
随后选择文件-》新建-》Notebook 即可。
输入笔记内容:
#@title 查看显卡

!nvidia-smi
点击运行单元格:
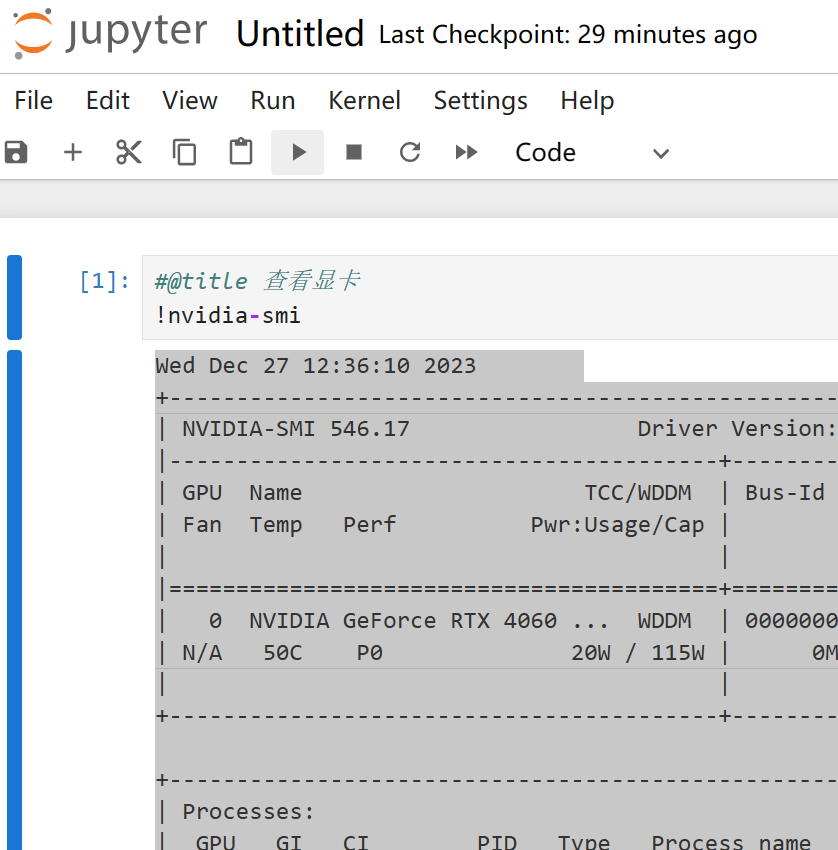
程序返回:
#@title 查看显卡

!nvidia-smi

Wed Dec 27 12:36:10 2023

+---------------------------------------------------------------------------------------+

| NVIDIA-SMI 546.17                 Driver Version: 546.17       CUDA Version: 12.3     |

|-----------------------------------------+----------------------+----------------------+

| GPU  Name                     TCC/WDDM  | Bus-Id        Disp.A | Volatile Uncorr. ECC |

| Fan  Temp   Perf          Pwr:Usage/Cap |         Memory-Usage | GPU-Util  Compute M. |

|                                         |                      |               MIG M. |

|=========================================+======================+======================|

|   0  NVIDIA GeForce RTX 4060 ...  WDDM  | 00000000:01:00.0 Off |                  N/A |

| N/A   50C    P0              20W / 115W |      0MiB /  8188MiB |      0%      Default |

|                                         |                      |                  N/A |

+-----------------------------------------+----------------------+----------------------+

+---------------------------------------------------------------------------------------+

| Processes:                                                                            |

|  GPU   GI   CI        PID   Type   Process name                            GPU Memory |

|        ID   ID                                                             Usage      |

|=======================================================================================|

|  No running processes found                                                           |

+---------------------------------------------------------------------------------------+
至此,就可以在本地调试NoteBook了。
安装ffmpeg
新增单元格:
#@title 安装ffmpeg

import os, uuid, re, IPython

import ipywidgets as widgets

import time

from glob import glob

from google.colab import output, drive

from IPython.display import clear_output

import os, sys, urllib.request

HOME = os.path.expanduser("~")

pathDoneCMD = f'{HOME}/doneCMD.sh'

if not os.path.exists(f"{HOME}/.ipython/ttmg.py"):

    hCode = "https://raw.githubusercontent.com/yunooooo/gcct/master/res/ttmg.py"

    urllib.request.urlretrieve(hCode, f"{HOME}/.ipython/ttmg.py")

from ttmg import (

    loadingAn,

    textAn,

)

loadingAn(name="lds")

textAn("Cloning Repositories...", ty='twg')

!git clone https://github.com/XniceCraft/ffmpeg-colab.git

!chmod 755 ./ffmpeg-colab/install

textAn("Installing FFmpeg...", ty='twg')

!./ffmpeg-colab/install

clear_output()

print('Installation finished!')

!rm -fr /content/ffmpeg-colab

!ffmpeg -version
由于语音转写需要ffmpeg的参与,所以需要安装ffmpeg的最新版本。
程序返回:
Installation finished!

c Copyright (c) 2000-2023 the FFmpeg developers

built with gcc 9 (Ubuntu 9.4.0-1ubuntu1~20.04.1)

configuration: --prefix=/home/ffmpeg-builder/release --pkg-config-flags=--static --extra-libs=-lm --disable-doc --disable-debug --disable-shared --disable-ffprobe --enable-static --enable-gpl --enable-version3 --enable-runtime-cpudetect --enable-avfilter --enable-filters --enable-nvenc --enable-nvdec --enable-cuvid --toolchain=hardened --disable-stripping --enable-opengl --pkgconfigdir=/home/ffmpeg-builder/release/lib/pkgconfig --extra-cflags='-I/home/ffmpeg-builder/release/include -static-libstdc++ -static-libgcc ' --extra-ldflags='-L/home/ffmpeg-builder/release/lib -fstack-protector -static-libstdc++ -static-libgcc ' --extra-cxxflags=' -static-libstdc++ -static-libgcc ' --extra-libs='-ldl -lrt -lpthread' --enable-ffnvcodec --enable-gmp --enable-libaom --enable-libass --enable-libbluray --enable-libdav1d --enable-libfdk-aac --enable-libfontconfig --enable-libfreetype --enable-libfribidi --enable-libgme --enable-libkvazaar --enable-libmp3lame --enable-libopus --enable-libopencore_amrnb --enable-libopencore_amrwb --enable-libopenh264 --enable-libopenjpeg --enable-libshine --enable-libsoxr --enable-libsrt --enable-libsvtav1 --enable-libtheora --enable-libvidstab --ld=g++ --enable-libvmaf --enable-libvorbis --enable-libvpx --enable-libx264 --enable-libx265 --enable-libxvid --enable-libzimg --enable-openssl --enable-zlib --enable-nonfree --extra-libs=-lpthread --enable-pthreads --extra-libs=-lgomp

libavutil      58.  2.100 / 58.  2.100

libavcodec     60.  3.100 / 60.  3.100

libavformat    60.  3.100 / 60.  3.100

libavdevice    60.  1.100 / 60.  1.100

libavfilter     9.  3.100 /  9.  3.100

libswscale      7.  1.100 /  7.  1.100

libswresample   4. 10.100 /  4. 10.100

libpostproc    57.  1.100 / 57.  1.100
这里安装的是最新版ffmpeg version 6.0
克隆代码库
接着克隆代码库:
#@title 克隆代码仓库

!git clone https://github.com/v3ucn/Bert-vits2-V2.3.git
程序返回:
Cloning into 'Bert-vits2-V2.3'...

remote: Enumerating objects: 234, done.

remote: Counting objects: 100% (234/234), done.

remote: Compressing objects: 100% (142/142), done.

remote: Total 234 (delta 80), reused 232 (delta 78), pack-reused 0

Receiving objects: 100% (234/234), 4.16 MiB | 14.14 MiB/s, done.

Resolving deltas: 100% (80/80), done.
安装项目依赖
随后进入项目的目录,安装依赖:
#@title 安装所需要的依赖

%cd /content/Bert-vits2-V2.3

!pip install -r requirements.txt
下载必要的模型
新增单元格,下载模型:
#@title 下载必要的模型

!wget -P slm/wavlm-base-plus/ https://huggingface.co/microsoft/wavlm-base-plus/resolve/main/pytorch_model.bin

!wget -P emotional/clap-htsat-fused/ https://huggingface.co/laion/clap-htsat-fused/resolve/main/pytorch_model.bin

!wget -P emotional/wav2vec2-large-robust-12-ft-emotion-msp-dim/ https://huggingface.co/audeering/wav2vec2-large-robust-12-ft-emotion-msp-dim/resolve/main/pytorch_model.bin

!wget -P bert/chinese-roberta-wwm-ext-large/ https://huggingface.co/hfl/chinese-roberta-wwm-ext-large/resolve/main/pytorch_model.bin

!wget -P bert/bert-base-japanese-v3/ https://huggingface.co/cl-tohoku/bert-base-japanese-v3/resolve/main/pytorch_model.bin

!wget -P bert/deberta-v3-large/ https://huggingface.co/microsoft/deberta-v3-large/resolve/main/pytorch_model.bin

!wget -P bert/deberta-v3-large/ https://huggingface.co/microsoft/deberta-v3-large/resolve/main/pytorch_model.generator.bin

!wget -P bert/deberta-v2-large-japanese/ https://huggingface.co/ku-nlp/deberta-v2-large-japanese/resolve/main/pytorch_model.bin
下载底模文件
接着下载预训练模型的底模:
#@title 下载底模文件

!wget -P Data/ada/models/ https://huggingface.co/OedoSoldier/Bert-VITS2-2.3/resolve/main/DUR_0.pth

!wget -P Data/ada/models/ https://huggingface.co/OedoSoldier/Bert-VITS2-2.3/resolve/main/D_0.pth

!wget -P Data/ada/models/ https://huggingface.co/OedoSoldier/Bert-VITS2-2.3/resolve/main/G_0.pth

!wget -P Data/ada/models/ https://huggingface.co/OedoSoldier/Bert-VITS2-2.3/resolve/main/WD_0.pth
注意2.3版本的底模是4个。
切分数据集
接着把艾达王的音频素材上传到Data/ada/raw/ada.wav
随后新建单元格:
#@title 切分数据集

!python3 audio_slicer.py
素材就会被切分。
转写和标注
此时我们需要把切片素材转写:
#@title 转写和标注

!pip install git+https://github.com/openai/whisper.git

!python3 short_audio_transcribe.py
注意这里单独安装whisper,很多人直接用 pip install whisper,其实这不是正确的安装方式,需要单独指定安装源:pip install git+https://github.com/openai/whisper.git,切记,否则会报错。
执行完毕后会在角色目录生成转写文件esd.list:
./Data\ada\wavs\ada_0.wav|ada|EN|I do. The kind you like.

./Data\ada\wavs\ada_1.wav|ada|EN|Now where's the amber?

./Data\ada\wavs\ada_10.wav|ada|EN|Leave the girl. She's lost no matter what.

./Data\ada\wavs\ada_11.wav|ada|EN|You walk away now, and who knows?

./Data\ada\wavs\ada_12.wav|ada|EN|Maybe you'll live to meet me again.

./Data\ada\wavs\ada_13.wav|ada|EN|And I might get you that greeting you were looking for.

./Data\ada\wavs\ada_14.wav|ada|EN|How about we continue this discussion another time?

./Data\ada\wavs\ada_15.wav|ada|EN|Sorry, nothing yet.

./Data\ada\wavs\ada_16.wav|ada|EN|But my little helper is creating

./Data\ada\wavs\ada_17.wav|ada|EN|Quite the commotion.

./Data\ada\wavs\ada_18.wav|ada|EN|Everything will work out just fine.

./Data\ada\wavs\ada_19.wav|ada|EN|He's a good boy. Predictable.

./Data\ada\wavs\ada_2.wav|ada|EN|The deal was, we get you out of here when you deliver the amber. No amber, no protection, Louise.

./Data\ada\wavs\ada_20.wav|ada|EN|Nothing personal, Leon.

./Data\ada\wavs\ada_21.wav|ada|EN|Louise and I had an arrangement.

./Data\ada\wavs\ada_22.wav|ada|EN|Don't worry, I'll take good care of it.

./Data\ada\wavs\ada_23.wav|ada|EN|Just one question.

./Data\ada\wavs\ada_24.wav|ada|EN|What are you planning to do with this?

./Data\ada\wavs\ada_25.wav|ada|EN|So, we're talking millions of casualties?

./Data\ada\wavs\ada_26.wav|ada|EN|We're changing course. Now.

./Data\ada\wavs\ada_3.wav|ada|EN|You can stop right there, Leon.

./Data\ada\wavs\ada_4.wav|ada|EN|wouldn't make me use this.

./Data\ada\wavs\ada_5.wav|ada|EN|Would you? You don't seem surprised.

./Data\ada\wavs\ada_6.wav|ada|EN|Interesting.

./Data\ada\wavs\ada_7.wav|ada|EN|Not a bad move

./Data\ada\wavs\ada_8.wav|ada|EN|Very smooth. Ah, Leon.

./Data\ada\wavs\ada_9.wav|ada|EN|You know I don't work and tell.
这里一共27条切片语音,对应27个转写文本,注意语言是英语。
音频重新采样
对素材音频进行重新采样的操作:
#@title 重新采样

!python3 resample.py --sr 44100 --in_dir ./Data/ada/raw/ --out_dir ./Data/ada/wavs/
预处理标签文件
接着处理转写文件,生成训练集和验证集:
#@title 预处理标签文件

!python3 preprocess_text.py --transcription-path ./Data/ada/esd.list --t
程序返回:
pytorch_model.bin: 100% 1.32G/1.32G [00:10<00:00, 122MB/s]

spm.model: 100% 2.46M/2.46M [00:00<00:00, 115MB/s]

The cache for model files in Transformers v4.22.0 has been updated. Migrating your old cache. This is a one-time only operation. You can interrupt this and resume the migration later on by calling `transformers.utils.move_cache()`.

0it [00:00, ?it/s]

[nltk_data] Downloading package averaged_perceptron_tagger to

[nltk_data]     /root/nltk_data...

[nltk_data]   Unzipping taggers/averaged_perceptron_tagger.zip.

[nltk_data] Downloading package cmudict to /root/nltk_data...

[nltk_data]   Unzipping corpora/cmudict.zip.

100% 27/27 [00:00<00:00, 4457.63it/s]

总重复音频数:0,总未找到的音频数:0

训练集和验证集生成完成!
生成 BERT 特征文件
最后生成bert特征文件:
#@title 生成 BERT 特征文件

!python3 bert_gen.py --config-path ./Data/ada/configs/config.json
对应27个素材:
100% 27/27 [00:33<00:00,  1.25s/it]

bert生成完毕!, 共有27个bert.pt生成!
模型训练
万事俱备,开始训练:
#@title 开始训练

!python3 train_ms.py
模型会在models目录生成,项目默认设置了训练间隔是50步,可以根据自己的需求修改config.json配置文件。
模型推理
一般情况下,训练了50步或者100步左右,可以推理一下查看效果,然后继续训练:
#@title 开始推理

!python3 webui.py
返回:
| numexpr.utils | INFO | NumExpr defaulting to 2 threads.

/usr/local/lib/python3.10/dist-packages/torch/nn/utils/weight_norm.py:30: UserWarning: torch.nn.utils.weight_norm is deprecated in favor of torch.nn.utils.parametrizations.weight_norm.

  warnings.warn("torch.nn.utils.weight_norm is deprecated in favor of torch.nn.utils.parametrizations.weight_norm.")

| utils | INFO | Loaded checkpoint 'Data/ada/models/G_150.pth' (iteration 25)

推理页面已开启!

Running on local URL:  http://127.0.0.1:7860

Running on public URL: https://814833a6f477ba151c.gradio.live
点击第二个公网地址进行推理即可。
结语
至此,我们已经完成了基于JupyterNoteBook的数据切分、转写、预处理、训练以及推理流程。最后奉上线上GoogleColab,以飨众乡亲:
https://colab.research.google.com/drive/1-H1DGG5dTy8u_8vFbq1HACXPX9AAM76s?usp=sharing
Bert-vits2最终版Bert-vits2-2.3云端训练和推理(Colab免费GPU算力平台)的更多相关文章
- 【中文版 | 论文原文】BERT:语言理解的深度双向变换器预训练
BERT:Pre-training of Deep Bidirectional Transformers for Language Understanding 谷歌AI语言组论文<BERT:语言 ...
- 【转载】BERT:用于语义理解的深度双向预训练转换器(Transformer)
BERT:用于语义理解的深度双向预训练转换器(Transformer) 鉴于最近BERT在人工智能领域特别火,但相关中文资料却很少,因此将BERT论文理论部分(1-3节)翻译成中文以方便大家后续研 ...
- 最终版的Web(Python实现)
天啦,要考试了,要期末考试了,今天把最终版的Python搭建Web代码先写这里记下了.详细的过程先不写了. 这次是在前面的基础上重写 HTTPServer 与 BaseHTTPRequestHandl ...
- Angular 2 最终版正式发布
9月15日,Angular 2 的最终版正式发布了. 作为 Angular 1 的全平台继任者 -- Angular 2 的最终版,意味着什么? 意味着稳定性已经得到了大范围用例的验证: 意味着已经针 ...
- RHEL 6.0服务器安装Oracle 11G R2 最终版
RHEL6安装Oracle 11g R2最终版 结合网上教程 服务器实战所得 1.使用DVD做yum源新建dvd挂载目录[root@fxq-dp ~]# mkdir /media/iso进入到DVD挂 ...
- 理解JavaScript设计模式与开发应用中发布-订阅模式的最终版代码
最近拜读了曾探所著的<JavaScript设计模式与开发应用>一书,在读到发布-订阅模式一章时,作者不仅给出了基本模式的通用版本的发布-订阅模式的代码,最后还做出了扩展,给该模式增加了离线 ...
- jQuery 3.0最终版发布,十大新特性眼前一亮
jQuery 3.0在日前发布了最终的全新版本.从2014年10月,jQuery团队对这个主要大版本进行维护开始,web开发者社区便一直在期待着这一刻的到来,终于在2016年6月他们迎来了这一个最终板 ...
- Delphi7/2007/2009/2010/XE/XE2/XE3/XE4/XE5/XE6/XE7/XE8/10最终版
RAD Studio 10.1 Berlin(with Update1)http://altd.embarcadero.com/download/radstudio/10.1/delphicbuild ...
- python---session(最终版)__setitem__和__getitem__方法
一般来说对于其他语言session值一般获取方法为session['name'],赋值使用session['name']=val 对于python类中含有一些魔术方法__setitem__,__get ...
- [oldboy-django][3作业汇总]登录,注册最终版
# 作业(登录,注册)最终版 - 保留上次输入的值 - 用户数据格式的验证
随机推荐
- Adobe全家桶PS、PR、AU等2022正版永久有效,无需破解直接安装就能用
[Adobe全家桶]已经亲测绝对好用,下载地址: 关注我的wx公众号"奋斗在IT"回复1013获取下载地址.
- lattice crosslink开发板mipi核心板csi测试dsi屏lif md6000 fpga
1. 概述 CrossLink开发板,是用Lattice的芯片CrossLink 家族系列的,LIF-MD6000-6JM80I.该芯片用于桥接视频接口功能,自带2路MIPI硬核的功能,4 LANE ...
- 递归解析Json,实现生成可视化Tree+快速获取JsonPath
内部平台的一个小功能点的实现过程,分享给大家: 递归解析Json,可以实现生成可视化Tree+快速获取JsonPath. 步骤: 1.利用JsonPath读取根,获取JsonObject 2.递归层次 ...
- Programming abstractions in C阅读笔记:p166-p175
<Programming Abstractions In C>学习第58天,p166-p175总结. 一.技术总结 1.斐波那契数列(Fibonacci Sequenc) (1)斐波那契数 ...
- np.random.beta
numpy.random.beta(a,b,size=None) 从β分布中提取样本.β分布是狄里克莱分布的一个特例,与伽马分布有关. 在这里我们将参数(3个参数)设置为32 32 3 参数1:32次 ...
- PHP -pop魔术方法
PHP魔术方法: PHP提供了一系列的魔术方法,这些魔术方法为编程提供了很多便利,在 PHP 中的作用是非常重要的.PHP 中的魔术方法通常以__(两个下划线)开始,可以在要使用时灵活调用. 例题 [ ...
- [SWPUCTF 2021 新生赛]sql
看到网站上写着参数是wllm,就用wllm=1试了一下,发现是SQL注入 查找字段数时,提示请勿非法操作 说明空格出现过滤,可以用/**/绕过 http://1.14.71.254:28347/?wl ...
- 传纸条 luoguP1006
题目描述 小渊和小轩是好朋友也是同班同学,他们在一起总有谈不完的话题.一次素质拓展活动中,班上同学安排坐成一个 mm 行 nn 列的矩阵,而小渊和小轩被安排在矩阵对角线的两端,因此,他们就无法直接交谈 ...
- 【v2v迁移】Xen2kvm 迁移-linux篇
迁移环境: 源平台:华为FusionComputeV100R006C10SPC101 目标平台:基于KVM虚拟化的云平台,本文以原生的libvirt为例 虚拟机:centos 7.6 具体操作步骤: ...
- Windows10 下载并编译指定版本chromium源码
1.一些信息 Chromium 的官网是 https://www.chromium.org/ Git 仓库是 https://chromium.googlesource.com/chromium/sr ...