pymysql 模块
Python3连接MySQL
介绍
PyMySQL 是在 Python3.x 版本中用于连接 MySQL 服务器的一个库,Python2中则使用mysqldb。
Django中也可以使用PyMySQL连接MySQL数据库。
安装模块
pip3 install pymysql
连接数据库
基本使用
# 导入pymysql模块

import pymysql

# 连接database

conn = pymysql.connect(host=“你的数据库地址”, user=“用户名”,password=“密码”,database=“数据库名”,charset=“utf8”)

# 得到一个可以执行SQL语句的光标对象

cursor = conn.cursor()

# 定义要执行的SQL语句

sql = """

CREATE TABLE USER1 (

id INT auto_increment PRIMARY KEY ,

name CHAR(10) NOT NULL UNIQUE,

age TINYINT NOT NULL

)ENGINE=innodb DEFAULT CHARSET=utf8;

"""

# 执行SQL语句

cursor.execute(sql)

# 关闭光标对象

cursor.close()

# 关闭数据库连接

conn.close()
execute()之sql注入
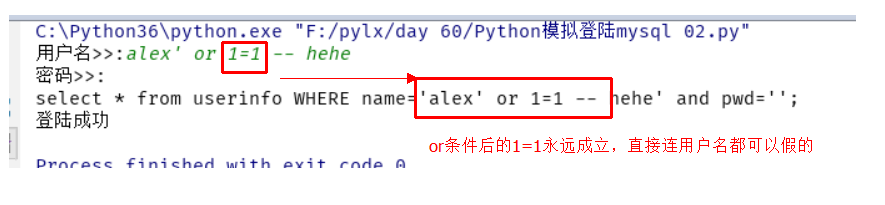
注意:符号--会注释掉它之后的sql,正确的语法:--后至少有一个任意字符
根本原理:就根据程序的字符串拼接name='%s',我们输入一个xxx' -- haha,用我们输入的xxx加'在程序中拼接成一个判断条件name='xxx' -- haha'
最后那一个空格,在一条sql语句中如果遇到select * from t1 where id > 3 -- and name='egon';则--之后的条件被注释掉了

#1、sql注入之:用户存在,绕过密码

egon' -- 任意字符

#2、sql注入之:用户不存在,绕过用户与密码

xxx' or 1=1 -- 任意字符
import pymysql

# 获取用户输入

name = input("用户名>>:")

pwd = input("密码>>:")

# 校验用户输入的用户名和密码是否正确

# 去数据库里取数据做判断

# 1. 连上数据库

conn = pymysql.connect(host="localhost",database="day60", user="root", password="", charset="utf8")  # 不是utf-8

# 光有链接还不行,需要获取光标,让我能够输入SQL语句并执行

cursor = conn.cursor()

# 2. 执行SQL语句 --> select * from userinfo where name=name and pwd=pwd

sql = "select * from userinfo WHERE name='%s' and pwd='%s';" % (name, pwd)

print(sql)

ret = cursor.execute(sql)  # 获取影响的行数

# 关闭光标和连接

cursor.close()

conn.close()

if ret:

    print("登陆成功")

else:

    print("登录失败")
解决mysql的注入问题
# 原来是我们对sql进行字符串拼接

# sql="select * from userinfo where name='%s' and password='%s'" %(user,pwd)

# print(sql)

# res=cursor.execute(sql)

#改写为(execute帮我们做字符串拼接,我们无需且一定不能再为%s加引号了)

sql="select * from userinfo where name=%s and password=%s" #!!!注意%s需要去掉引号,因为pymysql会自动为我们加上

res=cursor.execute(sql,[user,pwd]) #pymysql模块自动帮我们解决sql注入的问题,只要我们按照pymysql的规矩来。
import pymysql

# 获取用户输入

name = input("用户名>>:")

pwd = input("密码>>:")

# 校验用户输入的用户名和密码是否正确

# 去数据库里取数据做判断

# 1. 连上数据库

conn = pymysql.connect(host="localhost",database="day60", user="root", password="", charset="utf8")  # 不是utf-8

# 光有链接还不行,需要获取光标,让我能够输入SQL语句并执行

cursor = conn.cursor()

# 2. 执行SQL语句 --> select * from userinfo where name=name and pwd=pwd

sql = "select * from userinfo WHERE name=%s and pwd=%s;"

print(sql)

# 解决:让pymysql拼接字符串

ret = cursor.execute(sql,[name,pwd])  # 获取影响的行数

# 关闭光标和连接

cursor.close()

conn.close()

if ret:

    print("登陆成功")

else:

    print("登录失败")
增删改查操作
增
import pymysql

#  连接

conn = pymysql.connect(host=“你的数据库地址”, user=“用户名”,password=“密码”,database=“数据库名”,charset=“utf8”)

# 获取光标

cursor = conn.cursor()

# 写sql语句

sql = "insert into userinfo(name,pwd) VALUE (%s,%s);"

username = "dandan"

password = ""

# 执行sql语句

 cursor.execute(sql,(username,password))

 conn.commit()  # 把修改提交到数据库 (提交事务)

cursor.close()

conn.close()
插入数据失败回滚
# 导入pymysql模块

import pymysql

# 连接database

conn = pymysql.connect(host=“你的数据库地址”, user=“用户名”,password=“密码”,database=“数据库名”,charset=“utf8”)

# 得到一个可以执行SQL语句的光标对象

cursor = conn.cursor()

sql = "INSERT INTO USER1(name, age) VALUES (%s, %s);"

username = "lishi"
password = "1220"
try: # 执行SQL语句 cursor.execute(sql, [username, age]) # 提交事务 conn.commit() except Exception as e: # 有异常,回滚事务 conn.rollback() cursor.close() conn.close()
获取插入数据的ID(关联操作时会用到)
# 导入pymysql模块

import pymysql

# 连接database

conn = pymysql.connect(host=“你的数据库地址”, user=“用户名”,password=“密码”,database=“数据库名”,charset=“utf8”)

# 得到一个可以执行SQL语句的光标对象

cursor = conn.cursor()

sql = "INSERT INTO USER1(name, age) VALUES (%s, %s);"

username = "Alex"

age = 18

try:

    # 执行SQL语句

    cursor.execute(sql, [username, age])

    # 提交事务

    conn.commit()

    # 提交之后,获取刚插入的数据的ID

    last_id = cursor.lastrowid

except Exception as e:

    # 有异常,回滚事务

    conn.rollback()

cursor.close()

conn.close()
批量执行:用executemany()插入多条信息
# 导入pymysql模块

import pymysql

# 连接database

conn = pymysql.connect(host=“你的数据库地址”, user=“用户名”,password=“密码”,database=“数据库名”,charset=“utf8”)

# 得到一个可以执行SQL语句的光标对象

cursor = conn.cursor()

sql = "INSERT INTO USER1(name, age) VALUES (%s, %s);"

data = [("lishi", 18), ("lili", 20), ("dandna", 21)]

try:

    # 批量执行多条插入SQL语句

    cursor.executemany(sql, data)

    # 提交事务

    conn.commit()

except Exception as e:

    # 有异常,回滚事务

    conn.rollback()

cursor.close()

conn.close()
删
# 导入pymysql模块

import pymysql

# 连接database

conn = pymysql.connect(host=“你的数据库地址”, user=“用户名”,password=“密码”,database=“数据库名”,charset=“utf8”)

# 得到一个可以执行SQL语句的光标对象

cursor = conn.cursor()

sql = "DELETE FROM USER1 WHERE id=%s;"

try:

    cursor.execute(sql, [4])

    # 提交事务

    conn.commit()

except Exception as e:

    # 有异常,回滚事务

    conn.rollback()

cursor.close()

conn.close()
改
# 导入pymysql模块

import pymysql

# 连接database

conn = pymysql.connect(host=“你的数据库地址”, user=“用户名”,password=“密码”,database=“数据库名”,charset=“utf8”)

# 得到一个可以执行SQL语句的光标对象

cursor = conn.cursor()

# 修改数据的SQL语句

sql = "UPDATE USER1 SET age=%s WHERE name=%s;"

username = "Alex"

age = 80

try:

    # 执行SQL语句

    cursor.execute(sql, [age, username])

    # 提交事务

    conn.commit()

except Exception as e:

    # 有异常,回滚事务

    conn.rollback()

cursor.close()

conn.close()
查fetchone、fetchmany、fetchall
查询单条数据
# 导入pymysql模块

import pymysql

# 连接database

conn = pymysql.connect(host=“你的数据库地址”, user=“用户名”,password=“密码”,database=“数据库名”,charset=“utf8”)

# 得到一个可以执行SQL语句的光标对象

cursor = conn.cursor()

# 查询数据的SQL语句

sql = "SELECT id,name,age from USER1 WHERE id=1;"

# 执行SQL语句

cursor.execute(sql)

# 获取单条查询数据

ret = cursor.fetchone()

cursor.close()

conn.close()

# 打印下查询结果

print(ret)
查询多条数据
# 导入pymysql模块

import pymysql

# 连接database

conn = pymysql.connect(host=“你的数据库地址”, user=“用户名”,password=“密码”,database=“数据库名”,charset=“utf8”)

# 得到一个可以执行SQL语句的光标对象

cursor = conn.cursor()

# 查询数据的SQL语句

sql = "SELECT id,name,age from USER1;"

# 执行SQL语句

cursor.execute(sql)

# 获取多条查询数据

ret = cursor.fetchall()

cursor.close()

conn.close()

# 打印下查询结果

print(ret)
进阶用法
# 可以获取指定数量的数据

cursor.fetctmany(3)

# 光标按绝对位置移动1

cursor.scroll(1, mode="absolute")

# 光标按照相对位置(当前位置)移动1

cursor.scroll(1, mode="relative")
pymysql 模块的更多相关文章
- Python中操作mysql的pymysql模块详解
Python中操作mysql的pymysql模块详解 前言 pymsql是Python中操作MySQL的模块,其使用方法和MySQLdb几乎相同.但目前pymysql支持python3.x而后者不支持 ...
- python实战第一天-pymysql模块并练习
操作系统 Ubuntu 15.10 IDE & editor JetBrains PyCharm 5.0.2 ipython3 Python版本 python-3.4.3 安装pymysql模 ...
- pymysql 模块介绍
pymysql模块是python与mysql进行交互的一个模块. pymysql模块的安装: pymysql模块的用法: import pymysql user=input('user>> ...
- Mysql(六):数据备份、pymysql模块
一 IDE工具介绍 生产环境还是推荐使用mysql命令行,但为了方便我们测试,可以使用IDE工具 下载链接:https://pan.baidu.com/s/1bpo5mqj 掌握: #1. 测试+链接 ...
- python如何使用pymysql模块
Python 3.x 操作MySQL的pymysql模块详解 前言pymysql是Python中操作MySQL的模块,其使用方法和MySQLdb几乎相同.但目前pymysql支持python3.x而M ...
- MySQL之pymysql模块
MySQL之pymysql模块 import pymysql #s链接数据库 conn = pymysql.connect( host = '127.0.0.1', #被连接数据库的ip地址 po ...
- PyMySQL模块的使用
PyMySQL介绍 PyMySQL是在Python3.x版本中用于连接MySQL服务器的一个库,Python2系列中则使用mysqldb.Django中也可以使用PyMySQL连接MySQL数据库. ...
- MySQL学习12 - pymysql模块的使用
一.pymysql的下载和使用 1.pymysql模块的下载 2.pymysql的使用 二.execute()之sql注入 三.增.删.改:conn.commit() 四.查:fetchone.fet ...
- 数据库入门-pymysql模块的使用
一.pymysql模块安装 由于本人的Python版本为python3.7,所以用pymysql来连接数据库(mysqldb不支持python3.x) 方法一: #在cmd输入 pip3 instal ...
- Python连接MySQL数据库之pymysql模块使用
安装PyMySQL pip install pymysql PyMySQL介绍 PyMySQL是在python3.x版本中用于连接MySQL服务器的一个库,2中则使用mysqldb. Django中也 ...
随机推荐
- LeetCode:二进制手表【401】
LeetCode:二进制手表[401] 题目描述 二进制手表顶部有 4 个 LED 代表小时(0-11),底部的 6 个 LED 代表分钟(0-59). 每个 LED 代表一个 0 或 1,最低位在右 ...
- URAL 2078 Bowling game
题目: Bowling game In all asocial teams members ignore each other uniformly, each tight-knit team buil ...
- InterruptedException异常
本文总结自:https://blog.csdn.net/asdfsadfasdfsa/article/details/78808131 什么样的方法会抛出InterruptedException异常? ...
- JMeter学习(十四)jmeter_断言使用
先说一下使用断言的目的:在request的返回层面增加一层判断机制.因为request成功了,并不代表结果一定正确.类似于QTP中的检查点检查点.断言的使用方法: step_1:在你选择的Sample ...
- 关于jquery的each遍历,return只终止当前循环,不好使的解决办法
很奇怪,一般来说return会终止js,但是今天万万没想到的是,jquery 的each循环中,return不好使,做一记录, var result = true; $('input[type=&qu ...
- Makefile文件应用——huge项目
提高复用性 在build目录下,保存公用部分make.rule (1)绝对路径 用ROOT变量保存项目根目录 (2)增加控制变量 EXE/LIB/ (3)头文件查找目录 gcc 的-I(i的大写)选项 ...
- 使用display:table使两栏布局高度相等
两栏布局大家应该经常用了,但是遇到坑爹的要两栏的高度对齐的话要怎么办呢? <!DOCTYPE html> <html> <head> <meta charse ...
- Hibernate -- 配置c3p0连接池, 事务隔离级别, 管理session
知识点1:配置c3p0连接池(了解) * 引入c3p0-0.9.1.jar * 在hibernate.cfg.xml文件中增加如下配置 <!-- C3P0连接池设定--> <!-- ...
- 全方位解读Java反射(reflection)
JAVA提供了一种反射机制,反射也称为反省. java程序运行以后内存中就是一堆对象,除了对象什么都没有. 找对象 拉关系 瞎折腾 对象在运行过程中能否有一种机制查看自身的状态,属性和行为.这就是反射 ...
- Author Agreement
Dear Editor,We the undersigned declare that this manuscript entitled “文章标题” is original, has not bee ...