
ios的hitTest方法以及不规则区域内触摸事件处理方法
概述
在正常的使用场景中,我们处理了比较多的矩形区域内触摸事件,比如UIButton、UIControl。一般来说,这些控件的图形以及触摸区域都是矩形或者圆角矩形的。但是在一些特殊应用场景中我们有时不得不面对这样一种比较严苛的需求,比如要求程序只对某个圆形、五角形等非常规区域的点击事件进行处理,这就需要花点功夫了。本文以圆形为例子来介绍此类场景的处理方法。
先看下面一张图(附图1),我们的目标是实现如下自定义tabbar。中间带突起圆形的自定义tabbar曾一度流行,今天我们来粗糙地实现一下。
在附图一中,红色代表tabbar,上面有三个蓝色按钮。在三个按钮中我们重点解决按钮A,因为它有一半的区域突在tabbar的有效区域外。
对于按钮A,我们有以下两个问题需要解决:
1、如何准确过滤掉A外接矩形里非蓝色区域的点击事件?
2、如何让A的上半部分也能响应触摸事件?
其实两个问题的解决方法是基本一致的。在iOS中所有控件都是以矩形的方式存在的,在图2中尽管蓝色部分看起来是圆形,但当点击外接矩形内的非圆形区域时也会默认触发点击事件。因此,我们需要用一些手段把触摸事件“拦截”下来。想要“拦截”事件,就必须了解iOS的事件分发机制,也就是当你点击设备屏幕后,iOS是如何决定由那个view去最终响应你的触摸!下面插播一小段关于iOS事件分发的介绍:
==================================
当你手指触摸屏幕后会发生以下事情:触摸事件被封装成一个UIEvent事件,去当前iOS操作系统的active app队列中取当前活跃的APP,把event传给它--->event传给UIApplication--->传给UIWindow的root view controller(rootVC)--->调用rootVC.view的所有subviews的hitTest:event:方法。哪个view的hitTest:event方法返回非nil值,则触摸事件就交给该view处理。关于事件分发的详细机制及举例可以参考技术哥大神的文章
==================================
分析
让我们重新回到探讨的问题上。通过以上简介我们可以知道,想“拦截”触摸事件,则应该在tabbar的hitTest:event方法中做处理(坐标判断等)。以下是具体的demo源码:
#import <UIKit/UIKit.h>

@interface panelView : UIView

@end
panelView.h

#import <UIKit/UIKit.h> @interface panelView : UIView @end
#import "panelView.h"
@implementation panelView
- (id)initWithFrame:(CGRect)frame
{
self = [super initWithFrame:frame];
if (self) {
[self initSubviews];
}
return self;
}
- (void)initSubviews
{
UIButton *roundBtn = [UIButton buttonWithType:UIButtonTypeCustom];
roundBtn.frame = CGRectMake(self.frame.size.width / 2 - 30, -30, 60, 60);
roundBtn.backgroundColor = [UIColor blueColor];
roundBtn.layer.cornerRadius = 30;
roundBtn.tag = 10086;
[roundBtn addTarget:self action:@selector(onBtnPressed:)
forControlEvents:UIControlEventTouchUpInside];
[self addSubview:roundBtn];
UIButton *leftBtn = [UIButton buttonWithType:UIButtonTypeCustom];
leftBtn.frame = CGRectMake(0, 15, 30, 30);
leftBtn.backgroundColor = [UIColor blueColor];
leftBtn.tag = 10087;
[leftBtn addTarget:self action:@selector(onBtnPressed:)
forControlEvents:UIControlEventTouchUpInside];
[self addSubview:leftBtn];
UIButton *rightBtn = [UIButton buttonWithType:UIButtonTypeCustom];
rightBtn.frame = CGRectMake(self.frame.size.width - 30, 15, 30, 30);
rightBtn.backgroundColor = [UIColor blueColor];
rightBtn.tag = 10088;
[rightBtn addTarget:self action:@selector(onBtnPressed:)
forControlEvents:UIControlEventTouchUpInside];
[self addSubview:rightBtn];
}
- (UIView *)hitTest:(CGPoint)point withEvent:(UIEvent *)event
{
UIView *hitView = nil;
//NSLog(@"point:%@", NSStringFromCGPoint(point));
UIButton *roundBtn = (UIButton *)[self viewWithTag:10086];
UIButton *leftBtn = (UIButton *)[self viewWithTag:10087];
UIButton *rightBtn = (UIButton *)[self viewWithTag:10088];
BOOL pointInRound = [self touchPointInsideCircle:roundBtn.center radius:30 targetPoint:point];
if (pointInRound) {
hitView = roundBtn;
} else if(CGRectContainsPoint(leftBtn.frame, point)) {
hitView = leftBtn;
} else if(CGRectContainsPoint(rightBtn.frame, point)) {
hitView = rightBtn;
} else {
hitView = self;
}
return hitView;
}
- (BOOL)touchPointInsideCircle:(CGPoint)center radius:(CGFloat)radius targetPoint:(CGPoint)point
{
CGFloat dist = sqrtf((point.x - center.x) * (point.x - center.x) +
(point.y - center.y) * (point.y - center.y));
return (dist <= radius);
}
- (void)onBtnPressed:(id)sender
{
UIButton *btn = (UIButton *)sender;
NSLog(@"btn tag:%d", btn.tag);
}
@end
panelView.m(控件初始化,不展开)
 1 #import "panelView.h"

 2

 3 @implementation panelView

 4

 5 - (id)initWithFrame:(CGRect)frame

 6 {

 7     self = [super initWithFrame:frame];

 8     if (self) {

 9         [self initSubviews];

10     }

11     return self;

12 }

13

14 - (void)initSubviews

15 {

16     UIButton *roundBtn = [UIButton buttonWithType:UIButtonTypeCustom];

17     roundBtn.frame = CGRectMake(self.frame.size.width / 2 - 30, -30, 60, 60);

18     roundBtn.backgroundColor = [UIColor blueColor];

19     roundBtn.layer.cornerRadius = 30;

20     roundBtn.tag = 10086;

21     [roundBtn addTarget:self action:@selector(onBtnPressed:)

22        forControlEvents:UIControlEventTouchUpInside];

23     [self addSubview:roundBtn];

24

25     UIButton *leftBtn = [UIButton buttonWithType:UIButtonTypeCustom];

26     leftBtn.frame = CGRectMake(0, 15, 30, 30);

27     leftBtn.backgroundColor = [UIColor blueColor];

28     leftBtn.tag = 10087;

29     [leftBtn addTarget:self action:@selector(onBtnPressed:)

30        forControlEvents:UIControlEventTouchUpInside];

31     [self addSubview:leftBtn];

32

33     UIButton *rightBtn = [UIButton buttonWithType:UIButtonTypeCustom];

34     rightBtn.frame = CGRectMake(self.frame.size.width - 30, 15, 30, 30);

35     rightBtn.backgroundColor = [UIColor blueColor];

36     rightBtn.tag = 10088;

37     [rightBtn addTarget:self action:@selector(onBtnPressed:)

38        forControlEvents:UIControlEventTouchUpInside];

39     [self addSubview:rightBtn];

40 }

41

42 - (UIView *)hitTest:(CGPoint)point withEvent:(UIEvent *)event

43 {

44     UIView *hitView = nil;

45     //NSLog(@"point:%@", NSStringFromCGPoint(point));

46     UIButton *roundBtn = (UIButton *)[self viewWithTag:10086];

47     UIButton *leftBtn = (UIButton *)[self viewWithTag:10087];

48     UIButton *rightBtn = (UIButton *)[self viewWithTag:10088];

49     BOOL pointInRound = [self touchPointInsideCircle:roundBtn.center radius:30 targetPoint:point];

50     if (pointInRound) {

51         hitView = roundBtn;

52     } else if(CGRectContainsPoint(leftBtn.frame, point)) {

53         hitView  = leftBtn;

54     } else if(CGRectContainsPoint(rightBtn.frame, point)) {

55         hitView = rightBtn;

56     } else {

57         hitView = self;

58     }

59     return hitView;

60 }

61

62 - (BOOL)touchPointInsideCircle:(CGPoint)center radius:(CGFloat)radius targetPoint:(CGPoint)point

63 {

64     CGFloat dist = sqrtf((point.x - center.x) * (point.x - center.x) +

65                          (point.y - center.y) * (point.y - center.y));

66     return (dist <= radius);

67 }

68

69

70 - (void)onBtnPressed:(id)sender

71 {

72     UIButton *btn = (UIButton *)sender;

73     NSLog(@"btn tag:%d", btn.tag);

74 }

75

76 @end
在hitTest方法中最重要的是判断按钮A所在的区域,其实仅仅用到两点的距离公式来圈出蓝色部分所在的圆形,判断方法如下:
|
1
2
3
4
5
6
|
- (BOOL)touchPointInsideCircle:(CGPoint)center radius:(CGFloat)radius targetPoint:(CGPoint)point{ CGFloat dist = sqrtf((point.x - center.x) * (point.x - center.x) + (point.y - center.y) * (point.y - center.y)); return (dist <= radius);} |
而判断点是否在按钮B/C内就更简单了,系统提供了封装好的api:
|
1
|
bool CGRectContainsPoint(CGRect rect, CGPoint point) |
最终,关于事件“拦截”的判断如下:
|
1
2
3
4
5
6
7
8
9
10
11
12
13
14
15
16
17
18
19
|
- (UIView *)hitTest:(CGPoint)point withEvent:(UIEvent *)event{ UIView *hitView = nil; //NSLog(@"point:%@", NSStringFromCGPoint(point)); UIButton *roundBtn = (UIButton *)[self viewWithTag:10086]; UIButton *leftBtn = (UIButton *)[self viewWithTag:10087]; UIButton *rightBtn = (UIButton *)[self viewWithTag:10088]; BOOL pointInRound = [self touchPointInsideCircle:roundBtn.center radius:30 targetPoint:point]; if (pointInRound) { hitView = roundBtn; } else if(CGRectContainsPoint(leftBtn.frame, point)) { hitView = leftBtn; } else if(CGRectContainsPoint(rightBtn.frame, point)) { hitView = rightBtn; } else { hitView = self; } return hitView;} |
此外,在hitTest中还可以玩其他花样,比如将本该由按钮A响应的时间强制性转发给其他按钮,这只需在hitTest的返回值中修改一下即可!
本文所用demo完整源码点这里test.zip下载。
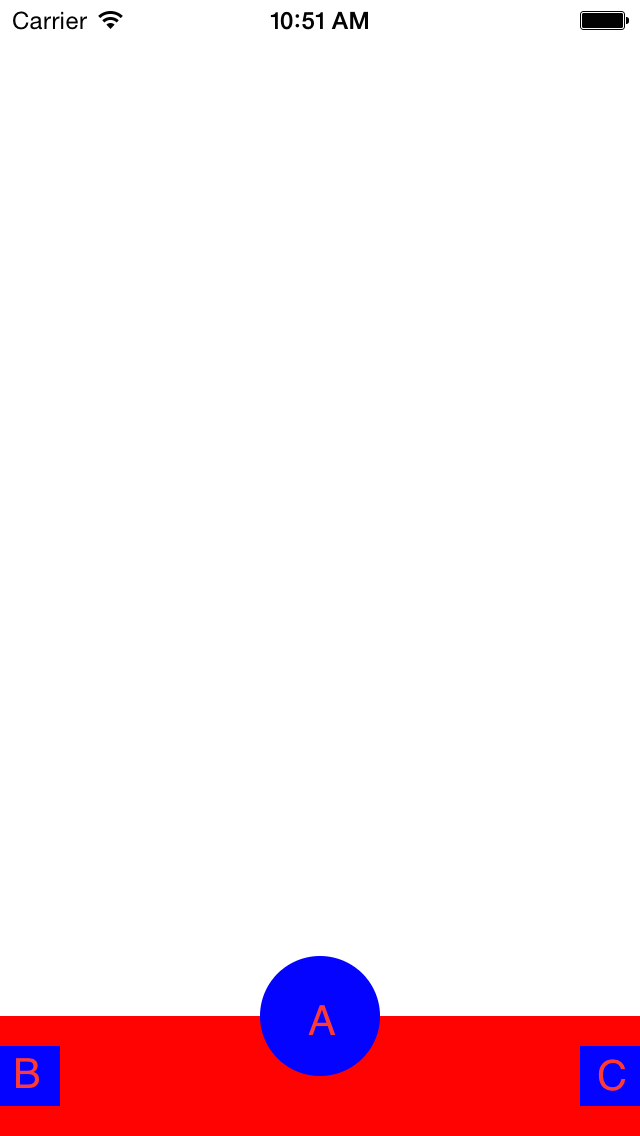
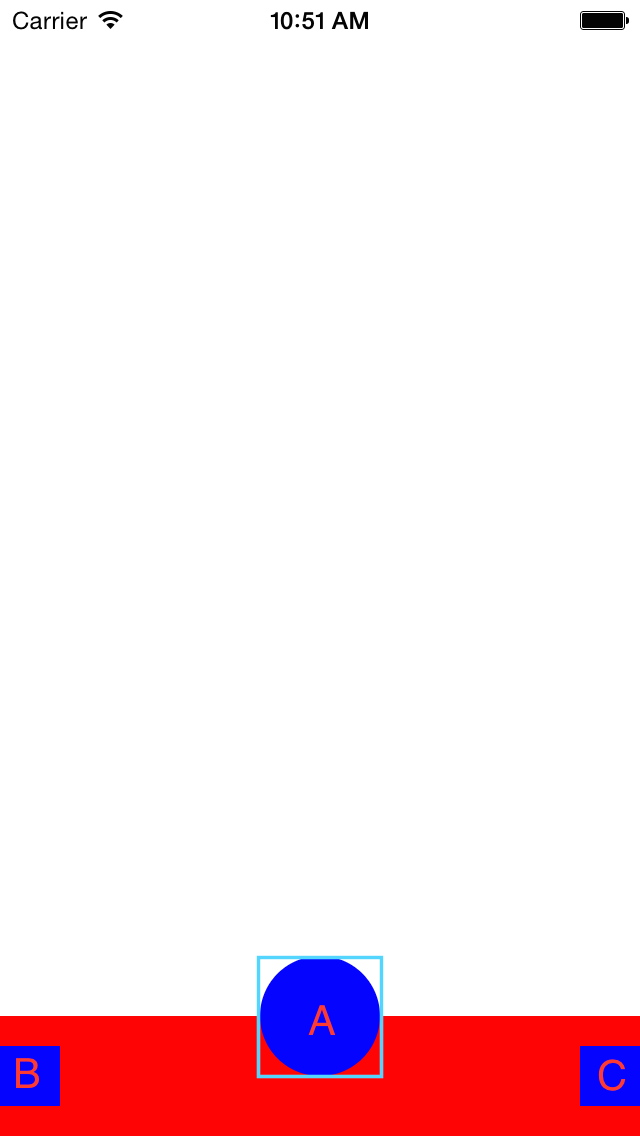
图1 图2
ios的hitTest方法以及不规则区域内触摸事件处理方法的更多相关文章
- 【原】ios的hitTest方法以及不规则区域内触摸事件处理方法
概述 在正常的使用场景中,我们处理了比较多的矩形区域内触摸事件,比如UIButton.UIControl.一般来说,这些控件的图形以及触摸区域都是矩形或者圆角矩形的.但是在一些特殊应用场景中我们有时不 ...
- 【GIS新探索】算法实现在不规则区域内均匀分布点
1 概要 在不规则区域内均匀分布点,这个需求初看可能不好理解.如果设想一下需求场景就比较简单了. 场景1:在某个地区范围内,例如A市区有100W人口,需要将这100W人口在地图上面相对均匀的标识出来. ...
- iOS开发中常见bug!(内附解答方法)
序言 你是否曾经修复了一个 bug ,随后又发现了一个跟刚修复 bug 有关的 bug ,又或是修复 bug 的方式引起了另一个 bug ? 然而这些问题是绝佳的学习机会.所以我们怎样尽可能多地从修复 ...
- AS3 在不规则区域内拖动
原理: 1.确保拖动对象在鼠标点上,如果不确定会出现瞬间移动的感觉 2.确保触碰到非通行区域,跳回到没触碰的点 源码: import flash.events.MouseEvent; import f ...
- iOS开发——UI进阶篇(十二)事件处理,触摸事件,UITouch,UIEvent,响应者链条,手势识别
触摸事件 在用户使用app过程中,会产生各种各样的事件 一.iOS中的事件可以分为3大类型 触摸事件加速计事件远程控制事件 响应者对象在iOS中不是任何对象都能处理事件,只有继承了UIResponde ...
- 【Unity游戏开发】UGUI不规则区域点击的实现
一.简介 马三从上一家公司离职了,最近一直在出去面试,忙得很,所以这一篇博客拖到现在才写出来.马三在上家公司工作的时候,曾处理了一个UGUI不规则区域点击的问题,制作过程中也有一些收获和需要注意坑,因 ...
- UGUI实现不规则区域点击响应
UGUI实现不规则区域点击响应 前言 大家吼啊!最近工作上事情特别多,没怎么打理博客.今天无意打开cnblog才想起该写点东西了.今天给大家讲一个Unity中不规则区域点击响应的实现方法,使用UGUI ...
- OSPF --- 不规则区域实验
OSPF不规则区域实验: 一.知识点整理: OSPF中路由器的角色(看图): 骨干路由器:路由器所有接口属于area 0 -->R3 非骨干路由器:路由器所有接口属于非area 0 --&g ...
- iOS开发系列--通讯录、蓝牙、内购、GameCenter、iCloud、Passbook系统服务开发汇总
--系统应用与系统服务 iOS开发过程中有时候难免会使用iOS内置的一些应用软件和服务,例如QQ通讯录.微信电话本会使用iOS的通讯录,一些第三方软件会在应用内发送短信等.今天将和大家一起学习如何使用 ...
随机推荐
- lintcode671 循环单词
循环单词 The words are same rotate words if rotate the word to the right by loop, and get another. Cou ...
- 181. Flip Bits【LintCode, by java】
Description Determine the number of bits required to flip if you want to convert integer n to intege ...
- SIG蓝牙mesh笔记2_mesh组成
目录 SIG 蓝牙 mesh 组成 mesh网络概述 网络和子网 设备和节点 devices & nodes 入网 mesh中的几个概念 智能插座例子 SIG 蓝牙 mesh 组成 mesh网 ...
- windows编程了解
文章:浅谈Windows API编程 (这个经典)
- lintcode-36-翻转链表 II
36-翻转链表 II 翻转链表中第m个节点到第n个节点的部分 注意事项 m,n满足1 ≤ m ≤ n ≤ 链表长度 样例 给出链表1->2->3->4->5->null, ...
- LintCode-88.最近公共祖先
最近公共祖先 给定一棵二叉树,找到两个节点的最近公共父节点(LCA). 最近公共祖先是两个节点的公共的祖先节点且具有最大深度. 注意事项 假设给出的两个节点都在树中存在 样例 对于下面这棵二叉树 LC ...
- my.conf 修改编码
mysql汉字乱码的原因 mysql默认的编码是Latin1是I-8859-1的别名,但Latin1是不支持汉字的,所以要将其改为UTF-8或GBK 1.关闭mysql服务器,这个很重要. 2.通过m ...
- 求csdn博客优良编辑方法
看见很多大牛的csdn博客编写的非常好,阅读体验也非常强.我就纳闷了,为啥我插公式也不行,插图片也不行呢... 插图片问题:图片不能复制招贴,否则在编辑的时候可以显示但是在发表之后就无法显示了.想要显 ...
- 每个zone的low memory是怎么计算出来的
内核都是试图让活动页和不活动页的数量均衡 在分配内存时每次都会唤醒wakeup_swapd,这个函数会在 现在是不是已经没有全局的LRU表了?已经都变成per cgroup级别的LRU表了吗? ina ...
- [socket编程] 一个服务器与多个客户端之间通信
转自:http://blog.csdn.net/neicole/article/details/7539444 并加以改进 Server程序: // OneServerMain.cpp #includ ...