airbnb 开源reAir 工具 用法及源码解析(一)
reAir 有批量复制与增量复制功能 今天我们先来看看批量复制功能
批量复制使用方式:
cd reair

./gradlew shadowjar -p main -x test

# 如果是本地table-list 一样要加file:/// ; 如果直接写  --table-list ~/reair/local_table_list ,此文件必须在hdfs上!

hadoop jar main/build/libs/airbnb-reair-main-1.0.0-all.jar com.airbnb.reair.batch.hive.MetastoreReplicationJob --config-files my_config_file.xml --table-list file:///reair/local_table_list
1.table_list 内容,用户要复制的库名.表名
db_name1.table_name1

db_name1.table_name2

db_name2.table_name3

...
- my_config_file.xml 配置
<?xml version="1.0"?>

<?xml-stylesheet type="text/xsl" href="configuration.xsl"?>

<configuration>

  <property>

    <name>airbnb.reair.clusters.src.name</name>

    <value>ns8</value>

    <comment>

      Name of the source cluster. It can be an arbitrary string and is used in

      logs, tags, etc.

    </comment>

  </property>

  <property>

    <name>airbnb.reair.clusters.src.metastore.url</name>

    <value>thrift://192.168.200.140:9083</value>

    <comment>Source metastore Thrift URL.</comment>

  </property>

  <property>

    <name>airbnb.reair.clusters.src.hdfs.root</name>

    <value>hdfs://ns8/</value>

    <comment>Source cluster HDFS root. Note trailing slash.</comment>

  </property>

  <property>

    <name>airbnb.reair.clusters.src.hdfs.tmp</name>

    <value>hdfs://ns8/tmp</value>

    <comment>

      Directory for temporary files on the source cluster.

    </comment>

  </property>

  <property>

    <name>airbnb.reair.clusters.dest.name</name>

    <value>ns1</value>

    <comment>

      Name of the destination cluster. It can be an arbitrary string and is used in

      logs, tags, etc.

    </comment>

  </property>

  <property>

    <name>airbnb.reair.clusters.dest.metastore.url</name>

    <value>thrift://dev04:9083</value>

    <comment>Destination metastore Thrift URL.</comment>

  </property>

  <property>

    <name>airbnb.reair.clusters.dest.hdfs.root</name>

    <value>hdfs://ns1/</value>

    <comment>Destination cluster HDFS root. Note trailing slash.</comment>

  </property>

  <property>

    <name>airbnb.reair.clusters.dest.hdfs.tmp</name>

    <value>hdfs://ns1/tmp</value>

    <comment>

      Directory for temporary files on the source cluster. Table / partition

      data is copied to this location before it is moved to the final location,

      so it should be on the same filesystem as the final location.

    </comment>

  </property>

  <property>

    <name>airbnb.reair.clusters.batch.output.dir</name>

    <value>/tmp/replica</value>

    <comment>

      This configuration must be provided. It gives location to store each stage

      MR job output.

    </comment>

  </property>

  <property>

    <name>airbnb.reair.clusters.batch.metastore.blacklist</name>

    <value>testdb:test.*,tmp_.*:.*</value>

    <comment>

      Comma separated regex blacklist. dbname_regex:tablename_regex,...

    </comment>

  </property>

  <property>

    <name>airbnb.reair.batch.metastore.parallelism</name>

    <value>5</value>

    <comment>

      The parallelism to use for jobs requiring metastore calls. This translates to the number of

      mappers or reducers in the relevant jobs.

    </comment>

  </property>

  <property>

    <name>airbnb.reair.batch.copy.parallelism</name>

    <value>5</value>

    <comment>

      The parallelism to use for jobs that copy files. This translates to the number of reducers

      in the relevant jobs.

    </comment>

  </property>

  <property>

    <name>airbnb.reair.batch.overwrite.newer</name>

    <value>true</value>

    <comment>

      Whether the batch job will overwrite newer tables/partitions on the destination. Default is true.

    </comment>

  </property>

  <property>

    <name>mapreduce.map.speculative</name>

    <value>false</value>

    <comment>

      Speculative execution is currently not supported for batch replication.

    </comment>

  </property>

  <property>

    <name>mapreduce.reduce.speculative</name>

    <value>false</value>

    <comment>

      Speculative execution is currently not supported for batch replication.

    </comment>

  </property>

</configuration>
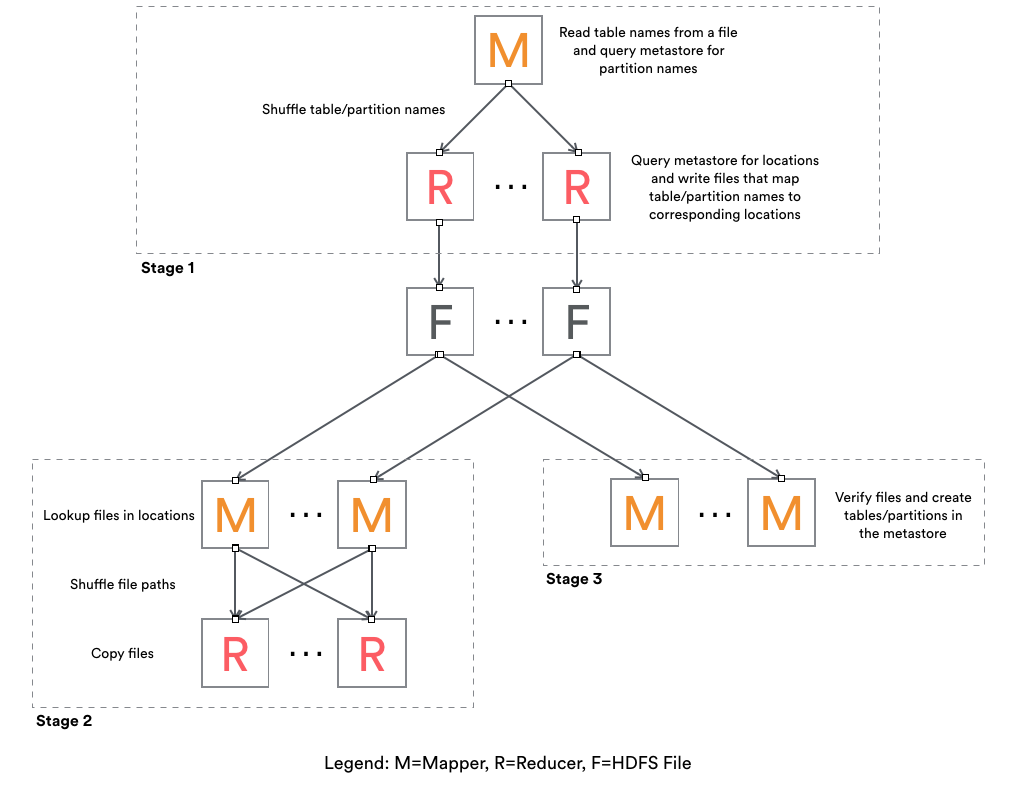
reAir批量复制步骤,共三个Stage
Stage 1
Mapper:

  1. 读取用户配置.xml文件配置(setup方法)

  2. 读取用户配置的table-list内容

    1). 过滤与黑名单匹配表名

    2). 生成TaskEstimate对象,通过各种策略封装了TaskEstimate.TaskType.xxx 的操作

    3). 如果src 是分区表,通过desc metastore thrift 执行 create/alter/noop 相应表

    4). 如果是分区表,会增加Check_Partition 任务(为每个分区创建任务,如dt=20180801等)

    5). 返回List<String> result,由 \t 分割

        result结构:TaskType isUpdateMeta isUpdateData srcPath destPath db_name table_name partition_name

        TaskEstimate对象:  TaskType isUpdateMeta isUpdateData srcPath destPath

        HiveObjectSpec对象:db_name table_name partition_name

    6). map 输出结果:<key:result.hashCode(), new Text(result)>

对mapper 2-3)的补充说明:

    1). COPY_UNPARTITION_TABLE

    2). NO_OP

    3). COPY_PARTITION_TABLE

        1)). CREATE(如果dest没有对应表); ALTER(如果dest存在相应表(ExistingTable), ExistingTable与我们期待的根据srcTable生成的expectTable不同); NO_OP(默认不操作)

        2)). CHECK_PARTITION(生成分区表所有分区,如dt=20180101,dt=20180102等等)

Reduce:

    1. 反序列化map的vaule值,Pair<TaskEstimate, HiveObjectSpec>

    2. 如果taskType == CHKER_PARTITION,重新对spec做任务类型校验(重复map端检验逻辑)

    3. 输出的result与map的value相同

       <new Text(result), Expection.toString>
Stage 2
Mapper:

    1. 反序列化stage1的result,如果estimate.TaskType == COPY_PARTITION_TABLE OR COPY_UNPARTITION_TABLE 并且需要更新 data 就走updateDir()方法,否则NO_OP

    2. updateDir():

        1). 清理destPath,并重新创建

        2). 以srcPath递归所有非隐藏文件

    3. 输出:<key:(srcFile.size + fileModificationTime).hashCode(), value:(srcFileName \t destPath \t srcFileSize)>

Reduce:

    1. 反序列化value

    2. 进行校验copy(重试三次)

        1). 成功日志: COPIED srcPathFileName DestPath srcFileSize "" currentSystemTime

        2). 失败(或未通过校验)日志:SKIPPED srcPathFileName DestPath srcFileSize Expection.toString currentSystemTime
Stage 3
只有mapper任务

Mapper:

    1. Input为Stage1的输出(<new Text(result), Expection.toString>)

    2. 判断Stage1的结果反序列化得到Estimate.TaskType,进行src/dest元数据的校验,并根据策略进行相应的 CREATE/ALTER/NOOP 操作
官方图参考:
airbnb 开源reAir 工具 用法及源码解析(一)的更多相关文章
- IPerf——网络测试工具介绍与源码解析(4)
上篇随笔讲到了TCP模式下的客户端,接下来会讲一下TCP模式普通场景下的服务端,说普通场景则是暂时不考虑双向测试的可能,毕竟了解一项东西还是先从简单的情况下入手会快些. 对于服务端,并不是我们认为的直 ...
- IPerf——网络测试工具介绍与源码解析(1)
IPerf是一个开源的测试网络宽带并能统计并报告延迟抖动.数据包丢失率信息的控制台命令程序,通过参数选项可以方便地看出,通过设置不同的选项值对网络带宽的影响,对于学习网络编程还是有一定的借鉴意义,至少 ...
- IPerf——网络测试工具介绍与源码解析(2)
对于IPerf源码解析,我是基于2.0.5版本在Windows下执行的情况进行分析的,提倡开始先通过对源码的简单修改使其能够在本地编译器运行起来,这样可以打印输出一些中间信息,对于理解源码的逻辑,程序 ...
- require用法及源码解析
一.require()的基本用法 require语句内部逻辑: 当 Node 遇到 require(X) 时,按下面的顺序处理. (1)如果 X 是内置模块(比如 require('http')) ...
- IPerf——网络测试工具介绍与源码解析(3)
[线程的生成] 生成线程时需要传入一个thread_Settings类型的变量,thread_Settings包含所有线程运行时需要的信息,命令行选项参数解析后所有得到的属性都存储到该类型的变量中 ...
- IPerf——网络测试工具介绍与源码解析(5)
本篇随笔讲述一下TCP协议下,双向测试模式和交易测试模式下客户端和服务端执行的情况: 双向测试模式: 官方文档的解释 Run Iperf in dual testing mode. This will ...
- Spring源码分析之IOC的三种常见用法及源码实现(二)
Spring源码分析之IOC的三种常见用法及源码实现(二) 回顾上文 我们研究的是 AnnotationConfigApplicationContext annotationConfigApplica ...
- 【安卓网络请求开源框架Volley源码解析系列】定制自己的Request请求及Volley框架源码剖析
通过前面的学习我们已经掌握了Volley的基本用法,没看过的建议大家先去阅读我的博文[安卓网络请求开源框架Volley源码解析系列]初识Volley及其基本用法.如StringRequest用来请求一 ...
- 你真的了解lambda吗?一文让你明白lambda用法与源码分析
本文作者: cmlanche 本文链接: http://www.cmlanche.com/2018/07/22/lambda用法与源码分析/ 转载来源:cmlanche.com 用法 示例:最普遍的一 ...
随机推荐
- C#获取程序运行时间
需要用到System.Diagnostics名称空间中的Stopwatch类! Stopwatch类其中有一个属性ElapsedMilliseconds.该属性是获取当前运行时间,以毫秒为单位! 其中 ...
- Android开发 ---SQLite数据库,lock文件,结果集游标,适配器,安全退出,给连接设置下划线,编辑器,投影,ContentValues存储,DbHelper,activity栈
目录截图: 1.activity_main.xml 主界面效果: <?xml version="1.0" encoding="utf-8"?> &l ...
- Java学习笔记42(数据库连接池 druid连接池)
druid连接池: 是阿里的连接池,druid的稳定性及效率都很高,目前用的比较广,所以建议开发过程中尽量用druid连接池(支持国产最重要) druid连接池也需要配置文件,配置文件必须是prope ...
- 基于Verilog的串口接收程序
一.模块框图及基本思路 detect_module:检测输入引脚的下降沿,以此判断一帧数据的开始 rx_bps_module:波特率时钟产生模块 rx_control_module:串口接收的核心控制 ...
- java.math.*;(一)
package com.test; /* Math类: java.lang.Math类中包含基本的数字操作,如指数.对数.平方根和三角函数. java.math是一个包,提供用于执行任意精度整数(Bi ...
- 测试那些事儿—postman入门介绍
1.postman入门介绍 一款功能强大的网页调试与发送网页HTTP请求的工具. 1)模拟各种HTTP请求,如get,post,put,delete 2)测试集合Collection Colle ...
- js: var定义域问题
- C++学习(三十六)(C语言部分)之 链表2
测试代码笔记如下: #include<stdio.h> #include<stdlib.h> typedef struct node { int data;//数据 struc ...
- vs+qt 运行过程出现cannot run rc.exe
刚开始,我按照网上的一堆教程在qt creator中设置了各种东西,设置完以后,运行时出现cannot run rc.exe,根据百度,将C:\Program Files (x86)\Windows ...
- php 图片缩放然后合成并保存
/** * 功能说明 * 将files/model_24/images/下的所有图片文件进行等比例缩放 到$image40w 尺寸 然后放到files/model_24/model.png图片的指定位 ...