
第九组 通信3班 063 OSPFv2与OSPFv3综合实验
实验目的
1. 掌握 OSPFv3(v2) 的配置方法
2. 掌握在帧中继环境下 OSPFv3 (v2)的配置方法
3. 掌握 OSPFv3(v2) NSSA 的配置方法
4. 掌握外部路由汇总的配置
5. 掌握区域间路由的汇总配置
OSPFv2
一、实验拓扑图
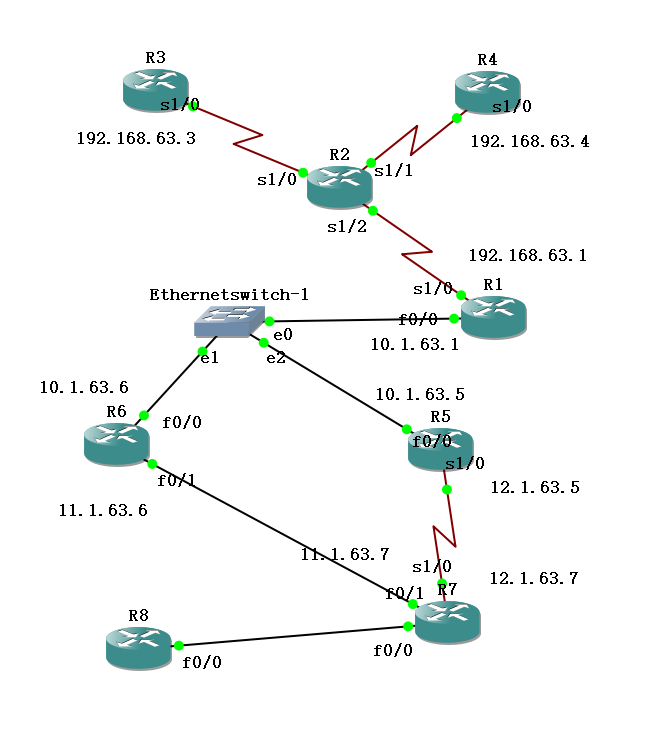
IPv4地址表
|
Device |
Interface |
IP Address |
|
R1 |
F 0/0 |
10.1.63.1 |
|
S 1/0 |
192.168.63.1 |
|
|
R3 |
S 1/0 |
192.168.63.3 |
|
R4 |
S 1/0 |
192.168.63.4 |
|
R5 |
F 0/0 |
10.1.63.5 |
|
S 1/0 |
12.1.63.5 |
|
|
R6 |
F 0/0 |
10.1.63.6 |
|
F 0/1 |
11.1.63.6 |
|
|
R7 |
F 0/1 |
11.1.63.7 |
|
S 1/0 |
12.1.63.7 |
步骤1:开启帧中继交换功能
R2(config)#frame-relay switching
步骤2:配置接口封装
R2(config)#int s 1/2
R2(config-if)#no shut
R2(config-if)#clock rate 128000
R2(config-if)#encapsulation frame-relay
R2(config)#int s 1/0
R2(config-if)#no shut
R2(config-if)#clock rate 128000
R2(config-if)#encapsulation frame-relay
R2(config)#int s 1/1
R2(config-if)#no shut
R2(config-if)#clock rate 128000
R2(config-if)#encapsulation frame-relay
(3) 步骤3:配置LMI类型
R2(config)#int s 1/2
R2(config-if)#frame-relay lmi-type cisco
R2(config-if)#frame-relay intf-type dce
R2(config)#int s 1/0
R2(config-if)#frame-relay lmi-type cisco
R2(config-if)#frame-relay intf-type dce
R2(config)#int s 1/1
R2(config-if)#frame-relay lmi-type cisco
R2(config-if)#frame-relay intf-type dce
(4) 步骤4:配置帧中继交换表
R2(config)#int s 1/2
R2(config-if)#frame-relay route 103 interface s 1/0 301
R2(config-if)#frame-relay route 104 interface s 1/1 401
R2(config)#int Serial 1/0
R2(config-if)#frame-relay route 301 interface Serial1/2 103
R2(config)#int Serial 1/1
R2(config-if)#frame-relay route 401 interface Serial1/2 104
此时“show frame-relay route”
检查帧中继交换机是否正常

(5)步骤5:配置R1、R3、R4,使得它们能够互相通信
R1(config)#int s 1/0
R1(config-if)#ip address 192.168..63.1 255.255.255.0
R1(config-if)#no shut
R1(config-if)#encapsulation frame-relay
R1(config-if)#frame-relay lmi-type cisco
R1(config-if)#no frame-relay inverse-arp //关闭自动映射
R1(config-if)#frame-relay map ip 192.168.63.3 103 broadcast
R1(config-if)#frame-relay map ip 192.168.63.4 104 broadcast
R3(config)#int s 1/0
R3(config-if)#ip address 192.168.63.3 255.255.255.0
R3(config-if)#no shut
R3(config-if)#encapsulation frame-relay
R3(config-if)#no frame-relay inverse-arp
R3(config-if)#frame-relay map ip 192.168.63.1 301 broadcast
R4(config)#int s 1/0
R4(config-if)#ip address 192.168.63.4 255.255.255.0
R4(config-if)#no shut
R4(config-if)#encapsulation frame-relay
R4(config-if)#no frame-relay inverse-arp
R4(config-if)#frame-relay map ip 192.168.63.1 401 broadcast
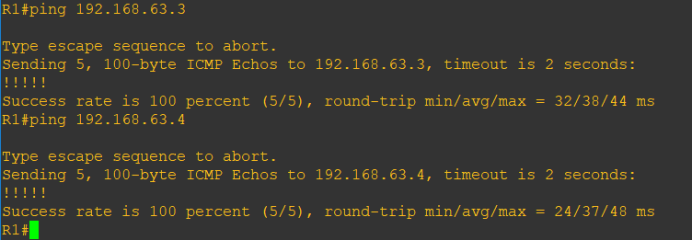
ping命令测试
R1 ping R3与R4
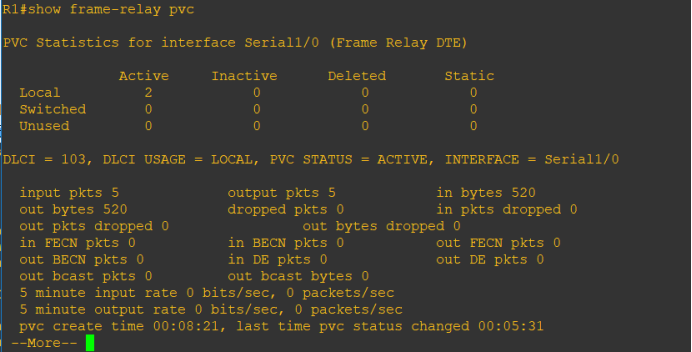
R1#show frame-relay PVC
存在两条本地连接
步骤6:开始配置ospf
先配置外部路由器ospf (R6、R1为例,R5.R7同理)
R6(config)#router ospf 1
R6(config-router)#router-id 6.6.6.6
R6 (config-router)#area 1 nssa――配置区域 1 为 NSSA 区域
R6(config)#interface loopback 0
R6(config-if)#ip add 6.6.6.6 255.255.255.255
R6(config)#int f 0/0
R6(config-if)#ip add 10.1.63.6 255.255.255.0
R6(config-if)#no shut
R6(config-if)#ip ospf 1 area 0
R6(config-if)#int f 0/1
R6(config-if)#ip add 11.1.63.6 255.255.255.0
R6(config-if)#no shut
R6(config-if)#ip ospf 1 area 1
R6(config-if)#ex
R6(config)#router ospf 1
R6(config-router)#network 6.6.6.6 0.0.0.0 area 0
R6(config-router)#network 10.1.63.0 0.0.0.255 area 0
R6(config-router)#network 11.1.63.0 0.0.0.255 area 1
R1(config)#router ospf 1
R1(config-router)#router-id 1.1.1.1
R1(config)#interface loopback 0
R1(config-if)#ip add 1.1.1.1 255.255.255.255
R1(config)#int f 0/0
R1(config-if)#ip add 10.1.63.1 255.255.255.0
R1(config-if)#no shut
R1(config-if)#ip ospf 1 area 0
R1(config-if)#int s 1/0
R1(config-if)#ip ospf 1 area 0
R1(config-if)#ex
R1(config)#router ospf 1
R1(config-router)#network 1.1.1.1 0.0.0.0 area 0
R1(config-router)#network 10.1.63.0 0.0.0.255 area 0
R1(config-router)#network 192.168.63.0 0.0.0.255 area 2
R1(config-router)#neighbor 192.168.63.3
R1(config-router)#neighbor 192.168.63.4
步骤7:配置帧中继中路由器的ospf (R3为例,R4同理)
R3(config)#router ospf 1
R3(config-router)#router-id 3.3.3.3
R3(config-router)#ex
R3(config)#int loopback 0
R3(config-if)#ip add 3.3.3.3 255.255.255.255
R3(config-if)#ip ospf 1 area 2
R3(config-if)#int s 1/0
R3(config-if)# ip ospf 1 area 2
R3(config-if)# ip ospf priority 0
R3(config)#router ospf 1
R3(config-router)#network 3.3.3.3 0.0.0.0 area 2
R3(config-router)#network 192.168.63.0 0.0.0.255 area 2
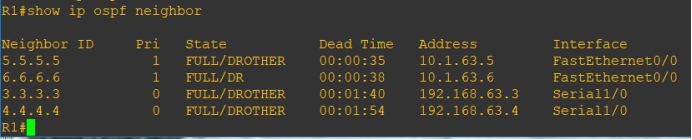
已完成OSPFv2配置,在R1上查ospf邻居关系
R1#show ipv6 ospf neighbor
测试路由通断情况
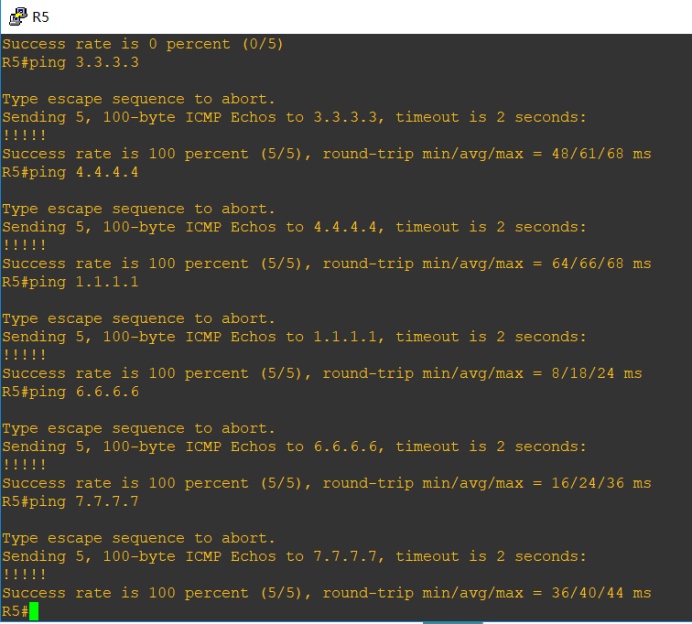
在R5上测试得出结果如下(从内部到外部皆ping通,实验完成)
OSPFv3
一、实验拓扑图:
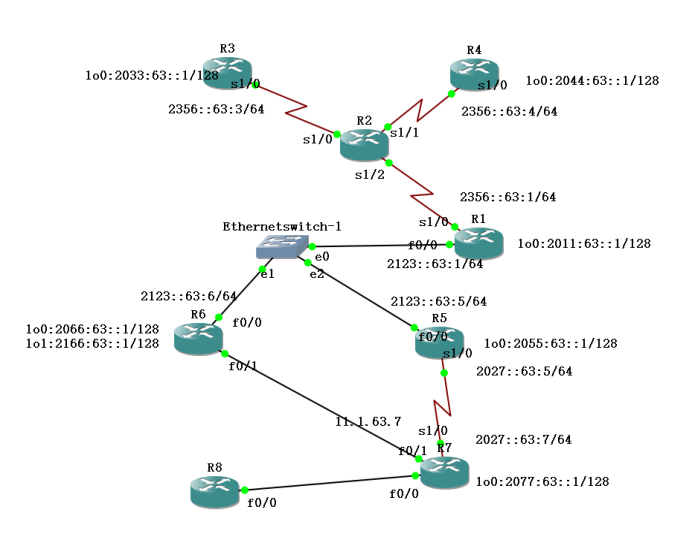
IPv6地址表
|
Device |
Interface |
IPv6 Address |
|
R1 |
F 0/0 |
2123::63:1/64 |
|
S 1/0.1 |
2356::63:1/64 |
|
|
Loopback 0 |
2011:63::1/128 |
|
|
R3 |
S 1/0.1 |
2356::63:3/64 |
|
Loopback 0 |
2033:63::1/128 |
|
|
R4 |
S 1/0.1 |
2356::63:4/64 |
|
Loopback 0 |
2044:63::1/128 |
|
|
R5 |
F 0/0 |
2123::63:5/64 |
|
S 1/0 |
2027::63:5/64 |
|
|
Loopback 0 |
2055:63::1/128 |
|
|
R6 |
F 0/0 |
2123::63:6/64 |
|
Loopback 0 |
2066:63::1/128 |
|
|
Loopback 1 |
2166:63::1/128 |
|
|
R7 |
S 1/0 |
2027::63:7/64 |
|
Loopback 0 |
2077:63::1/128 |
帧中继R2配置与ospfv2相同。
1.完成接口 IPv6 地址的配置,并且在路由上配置 loopback0
R1(config)#ipv6 unicast-routing ―――全局打开 IPv6 路由功能
R1config)#interface loopback 0
R1(config-if)#ipv6 enable
R1(config-if)#ipv6 address 2011:63::1/128―――配置 loopback0 接口地址
R1(config-if)#int f 0/0
R1(config-if)#ipv6 enable
R1(config-if)# ipv6 address 2123::63:1/64
R1(config-if)#no shut
R1(config-if)#int s 1/0
R1(config-if)#ipv6 enable
R1(config-if)# encapsulation frame-relay
R1(config-if)#no shut
R1(config)#interface serial 1/0.1 multipoint
R1(config-subif)#ipv6 address 2356::63:1/64
R1(config-subif)#frame-relay map ipv6 2356::63:3 103 broadcast
R1(config-subif)#frame-relay map ipv6 2356::63:4 104 broadcast
R1(config-subif)#frame-relay map ipv6 2356::63:1 104 broadcast
R1(config-subif)#frame-relay map ipv6 FE80::C804:1CFF:FE48:8 104 broadcast
R1(config-subif)#frame-relay map ipv6 FE80::C803:1CFF:FE48:8 103 broadcast
R3(config)#ipv6 unicast-routing
R3(config)#interface loopback 0
R3(config-if)#ipv6 address 2033:63::1/128
R3(config-if)#int s 1/0
R3(config-if)#ipv6 enable
R3(config-if)# encapsulation frame-relay
R3(config-if)#no shutdown
R3(config)#interface serial 1/0.1 multipoint
R3(config-subif)#ipv6 address 2356::63:3/64
R3(config-subif)#frame-relay map ipv6 2356::63:1 301 broadcast
R3(config-subif)#frame-relay map ipv6 2356::63:4 301 broadcast
R3(config-subif)#frame-relay map ipv6 2356::63:3 301 broadcast
R3(config-subif)#frame-relay map ipv6 FE80::C804:1CFF:FE48:8 304 broadcast
R3(config-subif)#frame-relay map ipv6 FE80::C801:1CFF:FE48:8 301 broadcast
R4(config)#ipv6 unicast-routing
R4(config)#interface loopback 0
R4(config-if)#ipv6 address 2044:63::1/128
R4(config-if)#int s 1/0
R4(config-if)#ipv6 enable
R4(config-if)# encapsulation frame-relay
R4(config-if)#no shutdown
R4(config)#interface serial 1/0.1 multipoint
R4(config-subif)#ipv6 address 2356::63:4/64
R4(config-subif)#frame-relay map ipv6 2356::63:1 401 broadcast
R4(config-subif)#frame-relay map ipv6 2356::63:4 401 broadcast
R4(config-subif)#frame-relay map ipv6 2356::63:3 401 broadcast
R4(config-subif)#frame-relay map ipv6 FE80::C803:1CFF:FE48:8 403 broadcast
R4(config-subif)#frame-relay map ipv6 FE80::C801:1CFF:FE48:8 401 broadcast
试R1上ping通 R3.R4

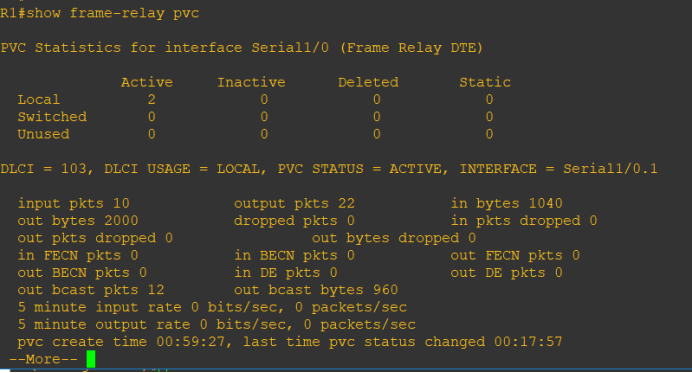
用show frame-relay pvc命令查看,帧中继配置完成
2. 按实验拓扑图标识的区域,完成 OSPFv3 的基本配置。区域 1 为 NSSA 区域。
R6(config)#ipv6 unicast-routing
R6(config)#ipv6 router ospf 1―――启动 OSPFv3 进程
R6(config-rtr)#router-id 6.6.6.6
R6(config-rtr)#area 1 nssa――配置区域 1 为 NSSA 区域
R6(config-rtr)#int f 0/0
R6(config-if)#ipv6 enable
R6(config-if)# ipv6 ospf 1 area 0
R6(config-if)#no shutdown
R6(config-if)#int loopback 0
R6(config-if)#ipv6 enable
R6(config-if)#ipv6 address 2066:63::1/128
R6(config-if)# ipv6 ospf 1 area 0
R6(config-if)#int f 0/1
R6(config-if)#ipv6 enable
R6(config-if)# ipv6 ospf 1 area 1
R6(config-if)#no shutdown
R5(config)#ipv6 unicast-routing
R5(config)#ipv6 router ospf 1―――启动 OSPFv3 进程
R5(config-rtr)#router-id 5.5.5.5
R5(config-rtr)#area 1 nssa――配置区域 1 为 NSSA 区域
R5(config-rtr)#int f 0/0
R5(config-if)#ipv6 enable
R5(config-if)# ipv6 ospf 1 area 0
R5(config-if)#no shutdown
R5(config-if)#int loopback 0
R5(config-if)#ipv6 enable
R5(config-if)#ipv6 address 2055:63::1/128
R5(config-if)# ipv6 ospf 1 area 0
R5(config-if)#int s 1/0
R5(config-if)#ipv6 enable
R5(config-if)# ipv6 ospf 1 area 1
R5(config-if)#no shutdown
R1(config)#ipv6 unicast-routing
R1(config)#ipv6 router ospf 1―――启动 OSPFv3 进程
R1(config-rtr)#router-id 1.1.1.1
R1(config-rtr)#int f 0/0
R1(config-if)#ipv6 enable
R1(config-if)# ipv6 ospf 1 area 0
R1(config-if)#no shutdown
R1(config-if)#int loopback 0
R1(config-if)#ipv6 enable
R1(config-if)#ipv6 address 2011:63::1/128
R1(config-if)# ipv6 ospf 1 area 0
R1(config-if)#int s 1/0.1
R1(config-subif)#ipv6 enable
R1(config-subif)# ipv6 ospf 1 area 2
R1(config-subif)#ipv6 ospf neighbor FE80::C803:1CFF:FE48:8
R1(config-subif)#ipv6 ospf neighbor FE80::C804:1CFF:FE48:8
R1(config-subif)# ipv6 address FE80::C801:1CFF:FE48:8 link-local
R3(config)#ipv6 router ospf 1
R3(config-rtr)#router-id 3.3.3.3
R3(config-rtr)#int loopback 0
R3(config-if)#ipv6 enable
R3(config-if)#ipv6 address 2033:63::1/128
R3(config-if)# ipv6 ospf 1 area 2
R3(config-if)#int s 1/0.1
R3(config-subif)#ipv6 enable
R3(config-subif)# ipv6 ospf 1 area 2
R3(config-subif)# ipv6 ospf priority 0
R3(config-subif)# ipv6 address FE80::C803:1CFF:FE48:8 link-local
R4config)#ipv6 router ospf 1
R4config-rtr)#router-id 4.4.4.4
R4config-rtr)#int loopback 0
R4config-if)#ipv6 enable
R4(config-if)#ipv6 address 2044:63::1/128
R4(config-if)# ipv6 ospf 1 area 2
R4(config-if)#int s 1/0.1
R4(config-subif)#ipv6 enable
R4(config-subif)# ipv6 ospf 1 area 2
R4(config-subif)# ipv6 ospf priority 0
R4(config-subif)# ipv6 address FE80::C804:1CFF:FE48:8 link-local
R7(config)#ipv6 unicast-routing
R7(config)#ipv6 router ospf 1―――启动 OSPFv3 进程
R7(config-rtr)#router-id 7.7.7.7
R7(config-rtr)#area 1 nssa――配置区域 1 为 NSSA 区域
R7(config-rtr)#int s 1/0
R7(config-if)#ipv6 enable
R7(config-if)# ipv6 ospf 1 area 1
R7(config-if)#no shutdown
R7(config-if)#int loopback 0
R7(config-if)#ipv6 enable
R7(config-if)#ipv6 address 2077:63::1/128
R7(config-if)# ipv6 ospf 1 area 1
R7(config-if)#int f 0/1
R7(config-if)#ipv6 enable
R7(config-if)# ipv6 ospf 1 area 1
R7(config-if)#no shutdown
3.检查 OSPFv3 的邻居关系
R1上检查,可以看到邻居的 Router-ID 都是用 IPv4 的地址格式标识
R1#show ipv6 ospf neighbor

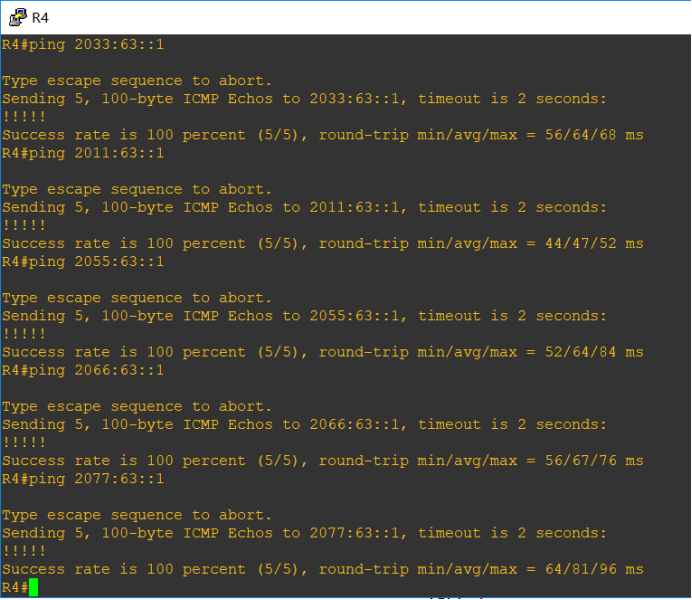
4.测试路由通断情况在R4测试,Ospfv3配置成功。
本实验步骤引入外部路由类型 5 和外部路由类型 7
1) 在 R6 上新增加一个 loopback1 接口,地址为 2166::1/128,然后重分布进入 OSPFv3
R6(config)#interface loopback 1
R6(config-if)#ipv6 address 2166:63::1/128
R6(config-if)#exit
R6(config)#ipv6 router ospf 1
R6(config-rtr)#redistribute connected
配置 R7 和 R8 的 RIPng,然后重分布 RIPng 到 OSPFv3
R8(config)#ipv6 router rip yeslab
R8(config-rtr)#exit
R8(config)#interface fastEthernet 0/0
R8(config-if)#ipv6 rip yeslab enable
R8(config-if)#exit
R7(config)#ipv6 router rip yeslab
R7(config-rtr)#exit
R7(config)#interface fastEthernet 0/0
R7(config-if)#ipv6 rip yeslab enable
R7(config-if)#exit
R7(config)#ipv6 router ospf 1
R7(config-rtr)#redistribute rip yeslab―――重分布 RIPng 到 OSPFv3
R7(config-rtr)#redistribute connected―――由于重分布 RIPng,不能把连接 R7 的接口网段重分布进入OSPFv3,因此重分布直连,把连接 R7的网段重分布到 OSPFv3
5.作业总结:
本次作业主要是完成ospfv3的配置,由于对ipv6动态路由的配置不是十分了解,所以通过先配置ipv4动态路由,完成ospfv2的配置加深认识动态路由协议,然后再完成ospfv3的配置。起初由于对配置命令不是很了解,卡在了帧中继的配置阶段,花费了很长的时间去克服,最终通过询问同学和网上查找资料,才完成了配置。在配置动态路由阶段,由于对区域的划分比较混乱,所以导致路由联通总是报错,经过长时间的差错和询问同学才修改过来,最终完成配置。经过此次作业,使我认识到要学好这门课必须多思考和多动手进行检验配置命令。
第九组 通信3班 063 OSPFv2与OSPFv3综合实验的更多相关文章
- 第三组 通信一班 030 OSPFv2、OSPFv3综合实验
一. 实验目的 掌握 OSPFv2. OSPFv3 的配置方法 掌握在帧中继环境下OSPFv2. OSPFv3 的配置方法 掌握 OSPFv2. OSPFv3 NSSA 的配置方法 ...
- 第九组 通信3班 063 自反ACL
一.拓扑图 R4为外网,R2和R3为内网. 二.地址表 Device Interface IP address R1 F 0/0 10.1.63.1 F 0/1 14.1.63.1 R2 F 0/0 ...
- 第三组 通信一班 030 IPv6 RIPng (PT)
实验拓扑 地址规划 设备 接口 IPV6 地址/掩码 PC0 / 2001:DB8:30:2:201:42FF:FE8A:7688/64 PC1 / 2001:DB8:30:1:230:A3FF:F ...
- OSPFV3综合实验 (第三组)
拓扑图 本次试验规划:拓扑分4个区域,其中区域2采用帧中继实现区域内互通的前提下配置OSPF.ospfv3.R7与R8之间配置rip实现互通,区域1作为nssa区域,实现路由注入.最终实现全局互通. ...
- 【MPI学习5】MPI并行程序设计模式:组通信MPI程序设计
相关章节:第13章组通信MPI程序设计. MPI组通信与点到点通信的一个重要区别就是:组通信需要特定组内所有成员参与,而点对点通信只涉及到发送方和接收方. 由于需要组内所有成员参与,因此也是一种比较复 ...
- JBoss 系列十七:使用JGroups构建块MessageDispatcher 构建群组通信应用
内容概要 本部分说明JGroups构建块接口MessageDispatcher,具体提供一个简单示例来说明如何使用JGroups构建块MessageDispatcher 构建群组通信应用 示例描述 构 ...
- JBoss 系列十八:使用JGroups构建块RpcDispatcher构建群组通信应用
内容概要 本部分说明JGroups构建块接口RpcDispatcher,具体提供一个简单示例来说明如何使用JGroups构建块RpcDispatcher构建群组通信应用. 示例描述 类似Message ...
- JBoss 系列十九:使用JGroups构建块RspFilter对群组通信返回消息进行过滤
内容概述 本部分说明JGroups构建块接口RspFilter,具体提供一个简单示例来说明如何使用JGroups构建块RspFilter对群组通信返回消息进行过滤. 示例描述 我们知道构建块基于通道之 ...
- 第13组_16通信3班_045_OSPFv3作业
IPv6 路由-OSPFv3 实验目的 1. 掌握 OSPFv3 的配置方法 2. 掌握在帧中继环境下 OSPFv3 的配置方法 3. 掌握 OSPFv3 NSSA 的配置方法 4. 学会查看 O ...
随机推荐
- Google IO 2019 Android 太长不看版
Google I/O 2019, 这里有个playlist是所有Android开发相关的session视频合集: Android & Play at Google I/O 2019 当然啦每个 ...
- python基本模块相关信息
系统相关的信息模块: import sys sys.argv 是一个 list,包含所有的命令行参数. sys.stdout sys.stdin sys.stderr 分别表示标准输入输出,错误输出的 ...
- python日期格式化符号
python中时间日期格式化符号: %y 两位数的年份表示(00-99) %Y 四位数的年份表示(000-9999) %m 月份(01-12) %d 月内中的一天(0-31) %H 24小时制小时数( ...
- google IO大会
怎么参加一次 Google I/O?大概要多少预算? Google I/O(参加Goole I/O 是我的一个梦想,因为我是Google死忠,想亲自去Google总部看看,所以想知道这些) 费用构成: ...
- JavaMail API的应用
JavaMail API 是一个用于阅读.编写和发送电子消息的可选包(标准扩展),用来创建邮件用户代理(Mail User Agent,MUA)类型程序. JavaMail API 需要 JavaBe ...
- linux下Redis以及c++操作
使用不同的语言,redis支持不同的编程语言,但是调用了不同的redis包,例如: java对应jedis: php对应phpredis: C++对应的则是hredis. 安装Redis 上篇博客已经 ...
- Mysql 5.7.18忘记密码
5.7.18密码修改发生了变化,旧版的方法不再奏效. 1. ps -ef | grep mysqld,kill掉启动的mysql服务: 2. 创建/etc/my.cnf,添加: [mysqld] sk ...
- BZOJ3110:[ZJOI2013]K大数查询
浅谈树状数组与线段树:https://www.cnblogs.com/AKMer/p/9946944.html 题目传送门:https://www.lydsy.com/JudgeOnline/prob ...
- 洛谷 P4721 [模板]分治FFT —— 分治FFT / 多项式求逆
题目:https://www.luogu.org/problemnew/show/P4721 分治做法,考虑左边对右边的贡献即可: 注意最大用到的 a 的项也不过是 a[r-l] ,所以 NTT 可以 ...
- Lagom学习 六 Akka Stream
lagom中的stream 流数据处理是基于akka stream的,异步的处理流数据的.如下看代码: 流式service好处是: A: 并行: hellos.mapAsync(8, name -& ...