
第三组 通信一班 030 OSPFv2、OSPFv3综合实验
一、 实验目的
- 掌握 OSPFv2、 OSPFv3 的配置方法
- 掌握在帧中继环境下OSPFv2、 OSPFv3 的配置方法
- 掌握 OSPFv2、 OSPFv3 NSSA 的配置方法
- 掌握外部路由汇总的配置
- 掌握区域间路由的汇总配置
- 掌握往 OSPFv2、OSPFv3 区域注入路由的方法
二、 拓扑
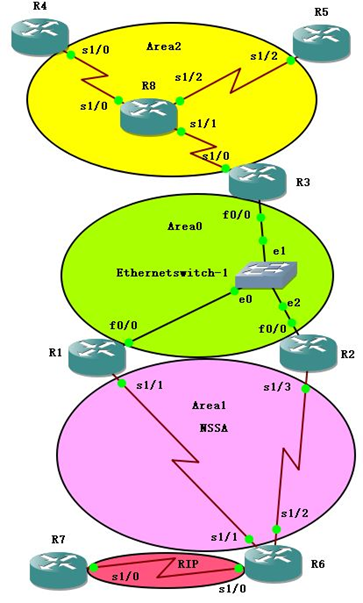
三、 地址规划
1. IPV4地址规划
|
路由器 |
接口 |
接口地址 |
环回地址 |
归属区域 |
|
R1 |
S 1/1 |
172.17.30.1/24 |
L0:172.23.30.1/24 |
Area 1 |
|
F 0/0 |
172.27.30.1/24 |
Area 0 |
||
|
R2 |
S 1/3 |
172.18.30.2/24 |
L0:72.26.30.2/24 |
Area 1 |
|
F 0/0 |
172.27.30.2/24 |
Area 0 |
||
|
R3 |
S 1/0 |
172.16.30.3/24 |
L0:172.20.30.3/24 |
Area 2 |
|
F 0/0 |
172.27.30.3/24 |
L1:72.20.31.3/24 |
Area 0 |
|
|
R4 |
S 1/0 |
172.16.30.4/24 |
L0:172.21.30.4/24 |
Area 2 |
|
R5 |
S 1/2 |
172.16.30.5/24 |
L0:172.22.30.5/24 |
Area 2 |
|
R6 |
S 1/0 |
172.19.30.6/24 |
L0:172.25.30.6/24 |
RIP |
|
S 1/1 |
172.17.30.6/24 |
Area 1 |
||
|
S 1/2 |
172.18.30.6/24 |
Area 1 |
||
|
R7 |
S 1/0 |
172.19.30.7/24 |
L0:172.24.30.7/24 |
RIP |
|
L1:172.24.31.7/24 |
||||
|
R8 |
帧中继交换机 |
|||
2. IPV6路由规划表
|
路由器 |
接口 |
接口地址 |
环回地址 |
归属区域 |
|
R1 |
S 1/1 |
2001:db8:30:17::1/64 |
L0:2001:db8:30:23::1/64 |
Area 1 |
|
F 0/0 |
2001:db8:30:27::1/64 |
L1:2001:db8:30:28::1/128 |
Area 0 |
|
|
R2 |
S 1/3 |
2001:db8:30:18::2/64 |
L0:2001:db8:30:26::2/64 |
Area 1 |
|
F 0/0 |
2001:db8:30:27::2/64 |
Area 0 |
||
|
R3 |
S 1/0 |
2001:db8:30:16::3/64 |
L0:2001:db8:30:20::3/64 |
Area 2 |
|
F 0/0 |
2001:db8:30:27::3/64 |
Area 0 |
||
|
R4 |
S 1/0 |
2001:db8:30:16::4/64 |
L0:2001:db8:30:21::4/64 |
Area 2 |
|
R5 |
S 1/2 |
2001:db8:30:16::5/64 |
L0:2001:db8:30:22::5/64 |
Area 2 |
|
R6 |
S 1/0 |
2001:db8:30:19::6/64 |
L0:2001:db8:30:25::6/64 |
RIP |
|
S 1/1 |
2001:db8:30:17::6/64 |
Area 1 |
||
|
S 1/2 |
2001:db8:30:18::6/64 |
Area 1 |
||
|
R7 |
S 1/0 |
2001:db8:30:19::7/64 |
Lo:2001:db8:30:24::7/64 |
RIP |
|
R8 |
帧中继交换机 |
|||
3.区域规划
|
区域 |
区域路由属性 |
|
Area 0 |
OSPF 主干网络 |
|
Area 1 |
OSPF NSSA |
|
Area 2 |
OSPF NBMA 帧中继网 |
|
RIP |
RIP |
四、 实验步骤
IPV4网络
4.1.1 Area 1帧中继网络的OSPF(NBMA实验)
四台路由器,R8配置成帧中继交换机。
R3,R4,R5运行OSPF。
实验配置:
R3:
R3(config)#interface Loopback 0
R3(config-if)#ip address 172.20.30.3 255.255.255.0
R3(config-if)#ip ospf network point-to-point //使路由正常。
R3(config)#interface Serial 1/0
R3(config-if)#no shutdown
R3(config-if)#ip address 172.16.30.3 255.255.255.0
R3(config-if)#encapsulation frame-relay //封装成帧中继。
R3(config-if)#ip ospf network non-broadcast // 配置成NBMA的网络。
R3(config-if)#ip ospf priority 255 // 使R1成为DR。接口悠闲级。
R3(config-if)#frame-relay map ip 172.16.30.4 103 broadcast //用广播方式发送帧中继信息。静态映射。(注意:对方IP和己方DLCI)
R3(config-if)#frame-relay map ip 172.16.30.5 104 broadcast
R3(config-if)#no frame-relay inverse-arp //关闭自动映射。
R3(config)#router ospf 1
R3(config-router)#log-adjacency-changes
R3(config-router)#network 172.20.30.0 0.0.0.255 area 2
R3(config-router)#network 172.16.30.0 0.0.0.255 area 2
R3(config-router)#neighbor 172.16.30.4 priority 3 //在NBMA的网络中,只能使用neighbor来指明邻居还可以指明邻居的优先级。
R3(config-router)#neighbor 172.16.30.5
R8:
R8(config)#frame-relay switching 配置成帧中继交换机。此命令很重要。
R8(config)#interface Serial 1/1
R8(config-if)#no shutdown
R8(config-if)#no ip address
R8(config-if)#encapsulation frame-relay 封装成帧中继
R8(config-if)#clockrate 128000
R8(config-if)#frame-relay lmi-type cisco 配置帧中继的类型
R8(config-if)#frame-relay intf-type dce 配置帧中继为DCE
R8(config-if)#frame-relay route 103 interface Serial0/1 301 做帧中继映射
R8(config-if)#frame-relay route 104 interface Serial0/2 401
R8(config)#interface Serial 0/1
R8(config-if)#no shutdown
R8(config-if)#no ip address
R8(config-if)#encapsulation frame-relay
R8(config-if)#clockrate 128000
R8(config-if)#frame-relay lmi-type cisco
R8(config-if)#frame-relay intf-type dce
R8(config-if)#frame-relay route 301 interface Serial0/0 103
R8(config)#interface Serial0/2
R8(config-if)#no shutdown
R8(config-if)#no ip address
R8(config-if)#encapsulation frame-relay
R8(config-if)#clockrate 128000
R8(config-if)#frame-relay lmi-type cisco
R8(config-if)#frame-relay intf-type dce
R8(config-if)#frame-relay route 401 interface Serial0/0 104
R4:
R4(config)#interface Loopback 0
R4(config-if)#ip address 172.21.30.4 255.255.255.0
R4(config-if)#ip ospf network point-to-point
R4(config-if)#interface Serial 1/0
R4(config-if)#no shutdown
R4(config-if)#ip address 172.16.30.4 255.255.255.0
R4(config-if)#encapsulation frame-relay
R4(config-if)#ip ospf network non-broadcast
R4(config-if)#ip ospf priority 3
R4(config-if)#frame-relay map ip 172.16.30.3 301 broadcast
R4(config-if)#frame-relay map ip 172.16.30.5 301 broadcast
R4(config-if)#no frame-relay inverse-arp
R4(config)#router ospf 1
R4(config- router)#log-adjacency-changes
R4(config- router)#network 172.21.30.0 0.0.0.255 area 2
R4(config- router)#network 172.16.30.0 0.0.0.255 area 2
R5的配置以R4的配置为例
4.1.2 按实验拓扑图标识的区域,完成 OSPFv3 的基本配置。
Area 0 主干区域网的配置以R3 F0/0端口为例
R3(config)#interface fastEthernet 0/0
R3(config-if)#ip address 172.27.30.3 255.255.255.0
R3(config-if)#no shutdown
R3(config)#router ospf 1
R3(config-router)#network 172.27.30.0 0.0.0.255 area 0
Area 1 NSSA区的配置以R1 为例
R1(config)# interface Serial 1/1
R1(config-if)#ip address 172.17.30.1 255.255.255.0
R1(config-if)#no shutdown
R1(config)# interface Loopback 0
R1(config-if)#ip address 172.23.30.1
R1(config)#router ospf 1
R1(config- router)#network 172.27.30.0 0.0.0.255 area 0
R1(config- router)#network 172.23.30.0 0.0.0.255 area 0
R1(config- router)#area 1 nssa
4.1.3 RIP区与路由注入、路由汇总(区域间汇总和外区汇总
汇总主要在R3、R1、R6、R7之间进行,其中R3为ABR汇总区域间的Looback地址,R6为ASBR汇总外区地址
R3中加入L1:172.20.31.3/24 并加入到OSPF中
R3(config)#interface Loopback 1
R3(config-if)#ip address 172.20.31.3 255.255.255.0
R3(config)#router ospf 1
R3(config-router)#network 172.20.31.0 0.0.1.255 area 0
R1加入汇总命令
R1(config)#router ospf 1
R1(config- router)#router-id 172.23.30.1
R1(config- router)#area 0 range 192.20.30.0 255.255.254.0
R6:主要列出路由注入与汇总的配置过程
R6(config)#router ospf 1
R6(config- router)#router-id 172.25.30.6
R6(config- router)#network 172.25.30.0 0.0.0.255 area 1
R6(config- router)#network 172.18.30.0 0.0.0.255 area 1
R6(config- router)#network 172.17.30.0 0.0.0.255 area 1
R6config- router)#summary-address 172.24.30.0 255.255.254.0
R6(config- router)#redistribute rip subnets //将RIP路由重发布到OSPF中
R6(config)#router rip
R6(config- router)#version 2
R6(config- router)#no auto-summary
R6(config- router)#network 172.19.30.0
R6(config- router)#redistribute ospf 1 metric 2 //将OSPF路由重分布到RIP中
R7:
R7(config)#router rip
R7(config-router)#version 2
R7(config-router)#no auto-summary
R7(config-router)#network 172.19.30.0
R7(config-router)#network 172.24.30.0
R7(config-router)#network 172.24.31.0
IPV6网络
4.2.1 Area 1帧中继网络的OSPF
以下只展示 R3 和 R5 的配置:
R3:
R3(config)#ipv6 unicast-routing ―――全局打开 IPv6 路由功能
R3 (config)#interface loopback 0
R3 (config-if)#ipv6 address 2001:db8:30:20::3/64―――配置 loopback0 接口地址
R3 (config-if)#exit
R3 (config)#interface fastEthernet 0/0
R3 (config-if)#ipv6 address 2001:db8:30:27::3/64―――配置 F0/0 接口地址
R3 (config-if)#no shutdown
R3 (config-if)#exit
R3 (config)#interface serial 1/0
R3 (config-if)#encapsulation frame-relay
R3 (config-if)#no shutdown
R3 (config-if)#exit
R3 (config)#interface serial 1/0.1
R3 (config-subif)#ipv6 address 2001:db8:30:16::3/64―――配置 FR 子接口地址
R3 (config-subif)#frame-relay map ipv6 2001:db8:30:16::4 304 broadcast//配置 IPv6 的静态帧中继映射
R3 (config-subif)#frame-relay map ipv6 2001:db8:30:16::5 305 broadcast
R3 (config-subif)#frame-relay map ipv6 2001:db8:30:16::3 305 broadcast
R3 (config-subif)#frame-relay map ipv6 FE80::CE04:36FF:FEB0:0 304 broadcas――对帧中继邻居的 link-local 地址的映射不能忘记,因为 OSPFv3 的路由用的是 link-local 地址来交换 LSA。此处配置映射 R4 的 link-local 地址
R3(config-subif)#frame-relay map ipv6 FE80::CE05:5FF:FE94:0 305 broadcast――此处配置映射 R5 的link-local 地址
R5:
R5 (config)#ipv6 ushnicast-routing
R5 (config)#interface loopback 0
R5 (config-if)#ipv6 address 2001:db8:30:22::5/64
R5 (config-if)#exit
R5 (config)#interface serial 1/2
R5 (config-if)#encapsulation frame-relay
R5(config-if)#no shutdown
R5 (config-if)#exit
R5(config)#interface serial 1/2.1 multipoint
r5(config-subif)#ipv6 address 2001:db8:30:16::5/64
R5 (config-subif)#frame-relay map ipv6 2001:db8:30:16::3 503 broadcast
R5 (config-subif)#frame-relay map ipv6 2001:db8:30:16::5 503 broadcast―――此映射是为了 ping 通本接口
R5 (config-subif)#frame-relay map ipv6 2001:db8:30:16::4 503 broadcast―――此映射千万别忘记
R5 (config-subif)# frame-relay map ipv6 FE80::CE04:36FF:FEB0:0 503 broadcast――此处配置映射 R4 的
link-local 地址
R5 (config-subif)# frame-relay map ipv6 FE80::CE03:5FF:FEA8:0 503 broadcast――此处配置映射 R3 的link-local 地址
4.2.2按实验拓扑图标识的区域,完成 OSPFv3 的基本配置。
R1(config)#ipv6 router ospf 1―――启动 OSPFv3 进程
R1(config-rtr)#router-id 172.23.30.1
R1(config-rtr)#area 1 nssa――配置区域 1 为 NSSA 区域
R1(config-rtr)#exit
R1(config)#interface fastEthernet 0/0
R1(config-if)#ipv6 ospf 1 area 0―――把 F0/0 接口宣告到 OSPFv3 进程 1,区域 ID 为 0
R1(config-if)#exit
R1(config)#interface loopback 0
R1(config-if)#ipv6 ospf 1 area 0
R1(config-if)#exit
R1(config)#interface serial 1/1
R1(config-Rf)#ipv6 ospf 1 area 1
R2(config)#ipv6 router ospf 1
R2(config-rtr)#router-id 172.26.30.2
R2(config-rtr)#area 1 nssa――配置区域 1 为 NSSA 区域
R2(config-rtr)#exit
R2(config)#interface fastEthernet 0/0
R2(config-if)#ipv6 ospf 1 area 0
R2(config-if)#exit
R2(config)#interface loopback 0
R2(config-if)#ipv6 ospf 1 area 0
R2(config-if)#exit
R2(config)#interface serial 1/3
R2(config-if)#ipv6 ospf 1 area 1
R3(config)#ipv6 router ospf 1
R3(config-rtr)#router-id 172.20.30.3
R3(config-rtr)#exit
R3(config)#interface fastEthernet 0/0
R3(config-if)#ipv6 ospf 1 area 0
R3(config-if)#exit
R3(config)#interface loopback 0
R3(config-if)#ipv6 ospf 1 area 0
R3(config-if)#exit
R3(config)#interface serial 1/0.1―――缺省的帧中继多点子接口在 OSPFv3 网络类型为 NBMA
R3(config-subif)#ipv6 ospf 1 area 2
R3(config-subif)#exit
R3(config)#interface serial 1/0.1
R3(config-subif)#ipv6 ospf neighbor FE80::CE04:36FF:FEB0:0 ――-在接口下手动指邻居 R4,使用邻居 的 link-local 地址
R3(config-subif)#ipv6 ospf neighbor FE80::CE05:5FF:FE94:0 ――-在接口下手动指邻居 R5,使用邻居 的 link-local 地址
R5(config)#ipv6 router ospf 1
R5(config-rtr)#router-id 172.22.30.5
R5(config-rtr)#exit
R5(config)#interface loopback 0
R5(config-if)#ipv6 ospf 1 area 2
R5(config-if)#exit
R5(config)#interface serial 1/2.1
R5(config-subif)#ipv6 ospf 1 area 2
R5(config-subif)#ipv6 ospf priority 0―――把 spoke 站点的的优先级设置为 0,不让其参与 DR、BRD
的选举
R4(config)#ipv6 router ospf 1
R4(config-rtr)#router-id 172.21.30.4
R4(config-rtr)#exit
R4(config)#interface loopback 0
R4(config-if)#ipv6 ospf 1 area 2
R4(config-if)#exit
R4(config)#interface serial 1/0.1
R4(config-subif)#ipv6 ospf 1 area 2
R4(config-subif)#ipv6 ospf priority 0
R6(config)#ipv6 router ospf 1
R6(config-rtr)#router-id 172.25.30.6
R6(config-rtr)#area 1 nssa――配置区域 1 为 NSSA 区域
R6(config-rtr)#exit
R6(config)#interface loopback 0
R6(config-if)#ipv6 ospf 1 area 1
R6(config-if)#exit
R6(config-if)#interface serial 1/2
R6(config-if)#ipv6 ospf 1 area 1
R6(config-if)#exit
R6(config)#interface serial 1/1
R6(config-if)#ipv6 ospf 1 area 1
4.2.3本实验步骤引入外部路由类型 5 和外部路由类型 7
在 R1 上新增加一个 loopback1 接口,地址为 2001:db8:30:28::1/128,然后重分布进入 OSPFv3
R1(config)#interface loopback 1
R1(config-if)#ipv6 address 2001:db8:30:28::1/128
R1(config-if)#exit
R1(config)#ipv6 router ospf 1
R1(config-rtr)#redistribute connected
配置 R7 和 R6 的 RIPng,然后重分布 RIPng 到 OSPFv3
R7(config)#ipv6 router rip wang
R7(config-rtr)#exit
R7(config)#interface serial 1/0
R7(config-if)#ipv6 rip wang enable
R7(config-if)#exit
R6(config)#ipv6 router rip wang
R6(config-rtr)# redistribute ospf 1 metric 2//重分布OSPFv3 到 RIPng
R6(config-rtr)# redistribute connected
R6(config-rtr)#exit
R6(config)#interface serial 1/0
R6(config-if)#ipv6 rip wang enable
R6(config-if)#exit
R6(config)#ipv6 router ospf 1
R6(config-rtr)#redistribute rip wang―――重分布 RIPng 到 OSPFv3
R6(config-rtr)#redistribute connected―――由于重分布 RIPng,不能把连接 R8 的接口网段重分布进入OSPFv3,因此重分布直连,把连接 R8 的网段重分布到 OSPFv3
4.2.4本步骤演示外部路由汇总
在 R1 上,把重分布的 loopback1 接口所在网段从 128 位汇总为 64 位
在 R1 上配置:
r1(config)#ipv6 router ospf 1
r1(config-rtr)#summary-prefix 2001:db8:30:28::/64
4.2.5本步骤演示区域间路由汇总
在 R3 上,把 R1 的 loopback0 接口所在网段汇总为 64 位
在 R3 上配置
r3(config)#ipv6 router ospf 1
r3(config-rtr)#area 0 range 2001:db8:30:23::/64――注意,被汇总路由来自区域 0
五、 实验结果验证
IPV4网络
5.1.1 网络联通性验证
R7 ping R4

图 1
5.1.2帧中继区邻居关系

图 2
5.1.3 路由汇总
内部区域汇总
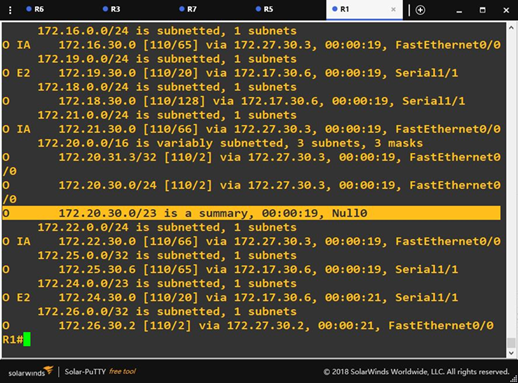
图 3
5.1.4外区汇总
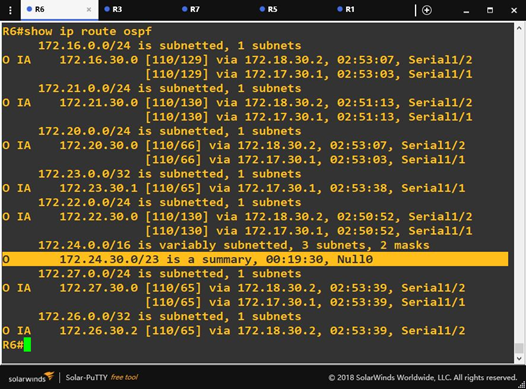
图 4
IPV6网络
5.2.1网络联通性验证
R7 ping R5

图 5
5.2.2帧中继邻居关系

图 6
5.2.3 路由汇总R1内区汇总128位汇总为64 位
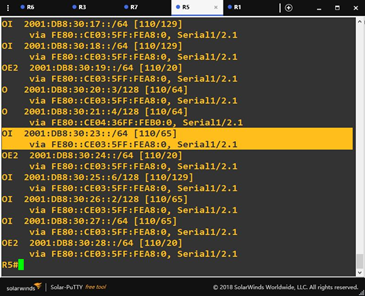
图 7
5.2.4 R3外区汇总R1 128位汇总为64 位
六、 实验总结
在本次实验中遇到了很多问题,比如在配置IPV6 帧中继时,有一台路由器的子接口OSPF加到端口上了,导致网络不通。还有就是对路由类型理解不够透彻。不知道ABR、ASBR的是如何判别的。然后经过网上查询资料,以及与同学的讨论后,明白了要通过查看LSA来查看ABR与ASBR。OSPFv3继承了 OSPFv2 的大多数 LSA 类型,只是名称上有所改变,并增加了新的 LSA 类型。
通过本此次IPV4与IPV6 OSPF综合大作业,让我加深了对IPV4网络与IPV6网络的理解与它们的区别,收获颇丰。
第三组 通信一班 030 OSPFv2、OSPFv3综合实验的更多相关文章
- 第三组 通信一班 030 IPv6 RIPng (PT)
实验拓扑 地址规划 设备 接口 IPV6 地址/掩码 PC0 / 2001:DB8:30:2:201:42FF:FE8A:7688/64 PC1 / 2001:DB8:30:1:230:A3FF:F ...
- 第九组 通信3班 063 OSPFv2与OSPFv3综合实验
实验目的 1. 掌握 OSPFv3(v2) 的配置方法 2. 掌握在帧中继环境下 OSPFv3 (v2)的配置方法 3. 掌握 OSPFv3(v2) NSSA 的配置方法 4. 掌握外部路由汇总的配置 ...
- 第九组 通信3班 063 自反ACL
一.拓扑图 R4为外网,R2和R3为内网. 二.地址表 Device Interface IP address R1 F 0/0 10.1.63.1 F 0/1 14.1.63.1 R2 F 0/0 ...
- OSPFV3综合实验 (第三组)
拓扑图 本次试验规划:拓扑分4个区域,其中区域2采用帧中继实现区域内互通的前提下配置OSPF.ospfv3.R7与R8之间配置rip实现互通,区域1作为nssa区域,实现路由注入.最终实现全局互通. ...
- 【MPI学习5】MPI并行程序设计模式:组通信MPI程序设计
相关章节:第13章组通信MPI程序设计. MPI组通信与点到点通信的一个重要区别就是:组通信需要特定组内所有成员参与,而点对点通信只涉及到发送方和接收方. 由于需要组内所有成员参与,因此也是一种比较复 ...
- JBoss 系列十七:使用JGroups构建块MessageDispatcher 构建群组通信应用
内容概要 本部分说明JGroups构建块接口MessageDispatcher,具体提供一个简单示例来说明如何使用JGroups构建块MessageDispatcher 构建群组通信应用 示例描述 构 ...
- JBoss 系列十八:使用JGroups构建块RpcDispatcher构建群组通信应用
内容概要 本部分说明JGroups构建块接口RpcDispatcher,具体提供一个简单示例来说明如何使用JGroups构建块RpcDispatcher构建群组通信应用. 示例描述 类似Message ...
- JBoss 系列十九:使用JGroups构建块RspFilter对群组通信返回消息进行过滤
内容概述 本部分说明JGroups构建块接口RspFilter,具体提供一个简单示例来说明如何使用JGroups构建块RspFilter对群组通信返回消息进行过滤. 示例描述 我们知道构建块基于通道之 ...
- PBOC金融IC卡,卡片与终端交互的13个步骤,简介-第三组
七:终端风险管理-必选但包含可选步骤异常文件:终端检查应用主账号是否在异常文件列表(卡号黑名单)中.商户强制联机:商户可以将当前交易强制为联机处理.最低限额:控制交易当前交易金额或同一张卡片连续几笔交 ...
随机推荐
- vue-amap | 基于 Vue 2.x 与高德的地图组件
vue-amap | 基于 Vue 2.x 与高德的地图组件 参考:https://elemefe.github.io/vue-amap/#/
- nodejs 癞子麻将
'use strict'; var _ = require('lodash'); var quick = require('quick-pomelo'); var P = quick.Promise; ...
- 使用intellJ导入非maven,gradle等非构建工程的依赖,发布工程时候的打包详解
一.导入 1.java项目在没有导入该jar包之前,如图: 2.点击 File -> Project Structure(快捷键 Ctrl + Alt + Shift + s),点击Proje ...
- mysql误删root
在Linux中有时安装Mysql会出现没有root用户的状况,或者说root账户被从mysql.user表中误删除,这样就导致很多权限无法控制.解决办法是重新创建root用户,并授予所有权限,具体方法 ...
- Kubernetes容器上下文环境
目录贴:Kubernetes学习系列 下面我们将主要介绍运行在Kubernetes集群中的容器所能够感知到的上下文环境,以及容器是如何获知这些信息的. 首先,Kubernetes提供了一个能够让容器感 ...
- <转>jmeter(十八)关联之XPath Extractor
本博客转载自:http://www.cnblogs.com/imyalost/category/846346.html 个人感觉不错,对jmeter讲解非常详细,担心以后找不到了,所以转发出来,留着慢 ...
- Why Choose MB SD C5 with Engineer Software
MB SD C5 with engineer software performed good and now is released. Unlike the old clone C5 which us ...
- Docker Registry V2 Garbage Collection
运行 docker run --rm -v /nfs1/docker/registry:/var/lib/registry registry:2.5.1 garbage-collect -d /roo ...
- ELK(ElasticSearch+Logstash+ Kibana)搭建实时日志分析平台
一.简介 ELK 由三部分组成elasticsearch.logstash.kibana,elasticsearch是一个近似实时的搜索平台,它让你以前所未有的速度处理大数据成为可能. Elastic ...
- Java虚拟机内存分配详解
简介 了解Java虚拟机内存分布的好处 1.了解Java内存管理的细节,有助于程序员编写出性能更好的程序.比如,在新的线程创建时,JVM会为每个线程创建一个专属的栈 (stack),其栈是先进后出的数 ...