
Linux中mysql5.7主从配置
MySQL主从配置(两台Linux之间)
简介
Linux下MySQL数据库的主从同步用来实现读写分离。主数据库进行数据的插入,删除与更新;从数据库专门用来查询操作,缓解数据库的压力。让运行海量数据的时候无论是从速度还是效率上都大大提高,Mysql的主从复制至少是需要两个Mysql的服务,当然Mysql的服务是可以分布在不同的服务器上,也可以在一台服务器上启动多个服务。
主从同步原理
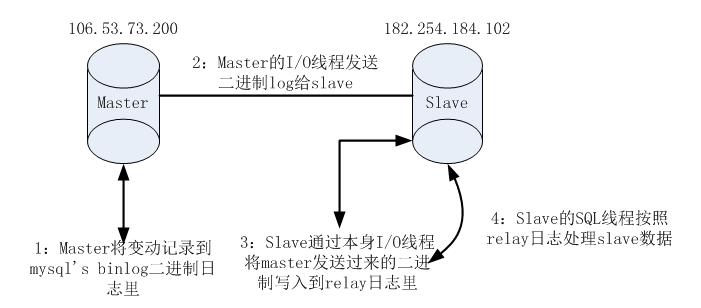
一个异步复制过程,从master复制到slave,由三个线程来完成,其中sql线程和IO线程在slave端,另一个IO线程在master端,要实现MySQL的replication首先需要打开master端的二进制log功能
(1) master 将操作记录到二进制日志(binary log)中;
(2)master有一个I/O线程将二进制日志发送到slave;
(3) slave IO 线程 将master的binary log events读写到它的中继日志(relay log);
(4) slave SQL进程读取中继日志,将重做记录数据到数据库中。
结构图
环境准备
Linux版本:CentOS Linux release 7.6.1810 (Core)
MySQL安装包:mysql-5.7.27-1.el7.x86_64.rpm-bundle.tar
主数据库:106.53.73.200:3306
从数据库:182.254.184.102:3306
安装部署
上传至Linux服务器的/tmp目录下
安装之前先查看并卸载已安装的mysql,mariadb
 [root@VM_0_10_centos ~]# rpm -qa | grep mysql

 [root@VM_0_10_centos ~]# rpm -qa | grep mariadb

 [root@VM_0_10_centos ~]# rpm -e --nodeps `rpm -qa | grep mysql`

 [root@VM_0_10_centos ~]# rpm -e --nodeps `rpm -qa | grep mariadb`
在/usr/local目录下创建mysql目录:
[root@VM_0_10_centos tmp]# mkdir -p /usr/local/mysql
1.解压
进入上次安装包的/tmp目录下
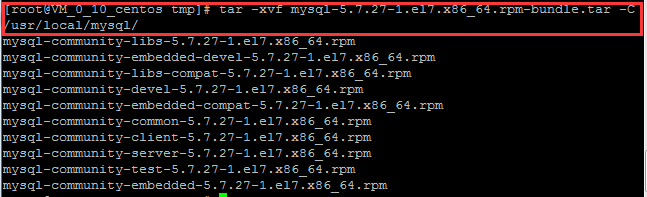
解压mysql5.7安装包到/usr/local/mysql目录下
[root@VM_0_10_centos tmp]# tar -zxvf mysql-5.7.-.el7.x86_64.rpm-bundle.tar -C /usr/local/mysql/
2.安装
进入解压目录/usr/local/mysql目录下进行安装(PS: 注意安装顺序)
[root@VM_0_10_centos tmp]# cd /usr/local/mysql/
依次执行:
 [root@VM_0_10_centos mysql]# rpm -ivh mysql-community-common-5.7.-.el7.x86_64.rpm

 [root@VM_0_10_centos mysql]# rpm -ivh mysql-community-libs-5.7.-.el7.x86_64.rpm

 [root@VM_0_10_centos mysql]# rpm -ivh mysql-community-client-5.7.-.el7.x86_64.rpm

 [root@VM_0_10_centos mysql]# rpm -ivh mysql-community-server-5.7.-.el7.x86_64.rpm

报错:安装mysql的server服务是报错:缺少依赖包
解决:安装依赖包
[root@VM_0_10_centos mysql]# yum -y install numactl
再次运行安装mysql服务即可
[root@VM_0_10_centos mysql]# rpm -ivh mysql-community-server-5.7.-.el7.x86_64.rpm

4.启动服务
 [root@VM_0_10_centos mysql]# service mysqld restart
或
  [root@VM_0_10_centos mysql]# systemctl restart mysqld

5.修改账户密码
先停止MySQL服务
[root@VM_0_10_centos mysql]# service mysqld stop
编辑my.cnf配置文件
 [root@VM_0_10_centos mysql]# vi /etc/my.cnf

 [mysqld]

 #添加跳过密码验证

 skip-grant-tables

重启mysql服务
[root@VM_0_10_centos mysql]# service mysqld restart
登录数据库修改密码
[root@VM_0_10_centos mysql]# mysql -uroot -p  #直接回车即可

mysql> use mysql;

mysql> update user set authentication_string = password('密码') where user = 'root';

mysql> flush privileges;

mysql> grant all privileges on *.* to 'root'@'%' identified by '密码';

mysql> flush privileges;
将my.cnf配置文件中跳过密码啊验证注释,再重启服务

[root@VM_0_10_centos mysql]# service mysqld restart
使用账户密码登录mysql
 [root@VM_0_10_centos mysql]# mysql -uroot -p

 Enter password:

初始化密码设置成功之后需要对账户进行密码重置(PS:不重置在进行创建数据库会报如下错误)

按照提示重置密码
mysql> alter user 'root'@'localhost' identified by '密码';
PS:如果在重置密码时提示 如下错误:
ERROR 1819 (HY000): Your password does not satisfy the current policy requirements
这是因为密码不和长度集,设置密码不需要符合长度集
参考网址:https://www.cnblogs.com/ivictor/p/5142809.html
https://blog.csdn.net/brighter_xiao/article/details/51556532
 mysql> set global validate_password_policy=;

 mysql> alter user 'root'@'localhost' identified by '密码';
mysql> flush privileges;

这样就能正常创建数据库了

主从数据库配置
1.操作步骤
1)开启master的二进制日志
2)开启slave的二进制日志
3)将slave指向master
4)开始复制
2.开启master二进制日志
1)编辑mysql配置文件
[root@VM_0_10_centos ~]# vi /etc/my.cnf
2)添加二进制日志配置,开启二进制(mysql-bin只是二进制日志名称,可以自行指定)
 server-id=             #id是一定要指定的,是唯一的标识(master数据库要比slave数据库的id优先级高才行)

 log-bin=mysql-bin       #开启二进制日志
3)授权
登录数据库
需要给slave数据库配置一个用户/密码的权限
mysql> grant replication slave on *.* to 'root'@'slave数据库ip' identified by '密码';
允许某个ip地址的某个用户以某个密码对当前数据库的所有库和表进行复制操作
配置之后需要刷新权限
mysql> flush privileges;
上面修改配置文件需重启服务
[root@VM_0_10_centos ~]# service mysqld restart
4)查看master的状态
登录数据库
mysql> show master status;
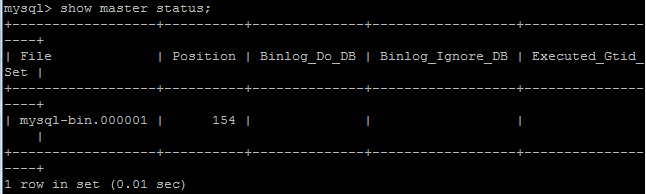
file:是日志文件名称
position:日志所在位置
3.开启slave的二进制日志
登录slave服务器
1)配置my.cnf配置文件
[root@VM_0_16_centos ~]# vi /etc/my.cnf
2)添加slave二进制日志配置,开启二进制(mysql-bin只是二进制日志名称,可以自行指定)
 server-id=

 log-bin=mysql-bin
注意:每一台指定唯一的一个server-id标识
修改完配置服务需重启服务
[root@VM_0_16_centos ~]# service mysqld restart
3)配置slave指向master
登录数据库
 mysql> change master to

     -> master_host='master数据库ip',

     -> master_user='master授权账号',

     -> master_password='授权密码',

     -> master_log_file='master日志文件(mysql-bin.000001)',

     -> master_log_pos=master日志所在位置();
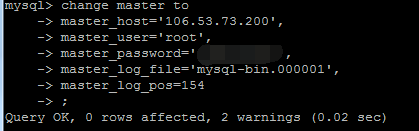
master的日志文件名称可以在master数据库使用show master status;查看到
4.开启主从复制
在slave服务器上执行
mysql> start slave;
查看slave运行状态
mysql> show slave status\G;
可看到如下内容
mysql> show slave status\G;

*************************** . row ***************************

               Slave_IO_State: Waiting for master to send event

                  Master_Host: 106.53.73.200

                  Master_User: root

                  Master_Port:

                Connect_Retry:

              Master_Log_File: mysql-bin.

          Read_Master_Log_Pos:

               Relay_Log_File: VM_0_16_centos-relay-bin.

                Relay_Log_Pos:

        Relay_Master_Log_File: mysql-bin.

             Slave_IO_Running: Yes

            Slave_SQL_Running: Yes

              Replicate_Do_DB:

          Replicate_Ignore_DB:

           Replicate_Do_Table:

       Replicate_Ignore_Table:

      Replicate_Wild_Do_Table:

  Replicate_Wild_Ignore_Table:

                   Last_Errno:

                   Last_Error:

                 Skip_Counter:

          Exec_Master_Log_Pos:

              Relay_Log_Space:

              Until_Condition: None

               Until_Log_File:

                Until_Log_Pos:

           Master_SSL_Allowed: No

           Master_SSL_CA_File:

           Master_SSL_CA_Path:

              Master_SSL_Cert:

            Master_SSL_Cipher:

               Master_SSL_Key:

        Seconds_Behind_Master:

Master_SSL_Verify_Server_Cert: No

                Last_IO_Errno:

                Last_IO_Error:

               Last_SQL_Errno:

               Last_SQL_Error:

  Replicate_Ignore_Server_Ids:

             Master_Server_Id:

                  Master_UUID: f8100725-c3e5-11e9-ae45-525400da2f1f

             Master_Info_File: /var/lib/mysql/master.info

                    SQL_Delay:

          SQL_Remaining_Delay: NULL

      Slave_SQL_Running_State: Slave has read all relay log; waiting for more updates

           Master_Retry_Count:

                  Master_Bind:

      Last_IO_Error_Timestamp:

     Last_SQL_Error_Timestamp:

               Master_SSL_Crl:

           Master_SSL_Crlpath:

           Retrieved_Gtid_Set:

            Executed_Gtid_Set:

                Auto_Position:

         Replicate_Rewrite_DB:

                 Channel_Name:

           Master_TLS_Version:

 row in set (0.00 sec)

ERROR:

No query specified
能查看到这两个为yes则成功
 Slave_IO_Running: Yes       #表示slave的日志读取线程开启

 Slave_SQL_Running: Yes    #表示SQL执行线程开启
测试主从复制
在master数据库创建表
 mysql> create database test;

 Query OK,  row affected (0.01 sec)

 mysql> show databases;

 +--------------------+

 | Database           |

 +--------------------+

 | information_schema |

 | mysql              |

 | performance_schema |

 | public_thyzs       |

 | sys                |

 | test               |

 +--------------------+

  rows in set (0.00 sec)

 mysql> use test;

 Database changed

 mysql>

 mysql> CREATE TABLE `t_test` (

     -> `id`  int NOT NULL AUTO_INCREMENT ,

     -> `content`  varchar() NULL ,

     -> PRIMARY KEY (`id`)

     -> );

 Query OK,  rows affected (0.04 sec)

 mysql> INSERT INTO `t_test` (`content`) VALUES ('test1'),('test2'),('test3'),('test4');

 Query OK,  rows affected (0.03 sec)

 Records:   Duplicates:   Warnings:
登录从数据库查看
 mysql> show databases;                                                                                                                                                  +--------------------+

 | Database           |

 +--------------------+

 | information_schema |

 | cau_thy            |

 | mysql              |

 | performance_schema |

 | sys                |

 | test               |

 | weixing            |

 +--------------------+

  rows in set (0.00 sec)

 mysql> use test;

 Reading table information for completion of table and column names

 You can turn off this feature to get a quicker startup with -A

 Database changed

 mysql>

 mysql>

 mysql> select * from t_test;

 +----+---------+

 | id | content |

 +----+---------+

 |   | test1   |

 |   | test2   |

 |   | test3   |

 |   | test4   |

 +----+---------+

  rows in set (0.00 sec)
如果出现不同步情况参考网址:https://blog.csdn.net/heng_ji/article/details/51013710
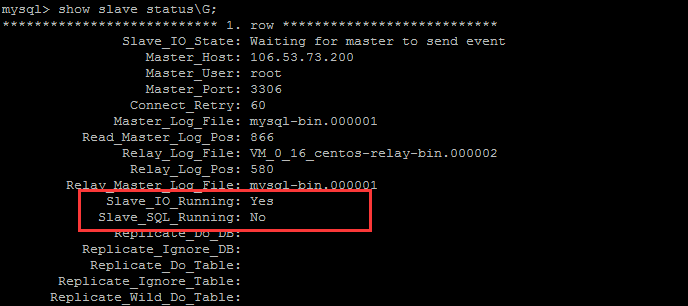
 mysql> stop slave;

 Query OK,  rows affected (0.00 sec)

 mysql> set global sql_slave_skip_counter=;

 Query OK,  rows affected (0.00 sec)

 mysql> start slave;

 Query OK,  rows affected (0.00 sec)
Linux中mysql5.7主从配置的更多相关文章
- Linux中Nginx安装与配置详解
转载自:http://www.linuxidc.com/Linux/2016-08/134110.htm Linux中Nginx安装与配置详解(CentOS-6.5:nginx-1.5.0). 1 N ...
- Linux中vim的简单配置
本文主要分享Linux中vim的简单配置 ★配置文件的位置 在目录/etc.下面,有个名为vimrc的文件,这就是系统中公共的vim配置文件,对所有用户都开放.而在每个用户的主目录下,都可以自 ...
- Linux中KVM桥接的配置
Linux中KVM桥接的配置 1. 原理 1.1 说明 在安装一个拥有虚拟化功能的Linux操作系统(此处以CentOS为例),一般我们有两种方法: .在光盘安装的时候安装好虚拟化包或者PXE服务器上 ...
- Linux安装MySql5.7及配置(yum安装)
Linux安装MySql5.7及配置(yum安装) [root@xld ~]# rpm -q centos-release centos-release-7-7.1908.0.el7.centos.x ...
- Linux中MySQL5.5解压版普通用户安装
#查看本机mysql 安装路径 [hadoop@SY-0134 toolkit]$ rpm -qa|grep -i mysql [hadoop@SY-0134 toolkit]$ whereis my ...
- [Intel Edison开发板] 06、Edison开发在linux中烧写、配置、搭建开发环境
1.前言 linux上烧写.配置.搭建Edison环境,千万不要用默认的setup tool for ubuntu!!! (即使,你用的就是ubuntu) 因为,其默认的工具会从一个坏链接下载配置文件 ...
- linux中Samba服务器的配置
Samba简介 Samba是在Linux和UNIX系统上实现SMB协议的一个免费软件,由服务器及客户端程序构成.SMB(Server Messages Block,信息服务块)是一种在局域网上共享文件 ...
- Linux中的yum的配置以及常见报错的处理
一. 今天登录服务器的时候,误把yum所在的cache文件夹中的文件删除掉了,导致yum不能够使用,解决的方法: 显示错误如下: Loaded plugins: fastestmirror Deter ...
- Linux中的网络管理——网络配置及命令
Linux网络配置 在Linux中配置IP地址的方法有以下这么几种: 图形界面配置IP地址(操作方式如Windows系统配置IP,但在实际生产中,我们并不建议在我们的服务器上安装Linux的图形界面, ...
随机推荐
- jsp数据交互(二).1
对象的作用域: JSP中提供了四种作用域,分别是page作用域,request作用域,session作用域和application作用域. page作用域: page作用域指单一JSP页面的范围, ...
- Ubuntu18.04服务器使用netplan网络构建桥接kvm虚拟机
参考链接 Ubuntu 18.04 LTS安装KVM虚拟机 如何在 Ubuntu 18.04 服务器上安装和配置 KVM KVM日常管理和克隆 KVM详解 1.准备工作 首先需要检查一下CPU是否支持 ...
- Netty源码分析-- FastThreadLocal分析(十)
上节讲过了ThreadLocal的源码,这一节我们来看下FastThreadLocal.这个我觉得要比ThreadLocal要简单,因为缺少了对于Entry的清理和整理工作,所以ThreadLocal ...
- PowerShell安装IIS
Windows作web开发的同学,应该都会用到IIS服务器.比如在阿里云或是Azure上购买一台新的服务器,默认是没有安装IIS的(安装的镜像就带有IIS或是MySql的除外).届时需要安装IIS,安 ...
- Javaweb表格加载---DataTable
Datatables是一款jquery表格插件.它是一个高度灵活的工具,可以将任何HTML表格添加高级的交互功能. 使用 jQuery Datatable 构造数据列表,并且增加或者隐藏相应的列,已达 ...
- (三十)c#Winform自定义控件-文本框(三)
前提 入行已经7,8年了,一直想做一套漂亮点的自定义控件,于是就有了本系列文章. 开源地址:https://gitee.com/kwwwvagaa/net_winform_custom_control ...
- html5 placeholder属性兼容ie11
placeholder 属性是html5的属性,用于提供描述输入字段预期值的提示信息(hint). 简单例子: <!DOCTYPE HTML> <html> <body& ...
- java后端_百度二面
参考: https://www.nowcoder.com/discuss/215891?type=2&order=0&pos=10&page=1 1. gc 2. java l ...
- tensorflow学习笔记——图像数据处理
喜欢摄影的盆友都知道图像的亮度,对比度等属性对图像的影响是非常大的,相同物体在不同亮度,对比度下差别非常大.然而在很多图像识别问题中,这些因素都不应该影响最后的结果.所以本文将学习如何对图像数据进行预 ...
- Xcodebuild命令使用
Xcodebuild简介 Xcodebuild是命令行工具包的其中一项. 命令行工具包(Command Line Tools)是一个轻量的.可以与XCode分开的.在Mac上单独下载的命令行工具包. ...