FastDFS集群-安装说明
一、简介
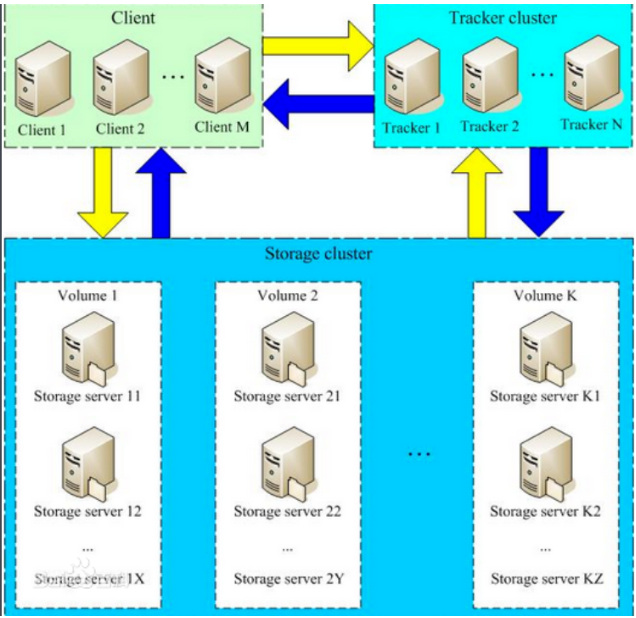
FastDFS服务端有两个角色:跟踪器(tracker)和存储节点(storage)。跟踪器主要做调度工作,在访问上起负载均衡的作用。
2.2、FastDFS系统结构图
|
说明
|
位置
|
|
所有安装包
|
/usr/local/src
|
|
数据存储位置
|
/home/dfs/
|
3.2、编译环境:
yum install git gcc gcc-c++ make automake autoconf libtool pcre pcre-devel zlib zlib-devel openssl-devel wget vim -y
4.1、修改tracker配置文件
vim /etc/fdfs/tracker.conf
# 修改的内容如下:
disabled=false # 启用配置文件
port=22122 # tracker服务器端口(默认22122)
base_path=/home/dfs # 存储日志和数据的根目录
store_lookup=0 # 轮询方式上传
4.2、启动tracker服务器
cp /usr/local/src/fastdfs/init.d/fdfs_storaged
chmod +x /etc/rc.d/init.d/fdfs_trackerd
/etc/init.d/fdfs_trackerd start
或者
systemctl start fdfs_trackerd
或者
fdfs_trackerd /etc/fdfs/tracker.conf start
初次启动,会在/data/fastdfs/tracker目录下生成logs、data两个目录。
drwxr-xr-x 2 root root 178 May 3 22:34 data
drwxr-xr-x 2 root root 26 May 2 18:57 logs
检查FastDFS Tracker Server是否启动成功:
ps aux | grep fdfs_trackerd
4.3、tracker server的关闭命令
/etc/init.d/fdfs_trackerd stop
或者
systemctl stop fdfs_trackerd
或者
fdfs_trackerd /etc/fdfs/tracker.conf stop
4.4、设置tracker server开机启动
chkconfig fdfs_trackerd on
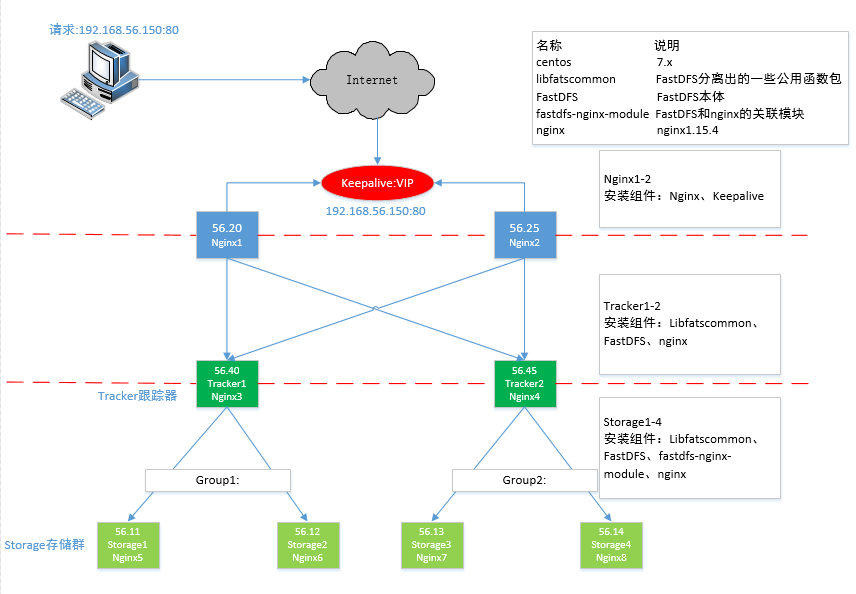
配置文件准备:cp /etc/fdfs/storage.conf.sample /etc/fdfs/storage.conf
4.5、192.168.56.11、192.168.56.12修改storage配置文件
vim /etc/fdfs/storage.conf
# 修改的内容如下:
disabled=false # 启用配置文件
port=23000 # storage的端口号,同一个组的 storage 端口号必须相同
group_name=group1
base_path=/home/dfs # 存储日志和数据的根目录
store_path0=/home/dfs # 第一个存储目录
store_path_count=1 #存储路径个数,需要和store_path个数匹配
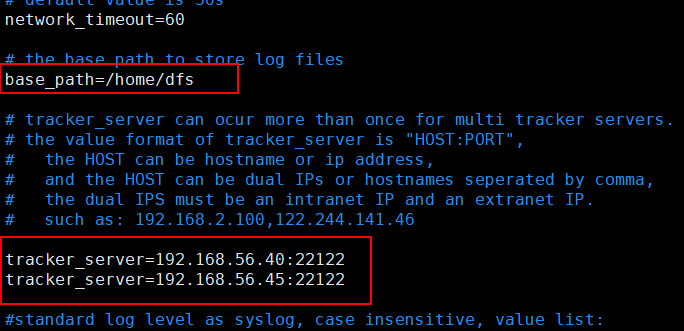
tracker_server=192.168.56.40:22122 # tracker服务器的IP地址和端口
tracker_server=192.168.56.45:22122 # 多个tracker直接添加多条配置
配置group_name
不同分组配置不同group_name,第一组为group1, 第二组为group2
4.6、192.168.56.13、192.168.56.14修改storage配置文件
vim /etc/fdfs/storage.conf
# 修改的内容如下:
disabled=false # 启用配置文件
port=23000 # storage的端口号,同一个组的 storage 端口号必须相同
group_name=group2
base_path=/home/dfs # 存储日志和数据的根目录
store_path0=/home/dfs # 第一个存储目录
store_path_count=1 #存储路径个数,需要和store_path个数匹配
tracker_server=192.168.56.40:22122 # tracker服务器的IP地址和端口
tracker_server=192.168.56.45:22122 # 多个tracker直接添加多条配置
4.7、启动storage服务器
/etc/init.d/fdfs_storaged start
或者
systemctl start fdfs_storaged
或者
fdfs_storaged /etc/fdfs/tracker.conf start
初次启动,会在/home/dfs目录下生成logs、data两个目录。
drwxr-xr-x 259 root root 8192 May 3 23:06 data
drwxr-xr-x 2 root root 26 May 2 19:12 logs
检查FastDFS Tracker Server是否启动成功:
ps aux | grep fdfs_storaged
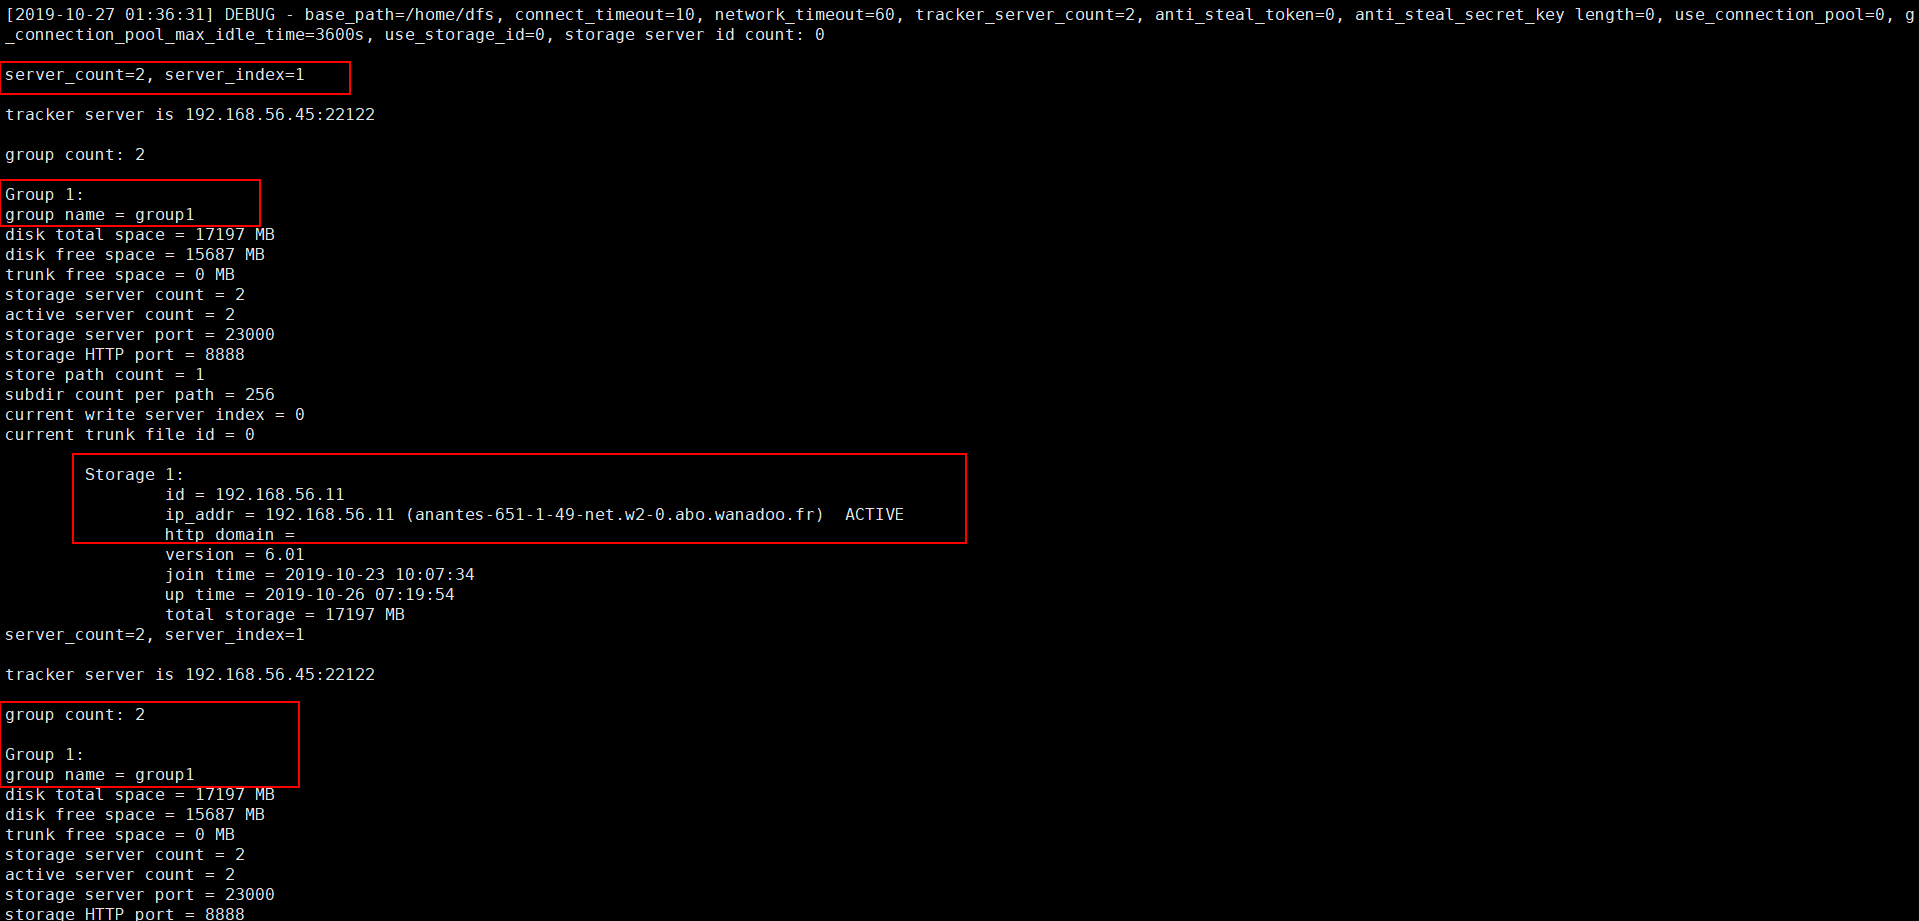
所有 Storage 节点都启动之后,可以在任一 Storage 节点上使用如下命令查看集群信息:
/usr/bin/fdfs_monitor /etc/fdfs/storage.conf
部分截图信息


user nobody;

worker_processes 1;

events {

        worker_connections 1024;

        }

http {

        include mime.types;

        default_type application/octet-stream;

        sendfile on;

        keepalive_timeout 65;

server {

        listen 8888;

        server_name localhost;

        location ~/group[1-2]/M00

            {

                ngx_fastdfs_module;

            }

error_page 500 502 503 504 /50x.html;

location = /50x.html { root html;

            }

        }

    }
user root;

worker_processes 1;

events {

    worker_connections 1024;

    use epoll;

}

http {

    include mime.types;

    default_type application/octet-stream;

        sendfile on;

         tcp_nopush on;

        keepalive_timeout 65;

    upstream fdfs_group1 {

        server 192.168.56.11:8888 weight=1 max_fails=2 fail_timeout=30s;

        server 192.168.56.12:8888 weight=1 max_fails=2 fail_timeout=30s;

    }

    upstream fdfs_group2 {

        server 192.168.56.13:8888 weight=1 max_fails=2 fail_timeout=30s;

        server 192.168.56.14:8888 weight=1 max_fails=2 fail_timeout=30s;

    }

        server {

        listen 8000;

        server_name localhost;

        #charset koi8-r;

        #access_log logs/host.access.log main;

        #设置 group 的负载均衡参数

        location /group1/M00 {

            proxy_pass http://fdfs_group2;

        }

        location /group2/M00 {

            proxy_pass http://fdfs_group2;

        }

    }

}
7.3、启动Nginx
user root;

worker_processes 1;

events {

    worker_connections 1024;

    use epoll;

}

http {

    include mime.types;

    default_type application/octet-stream;

    log_format main '$remote_addr - $remote_user [$time_local] "$request" '

     '$status $body_bytes_sent "$http_referer" '

     '"$http_user_agent" "$http_x_forwarded_for"';

    access_log logs/access.log main;

    sendfile on;

    tcp_nopush on;

    #keepalive_timeout 0;

    keepalive_timeout 65;

    #gzip on;

    server_names_hash_bucket_size 128;

    client_header_buffer_size 32k;

    large_client_header_buffers 4 32k;

    client_max_body_size 300m;

    proxy_redirect off;

    proxy_set_header Host $http_host;

    proxy_set_header X-Real-IP $remote_addr;

    proxy_set_header X-Forwarded-For $proxy_add_x_forwarded_for;

    proxy_connect_timeout 90;

    proxy_send_timeout 90;

    proxy_read_timeout 90;

    proxy_buffer_size 16k;

    proxy_buffers 4 64k;

    proxy_busy_buffers_size 128k;

    proxy_temp_file_write_size 128k;

    proxy_cache_path /tmp/cache/nginx/proxy_cache levels=1:2 keys_zone=http-cache:200m max_size=1g inactive=30d;

    proxy_temp_path /tmp/cache/nginx/proxy_cache/tmp;

        upstream fdfs_group1 {

        server 192.168.56.40:8000 weight=1 max_fails=2 fail_timeout=30s;

        server 192.168.56.45:8000 weight=1 max_fails=2 fail_timeout=30s;

    }

    upstream fdfs_group2 {

        server 192.168.56.40:8000 weight=1 max_fails=2 fail_timeout=30s;

        server 192.168.56.45:8000 weight=1 max_fails=2 fail_timeout=30s;

    }

    server {

        listen 80;

        server_name localhost;

        #charset koi8-r;

        #access_log logs/host.access.log main;

        location /group1/M00 {

            proxy_next_upstream http_502 http_504 error timeout invalid_header;

            proxy_cache http-cache;

            proxy_cache_valid 200 304 12h;

            proxy_cache_key $uri$is_args$args;

            proxy_pass http://fdfs_group1;

            expires 30d;

        }

        location /group2/M00 {

            proxy_next_upstream http_502 http_504 error timeout invalid_header;

            proxy_cache http-cache;

            proxy_cache_valid 200 304 12h;

            proxy_cache_key $uri$is_args$args;

            proxy_pass http://fdfs_group2;

            expires 30d;

        }

        #error_page 404 /404.html;

        # redirect server error pages to the static page /50x.html

        #

        error_page 500 502 503 504 /50x.html;

            location = /50x.html {

            root html;

        }

    }

}


FastDFS集群-安装说明的更多相关文章
- FastDFS 集群 安装 配置
这篇文章介绍如何搭建FastDFS 集群 FastDFS是一个开源的轻量级分布式文件系统,它对文件进行管理,功能包括:文件存储.文件同步.文件访问(文件上传.文件下载)等,解决了大容量存储和负载均衡的 ...
- FastDFS集群安装
集群安装1.FastDFS安装 Tracker,nginx 192.168.56.113 192.168.56.114 storage group1 192.168.56.115 ...
- fastdfs集群安装过程_学习笔记
最终效果 初始化为6个节点 在/usr/local/software 目录下上传需要用到tar包,分别在各个节点上传 使用scp 将本地software目录复制到其他节点上 73.74为 tracke ...
- 集群 安装 配置FastDFS
FastDFS 集群 安装 配置 这篇文章介绍如何搭建FastDFS 集群 FastDFS是一个开源的轻量级分布式文件系统,它对文件进行管理,功能包括:文件存储.文件同步.文件访问(文件上传.文件下载 ...
- 一张图讲解最少机器搭建FastDFS高可用分布式集群安装说明
很幸运参与零售云快消平台的公有云搭建及孵化项目.零售云快消平台源于零售云家电3C平台私有项目,是与公司业务强耦合的.为了适用于全场景全品类平台,集团要求项目平台化,我们抢先并承担了此任务.并由我来主 ...
- Dubbo入门到精通学习笔记(十七):FastDFS集群的安装、FastDFS集群的配置
文章目录 FastDFS集群的安装 FastDFS 介绍(参考:http://www.oschina.net/p/fastdfs) FastDFS 上传文件交互过程: FastDFS 下载文件交互过程 ...
- Linux安装fastdfs集群部署
过程问题: make: gcc:命令未找到 解决: yum -y install gcc 一.环境和版本: Linux环境:CentOS 7.6 libfastcommon版本:1.0.39 Fast ...
- 19.fastDFS集群理解+搭建笔记
软件架构理解 1FastDFS介绍 1.1什么是FastDFS FastDFS是用c语言编写的一款开源的分布式文件系统.FastDFS为互联网量身定制,充分考虑了冗余备份.负载均衡.线性扩容等机制,并 ...
- FastDfs集群docker化部署
初识分布式文件系统FastDFS- 1.分布式与集群的区别 区别:集群是个物理形态,分布式是个工作方式.只要是一堆机器,就可以叫集群,他们是不是一起协作着干活,这个谁也不知道:一个程序或系统,只要运行 ...
随机推荐
- Spring——面向切面编程(AOP)详解
声明:本博客仅仅是一个初学者的学习记录.心得总结,其中肯定有许多错误,不具有参考价值,欢迎大佬指正,谢谢!想和我交流.一起学习.一起进步的朋友可以加我微信Liu__66666666 这是简单学习一遍之 ...
- [AWS] Lambda by Python
当前统治数据分析的语言还是Python,还是暂时走:Python + GPU的常规路线好了. numba, pyculib (分装了cublas) Ref: 使用 Python 构建 Lambda 函 ...
- asp.net core mvc 之 DynamicApi
这段时间闲赋在家,感觉手痒,故想折腾一些东西. 由于之前移植了一个c#版本的spring cloud feign客户端(https://github.com/daixinkai/feign.net), ...
- 主动降噪技术(ANC)的前生今世--原理仿真
一 原理: 主动降噪就是通过反相检测麦克风的声音或噪声来减弱周围环境的噪声让扬声器出来的声音听起来更清晰.主动降噪技术的目标就是通过一个自适应滤波器把不想要的噪声反相从而把噪声约束到固定的范围内.该系 ...
- TCP通信 -C/S中的Socket与ServerSocket
客户端类:Socket类 TCP通信的客户端:向服务器发送连接请求,给服务器发送数据,读取服务器的数据,两次IO流 java.lang.Object 继承者 java.net.Socket 构造方法: ...
- aapt的具体使用
一.什么是aapt: aapt Android Asset Packaging Tool android的一个资源打包工具 二.配置aapt路径: aapt这个工具,在sdk的build-tools下 ...
- JAVA多线程线程同步问题
线程同步 在多线程的编程环境下,可能看着没有问题的代码在运行几千上万或者更多次后,出现了一些看着很奇怪的问题,出现这样的问题的原因就是可能会有两个或者更多个线程进入了同一块业务处理代码中导致了判断失效 ...
- RocketMQ学习 -> NameServer路由中心
RocketMQ项目代码核心目录说明 broker:broker启动进程 client:消息客户端,包含消息生产者,消息消费者相关类 common:公共包 dev:开发者信息(非源代码) distri ...
- KD-tree学习笔记(超全!)
目录 K-D树 更新信息 建树 插入 查询 k远/近询问 重构 K-D 树优化建边 后记 因为之前找不到全的博客,唯一的一篇码风比较毒瘤... 所以我就来写了 K-D树 大概是高维二叉树吧 每次按一个 ...
- nslookup的基本使用
nslookup的基本使用 nslookup:name server lookup 用来查询DNS的. 1:安装nslookup命令 [root@localhost ~]# yum install b ...