redis连接数据库进行操作
该项目需要的类目录
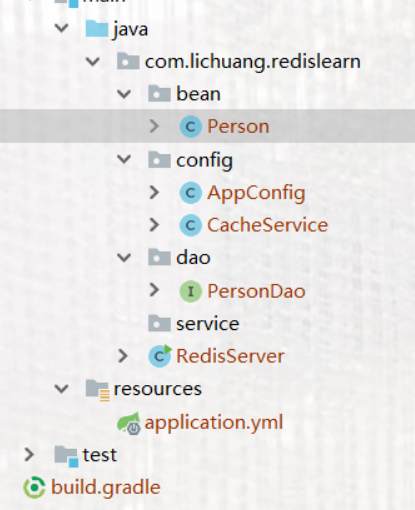
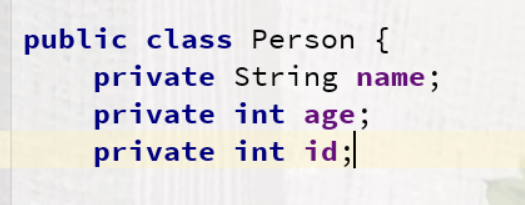
1.首先我们需要创建我们的实体类
2.放置我们的dao层,在里面写入方法

3.配置类Appconfig需要加入我们的JdbcTemplate方法,因为我们用的是spring,所以需要手动添加@Bean
package com.lichuang.redislearn.config;

import org.springframework.cache.CacheManager;

import org.springframework.cache.annotation.EnableCaching;

import org.springframework.context.annotation.Bean;

import org.springframework.context.annotation.ComponentScan;

import org.springframework.context.annotation.Configuration;

import org.springframework.data.redis.cache.RedisCacheConfiguration;

import org.springframework.data.redis.cache.RedisCacheManager;

import org.springframework.data.redis.cache.RedisCacheWriter;

import org.springframework.data.redis.connection.RedisConnectionFactory;

import org.springframework.data.redis.connection.RedisStandaloneConfiguration;

import org.springframework.data.redis.connection.lettuce.LettuceConnectionFactory;

import org.springframework.data.redis.core.StringRedisTemplate;

import org.springframework.data.redis.serializer.GenericJackson2JsonRedisSerializer;

import org.springframework.data.redis.serializer.RedisSerializationContext;

import org.springframework.jdbc.core.JdbcTemplate;

import org.springframework.jdbc.datasource.DataSourceTransactionManager;

import org.springframework.jdbc.datasource.DriverManagerDataSource;

@Configuration

@ComponentScan

@EnableCaching

public class AppConfig {

    @Bean

    public RedisStandaloneConfiguration redisStandaloneConfiguration(){

        RedisStandaloneConfiguration standaloneConfiguration = new RedisStandaloneConfiguration("101.132.107.145",);

        return  standaloneConfiguration;

    }

    @Bean

    public RedisConnectionFactory redisConnectionFactory(){

        LettuceConnectionFactory lettuceConnectionFactory= new LettuceConnectionFactory(redisStandaloneConfiguration());

        return  lettuceConnectionFactory;

    }

    @Bean

    public StringRedisTemplate stringRedisTemplate(){

        StringRedisTemplate stringRedisTemplate = new StringRedisTemplate(redisConnectionFactory());

        return  stringRedisTemplate;

    }

    @Bean

    public CacheManager cacheManager(){

        RedisCacheConfiguration redisCacheConfiguration=

        RedisCacheConfiguration.defaultCacheConfig().serializeValuesWith(RedisSerializationContext.SerializationPair.fromSerializer(new GenericJackson2JsonRedisSerializer()));

        RedisCacheWriter redisCacheWriter=RedisCacheWriter.nonLockingRedisCacheWriter(redisConnectionFactory());

        RedisCacheManager redisCacheManager=new RedisCacheManager(redisCacheWriter,redisCacheConfiguration);

        return redisCacheManager;

    }

    @Bean

    public JdbcTemplate jdbcTemplate(){

        DriverManagerDataSource dataSource=new DriverManagerDataSource();

        dataSource.setDriverClassName("com.mysql.cj.jdbc.Driver");

        dataSource.setUsername("root");

        dataSource.setPassword("");

        dataSource.setUrl("jdbc:mysql://localhost:3306/docker-test?serverTimezone=UTC");

        return new JdbcTemplate(dataSource);

    }

}
4.CacheService里面注入JdbcTemplate,写查询方法
@Service

public class CacheService {

    @Autowired

    private JdbcTemplate jdbcTemplate;

    @Cacheable(cacheNames = "person")

    public Person selectById(int id){

        System.out.println("缓存中如果没有,则执行此方法添加缓存");

        return jdbcTemplate.queryForObject("select * from person where id=?", new Object[]{id}, new RowMapper<Person>() {

            @Override

            public Person mapRow(ResultSet rs, int rowNum) throws SQLException {

                Person person=new Person();

                person.setName(rs.getString("name"));

                person.setAge(rs.getInt("age"));

                person.setId(rs.getInt("id"));

               return person;

            }

        });

    }
5.操作main方法
public class RedisServer {

    public static void main(String[] args) {

        AnnotationConfigApplicationContext applicationContext=new AnnotationConfigApplicationContext(AppConfig.class);

        StringRedisTemplate redisTemplate=applicationContext.getBean(StringRedisTemplate.class);

//        redisTemplate.opsForValue().set("name","test");

        CacheService cacheService=applicationContext.getBean(CacheService.class);

        for (int i=;i<;i++){

            System.out.println(cacheService.selectById(i).getName());

        }

    }

}
6.application.yml里面需要加入我们连接数据库的属性
spring:

  application:

    name: redis-server

  datasource:

    driver-class-name: com.mysql.cj.jdbc.Driver

    username: root

    password:

    url: jdbc:mysql://localhost:3306/docker-test?serverTimezone=UTC

  redis:

    host: 101.132.107.145

    port:
7.所需的依赖
dependencies {

    implementation 'org.springframework.boot:spring-boot-starter-actuator'

    implementation 'org.springframework.boot:spring-boot-starter-web'

    implementation 'org.springframework.cloud:spring-cloud-starter'

    // implementation 'org.springframework.cloud:spring-cloud-starter-config'

    testImplementation 'org.springframework.boot:spring-boot-starter-test'

    implementation 'org.springframework.boot:spring-boot-starter-data-redis'

    compileOnly group: 'org.projectlombok', name: 'lombok'

    compile group: 'com.alibaba', name: 'fastjson', version: '1.2.58'

    implementation 'org.springframework.boot:spring-boot-starter-jdbc'

    runtimeOnly 'mysql:mysql-connector-java'

    compile group: 'org.mybatis.spring.boot', name: 'mybatis-spring-boot-starter', version: '2.0.1'

}
连接服务器进行操作redis
首先需要打开我们的redis容器客户端
docker exec -it 738d6038d618 redis-cli
进入redis内部进行操作数据库

完成!
redis连接数据库进行操作的更多相关文章
- redis的一些操作
public class WnsRedisFactory { private static Cache pool = null; private static JedisConnectionFacto ...
- python之redis和memcache操作
Redis 教程 Redis是一个开源(BSD许可),内存存储的数据结构服务器,可用作数据库,高速缓存和消息队列代理.Redis 是完全开源免费的,遵守BSD协议,是一个高性能的key-value数据 ...
- redis的hash操作在集中式session中的应用
在集群部署时,为了高可用性的目的,往往把session进行共享,共享分为两种:session复制和集中式管理. redis在session集中式管理中可以起到比较大的作用. 制约session集中式共 ...
- Redis客户端API操作 Jedis详解
redis是一个著名的key-value存储系统,也是nosql中的最常见的一种.其实,个人认为,redis最强大的地方不在于其存储,而在于其强大的缓存作用. 我们可以把它想象成一个巨大的(多借点集群 ...
- Spring Boot 整合 Redis 实现缓存操作
摘要: 原创出处 www.bysocket.com 「泥瓦匠BYSocket 」欢迎转载,保留摘要,谢谢! 『 产品没有价值,开发团队再优秀也无济于事 – <启示录> 』 本文提纲 ...
- 缓存数据库-redis数据类型和操作(list)
转: 狼来的日子里! 奋发博取 缓存数据库-redis数据类型和操作(list) 一:Redis 列表(List) Redis列表是简单的字符串列表,按照插入顺序排序.你可以添加一个元素导列表的头部( ...
- redis键值操作
1.1. redis键值操作 1.1.1. keys patten 查询相应的key 可以精确的查,也可以模糊的查 1.1.1.1. 通配符:* ? [] 在redis里,模糊查询key的时候有3个通 ...
- redis 批量删除操作
redis 批量删除操作 需要在redis里面清空一批数据,redis没有支持通配符删除, 只有del key1 key2 ... 但是可以通配符获取 KEYS PATTERN 然后利用linux管道 ...
- thinkphp5.0上对redis的具体操作
一.环境搭建 首先先安装composer.thinkphp5.0版本.和redis的windows版本的redis程序或者linux版本的redis程序,linux安装教程: https://www. ...
随机推荐
- Elasticsearch 插入地理索引文档一直为空
今天在获取插入索引数据的时候,一直提示插入不成功,尝试了很多方法,原来是因为在插入的时候应该先 插入Latitude后插入longitude修改后的代码如下 public boolean insert ...
- C3P0连接池工具类实现步骤及方法
C3P0连接池的工具类 使用C3P0获得连接对象连接池有一个规范接口 javax.sal.DataSourse 接口定义了一个从连接池中获得连接的方法getConnection(); 步骤导入jar包 ...
- java项目部署jar包
1. 先将打包成jar包 2. 查看所有的java进程 pgrep java 3. 杀死进程 kill -9 程序号 4.执行命令 nohup java -jar admin.jar > ...
- 1-3 编程基础 makefile工程管理
GNU make Linux程序员必须学会使用GNU make来构建和管理自己的软件工程.GNU的make能够使整个工程的编译.链接只需要一个命令就可以完成. makefile make在执行时,需要 ...
- Spring boot 项目打成war包并在idea中运行
1. 修改pom文件原来是jar改成<packaging>war</packaging> 2. 在pom文件中添加移除内置tomcat并且添加添加servlet-api的依赖. ...
- Redis那些事(一) — Redis简介
本人最近在学习Redis的使用和底层原理,有一些收获,所以希望通过写博客的形式来记录自己的学习过程,加深自己的理解,同时也方便以后查阅复习.目前打算先记录一些基本的使用方法和部分底层实现,其他的如果有 ...
- c++_加法变乘法
加法变乘法 我们都知道:1+2+3+ ... + 49 = 1225现在要求你把其中两个不相邻的加号变成乘号,使得结果为2015 比如:1+2+3+...+10*11+12+...+27*28+29+ ...
- c++_包子凑数
标题:包子凑数 小明几乎每天早晨都会在一家包子铺吃早餐.他发现这家包子铺有N种蒸笼,其中第i种蒸笼恰好能放Ai个包子.每种蒸笼都有非常多笼,可以认为是无限笼. 每当有顾客想买X个包子,卖包子的大叔就会 ...
- Linux项目发布流程
Linux项目发布流程(一) 1.安装pyhton3.7 的依赖包 yum -y groupinstall "Development tools" yum -y install z ...
- LeetCode(80)Remove Duplicates from Sorted Array II
题目 Follow up for "Remove Duplicates": What if duplicates are allowed at most twice? For ex ...