
spring中如何向一个单例bean中注入非单例bean
看到这个题目相信很多小伙伴都是懵懵的,平时我们的做法大都是下面的操作
@Component

public class People{

@Autowired

private Man man;

}
这里如果Man是单例的,这种写法是没有问题的,但如果Man是原型的,这样是否会存在问题。
错误实例演示
这里有一个原型(生命周期为prototype)的类
package com.example.myDemo.component;

import org.springframework.context.annotation.Scope;

import org.springframework.stereotype.Component;

@Component

@Scope(value = "prototype")

public class Man  {

    public void eat() {

        System.out.println("I like beef");

    }

}
有一个单例(生命周期为singleton)的类
package com.example.myDemo.component;

import org.springframework.beans.factory.annotation.Autowired;

import org.springframework.beans.factory.annotation.Lookup;

import org.springframework.stereotype.Component;

@Component

public class Woman {

    //使用依赖注入的方式,注入原型的Man
    @Autowired

    private Man man;

    public void eat() {

        System.out.println("man:"+man);

        System.out.println("I like fruits");

    }

}
下面看测试方法,
package com.example.myDemo;

import com.example.myDemo.component.MyFactoryBean;

import com.example.myDemo.component.Woman;

import com.example.myDemo.po.Student;

import org.springframework.boot.SpringApplication;

import org.springframework.boot.autoconfigure.SpringBootApplication;

import org.springframework.boot.autoconfigure.jdbc.DataSourceAutoConfiguration;

import org.springframework.boot.autoconfigure.orm.jpa.HibernateJpaAutoConfiguration;

import org.springframework.context.ApplicationContext;

@SpringBootApplication(exclude={DataSourceAutoConfiguration.class, HibernateJpaAutoConfiguration.class})

public class MyDemoApplication {

    public static void main(String[] args) {

        ApplicationContext ac=SpringApplication.run(MyDemoApplication.class, args);

        Woman woman=(Woman)ac.getBean("woman");

        for(int i=0;i<5;i++){

            woman.eat();

        }

    }

}
看下测试结果,
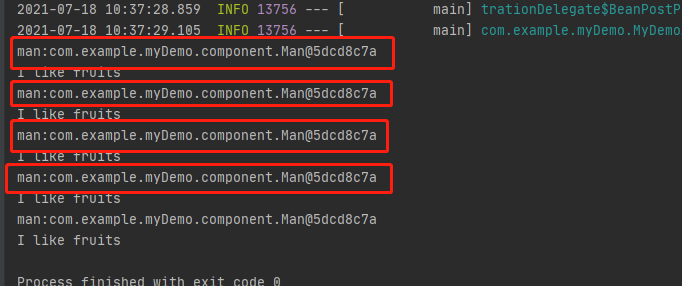
上面的结果显示Woman中的man是单例的,因为5次循环打印打出的结果是同一个对象,发生了什么,
Woman是单例的,Man是原型的,我们使用常规的@Autowired注解注入的却是同一个实例,这里想下为什么Man是一个对象,Woman是单例的,意味着在整个spring容器中只有一个实例,在属性注入的时候肯定也只会注入一次,所以其中Man属性也只能是一个实例,出现上图的结果也就不稀奇了。
现在有这样一个需求要向单例bean中注入原型bean,要怎么实现这样的需求
实现ApplicationContextAware接口
都知道ApplicationContextAware接口是spring提供的一个扩展点,实现该接口的类可以获得ApplicationContext
Woamn类改成下面的样子
package com.example.myDemo.component;

import org.springframework.beans.BeansException;

import org.springframework.beans.factory.annotation.Autowired;

import org.springframework.beans.factory.annotation.Lookup;

import org.springframework.context.ApplicationContext;

import org.springframework.context.ApplicationContextAware;

import org.springframework.stereotype.Component;

@Component

public class Woman implements ApplicationContextAware {

    private Man man;

    private ApplicationContext ac;

    public void eat() {

        this.man = (Man) ac.getBean("man");

        System.out.println("man:" + man);

        System.out.println("I like fruits");

    }

    @Override

    public void setApplicationContext(ApplicationContext applicationContext) throws BeansException {

        this.ac = applicationContext;

    }

}
Woman实现了ApplicationContextAware接口,注入了ApplicaitonContext对象,然后再eat()方法中通过AppicationContext获得Man的实例,看测试结果,
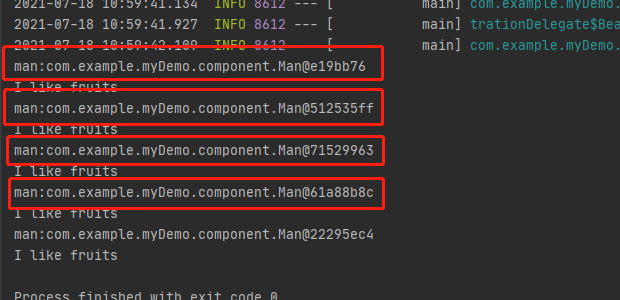
可以看到man属性是多例的也就是符合原型模式的定义。
思考下为什么采用这种方式可以达到注入原型bean的目的
在eat()方法中使用ApplicationContext的getBean方法获取Man,eat()方法每执行一次均会调用一次getBean方法,getbean方法在执行的时候的时候会判断Man的生命周期,如果是原型(prototype)的,那么每调用一次就会重新实例化一个Man,所以会出现上述的结果。
该方法有一个很大的缺点那就是和spring耦合度太高,不符合降低系统的耦合度的要求。
lookup method
spring也考虑了向一个单例bean中注入原型bean的情况,提供了@Lookup注解,在XML配置方式下是<lookup-method>标签,这里仅使用注解的方式演示,
Woman类修改如下,
package com.example.myDemo.component;

import org.springframework.beans.BeansException;

import org.springframework.beans.factory.annotation.Autowired;

import org.springframework.beans.factory.annotation.Lookup;

import org.springframework.context.ApplicationContext;

import org.springframework.context.ApplicationContextAware;

import org.springframework.stereotype.Component;

@Component

public class Woman  {

    private Man man;

    public void eat() {

        this.man = createMan();

        System.out.println("man:" + man);

        System.out.println("I like fruits");

    }

    @Lookup

    public Man createMan(){

        return null;

    }

}
看下测试结果,
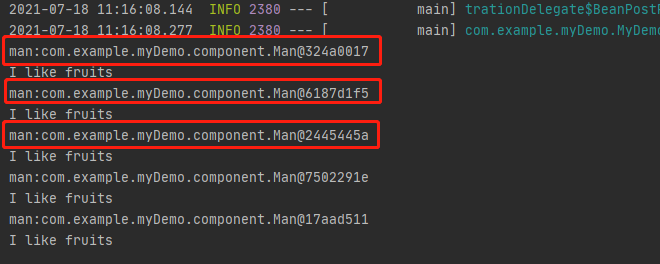
上图显示man是一个多例的,也就是向单例bean中注入了原型bean,其作用的是@Lookup注解。
通过@Lookup注解便完成了注入原型bean的目的,留个思考问题spring是如何做到的?
lookup method签名
被@Lookup注解或<lookup-method>配置的方法有如下要求,
public|protected [abstract] return-type methodName(no-argments)
- 方法可以是public也可以是protected;
- 方法可以是抽象的也可以是非抽象的;
- 方法的返回值是要注入的类型,这里是prototype类型的类;
- 方法没有入参;
- 方法体可以是空的。具体返回值可以是null或任何类型,对结果没有影响;
总结
分享了向单例bean中注入原型bean的方式,使用lookup的方式会更简洁些。
这还可能是道面试题哦,各位小伙伴注意喽。lookup的原理下次分享,敬请关注
推荐阅读
《一次性讲清楚spring中bean的生命周期之三:bean是如何实例化的》

spring中如何向一个单例bean中注入非单例bean的更多相关文章
- 在小程序中修改上一个页面里data中的数据调用上一个页面的方法
//获取已经打开的页面的数组 var pages = getCurrentPages(); //获取上一个页面的所有的方法和data中的数据 var lastpage = pages[pages.l ...
- Java中在实例化一个类时,这个类中没有初始值的int类型成员变量i,i的值是不是0?
java中有两种类型一种是数值性,另一种是类变量数值性变量的初始值为0,类变量的初始化为null没做初始化成员变量int性变量是0, 在java中有这么一条规则,声明在方法中的变量在使用时必须要初始化 ...
- 在Python 中怎么表示一个元素在一个list中的数量?
commonest = [1,2,2,2,1,3,4,5,1,1] print(commonest.count(1))
- Spring实战2:装配bean—依赖注入的本质
主要内容 Spring的配置方法概览 自动装配bean 基于Java配置文件装配bean 控制bean的创建和销毁 任何一个成功的应用都是由多个为了实现某个业务目标而相互协作的组件构成的,这些组件必须 ...
- 在C#中使用Panel控件实现在一个窗体中嵌套另一个窗体
在C#中使用Panel控件实现在一个窗体中嵌套另一个窗体 在C#中使用Panel控件实现在一个窗体中嵌套另一个窗体ShowAllPage sAllPage = new ShowAllPage(); ...
- 002-Spring4 快速入门-项目搭建、基于注解的开发bean,Bean创建和装配、基于注解的开发bean,Bean初始化销毁、Bean装配,注解、Bean依赖注入
一.项目搭建 1.项目创建 eclipse→project explorer→new→Project→Maven Project 默认配置即可创建项目 2.spring配置 <dependenc ...
- golang中的slice翻转存在以及map中的key判断
//slice翻转 func stringReverse(src []string){ if src == nil { panic(fmt.Errorf("the src can't be ...
- Spring源码分析(十三)缓存中获取单例bean
摘要:本文结合<Spring源码深度解析>来分析Spring 5.0.6版本的源代码.若有描述错误之处,欢迎指正. 介绍过FactoryBean的用法后,我们就可以了解bean加载的过程了 ...
- 记录Spring Boot大坑一个,在bean中如果有@Test单元测试,不会注入成功
记录Spring Boot大坑一个,在bean中如果有@Test单元测试,不会注入成功 记录Spring Boot大坑一个,在bean中如果有@Test单元测试,不会注入成功 记录Spring Boo ...
随机推荐
- Archlinux常用软件推荐 更新于2021年4月
记录一下常用软件 必装软件 包管理工具 yay 代替pacman的包管理 yaourt 备用 终端工具 zsh oh-my-zsh-git 搭配zsh利器` proxychains4 终端代理工具` ...
- Elasticsearch分页查询
global index global CLIENT index = "guajibao-ipused-2019.10.13" CLIENT = Elasticsearch(hos ...
- Linux基础服务——Bind DNS服务 Part2
Linux基础服务--Bind DNS服务 Part2 DNS反向解析与区域传送 实验环境延续Part1的实验环境. 反向区域配置 正向解析是域名到IP地址的映射,反向解析则是IP地址到域名的解析,在 ...
- 10分钟内基于gpu的目标检测
10分钟内基于gpu的目标检测 Object Detection on GPUs in 10 Minutes 目标检测仍然是自动驾驶和智能视频分析等应用的主要驱动力.目标检测应用程序需要使用大量数据集 ...
- CUDA 7 Stream流简化并发性
CUDA 7 Stream流简化并发性 异构计算是指高效地使用系统中的所有处理器,包括 CPU 和 GPU .为此,应用程序必须在多个处理器上并发执行函数. CUDA 应用程序通过在 streams ...
- C#搞跨平台桌面UI,分别实现Windows,Mac,Linux屏幕截图
搞跨平台IM,截图功能少不了. Windows 创建GDI的兼容位图,把桌面的图像通过BitBlt拷贝到兼容位图里,通过兼容位图的数据指针创建Bitmap对象,由于兼容位图的内存是非托管的,Bitma ...
- 【NX二次开发】Block UI 线型
属性说明 常规 类型 描述 BlockID String 控件ID Enable Logical 是否可操作 Group Logical ...
- 08:'my_tag' is not a registered tag library. Must be one of
确保每次修改模板标签时都重新启动 Django 开发服务器(或确保它自己重新启动).如果服务器没有重新启动,Django 将不会注册标签. 从 django 1.9 开始,您可以在如下设置中加载这些新 ...
- Bootstrap中宽度大于指定宽度时有空白的解决方法
<div class="container-fluid"></div> 其中container-fluid的作用是占100%
- 制作 Cocoapods 库
一.准备工作:注册 trunk 1.更新 cocoapods 至最新版本 2.申请注册 trunk pod trunk register email 'name' 3.进入邮箱,点击激活注册 4.验证 ...