Ascend C sqrt算子实战
摘要:编写一个Ascend C的sqrt算子,并通过内核调用方式在cpu和npu模式下进行验证。
本文分享自华为云社区《【2023 · CANN训练营第一季】——Ascend C sqrt算子实战》,作者:dayao。
前言
编写一个Ascend C的sqrt算子,并通过内核调用方式在cpu和npu模式下进行验证。在训练营沙箱环境下,cpu模式工作正常结果正确。
一、概述
先简单回顾下TIK C++算子矢量编程的流程和实现。
矢量算子开发流程如下:
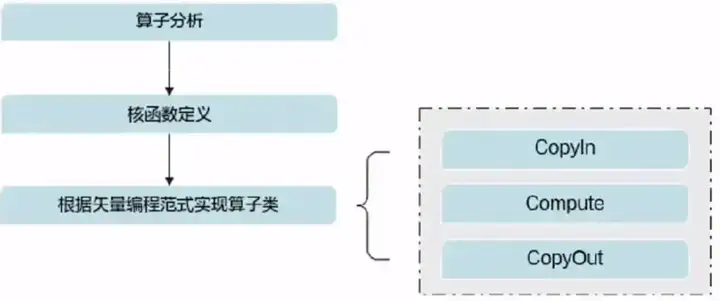
主要工作内容有:
1、算子分析:确定输入输出,确定数学表达式以及底层实现接口,确定核函数定义。
2、算子类的实现:实现init()和process()。init()完成内存初始化,实质上体现的是多核运行,和单核数据切分以及是否开启double buffer优化;Process()实现的是CopyIn,Compute、CopyOut三个流水任务。
3、算子验证:通过核函数的内核调用符的方式调用算子,计算出结果,并于使用相同输入用numpy计算结果进行比对,误差在一定范围内即可。实际应用中,需要使用原有框架的算子进行计算精度比对。
二、算子分析
算子定义如下:假定仍是8个逻辑核。
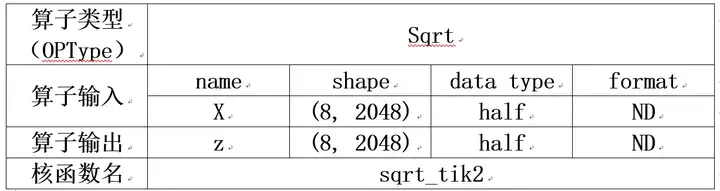
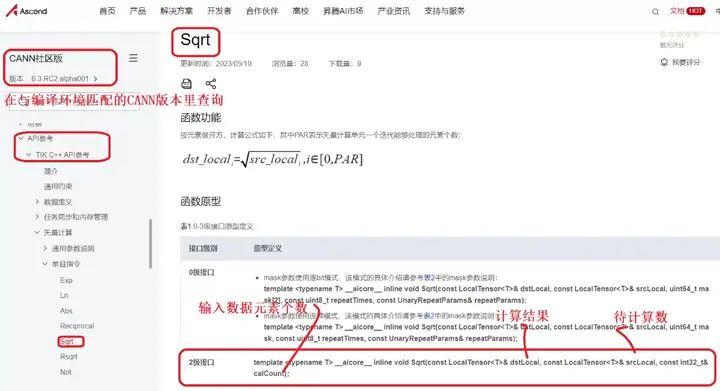
查询TIK C++的API可知,可以使用(TIK C++ API/矢量计算/单目/Sqrt,采用2级接口)完成运算,得到最终结果。
三、代码分析
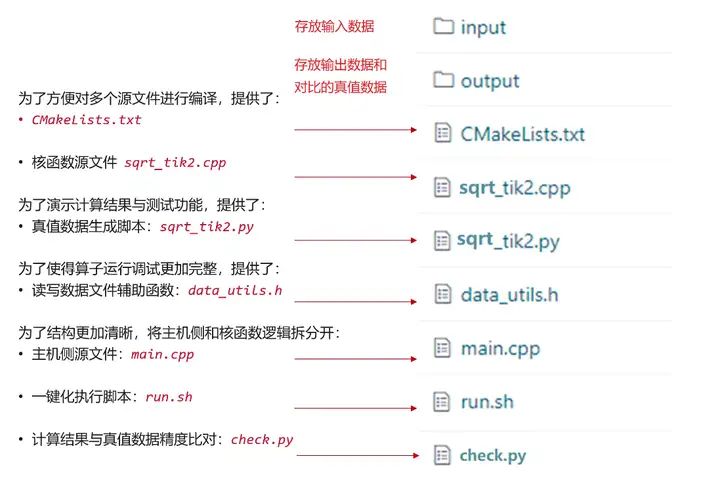
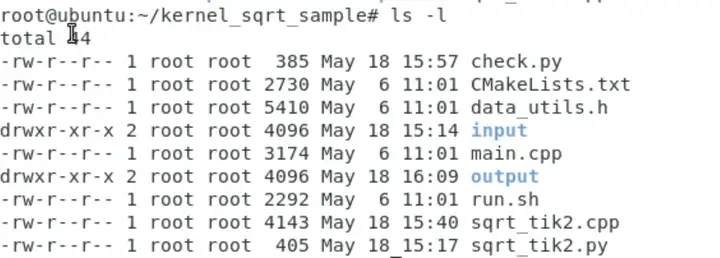
直接在训练营课程提供的add_tik2算子工程上修改。代码地址:https://gitee.com/zgx950813/samples/tree/master/tik2_demo/kernel_samples/kernel_add_sample
修改代码目录结构如下:CMakeLists.txt和data_utils.h未作修改,编译和执行脚本run.sh只改了计算结果与真值比对部分。
一)、核函数定义
与例程相比,输入参数只有x。
extern "C" __global__ __aicore__ void sqrt_tik2(__gm__ uint8_t* x, __gm__ uint8_t* z)

{

 KernelSqrt op;

 op.Init(x, z);

 op.Process();

}
二)、算子类
实现方式与add例程类似。init()函数里初始化内存:x,y的Global Memory ;流水线任务通讯内存;Process()实现流水线任务;按范式编写CopyIn、Compute、CopyOut。与add例程最大差异是,在compute函数中,调用sqrt的2类接口API实现计算。
class KernelSqrt {

public:

    __aicore__ inline KernelSqrt() {}

    __aicore__ inline void Init(__gm__ uint8_t* x, __gm__ uint8_t* z)

    {

 // get start index for current core, core parallel

 xGm.SetGlobalBuffer((__gm__ half*)x + block_idx * BLOCK_LENGTH, BLOCK_LENGTH);

 zGm.SetGlobalBuffer((__gm__ half*)z + block_idx * BLOCK_LENGTH, BLOCK_LENGTH);

 // pipe alloc memory to queue, the unit is Bytes

 pipe.InitBuffer(inQueueX, BUFFER_NUM, TILE_LENGTH * sizeof(half));

 pipe.InitBuffer(outQueueZ, BUFFER_NUM, TILE_LENGTH * sizeof(half));

    }

    __aicore__ inline void Process()

    {

 // loop count need to be doubled, due to double buffer

 constexpr int32_t loopCount = TILE_NUM * BUFFER_NUM;

 // tiling strategy, pipeline parallel

 for (int32_t i = 0; i < loopCount; i++) {

 CopyIn(i);

 Compute(i);

 CopyOut(i);

        }

    }

private:

    __aicore__ inline void CopyIn(int32_t progress)

    {

 // alloc tensor from queue memory

 LocalTensor<half> xLocal = inQueueX.AllocTensor<half>();

 // copy progress_th tile from global tensor to local tensor

 DataCopy(xLocal, xGm[progress * TILE_LENGTH], TILE_LENGTH);

 // enque input tensors to VECIN queue

 inQueueX.EnQue(xLocal);

    }

    __aicore__ inline void Compute(int32_t progress)

    {

 // deque input tensors from VECIN queue

 LocalTensor<half> xLocal = inQueueX.DeQue<half>();

 LocalTensor<half> zLocal = outQueueZ.AllocTensor<half>();

 // call Sqrt instr for computation

 Sqrt(zLocal, xLocal, TILE_LENGTH);

 // enque the output tensor to VECOUT queue

 outQueueZ.EnQue<half>(zLocal);

 // free input tensors for reuse

 inQueueX.FreeTensor(xLocal);

    }

    __aicore__ inline void CopyOut(int32_t progress)

    {

 // deque output tensor from VECOUT queue

 LocalTensor<half> zLocal = outQueueZ.DeQue<half>();

 // copy progress_th tile from local tensor to global tensor

 DataCopy(zGm[progress * TILE_LENGTH], zLocal, TILE_LENGTH);

 // free output tensor for reuse

 outQueueZ.FreeTensor(zLocal);

    }

private:

 TPipe pipe;

 // create queues for input, in this case depth is equal to buffer num

 TQue<QuePosition::VECIN, BUFFER_NUM> inQueueX;

 // create queue for output, in this case depth is equal to buffer num

 TQue<QuePosition::VECOUT, BUFFER_NUM> outQueueZ;

 GlobalTensor<half> xGm, zGm;

};
三)、核函数调用
1、在CPU模式下,通过ICPU_RUN_KF调用
ICPU_RUN_KF(sqrt_tik2, blockDim, x, z); // use this macro for cpu debug
2、在NPU模式下,通过<<<>>>调用
#ifndef __CCE_KT_TEST__

// call of kernel function

void sqrt_tik2_do(uint32_t blockDim, void* l2ctrl, void* stream, uint8_t* x, uint8_t* z)

{

    sqrt_tik2<<<blockDim, l2ctrl, stream>>>(x, z);

}

#endif
由于<<<>>>,只能在NPU模式下调用,所以需要用条件编译,不在CPU调试模式下有效。在调用sqrt_tik2_do,需要按ascendcl应用编程的要求进行。
3、调用代码
通过“__CCE_KT_TEST__”宏区分CPU和NPU模式。
int32_t main(int32_t argc, char* argv[])

{

 size_t inputByteSize = 8 * 2048 * sizeof(uint16_t);  // uint16_t represent half

 size_t outputByteSize = 8 * 2048 * sizeof(uint16_t);  // uint16_t represent half

    uint32_t blockDim = 8;

#ifdef __CCE_KT_TEST__

    uint8_t* x = (uint8_t*)tik2::GmAlloc(inputByteSize);

    uint8_t* z = (uint8_t*)tik2::GmAlloc(outputByteSize);

 ReadFile("./input/input_x.bin", inputByteSize, x, inputByteSize);

 // PrintData(x, 16, printDataType::HALF);

 ICPU_RUN_KF(sqrt_tik2, blockDim, x, z); // use this macro for cpu debug

 // PrintData(z, 16, printDataType::HALF);

 WriteFile("./output/output_z.bin", z, outputByteSize);

    tik2::GmFree((void *)x);

    tik2::GmFree((void *)z);

#else

 aclInit(nullptr);

 aclrtContext context;

 aclError error;

    int32_t deviceId = 0;

 aclrtCreateContext(&context, deviceId);

 aclrtStream stream = nullptr;

 aclrtCreateStream(&stream);

    uint8_t *xHost, *zHost;

    uint8_t *xDevice, *zDevice;

 aclrtMallocHost((void**)(&xHost), inputByteSize);

 aclrtMallocHost((void**)(&zHost), outputByteSize);

 aclrtMalloc((void**)&xDevice, inputByteSize, ACL_MEM_MALLOC_HUGE_FIRST);

 aclrtMalloc((void**)&zDevice, outputByteSize, ACL_MEM_MALLOC_HUGE_FIRST);

 ReadFile("./input/input_x.bin", inputByteSize, xHost, inputByteSize);

 // PrintData(xHost, 16, printDataType::HALF);

 aclrtMemcpy(xDevice, inputByteSize, xHost, inputByteSize, ACL_MEMCPY_HOST_TO_DEVICE);

 sqrt_tik2_do(blockDim, nullptr, stream, xDevice, zDevice); // call kernel in this function

 aclrtSynchronizeStream(stream);

 aclrtMemcpy(zHost, outputByteSize, zDevice, outputByteSize, ACL_MEMCPY_DEVICE_TO_HOST);

 // PrintData(zHost, 16, printDataType::HALF);

 WriteFile("./output/output_z.bin", zHost, outputByteSize);

 aclrtFree(xDevice);

 aclrtFree(zDevice);

 aclrtFreeHost(xHost);

 aclrtFreeHost(zHost);

 aclrtDestroyStream(stream);

 aclrtResetDevice(deviceId);

 aclFinalize();

#endif

 return 0;

}
四)、基准数据生成——sqrt_tik2.py
使用numpy生成input_x和基准结果golden。
import numpy as np

def gen_golden_data_simple():

 input_x = np.random.uniform(0, 100, [8, 2048]).astype(np.float16)

    golden = np.sqrt(input_x).astype(np.float16)

 input_x.tofile("./input/input_x.bin")

 golden.tofile("./output/golden.bin")

if __name__ == "__main__":

 gen_golden_data_simple()
五)、计算结果比较
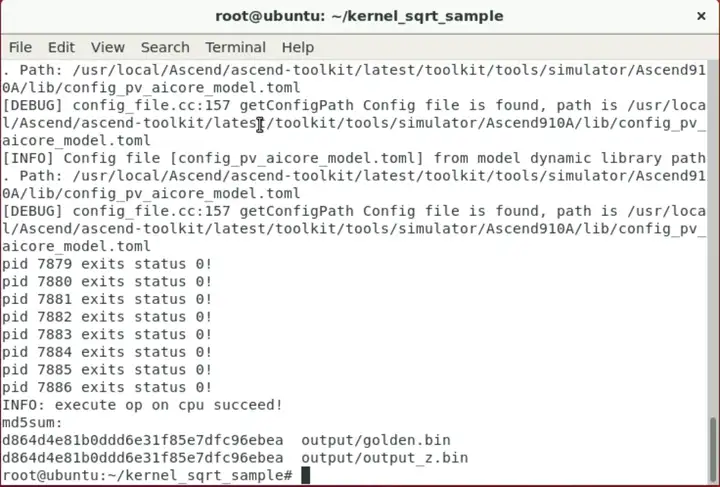
使用numpy的allclose()函数比较算子计算与基准数据的结果。实际上由于npu模式编译出错,实际未执行改函数进行比较。CPU模式下,算子计算出的结果与基准golden数据完全一致,两者的md5相同。
四、编译运行
本次课程提供了沙箱运行环境,想个办法把代码搞进去。
一)、配置环境变量

二)、CPU模式
cpu模式顺利编译运行,结果与对比组完全一致。
三)、NPU模式
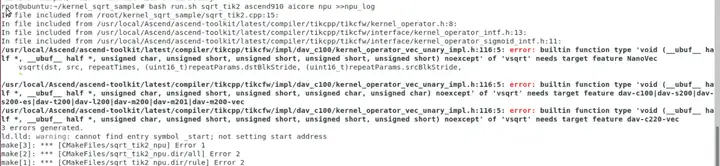
npu模式下编译报错,因为沙箱时间有限,以后有机会再研究。
Ascend C sqrt算子实战的更多相关文章
- Spark算子---实战应用
Spark算子实战应用 数据集 :http://grouplens.org/datasets/movielens/ MovieLens 1M Datase 相关数据文件 : users.dat --- ...
- Spark GraphX图计算核心算子实战【AggreagteMessage】
一.简介 参考博客:https://www.cnblogs.com/yszd/p/10186556.html 二.代码实现 package graphx import org.apache.log4j ...
- 6.RDD算子实战
from pyspark import SparkContext,SparkConf import sys if __name__ == '__main__': if len(sys.argv) != ...
- Ascend Pytorch算子功能验证
Ascend Pytorch算子功能验证 编写测试用例 以add算子为例,测试脚本文件命名为:add_testcase.py.以下示例仅为一个简单的用例实现,具体算子的实现,需要根据算子定义进行完整的 ...
- Ascend Pytorch算子适配层开发
Ascend Pytorch算子适配层开发 适配方法 找到和PyTorch算子功能对应的NPU TBE算子,根据算子功能计算出输出Tensor的size,再根据TBE算子原型构造对应的input/ou ...
- 数学之路-python计算实战(20)-机器视觉-拉普拉斯算子卷积滤波
拉普拉斯算子进行二维卷积计算,线性锐化滤波 # -*- coding: utf-8 -*- #线性锐化滤波-拉普拉斯算子进行二维卷积计算 #code:myhaspl@myhaspl.com impor ...
- Ceres Solver: 高效的非线性优化库(二)实战篇
Ceres Solver: 高效的非线性优化库(二)实战篇 接上篇: Ceres Solver: 高效的非线性优化库(一) 如何求导 Ceres Solver提供了一种自动求导的方案,上一篇我们已经看 ...
- 《TensorFlow实战》中AlexNet卷积神经网络的训练中
TensorFlow实战中AlexNet卷积神经网络的训练 01 出错 TypeError: as_default() missing 1 required positional argument: ...
- flink实时数仓从入门到实战
第一章.flink实时数仓入门 一.依赖 <!--Licensed to the Apache Software Foundation (ASF) under oneor more contri ...
- AI实战分享 | 基于CANN的辅助驾驶应用案例
摘要:什么是辅助驾驶?简而言之,就是借助汽车对周围环境的自动感知和分析,让驾驶员预先察觉可能发生的危险,有效增加汽车驾驶的舒适性和安全性. 导读:基于昇腾AI异构计算架构CANN的辅助驾驶AI应用实战 ...
随机推荐
- Kafka 事务
更多内容,前往IT-BLOG 在了解 Kafka的事务之前,先说一下 Kafka中幂等和事务(Kafka 0.11.0.0版本引入的两个特性)以此来实现 Exactly once(精确一次)了解更多链 ...
- 微软开源了一个 助力开发LLM 加持的应用的 工具包 semantic-kernel
在首席执行官萨蒂亚·纳德拉(Satya Nadella)的支持下,微软似乎正在迅速转变为一家以人工智能为中心的公司.最近微软的众多产品线都采用GPT-4加持,从Microsoft 365等商业产品到& ...
- WPF随笔收录-解析DICOM文件
一.前言 在最近的项目开发中,涉及到了解析DICOM文件.根据百度百科可知,DICOM(Digital Imaging and Communications in Medicine)即医学数字成像和通 ...
- SwitchHosts operation not permitted 解决方案--亲测有效
SwitchHost!是帮助我们管理Hosts的工具,可以帮助我们做域名解析, 弥补了如果要修改域名还要改计算机C:\Windows\System32\drivers\etc位置下的hosts文件的弊 ...
- 系统评价——数据包络分析DEA的R语言实现(七)
数据包络分析(Data envelopment analysis,DEA)是运筹学中用于测量决策部门生产效率的一种方法,它是基于相对效率发展的崭新的效率评估方法. 详细来说,通过使用数学规划模型,计算 ...
- Linux磁盘LVM根目录扩容
LVM 的基本概念 物理卷 Physical Volume (PV):可以在上面建立卷组的媒介,可以是硬盘分区,也可以是硬盘本身或者回环文件(loopback file).物理卷包括一个特殊的 hea ...
- [Java/Arthas]Arthas The telnet port 3658 is used by process 13988 instead of target process 11208, y[转载]
1 问题描述 Arthas 跟踪 一个已经在tomcat部署的工程quality,第一次使用过的是135091号进程,后来出现问题,换进程连接,报错如上图所示,提示端口占用.原因是上次连接了一个进程, ...
- 0001 嵌入式开发带你从小白到大佬系列之——Linux开发环境搭建—Windows-VMware-Ubuntu环境配置
如文章标题,我们安装的Linux开发环境是:Windows-VMware-Ubuntu环境 配置,即在windows系统下安装VMware虚拟机,之后在VMware中配置安装Linux系统的常用发行版 ...
- day68:Vue:类值操作/style样式操作&v-for&filer/computed/watch&生命周期钩子函数&axios
目录 1.类值操作 :class 2.style操作样式 :style 3:示例:选项卡 @click+:class 4.v-for示例:循环商品显示 5.过滤器:filter 6.计算属性:comp ...
- 创建SVN和设置密码以及SVN自动更新
重新创建版本库: svnadmin create /usr/local/svn/month_exam //创建一个svn版本仓库month_exam(month_exam可以随便起名字) cd ...