译: 2. RabbitMQ Spring AMQP 之 Work Queues
在上一篇博文中,我们写了程序来发送和接受消息从一个队列中。
在这篇博文中我们将创建一个工作队列,用于在多个工作人员之间分配耗时的任务。
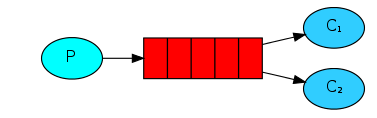
Work Queues 工作队列(又称:任务队列)背后的主要思想是避免立即执行资源密集型任务,并且必须等待它完成。相反,我们安排任务稍后完成。我们将任务封装 为消息并将其发送到队列。在后台运行的工作进程将弹出任务并最终执行作业。当您运行许多工作程序时,它们之间将共享任务。
这个概念在Web应用程序中特别有用,因为在短的HTTP请求窗口中无法处理复杂的任务。
我们没有真实的业务场景,因此接下来我们将会用Thread.sleep()方法来模拟一个耗时比较久的任务。
编写application.properties
我们将在生成的项目中找到application.properties文件,其中没有任何内容。
添加application.properties 配置如下:
spring.profiles.active=usage_message

logging.level.org=ERROR

tutorial.client.duration=10000

# 当declareExchange为true时,将持久标志设置为此值

spring.rabbitmq.durable=true

# PERSISTENT或NON_PERSISTENT确定RabbitMQ是否应该保留消息

spring.rabbitmq.deliveryMode=PERSISTENT

# 更多属性设置 https://docs.spring.io/spring-amqp/reference/htmlsingle/#_common_properties
编写Java配置类
刚才配置文件中我们配置了一个
tutorial.client.duration=10000
但是这个配置字段不存在于任何框架jar包里,因此我们需要编写一个类来处理这个属性
import org.springframework.beans.factory.annotation.Autowired;

import org.springframework.beans.factory.annotation.Value;

import org.springframework.boot.CommandLineRunner;

import org.springframework.context.ConfigurableApplicationContext;

public class RabbitAmqpTutorialsRunner implements CommandLineRunner {

    @Value("${tutorial.client.duration:0}")

    private int duration;

    @Autowired

    private ConfigurableApplicationContext ctx;

    @Override

    public void run(String... args) throws Exception {

        // TODO Auto-generated method stub

        System.out.println("Ready ... running for " + duration + "ms");

        Thread.sleep(duration);

        ctx.close();

    }

}
我们仍然和之前教程一样需要一个Java配置类:
import org.springframework.amqp.core.Queue;

import org.springframework.context.annotation.Bean;

import org.springframework.context.annotation.Configuration;

import org.springframework.context.annotation.Profile;

import com.xingyun.springamqp.business.Tut2Receiver;

import com.xingyun.springamqp.business.Tut2Sender;

@Profile({"tut2", "work-queues"})

@Configuration

public class Tut2Config {

    @Bean

    public Queue hello() {

        return new Queue("hello");

    }

    @Profile("receiver")

    private static class ReceiverConfig {

        @Bean

        public Tut2Receiver receiver1() {

            return new Tut2Receiver(1);

        }

        @Bean

        public Tut2Receiver receiver2() {

            return new Tut2Receiver(2);

        }

    }

    @Profile("sender")

    @Bean

    public Tut2Sender sender() {

        return new Tut2Sender();

    }

}
通过上面这个配置类,我们做了四件事
- 首先通过 @Profile 注解,定义了 两个配置文件前缀别名,tut2 或者 work-queues
- 通过@Configuration 注解来让Spring 知道这是一个Java 配置文件
- 定义了 一个队列,名字叫做hello
- 另外定义了两个配置文件,一个叫做sender,一个叫做receiver
为什么要有这两个配置文件? 因为我们待会运行生产者和消费者的时候,可以通过动态加载不同的配置文件来启动不同的类。
比如我们启动生产者发布信息就可以调用这个配置:
--spring.profiles.active=tut2,sender
当我们想启动消费者就动态调用这个配置
--spring.profiles.active=tut2,receiver
接下来我们需要修改下整个应用程序的启动类:
import org.springframework.boot.CommandLineRunner;

import org.springframework.boot.SpringApplication;

import org.springframework.boot.autoconfigure.SpringBootApplication;

import org.springframework.context.annotation.Bean;

import org.springframework.context.annotation.Profile;

import org.springframework.scheduling.annotation.EnableScheduling;

import com.xingyun.springamqp.config.RabbitAmqpTutorialsRunner;

@SpringBootApplication

@EnableScheduling

public class RabbitMq0x02SpringAmqpWorkQueuesSampleApplication {

    public static void main(String[] args) {

        SpringApplication.run(RabbitMq0x02SpringAmqpWorkQueuesSampleApplication.class, args);

    }

    @Profile("usage_message")

    @Bean

    public CommandLineRunner usage() {

        return new CommandLineRunner() {

            @Override

            public void run(String... arg0) throws Exception {

                System.out.println("This app uses Spring Profiles to control its behavior.\n");

                System.out.println("Sample usage: java -jar "

                        + "RabbitMQ_0x02_SpringAMQP_WorkQueues_Sample-0.0.1-SNAPSHOT.jar "

                        + "--spring.profiles.active=work-queues,sender");

            }

        };

    }

    @Profile("!usage_message")

    @Bean

    public CommandLineRunner tutorial() {

        return new RabbitAmqpTutorialsRunner();

    }

}
当执行这个项目的jar 文件时会自动加载这个usage_message 配置,打印用法信息。
我们在启动类上添加@EnableScheduling,以便于开启对定时任务的支持.
生产者
我们将修改发送方以通过在RabbitTemplate上使用相同的方法发布消息convertAndSend,以非常人为的方式在消息中附加一个点来提供识别其是否为更长时间运行任务的方法。该文档将此定义为“将Java对象转换为Amqp消息并将其发送到具有默认路由密钥的默认交换”。
import org.springframework.amqp.core.Queue;

import org.springframework.amqp.rabbit.core.RabbitTemplate;

import org.springframework.beans.factory.annotation.Autowired;

import org.springframework.scheduling.annotation.Scheduled;

public class Tut2Sender {

        @Autowired

        private RabbitTemplate template;

        @Autowired

        private Queue queue;

        int dots = 0;

        int count = 0;

        @Scheduled(fixedDelay = 1000, initialDelay = 500)

        public void send() {

            StringBuilder builder = new StringBuilder("Hello");

            if (dots++ == 3) {

                dots = 1;

            }

            for (int i = 0; i < dots; i++) {

                builder.append('.');

            }

            builder.append(Integer.toString(++count));

            String message = builder.toString();

            template.convertAndSend(queue.getName(), message);

            System.out.println(" [x] Sent '" + message + "'");

        }

}
消费者
我们的接收器Tut2Receiver模拟doWork()方法中伪造任务的任意长度,其中点数转换为工作所需的秒数。同样,我们利用“hello”队列上的@RabbitListener和@RabbitHandler来接收消息。消耗该消息的实例将添加到我们的监视器中,以显示处理消息的实例,消息和时间长度。
import org.springframework.amqp.rabbit.annotation.RabbitHandler;

import org.springframework.amqp.rabbit.annotation.RabbitListener;

import org.springframework.util.StopWatch;

@RabbitListener(queues = "hello")

public class Tut2Receiver {

    private final int instance;

    public Tut2Receiver(int i) {

        this.instance = i;

    }

    @RabbitHandler

    public void receive(String in) throws InterruptedException {

        StopWatch watch = new StopWatch();

        watch.start();

        System.out.println("instance " + this.instance +

            " [x] Received '" + in + "'");

        doWork(in);

        watch.stop();

        System.out.println("instance " + this.instance +

            " [x] Done in " + watch.getTotalTimeSeconds() + "s");

    }

    private void doWork(String in) throws InterruptedException {

        for (char ch : in.toCharArray()) {

            if (ch == '.') {

                Thread.sleep(1000);

            }

        }

    }

}
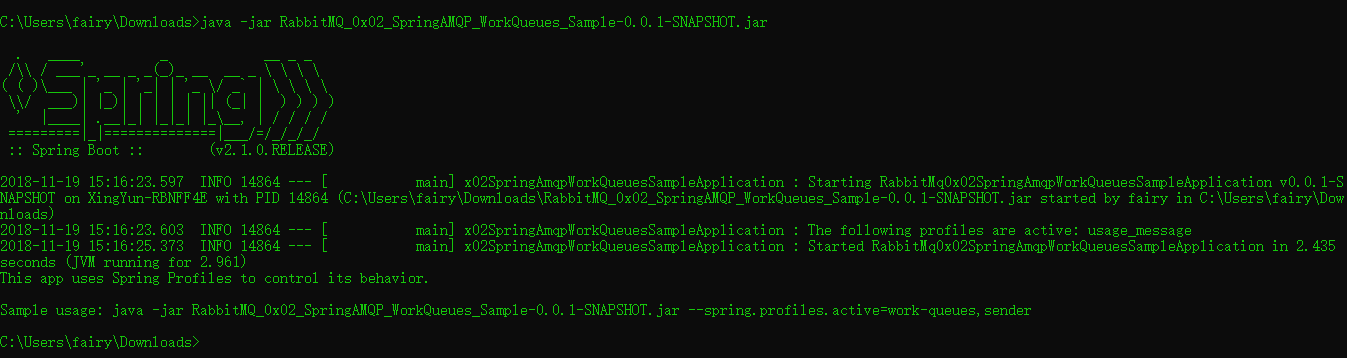
查看用法
java -jar RabbitMQ_0x02_SpringAMQP_WorkQueues_Sample-0.0.1-SNAPSHOT.jar
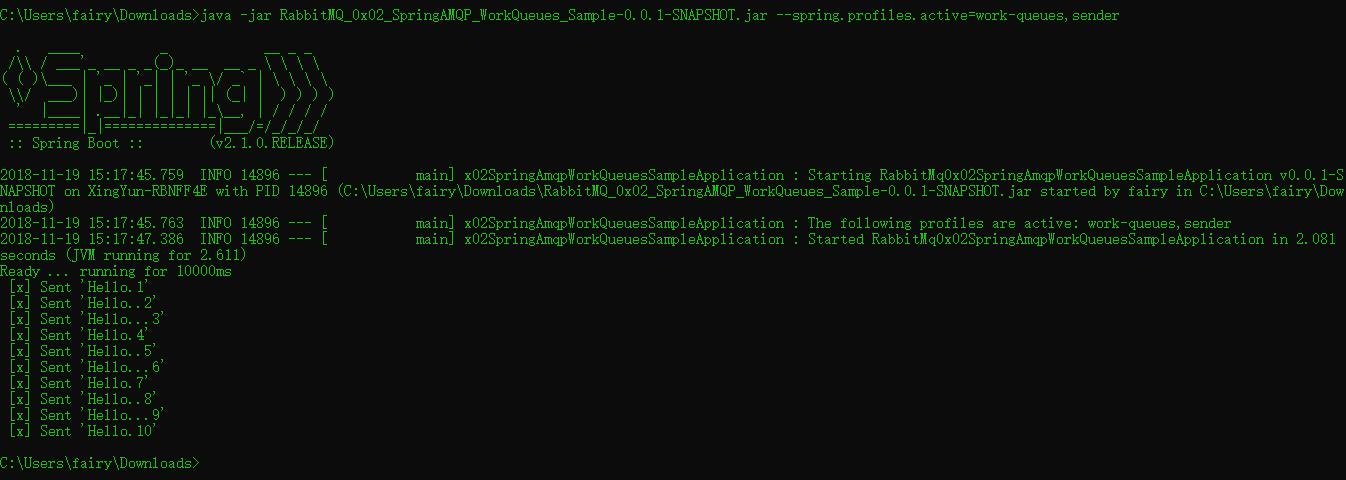
运行生产者
java -jar RabbitMQ_0x02_SpringAMQP_WorkQueues_Sample-0.0.1-SNAPSHOT.jar --spring.profiles.active=work-queues,sender
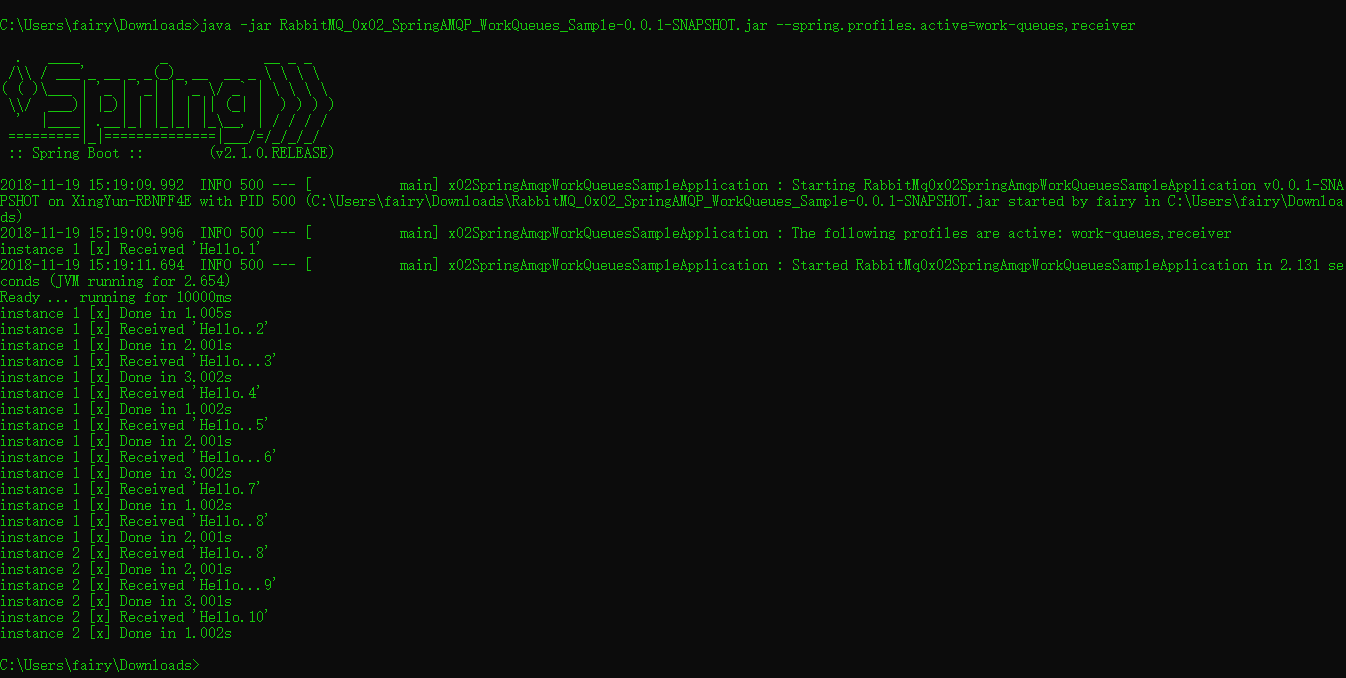
运行消费者
java -jar RabbitMQ_0x02_SpringAMQP_WorkQueues_Sample-0.0.1-SNAPSHOT.jar --spring.profiles.active=work-queues,receiver
译: 2. RabbitMQ Spring AMQP 之 Work Queues的更多相关文章
- 译: 1. RabbitMQ Spring AMQP 之 Hello World
本文是译文,原文请访问:http://www.rabbitmq.com/tutorials/tutorial-one-spring-amqp.html RabbitMQ 是一个Brocker (消息队 ...
- 译: 3. RabbitMQ Spring AMQP 之 Publish/Subscribe 发布和订阅
在第一篇教程中,我们展示了如何使用start.spring.io来利用Spring Initializr创建一个具有RabbitMQ starter dependency的项目来创建spring-am ...
- 译: 6. RabbitMQ Spring AMQP 之 RPC
Remote procedure call (RPC) 在第二篇教程中,我们学习了如何使用工作队列在多个工作人员之间分配耗时的任务. 但是如果我们需要在远程计算机上运行一个函数并等待结果呢?嗯,这是一 ...
- 译: 4. RabbitMQ Spring AMQP 之 Routing 路由
在上一个教程中,我们构建了一个简单的fanout(扇出)交换.我们能够向许多接收者广播消息. 在本教程中,我们将为其添加一个功能 - 我们将只能订阅一部分消息.例如,我们将只能将消息指向感兴趣的特定颜 ...
- 译: 5. RabbitMQ Spring AMQP 之 Topic 主题
在上一个教程中,我们提高了消息传递的灵活 我们使用direct交换而不是使用仅能够进行虚拟广播的fanout交换, 并且获得了基于路由key 有选择地接收消息的可能性. 虽然使用direct 交换改进 ...
- 译:2. RabbitMQ Java Client 之 Work Queues (工作队列)
在上篇揭开RabbitMQ的神秘面纱一文中,我们编写了程序来发送和接收来自命名队列的消息. 本篇我们将创建一个工作队列,工作队列背后的假设是每个任务都交付给一个工作者 本篇是译文,英文原文请移步:ht ...
- spring amqp rabbitmq fanout配置
基于spring amqp rabbitmq fanout配置如下: 发布端 <rabbit:connection-factory id="rabbitConnectionFactor ...
- 深入剖析 RabbitMQ —— Spring 框架下实现 AMQP 高级消息队列协议
前言 消息队列在现今数据量超大,并发量超高的系统中是十分常用的.本文将会对现时最常用到的几款消息队列框架 ActiveMQ.RabbitMQ.Kafka 进行分析对比.详细介绍 RabbitMQ 在 ...
- 消息中间件——RabbitMQ(九)RabbitMQ整合Spring AMQP实战!(全)
前言 1. AMQP 核心组件 RabbitAdmin SpringAMQP声明 RabbitTemplate SimpleMessageListenerContainer MessageListen ...
随机推荐
- 被忽视的META标签之特效(页面过渡效果)
在web设计中使用js可以实现很多的页面特效,然而很多人却忽视了HTML标签中META标签的强大功效,其实meta标签也可以实现很多漂亮的页面过渡效果. META标签是HTML语言HEAD区的一个辅助 ...
- format 用法及对齐
空格填充: 元素填充(这里是2):
- symmfony
安装:http://symfony.cn/docs/book/installation.html 1先检查php版本是否符合你要下载的symfony的最低版本: php -version 系统安装完成 ...
- POJ 1655 Balancing Act (求树的重心)【树形DP】(经典)
<题目链接> 题目大意:给你一棵树,任意去除某一个点后,树被分成了几个联通块,则该点的平衡值为所有分成的连通块中,点数最大的那个,问你:该树所有点中,平衡值最小的那个点是什么? 解题分析: ...
- Manjaro 初始配置----anaconda-pycharm-opencv-tensorflow
1.安装蟒蛇 1)安装 yaourt anaconda source /opt/anaconda/bin/active root 2)添加环境变量 在〜/ .bashrc中添加 export PATH ...
- NumPy学习(让数据处理变简单)
NumPy学习(一) NumPy数组创建 NumPy数组属性 NumPy数学算术与算数运算 NumPy数组创建 NumPy 中定义的最重要的对象是称为 ndarray 的 N 维数组类型. 它描述相同 ...
- 20172302 《Java软件结构与数据结构》第六周学习总结
2018年学习总结博客总目录:第一周 第二周 第三周 第四周 第五周 第六周 教材学习内容总结 1.树的概述及基本概念 (1)树是一种非线性数据结构,其中的元素被组织成了一个层次结构. (2)树由一个 ...
- c# 深入探索之CLR
概念: CLR : 公共语言运行时(Common Language Runtime) 是一个可由多种编程语言使用的"运行时",它负责资源管理(内存分配和垃圾收集等),并保证应用和底 ...
- CentOS 6.4在运行XFS时系统crash的bug分析
最近有一台CentOS 6.4的服务器发生多次crash,kernel version 是Linux 2.6.32-431.29.2.el6.x86_64.从vmcore-dmesg日志内容及cras ...
- 进程描述和控制(os 笔记二)
进程描述和控制 计算机最初的主要任务之一就是高效的自动化我们的工作,完成用户交付的任务.而这种任务在计算机中的表示就是一个个的进程.从上一篇文章中描述的计算机的发展历史我们能发现,无论是单道批处理 ...