
k8s集群之上运行etcd集群
一.知识点:
1.headless services
NOTE:: 我们在k8s上运行etcd集群,集群间通告身份是使用dns,不能使用pod ip,因为如果pod被重构了ip会变,在这种场景中不能直接使用k8s 的service,因为在集群环境中我们需要直接将service name映射到pod ip,而不是 service ip,这样我们才能完成集群间的身份验证。
2.env
NOTE: pod还没启动之前怎么能知道pod的ip呢?那我们启动etcd时绑定网卡的ip该怎样拿到呢?这时就可以用env将pod ip 以变量方式传给etcd,这样当pod启动后,etcd就通过env拿到了pod ip, 从而绑定到container 的ip
二.架构:
采用三节点的etcd:
分别为:etcd1,etcd2,etcd3
etcd持久数据采用nfs
etcd1.yml
apiVersion: apps/v1

kind: Deployment

metadata:

  name: etcd1

  labels:

    name: etcd1

spec:

  replicas:

  selector:

    matchLabels:

      app: etcd1

  template:

    metadata:

      labels:

        app: etcd1

    spec:

      containers:

      - name: etcd1

        image: myetcd

        imagePullPolicy: IfNotPresent

        volumeMounts:

        - mountPath: /data

          name: etcd-data

        env:

        - name: host_ip

          valueFrom:

            fieldRef:

              fieldPath: status.podIP

        command: ["/bin/sh","-c"]

        args:

        - /tmp/etcd

          --name etcd1

          --initial-advertise-peer-urls http://${host_ip}:2380

          --listen-peer-urls http://${host_ip}:2380

          --listen-client-urls http://${host_ip}:2379,http://127.0.0.1:2379

          --advertise-client-urls http://${host_ip}:2379

          --initial-cluster-token etcd-cluster-

          --initial-cluster etcd1=http://etcd1:2380,etcd2=http://etcd2:2380,etcd3=http://etcd3:2380

          --initial-cluster-state new

          --data-dir=/data

      volumes:

      - name: etcd-data

        nfs:

          server: 192.168.85.139

          path: /data/v1
etcd2.yml
apiVersion: apps/v1

kind: Deployment

metadata:

  name: etcd2

  labels:

    name: etcd2

spec:

  replicas:

  selector:

    matchLabels:

      app: etcd2

  template:

    metadata:

      labels:

        app: etcd2

    spec:

      containers:

      - name: etcd2

        image: myetcd

        imagePullPolicy: IfNotPresent

        volumeMounts:

        - mountPath: /data

          name: etcd-data

        env:

        - name: host_ip

          valueFrom:

            fieldRef:

              fieldPath: status.podIP

        command: ["/bin/sh","-c"]

        args:

        - /tmp/etcd

          --name etcd2

          --initial-advertise-peer-urls http://${host_ip}:2380

          --listen-peer-urls http://${host_ip}:2380

          --listen-client-urls http://${host_ip}:2379,http://127.0.0.1:2379

          --advertise-client-urls http://${host_ip}:2379

          --initial-cluster-token etcd-cluster-

          --initial-cluster etcd1=http://etcd1:2380,etcd2=http://etcd2:2380,etcd3=http://etcd3:2380

          --initial-cluster-state new

          --data-dir=/data

      volumes:

      - name: etcd-data

        nfs:

          server: 192.168.85.139

          path: /data/v2
etcd3.yml
apiVersion: apps/v1

kind: Deployment

metadata:

  name: etcd3

  labels:

    name: etcd3

spec:

  replicas:

  selector:

    matchLabels:

      app: etcd3

  template:

    metadata:

      labels:

        app: etcd3

    spec:

      containers:

      - name: etcd3

        image: myetcd

        imagePullPolicy: IfNotPresent

        volumeMounts:

        - mountPath: /data

          name: etcd-data

        env:

        - name: host_ip

          valueFrom:

            fieldRef:

              fieldPath: status.podIP

        command: ["/bin/sh","-c"]

        args:

        - /tmp/etcd

          --name etcd3

          --initial-advertise-peer-urls http://${host_ip}:2380

          --listen-peer-urls http://${host_ip}:2380

          --listen-client-urls http://${host_ip}:2379,http://127.0.0.1:2379

          --advertise-client-urls http://${host_ip}:2379

          --initial-cluster-token etcd-cluster-

          --initial-cluster etcd1=http://etcd1:2380,etcd2=http://etcd2:2380,etcd3=http://etcd3:2380

          --initial-cluster-state new

          --data-dir=/data

      volumes:

      - name: etcd-data

        nfs:

          server: 192.168.85.139

          path: /data/v3
etcd1-svc.yml
apiVersion: v1

kind: Service

metadata:

  name: etcd1

spec:

  clusterIP: None

  ports:

  - name: client

    port:

    targetPort:

  - name: message

    port:

    targetPort:

  selector:

    app: etcd1
etcd2-svc.yml
apiVersion: v1

kind: Service

metadata:

  name: etcd2

spec:

  clusterIP: None

  ports:

  - name: client

    port:

    targetPort:

  - name: message

    port:

    targetPort:

  selector:

    app: etcd2
etcd3-svc.yml
apiVersion: v1

kind: Service

metadata:

  name: etcd3

spec:

  clusterIP: None

  ports:

  - name: client

    port:

    targetPort:

  - name: message

    port:

    targetPort:

  selector:

    app: etcd3
在任意节点查看etcd状态:
[root@node1 test]# kubectl exec etcd1-79bdcb47c9-fwqps -- /tmp/etcdctl cluster-health
member 876043ef79ada1ea is healthy: got healthy result from http://10.244.1.113:2379
member 99eab3685d8363a1 is healthy: got healthy result from http://10.244.1.111:2379
member dcb68c82481661be is healthy: got healthy result from http://10.244.1.112:2379
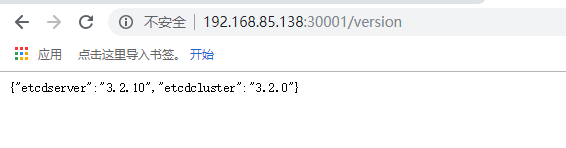
提供外部访问:
apiVersion: v1

kind: Service

metadata:

  name: etcd-external

spec:

  type: NodePort

  ports:

  - name: client

    port:

    targetPort:

    nodePort:

  - name: message

    port:

    targetPort:

    nodePort:

  selector:

    app: etcd1
k8s集群之上运行etcd集群的更多相关文章
- K8s二进制部署单节点 etcd集群,flannel网络配置 ——锥刺股
K8s 二进制部署单节点 master --锥刺股 k8s集群搭建: etcd集群 flannel网络插件 搭建master组件 搭建node组件 1.部署etcd集群 2.Flannel 网络 ...
- 使用k8s operator安装和维护etcd集群
关于Kubernetes Operator这个新生事物,可以参考下文来了解这一技术的来龙去脉: https://yq.aliyun.com/articles/685522?utm_content=g_ ...
- ETCD:在容器中运行etcd集群
原文地址:Docker container 以下指南显示了如何使用静态引导过程在rkt和Docker上运行etcd. rkt 运行单节点的etcd 以下rkt run命令将在端口2379上公开etcd ...
- k8s集群中遇到etcd集群故障的排查思路
一次在k8s集群中创建实例发现etcd集群状态出现连接失败状况,导致创建实例失败.于是排查了一下原因. 问题来源 下面是etcd集群健康状态: 1 2 3 4 5 6 7 8 9 10 11 [roo ...
- Kubernetes集群搭建之Etcd集群配置篇
介绍 etcd 是一个分布式一致性k-v存储系统,可用于服务注册发现与共享配置,具有以下优点. 简单 : 相比于晦涩难懂的paxos算法,etcd基于相对简单且易实现的raft算法实现一致性,并通过g ...
- Kubernetes集群部署之三ETCD集群部署
kuberntes 系统使用 etcd 存储所有数据,本文档介绍部署一个三节点高可用 etcd 集群的步骤,这三个节点复用 kubernetes 集群机器k8s-master.k8s-node-1.k ...
- k8s基础(3)etcd集群
下载安装 https://github.com/coreos/etcd/releases 在这网页,可以看到有多个版本共选择. 下载3.25 解压后, cd etcd-v3.2.5-linux-amd ...
- etcd集群部署与遇到的坑
在k8s集群中使用了etcd作为数据中心,在实际操作中遇到了一些坑.今天记录一下,为了以后更好操作. ETCD参数说明 —data-dir 指定节点的数据存储目录,这些数据包括节点ID,集群ID,集群 ...
- etcd集群部署与遇到的坑(转)
原文 https://www.cnblogs.com/breg/p/5728237.html etcd集群部署与遇到的坑 在k8s集群中使用了etcd作为数据中心,在实际操作中遇到了一些坑.今天记录一 ...
随机推荐
- Docker CentOS / Ubuntu容器开启 SSH 服务
Docker CentOS / Ubuntu容器开启 SSH 服务 在CentOS容器内执行 yum install passwd openssl openssh-server -y # Ubuntu ...
- [LeetCode] 265. Paint House II 粉刷房子
There are a row of n houses, each house can be painted with one of the k colors. The cost of paintin ...
- [LeetCode] 258. Add Digits 加数字
Given a non-negative integer num, repeatedly add all its digits until the result has only one digit. ...
- GoLand 2019.1 激活破解
链接://https://blog.csdn.net/hi_liuxiansheng/article/details/89078405
- zabbix详解
官网地址 https://www.zabbix.com/documentation/3.0/manual/config/items/itemtypes/zabbix_agent 使用率
- windows中怎么添加定时任务
linux中有crontab定时任务,很方便 其实windows也有类似的 需求:定时执行python脚本 1.Windows键+R,调出此窗口,输入compmgmt.msc 2. 每分钟都执行一次脚 ...
- 用Postman做接口测试
The higher your test coverage, the more flexible and bug-resistant your code will be, and the less t ...
- Influx Sql系列教程一:database 数据库
对于influxdb而言,database和我们更熟悉的mysql中的dababse没有什么特别的区别,可以将数据库简单理解为一堆表(measurement)的集合,接下来我们将看一下在influxd ...
- spring security实现记住我下次自动登录功能
目录 spring security实现记住我下次自动登录功能 一.原理分析 二.实现方式 2.1 简单实现方式 2.2 数据库实现方式 三.区分是密码登录还是rememberme登录 spring ...
- [JAVA] maven 阿里云节点 settings.xml
<?xml version="1.0" encoding="UTF-8"?> <settings xmlns="http://mav ...