15-Flutter移动电商实战-商品推荐区域制作
1、推荐商品类的编写
这个类接收一个List参数,就是推荐商品的列表,这个列表是可以左右滚动的。
/*商品推荐*/
class Recommend extends StatelessWidget {
  final List  recommendList;

  Recommend({Key key, this.recommendList}) : super(key: key);
}
2、推荐标题内部方法的编写
实际开发中,要尽量减少嵌套,我们需要把复杂的组件,单独拿出一个方法进行编写。这里就把商品推荐标题单独拿出一个方法进行编写。
/*推荐商品标题*/
Widget _titleWidget(){
 return Container(
   alignment: Alignment.centerLeft,
   padding: EdgeInsets.fromLTRB(10.0, 2.0, 0,5.0),
   decoration: BoxDecoration(
     color:Colors.white,
     border: Border(
       bottom: BorderSide(width:0.5,color:Colors.black12)
     )
   ),
   child:Text(
     '商品推荐',
     style:TextStyle(color:Colors.pink)
     )
 );
}
3、推荐商品单独项编写
把推荐商品的每一个子项我们也分离出来。每一个子项都使用InkWell,这样为以后的页面导航作准备。里边使用了Column,把内容分成三行。
先不充关于InkWel的使用
InkWell有的叫溅墨效果,有的叫水波纹效果。使用场景是给一些无点击事件的部件添加点击事件时使用(也支持长按、双击等事件),同时你也可以去修改它的颜色和形状。
InkWell(
  borderRadius: BorderRadius.circular(8.0), /*圆角*/
  splashColor: Colors.transparent, /*溅墨色(波纹色)*/
  highlightColor: Colors.transparent, /*点击时的背景色(高亮色)*/
  onTap: () {},/*点击事件*/
  child: Container(),
);
再回访推荐商品的编写
Widget _item(index){
    return InkWell(
      onTap: (){},
      child: Container(
        height: ScreenUtil().setHeight(330),
        width: ScreenUtil().setWidth(250),
        padding: EdgeInsets.all(8.0),
        decoration:BoxDecoration(
          color:Colors.white,
          border:Border(
            left: BorderSide(width:0.5,color:Colors.black12)
          )
        ),
        child: Column(
          children: <Widget>[
            Image.network(recommendList[index]['image']),
            Text('¥${recommendList[index]['mallPrice']}'),
            Text(
              '¥${recommendList[index]['price']}',
              style: TextStyle(
                decoration: TextDecoration.lineThrough,
                color:Colors.grey
              ),
            )
          ],
        ),
      ),
    );
}
4、横向列表组件的编写
横向列表组件也进行单独编写,以减少嵌套,这样我们就把每一个重要的部分都进行了分离。
Widget _recommedList(){

  return Container(
    height: ScreenUtil().setHeight(330),
    child: ListView.builder(
      scrollDirection: Axis.horizontal,
      itemCount: recommendList.length,
      itemBuilder: (context,index){
        return _item(index);
      },
    ),
  );
}
有了这三个基本组件,最后我们在build方法里进行组合,形成商品推荐区域。
@override
Widget build(BuildContext context) {
return Container(
   height: ScreenUtil().setHeight(380),
   margin: EdgeInsets.only(top: 10.0),
   child: Column(
     children: <Widget>[
       _titleWidget(),
       _recommedList()
     ],
   ),
);
}
5、整个组件的类代码如下
商品推荐
class Recommend extends StatelessWidget {
  final List  recommendList;

  Recommend({Key key, this.recommendList}) : super(key: key);

  @override
  Widget build(BuildContext context) {
    return Container(
       height: ScreenUtil().setHeight(380),
       margin: EdgeInsets.only(top: 10.0),
       child: Column(
         children: <Widget>[
           _titleWidget(),
           _recommedList()
         ],
       ),
    );
  }

推荐商品标题
  Widget _titleWidget(){
     return Container(
       alignment: Alignment.centerLeft,
       padding: EdgeInsets.fromLTRB(10.0, 2.0, 0,5.0),
       decoration: BoxDecoration(
         color:Colors.white,
         border: Border(
           bottom: BorderSide(width:0.5,color:Colors.black12)
         )
       ),
       child:Text(
         '商品推荐',
         style:TextStyle(color:Colors.pink)
         )
     );
  }

  Widget _recommedList(){

      return Container(
        height: ScreenUtil().setHeight(330),
        child: ListView.builder(
          scrollDirection: Axis.horizontal,
          itemCount: recommendList.length,
          itemBuilder: (context,index){
            return _item(index);
          },
        ),
      );
  }

  Widget _item(index){
    return InkWell(
      onTap: (){},
      child: Container(
        height: ScreenUtil().setHeight(330),
        width: ScreenUtil().setWidth(250),
        padding: EdgeInsets.all(8.0),
        decoration:BoxDecoration(
          color:Colors.white,
          border:Border(
            left: BorderSide(width:0.5,color:Colors.black12)
          )
        ),
        child: Column(
          children: <Widget>[
            Image.network(recommendList[index]['image']),
            Text('¥${recommendList[index]['mallPrice']}'),
            Text(
              '¥${recommendList[index]['price']}',
              style: TextStyle(
                decoration: TextDecoration.lineThrough,
                color:Colors.grey
              ),
            )
          ],
        ),
      ),
    );
  }
}
6、准备数据并进行调用
在 HomePage build 中继续添加:
List<Map> recommendList = (data['data']['recommend'] as List).cast();
 Recommend(recommendList:recommendList),
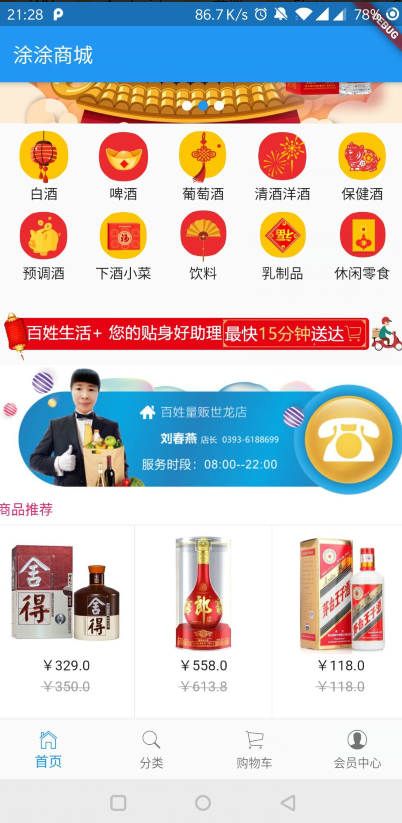
效果图:
15-Flutter移动电商实战-商品推荐区域制作的更多相关文章
- Flutter移动电商实战 --(15)商品推荐区域制作
1.推荐商品类的编写 这个类接收一个List参数,就是推荐商品的列表,这个列表是可以左右滚动的. /*商品推荐*/ class Recommend extends StatelessWidget { ...
- Flutter移动电商实战 --(1)项目学习记录
1.项目相关截图 2.项目知识点梳理图 Dio2.0: Dio是一个强大的 Dart Http 请求库,支持 Restful API.FormData.拦截器.请求取消等操作. Swiper: Swi ...
- Flutter移动电商实战 --(43)详细页_补充首页跳转到详细页
首页轮播点击到详细页 修改我们轮播这里的代码:SwiperDiy这个类这里的代码 return InkWell( onTap: (){ Application.router.navigateTo(co ...
- Flutter移动电商实战 --(51)购物车_Provide中添加商品
新加provide的cart.dart页面 引入三个文件.开始写provide类.provide需要用with 进行混入 从prefs里面获取到数据,判断有没有数据,如果有数据就返转正List< ...
- Flutter移动电商实战 --(37)路由_Fluro引入和商品详细页建立
https://github.com/theyakka/fluro pages/details_page.dart新建页面 使用路由 先添加路由插件的引用 fluro: ^1.4.0 如果网络上下载不 ...
- Flutter移动电商实战 --(33)列表页_子类和商品列表交互效果
主要实现点击小类下面的列表跟着切换 获取右侧下面的列表信息,即要传递大类的id也要传递小类的,所以需要把左侧的大类的id也要Provide化 可以看下网站上的接口说明: https://jspang. ...
- Flutter移动电商实战 --(28)列表页_商品列表后台接口调试
主要调试商品列表页的接口 这个接口是最难的因为有大类.小类还有上拉加载 先配置接口 config/service_url.dart //const serviceUrl='http://test.ba ...
- Flutter移动电商实战 --(53)购物车_商品列表UI框架布局
cart_page.dart 清空原来写的持久化的代码; 添加对应的引用,stless生成一个静态的类.建议始终静态的类,防止重复渲染 纠正个错误,上图的CartPage单词拼错了,这里改过来防止后面 ...
- Flutter移动电商实战 --(30)列表页_商品列表UI界面布局
小程序里面的布局方式 小程序的图片上这里使用的是warp布局,因为首页里面火爆专区,已经用过了warp来布局了. 所以这里我们没有必要再讲一遍,这里我们使用ListView,我们把它布局成下图这种形式 ...
随机推荐
- 爬虫 request payloa
小知识点: https://blog.csdn.net/zwq912318834/article/details/79930423
- Oracle的字串處理
Oracle的字串處理 除了寫程式之外,資料庫的應用也是蠻重要的,而SQL語法,用法大致相同,但各公司所出的資料庫還是有所差別,而ORACLE SQL給了相當多的函數應用,下面列了一些函法的名稱和用法 ...
- -透明度中百分比与十六进制的对应关系 MD
目录 目录 透明度中百分比与十六进制的对应关系 计算代码 对应关系表 Markdown版本笔记 我的GitHub首页 我的博客 我的微信 我的邮箱 MyAndroidBlogs baiqiantao ...
- WebService 与WebAPI的差异性
对于 WebService和 Web API这两个概念, WebService是一个广义的概念,既 包括采用 RPC的 SOAP WebService,也包括直接建立在 Web 上的非 SOAP We ...
- 从实践到原理,带你参透 gRPC
gRPC 在 Go 语言中大放异彩,越来越多的小伙伴在使用,最近也在公司安利了一波,希望这一篇文章能带你一览 gRPC 的巧妙之处,本文篇幅比较长,请做好阅读准备.本文目录如下: 简述 gRPC 是一 ...
- 2019 钢银java面试笔试题 (含面试题解析)
本人3年开发经验.18年年底开始跑路找工作,在互联网寒冬下成功拿到阿里巴巴.今日头条. 钢银等公司offer,岗位是Java后端开发,最终选择去了 钢银. 面试了很多家公司,感觉大部分公司考察的点都差 ...
- 通过创建一个简单的骰子游戏来探究 Python
在我的这系列的第一篇文章 中, 我已经讲解如何使用 Python 创建一个简单的.基于文本的骰子游戏.这次,我将展示如何使用 Python 模块 Pygame 来创建一个图形化游戏.它将需要几篇文章才 ...
- Java跳出多重循环的方法
我们一般用break和cuntinue来控制单个循环,但是如果遇到有多个循环的情况呢,比如下面这个: for (int i=0; i<10; i++) { for (int j=0; j< ...
- python day 21: HTML的基本元素及CSS
目录 python day 21 1. HTML 1.1 常见的HTML元素 python day 21 2019/11/02 学习资料来自老男孩与尚学堂 1. HTML 1.1 常见的HTML元素 ...
- 学习笔记之Slurm
Slurm Workload Manager - Overview https://slurm.schedmd.com/overview.html Slurm is an open source, f ...