【SpringBoot】SpringBoot的基础,全面理解bean的生命周期
前言
前段时间直接上手使用springboot开发了一个数据平台的后台部分,但是自身对于springboot的原理和过程还不是很清晰,所以反过来学习下springboot的基础。
大家都知道springboot是基于注解的,IOC和AOP是它的两大重要特性,然后AOP又是基于IOC来实现的。那么弄懂IOC就很有必要了。
IOC:控制反转,一种设计思想,它是Spring的核心。简单点说就是spring管理bean的容器。IOC容器一般具备两个基本功能:
1、通过描述管理Bean,包括发布和获取。
2、描述Bean之间的依赖关系。这两个问题深究下去是没有边界的,尤其是Bean之间的依赖关系,这个就是spring的核心。
从IOC的概念和功能就引申出了一个重要概念: Bean
本文将全方位介绍Spring Bean的生命周期
Spring Bean的简要流程:

如上图所示,在XML或者其他文件定义bean之后,spring通过注解的方式将bean传递到IOC容器,IOC容器将bean注册后给类class调用并实例化-构建,之后将bean放入到容器的缓冲池供程序调用。
从图片可以看到Spring Bean 在整个SpringBoot 项目中至关重要,它经过的路径如下:
- 实例化 【IOC容器寻找Bean的定义信息并将其实例化】
- 设置bean的Aware 【Aware意指能提前感知的,是spring的一个重要接口,使用依赖注入,spring按照Bean定义信息配置Bean的所有属性】
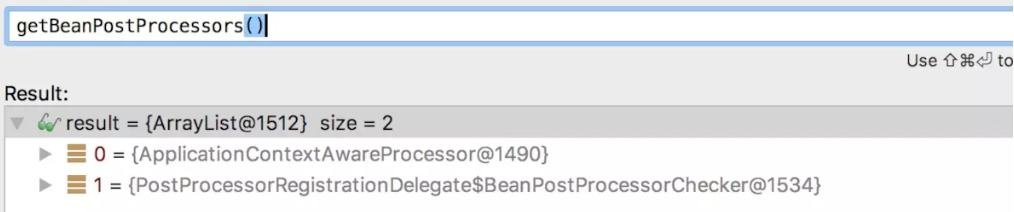
- BeanPostProcessor.postProcessBeforeInitialization(Object bean, String beanName) 【如果BeanPostProcessor和Bean关联,那么其postProcessBeforeInitialization()方法将被调用,Spring 框架会遍历得到容器中所有的 BeanPostProcessor ,挨个执行】
- InitializingBean.afterPorpertiesSet 【初始化bean, springboot读取properties文件的过程,默认的application.properties 还有其他方式】
- BeanPostProcessor.postProcessAfterInitialization(Object bean, String beanName) 【如果有BeanPostProcessor和Bean关联,那么其postProcessAfterInitialization()方法将被调用】
- SmartInitializingSingleton.afterSingletonsInstantiated
- SmartLifecycle.start
- 运行Bean
- SmartLifecycle.stop(Runnable callback)
- DisposableBean.destroy() 【销毁】
详细解释
1.实例化对应代码
【使用合适的初始化方案来创建一个新的bean实例,factory-method,构造器注入或者简单的直接实例化】
实例化策略类:
InstantiationStrategy
实例化具体方法:
AbstractAutowireCapableBeanFactory.createBeanInstance(String beanName, RootBeanDefinition mbd, Object[] args)
构造器注入:
@CompnentScan 【启动类】查找beans,结合@Autowired构造注入【Service层】
Factory Mothod方式也分两种, 分别是静态工厂方法 和 实例工厂方法。
1. 先创建一个汽车car类
public class Car {

    private int id;

    private String name;

    private int price;

    public int getId() {

        return id;

    }

    public void setId(int id) {

        this.id = id;

    }

    public String getName() {

        return name;

    }

    public void setName(String name) {

        this.name = name;

    }

    public int getPrice() {

        return price;

    }

    public void setPrice(int price) {

        this.price = price;

    }

    @Override

    public String toString() {

        return "Car [id=" + id + ", name=" + name + ", price=" + price + "]";

    }

  public Car(){

  }

    public Car(int id, String name, int price) {

        super();

        this.id = id;

        this.name = name;

        this.price = price;

    }

}
2. 定义一个工厂类 (定义了1个静态的bean 容器map. 然后提供1个静态方法根据Car 的id 来获取容器里的car对象。)
import java.util.HashMap;

import java.util.Map;

public class CarStaticFactory {

    private static Map<Integer, Car> map = new HashMap<Integer,Car>();

    static{

        map.put(1, new Car(1,"Honda",300000));

        map.put(2, new Car(2,"Audi",440000));

        map.put(3, new Car(3,"BMW",540000));

    }

    public static Car getCar(int id){

        return map.get(id);

    }

}
3. 定义配置XML (利用静态工厂方法定义的bean item种, class属性不在是bean的全类名, 而是静态工厂的全类名, 而且还需要指定工厂里的getBean 静态方法名字和参数)
  <!--

        Static Factory method:

        class: the class of Factory

        factory-method: method of get Bean Object

        constructor-arg: parameters of factory-method

     -->

    <bean id="bmwCar" class="com.home.factoryMethod.CarStaticFactory" factory-method="getCar">

        <constructor-arg value="3"></constructor-arg>

    </bean>

    <bean id="audiCar" class="com.home.factoryMethod.CarStaticFactory" factory-method="getCar">

        <constructor-arg value="2"></constructor-arg>

</bean>
4. 客户端调用factory-method的bean
public static void h(){

  ApplicationContext ctx = new ClassPathXmlApplicationContext("bean-factoryMethod.xml");

  Car car1 = (Car) ctx.getBean("bmwCar");

  System.out.println(car1);

  car1 = (Car) ctx.getBean("audiCar");

  System.out.println(car1);

}
2.设置bean的Aware
【InitializingBean.afterPorpertiesSet,BeanPostProcessor对bean的加工处理基本上在一块出现。】
设置Aware方法顺序:
- BeanNameAware
- BeanClassLoaderAware
- BeanFactoryAware
BeanPostProcessor.postProcessBeforeInitialization
ApplicationContextAwareProcessor也会设置Aware:
- EnvironmentAware
- EmbeddedValueResolverAware
- ResourceLoaderAware
- ApplicationEventPublisherAware
- MessageSourceAware
- ApplicationContextAware
调用afterpropertiesSet方法:位于AbstractAutowireCapableBeanFactory.invokeInitMethods(String beanName, final Object bean, RootBeanDefinition mbd)方法中
源码:
protected Object initializeBean(final String beanName, final Object bean, RootBeanDefinition mbd) {

      // 设置Aware

        if (System.getSecurityManager() != null) {

            AccessController.doPrivileged(new PrivilegedAction<Object>() {

                @Override

                public Object run() {

                    invokeAwareMethods(beanName, bean);

                    return null;

                }

            }, getAccessControlContext());

        }

        else {

            invokeAwareMethods(beanName, bean);

        }

      //BeanPostProcessor的postProcessBeforeInitialization

        Object wrappedBean = bean;

        if (mbd == null || !mbd.isSynthetic()) {

            wrappedBean = applyBeanPostProcessorsBeforeInitialization(wrappedBean, beanName);

        }

        try {

           //调用init方法,其判断是否是InitializingBean的实例,然后调用afterPropertiesSet

            invokeInitMethods(beanName, wrappedBean, mbd);

        }

        catch (Throwable ex) {

            throw new BeanCreationException(

                    (mbd != null ? mbd.getResourceDescription() : null),

                    beanName, "Invocation of init method failed", ex);

        }

      //BeanPostProcessor的postProcessAfterInitialization

        if (mbd == null || !mbd.isSynthetic()) {

            wrappedBean = applyBeanPostProcessorsAfterInitialization(wrappedBean, beanName);

        }

        return wrappedBean;

    }
3. SmartInitializingSingleton.afterSingletonsInstantiated的调用位置
@Override

    public void preInstantiateSingletons() throws BeansException {

        if (this.logger.isDebugEnabled()) {

            this.logger.debug("Pre-instantiating singletons in " + this);

        }

        // Iterate over a copy to allow for init methods which in turn register new bean definitions.

        // While this may not be part of the regular factory bootstrap, it does otherwise work fine.

        List<String> beanNames = new ArrayList<String>(this.beanDefinitionNames);

        // Trigger initialization of all non-lazy singleton beans...

        // 触发实例化所有的非懒加载的单例

        for (String beanName : beanNames) {

           ...

        }

        // Trigger post-initialization callback for all applicable beans...

        // 触发应用bean的post-initialization回调,也就是afterSingletonsInstantiated方法

        for (String beanName : beanNames) {

            Object singletonInstance = getSingleton(beanName);

            if (singletonInstance instanceof SmartInitializingSingleton) {

                final SmartInitializingSingleton smartSingleton = (SmartInitializingSingleton) singletonInstance;

                if (System.getSecurityManager() != null) {

                    AccessController.doPrivileged(new PrivilegedAction<Object>() {

                        @Override

                        public Object run() {

                            smartSingleton.afterSingletonsInstantiated();

                            return null;

                        }

                    }, getAccessControlContext());

                }

                else {

                    smartSingleton.afterSingletonsInstantiated();

                }

            }

        }

    }
4. SmartLifecycle.start
在ApplicationContext结束刷新finishRefresh时,getLifecycleProcessor().onRefresh();
判断bean是否为SmartLifecycle并且autoStartup。
位于:
DefaultLifecycleProcessor.onRefresh
5. stop方法
在Application.close的时候,调用getLifecycleProcessor().stop()方法仍然在DefaultLifecycleProcessor内部
6. DisposableBean.destroy方法
doCreateBean方法中会判断bean是否有销毁相关操作,实现了DisposableBean方法或定义了销毁方法。
AbstractAutowireCapableBeanFactory.doCreateBean(final String beanName, final RootBeanDefinition mbd, final Object[] args)
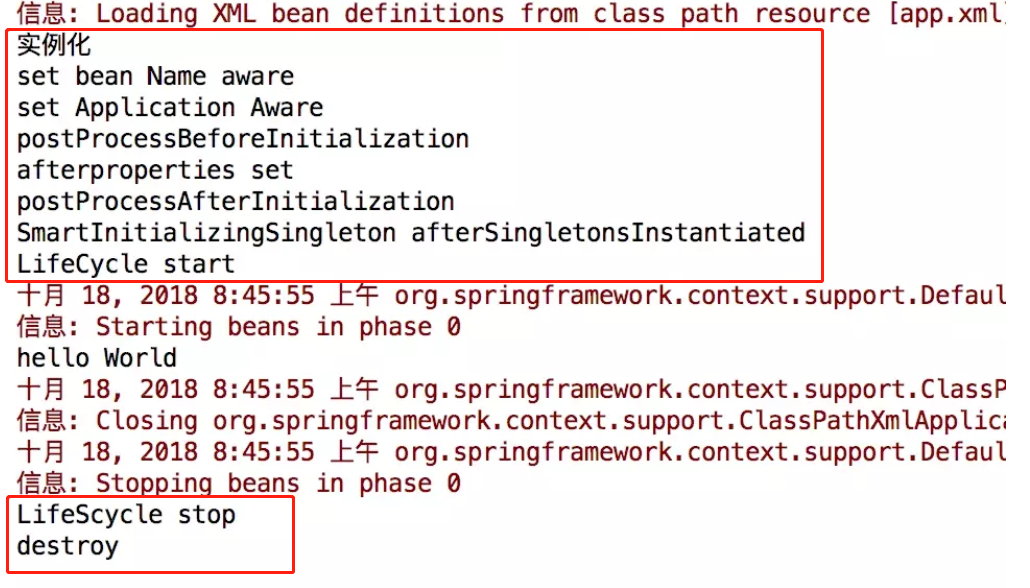
7. Bean 生命周期演示代码以及运行结果
public class HelloWorld implements SmartInitializingSingleton,SmartLifecycle,InitializingBean,

        DisposableBean,MyInterface,BeanNameAware,ApplicationContextAware

{

    private final Log logger = LogFactory.getLog(getClass());

    private boolean isRunning;

    public HelloWorld() {

        System.out.println("实例化");

    }

    public void sayHello(){

        System.out.println("hello World");

    }

    public void afterSingletonsInstantiated() {

        System.out.println("SmartInitializingSingleton afterSingletonsInstantiated");

    }

    public void start() {

        isRunning = true;

        System.out.println("LifeCycle start");

    }

    public void stop() {

        System.out.println("LifeCycle stop");

    }

    public boolean isRunning() {

        return isRunning;

    }

    public boolean isAutoStartup() {

        return true;

    }

    public void stop(Runnable callback) {

        System.out.println("LifeScycle stop");

        callback.run();

    }

    public int getPhase() {

        return 0;

    }

    public void afterPropertiesSet() throws Exception {

        System.out.println("afterproperties set");

    }

    public void destroy() throws Exception {

        System.out.println("destroy");

    }

    public void my(String str) {

        System.out.println(str);

    }

    public void setBeanName(String name) {

        System.out.println("set bean Name aware");

    }

    public void setApplicationContext(ApplicationContext applicationContext) throws BeansException {

        System.out.println("set Application Aware");

    }

}

//MyInterface接口

public interface MyInterface {

    void my(String str);

}

//app.xml

<?xml version="1.0" encoding="UTF-8"?>

<beans xmlns="http://www.springframework.org/schema/beans"

       xmlns:xsi="http://www.w3.org/2001/XMLSchema-instance"

       xsi:schemaLocation="http://www.springframework.org/schema/beans http://www.springframework.org/schema/beans/spring-beans.xsd">

    <bean id="porcessor" class="me.aihe.MyBeanPostProcessor" />

    <bean id="hello" class="me.aihe.HelloWorld">

    </bean>

</beans>

//SpringApp

public class SpringApp {

    public static void main(String[] args) {

        ClassPathXmlApplicationContext applicationContext = new ClassPathXmlApplicationContext("app.xml");

        HelloWorld hello = (HelloWorld) applicationContext.getBean("hello");

        hello.sayHello();

        applicationContext.close();

    }

}
总结:
Spring Bean 是整个Spring的基石,意义不言而喻,通过bean可以获取对象,实现容器,反射,简化配置,中间件,线程池等等。所以学习它非常有必要。
【SpringBoot】SpringBoot的基础,全面理解bean的生命周期的更多相关文章
- Spring 框架基础(02):Bean的生命周期,作用域,装配总结
本文源码:GitHub·点这里 || GitEE·点这里 一.装配方式 Bean的概念:Spring框架管理的应用程序中,由Spring容器负责创建,装配,设置属性,进而管理整个生命周期的对象,称为B ...
- Spring原理系列一:Spring Bean的生命周期
一.前言 在日常开发中,spring极大地简化了我们日常的开发工作.spring为我们管理好bean, 我们拿来就用.但是我们不应该只停留在使用层面,深究spring内部的原理,才能在使用时融汇贯通. ...
- Spring重点—— IOC 容器中 Bean 的生命周期
一.理解 Bean 的生命周期,对学习 Spring 的整个运行流程有极大的帮助. 二.在 IOC 容器中,Bean 的生命周期由 Spring IOC 容器进行管理. 三.在没有添加后置处理器的情况 ...
- IoC容器装配Bean(xml配置方式)(Bean的生命周期)
1.Spring管理Bean,实例化Bean对象 三种方式 第一种:使用类构造器实例化(默认无参数) package cn.itcast.spring.initbean; /** * 使用构造方法 实 ...
- 深究Spring中Bean的生命周期
前言 这其实是一道面试题,是我在面试百度的时候被问到的,当时没有答出来(因为自己真的很菜),后来在网上寻找答案,看到也是一头雾水,直到看到了<Spring in action>这本书,书上 ...
- spring框架中Bean的生命周期
一.Bean 的完整生命周期 在传统的Java应用中,bean的生命周期很简单,使用Java关键字 new 进行Bean 的实例化,然后该Bean 就能够使用了.一旦bean不再被使用,则由Java自 ...
- 通过BeanPostProcessor理解Spring中Bean的生命周期
通过BeanPostProcessor理解Spring中Bean的生命周期及AOP原理 Spring源码解析(十一)Spring扩展接口InstantiationAwareBeanPostProces ...
- (spring-第1回【IoC基础篇】)Spring容器中Bean的生命周期
日出日落,春去秋来,花随流水,北雁南飞,世间万物皆有生死轮回.从调用XML中的Bean配置信息,到应用到具体实例中,再到销毁,Bean也有属于它的生命周期. 人类大脑对图像的认知能力永远高于文字,因此 ...
- 深入理解Spring中bean的生命周期
[Spring中bean的生命周期] bean的生命周期 1.以ApplocationContext上下文单例模式装配bean为例,深入探讨bean的生命周期: (1).生命周期图: (2).具体事例 ...
随机推荐
- Item-Based Collaborative Recommender System
与User-Based Collaborative Recommender System认为‘类似的用户会对同一个item给出类似的打分’不同,Item-Based Collaborative Rec ...
- Visual Studio中把文件夹导入工程中
VS用到的功能还是太少,记录备忘. 有的时候需要把其他库的源码导入当前工程直接使用,而这个库是源码形式,又带很多目录的. 之前从没遇到过这种情况,自己的库目录自己新建,添加. 第三方库一般有单独的Pr ...
- 单击EasyUI的datagrid行时不选中
单击EasyUI的datagrid行时不选中,行背景色不变,点击选择框checkbox时选中该行 核心代码: $("#msgList").datagrid({ url ...
- HTML5--浏览器全屏操作、退出全屏、是否全屏
<!DOCTYPE html> <html lang="en"> <head> <meta charset="UTF-8&quo ...
- nodejs基础-nvm和npm
nvm npm 更新 npm install npm@latest -g 本地安装 npm install 包名称 require(”包名“) 全局安装 npm install 包名 -g 可以直接作 ...
- 18、NumPy——矩阵库(Matrix)
NumPy 矩阵库(Matrix) NumPy 中包含了一个矩阵库 numpy.matlib,该模块中的函数返回的是一个矩阵,而不是 ndarray 对象. 一个 的矩阵是一个由行(row)列(col ...
- 基于Zookeeper实现客户端动态监听服务器上下线
一.在具体实现之前,先来了解一下Zookeeper的监听器的原理: 图中Main()线程作为客户端,当在主线程中创建Zookeeper客户端时,会默认创建两个子线程:Listener和connect, ...
- StackExchange.Redis 使用LuaScript脚本模糊查询hash
原文:StackExchange.Redis 使用LuaScript脚本模糊查询hash 获取redis连接 public class RedisHelper { private static rea ...
- Java JNA (三)—— 结构体使用及简单示例
JNA简介 JNA全称Java Native Access,是一个建立在经典的JNI技术之上的Java开源框架(https://github.com/twall/jna).JNA提供一组Java工具类 ...
- 卷积神经网络CNN原理以及TensorFlow实现
在知乎上看到一段介绍卷积神经网络的文章,感觉讲的特别直观明了,我整理了一下.首先介绍原理部分. [透析] 卷积神经网络CNN究竟是怎样一步一步工作的? 通过一个图像分类问题介绍卷积神经网络是如何工作的 ...