
Python 通过wmi获取Window服务器硬件信息
通过pip install wmi安装wmi
查看cpu序列号:
wmic cpu get processorid

查看主板序列号:
wmic baseboard get serialnumber

查看网卡信息:
wmic nicconfig get macaddress
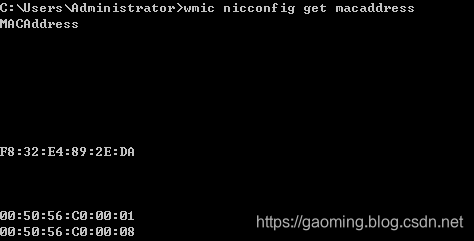
通过Python获取
#!/usr/bin/env python

# -*- coding: utf-8 -*-

import os, sys

import wmi

c = wmi.WMI()

# 处理器

def printCPU():

    tmpdict = {}

    tmpdict["CpuCores"] = 0

    for cpu in c.Win32_Processor():

        tmpdict["cpuid"] = cpu.ProcessorId.strip()

        tmpdict["CpuType"] = cpu.Name

        tmpdict['systemName'] = cpu.SystemName

        try:

            tmpdict["CpuCores"] = cpu.NumberOfCores

        except:

            tmpdict["CpuCores"] += 1

        tmpdict["CpuClock"] = cpu.MaxClockSpeed

        tmpdict['DataWidth'] = cpu.DataWidth

    print (tmpdict)

    return  tmpdict

# 主板

def printMain_board():

    boards = []

    # print len(c.Win32_BaseBoard()):

    for board_id in c.Win32_BaseBoard():

        tmpmsg = {}

        tmpmsg['UUID'] = board_id.qualifiers['UUID'][1:-1]  # 主板UUID,有的主板这部分信息取到为空值,ffffff-ffffff这样的

        tmpmsg['SerialNumber'] = board_id.SerialNumber  # 主板序列号

        tmpmsg['Manufacturer'] = board_id.Manufacturer  # 主板生产品牌厂家

        tmpmsg['Product'] = board_id.Product  # 主板型号

        boards.append(tmpmsg)

    print (boards)

    return boards

# BIOS

def printBIOS():

    bioss = []

    for bios_id in c.Win32_BIOS():

        tmpmsg = {}

        tmpmsg['BiosCharacteristics'] = bios_id.BiosCharacteristics  # BIOS特征码

        tmpmsg['version'] = bios_id.Version  # BIOS版本

        tmpmsg['Manufacturer'] = bios_id.Manufacturer.strip()  # BIOS固件生产厂家

        tmpmsg['ReleaseDate'] = bios_id.ReleaseDate  # BIOS释放日期

        tmpmsg['SMBIOSBIOSVersion'] = bios_id.SMBIOSBIOSVersion  # 系统管理规范版本

        bioss.append(tmpmsg)

    print (bioss)

    return bioss

# 硬盘

def printDisk():

    disks = []

    for disk in c.Win32_DiskDrive():

        # print disk.__dict__

        tmpmsg = {}

        tmpmsg['SerialNumber'] = disk.SerialNumber.strip()

        tmpmsg['DeviceID'] = disk.DeviceID

        tmpmsg['Caption'] = disk.Caption

        tmpmsg['Size'] = disk.Size

        tmpmsg['UUID'] = disk.qualifiers['UUID'][1:-1]

        disks.append(tmpmsg)

    for d in disks:

        print (d)

    return disks

# 内存

def printPhysicalMemory():

    memorys = []

    for mem in c.Win32_PhysicalMemory():

        tmpmsg = {}

        tmpmsg['UUID'] = mem.qualifiers['UUID'][1:-1]

        tmpmsg['BankLabel'] = mem.BankLabel

        tmpmsg['SerialNumber'] = mem.SerialNumber.strip()

        # tmpmsg['ConfiguredClockSpeed'] = mem.ConfiguredClockSpeed

        tmpmsg['Capacity'] = mem.Capacity

        # tmpmsg['ConfiguredVoltage'] = mem.ConfiguredVoltage

        memorys.append(tmpmsg)

    for m in memorys:

        print (m)

    return memorys

# 电池信息,只有笔记本才会有电池选项

def printBattery():

    isBatterys = False

    for b in c.Win32_Battery():

        isBatterys = True

    return isBatterys

# 网卡mac地址:

def printMacAddress():

    macs = []

    for n in  c.Win32_NetworkAdapter():

        mactmp = n.MACAddress

        if mactmp and len(mactmp.strip()) > 5:

            tmpmsg = {}

            tmpmsg['MACAddress'] = n.MACAddress

            tmpmsg['Name'] = n.Name

            tmpmsg['DeviceID'] = n.DeviceID

            tmpmsg['AdapterType'] = n.AdapterType

            tmpmsg['Speed'] = n.Speed

            macs.append(tmpmsg)

    print (macs)

    return macs

def main():

    printCPU()

    printMain_board()

    printBIOS()

    printDisk()

    printPhysicalMemory()

    printMacAddress()

    printBattery()

if __name__ == '__main__':

    main()

Python 通过wmi获取Window服务器硬件信息的更多相关文章
- Python使用wmi获取Windows相关信息
在使用Python获取Windows系统上的相关的信息可以使用WMI接口来获取, 什么是wmi? WMI是一项核心的Windows管理技术,WMI作为一种规范和基础结构,通过它可以访问.配置.管理和监 ...
- Python 通过dmidecode获取Linux服务器硬件信息
通过 dmidecode 命令可以获取到 Linux 系统的包括 BIOS. CPU.内存等系统的硬件信息,这里使用 python 代码来通过调用 dmidecode 命令来获取 Linux 必要的系 ...
- 通过wmi获取本地硬件信息的一些疑问。
通过wmi获取本地硬件信息的一些疑问. http://bbs.csdn.net/topics/391017789 http://blog.csdn.net/xcntime/article/detail ...
- 用PYTHON + PYWIN32 + WMI获取WINDOWS系统基本信息
网上原码,去了DECODE编码的问题. PyScripter这个PYTHON的IDE工具在WIN下表现不错哟. 感觉比SPYDER,ERIC,SUBLEME TEXT3之类的好用呀.. #!/usr/ ...
- 利用python 与 wmi 获取WINDOWS基本信息
#!/usr/bin/env python3.5 # -*- coding:utf8 -*- import platform import subprocess import wmi def serv ...
- Python基础:获取平台相关信息
Windows 10家庭中文版,Python 3.6.4, 本文介绍了使用os.platform.sys三个模块获取Python程序的运行平台相关的信息. os模块:提供 各种各样的操作系统接口 os ...
- C++ WMI获取系统硬件信息(CPU/DISK/NetWork etc)
官网找到一个例子,根据例子修改下可以获取很多信息 #define _WIN32_DCOM #include <iostream> using namespace std; #include ...
- python开发_platform_获取操作系统详细信息工具
''' python中,platform模块给我们提供了很多方法去获取操作系统的信息 如: import platform platform.platform() #获取操作系统名称及版本号,'Win ...
- c# WMI获取机器硬件信息(硬盘,cpu,内存等)
using System; using System.Collections.Generic; using System.Globalization; using System.Management; ...
随机推荐
- React 项目 ant design 的 CheckboxGroup 验证
使用 ant design 提供的 getFieldDecorator 进行验证 一般开始使用默认选中 <FormItem> {getFieldDecorator('checkProtoc ...
- C# walls
在学习C#的阶段中,我们一点一点的往前爬, 此代码需要添加selenium ,和 获取 引用. using Ivony.Html.Parser; using Ivony.Html; using Ope ...
- mybatis 注解方式插入,主键由uuid函数生成
@SelectKey(keyProperty = "record.id", resultType = String.class, before = true, statement ...
- Java synchronized到底锁住的是什么?
使用环境:多线程java程序中. 作用:在多线程的环境下,控制synchronized代码段不被多个线程同时执行.synchronized既可以加在一段代码上,也可以加在方法上. 使用:synchro ...
- frewalld假端口
之前服务器没有开启firewalld,上面有lnmp.zabbix服务,后来开启了防火墙,发现端口都在,但是不能访问zabbix,后来用firewalld把端口重新开启.重新加载后才可以访问,这就是f ...
- 一文学会Go - 2 数据结构与算法实践篇
练习:使用go语言实现冒泡排序和归并排序 冒泡排序是所有排序算法中最简单的,练习时先实现它: func bubbleSort(array []int) { n := len(array) ; j &l ...
- 浅谈CSS的模块化
一.简介 Web前端模块化:HTML模块化.CSS模块化以及JS模块化三个部分: 二.CSS模块化背景 对于小型项目来说,css的量还不至于庞大,问题没有凸显,而如果要开发和持续维护一个较为大型的项目 ...
- vue封装一些常用组件loading、switch、progress
vue封装一些常用组件loading.switch.progress github文档https://github.com/zengjielin/vue-component-library loadi ...
- 20191106 Spring Boot官方文档学习(1-2)
学习内容相关信息 最新版本:2.2.0 CURRENT GA 官网地址 官方文档地址 单页版文档地址 代码生成网址 2.入门 Spring Boot的主要目标是: 为所有Spring开发提供更快且入门 ...
- nginx rewrite + 排错方法 + server_name 172.19.134.43
upstream space.two.cn { ip_hash; #ip hash:每个请求按访问ip的hash结果分配,这样每个访客固定访问一个后端服务器,可以解决session的问题. serve ...