
第三十五篇-AppBarLayout的使用
效果图:

添加appbarlayout到xml文件中,然后在toolbar下面添加一个imageview并设置居中放置,我放置的是上面那个安卓的图标。

根据之前学过的toolbar那一节,结合viewpaper和toolbar设置三个页面,这时,运行程序,可能发现那三个页面并没有显示出来,NetedScollView这是个可滚动的页面,单击它,在右侧勾选fillViewport。在运行程序就可以显示页面了。
page1

page2

page3
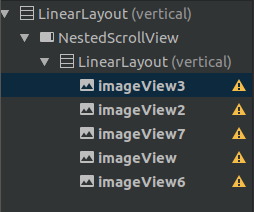
附上代码
main.java
package com.example.aimee.appbarlayouttest;

import android.support.annotation.Nullable;

import android.support.design.widget.TabLayout;

import android.support.v4.app.Fragment;

import android.support.v4.app.FragmentManager;

import android.support.v4.app.FragmentPagerAdapter;

import android.support.v4.view.ViewPager;

import android.support.v7.app.AppCompatActivity;

import android.os.Bundle;

import java.util.ArrayList;

import java.util.List;

public class MainActivity extends AppCompatActivity {

    TabLayout tabLayout;

    ViewPager viewPager;

    List<Fragment>fragments;

    String[] title={"新闻","财经","娱乐"};

    @Override

    protected void onCreate(Bundle savedInstanceState) {

        super.onCreate(savedInstanceState);

        setContentView(R.layout.activity_main);

        tabLayout=findViewById(R.id.tabs);

        viewPager=findViewById(R.id.viewpaper);

        fragments=new ArrayList<>();

        fragments.add(new MyFragment1());

        fragments.add(new MyFragment2());

        fragments.add(new MyFragment3());

        MyAdpter myAdpter=new MyAdpter(getSupportFragmentManager(),fragments);

        viewPager.setAdapter(myAdpter);

        tabLayout.setupWithViewPager(viewPager);

    }

    private class MyAdpter extends FragmentPagerAdapter{

        private List<Fragment>fragments;

        public MyAdpter(FragmentManager fm,List<Fragment>fragments) {

            super(fm);

            this.fragments=fragments;

        }

        @Override

        public Fragment getItem(int position) {

            return fragments.get(position);

        }

        @Override

        public int getCount() {

            return fragments.size();

        }

        @Nullable

        @Override

        public CharSequence getPageTitle(int position) {

            return title[position];

        }

    }

}
MyFragment1.java
package com.example.aimee.appbarlayouttest;

import android.os.Bundle;

import android.support.annotation.NonNull;

import android.support.annotation.Nullable;

import android.support.v4.app.Fragment;

import android.view.LayoutInflater;

import android.view.View;

import android.view.ViewGroup;

public class MyFragment1 extends Fragment {

    @Nullable

    @Override

    public View onCreateView(@NonNull LayoutInflater inflater, @Nullable ViewGroup container, @Nullable Bundle savedInstanceState) {

        View view1=inflater.inflate(R.layout.layout_page1,container,false);

        return view1;

    }

}
MyFragment2.java
package com.example.aimee.appbarlayouttest;

import android.os.Bundle;

import android.support.annotation.NonNull;

import android.support.annotation.Nullable;

import android.support.v4.app.Fragment;

import android.view.LayoutInflater;

import android.view.View;

import android.view.ViewGroup;

public class MyFragment2 extends Fragment {

    @Nullable

    @Override

    public View onCreateView(@NonNull LayoutInflater inflater, @Nullable ViewGroup container, @Nullable Bundle savedInstanceState) {

        View view1=inflater.inflate(R.layout.layout_page2,container,false);

        return view1;

    }

}
MyFragment3.java
package com.example.aimee.appbarlayouttest;

import android.os.Bundle;

import android.support.annotation.NonNull;

import android.support.annotation.Nullable;

import android.support.v4.app.Fragment;

import android.view.LayoutInflater;

import android.view.View;

import android.view.ViewGroup;

public class MyFragment3 extends Fragment {

    @Nullable

    @Override

    public View onCreateView(@NonNull LayoutInflater inflater, @Nullable ViewGroup container, @Nullable Bundle savedInstanceState) {

        View view1=inflater.inflate(R.layout.layout_page3,container,false);

        return view1;

    }

}
main.xml
<?xml version="1.0" encoding="utf-8"?>

<android.support.design.widget.CoordinatorLayout xmlns:android="http://schemas.android.com/apk/res/android"

    xmlns:tools="http://schemas.android.com/tools"

    xmlns:app="http://schemas.android.com/apk/res-auto"

    android:layout_width="match_parent"

    android:layout_height="match_parent">

    <android.support.design.widget.AppBarLayout

        android:id="@+id/appbar"

        android:layout_height="wrap_content"

        android:layout_width="match_parent">

        <android.support.v7.widget.Toolbar

            android:gravity="center"

            android:layout_height="?attr/actionBarSize"

            android:layout_width="match_parent"

            app:layout_scrollFlags="scroll|enterAlways">

            <ImageView

                android:src="@mipmap/ic_launcher"

                android:layout_width="match_parent"

                android:layout_height="wrap_content" />

        </android.support.v7.widget.Toolbar>

        <android.support.design.widget.TabLayout

            android:id="@+id/tabs"

            android:layout_width="match_parent"

            android:layout_height="wrap_content"

            app:layout_scrollFlags="scroll|enterAlways"

            app:tabMode="scrollable">

            <android.support.design.widget.TabItem

                android:layout_height="wrap_content"

                android:layout_width="wrap_content"

                android:text="Tab1" />

            <android.support.design.widget.TabItem

                android:layout_height="wrap_content"

                android:layout_width="wrap_content"

                android:text="Tab2" />

            <android.support.design.widget.TabItem

                android:layout_height="wrap_content"

                android:layout_width="wrap_content"

                android:text="Tab3" />

        </android.support.design.widget.TabLayout>

    </android.support.design.widget.AppBarLayout>

    <android.support.v4.widget.NestedScrollView

        android:layout_width="match_parent"

        android:layout_height="match_parent"

        android:fillViewport="true"

        app:layout_behavior="android.support.design.widget.AppBarLayout$ScrollingViewBehavior">

        <android.support.constraint.ConstraintLayout

            android:layout_width="match_parent"

            android:layout_height="match_parent"

            tools:context=".MainActivity">

            <android.support.v4.view.ViewPager

                android:id="@+id/viewpaper"

                android:layout_width="match_parent"

                android:layout_height="0dp" />

        </android.support.constraint.ConstraintLayout>

    </android.support.v4.widget.NestedScrollView>

</android.support.design.widget.CoordinatorLayout>
layout_page1.xml
<?xml version="1.0" encoding="utf-8"?>

<LinearLayout xmlns:android="http://schemas.android.com/apk/res/android"

    android:layout_width="match_parent"

    android:layout_height="match_parent"

    android:gravity="center"

    android:orientation="vertical">

    <TextView

        android:id="@+id/textView2"

        android:layout_width="wrap_content"

        android:layout_height="wrap_content"

        android:text="TextView" />

</LinearLayout>
layout_page2.xml
<?xml version="1.0" encoding="utf-8"?>

<LinearLayout xmlns:android="http://schemas.android.com/apk/res/android"

    android:layout_width="match_parent"

    android:layout_height="match_parent"

    android:orientation="vertical">

    <Button

        android:id="@+id/button"

        android:layout_width="match_parent"

        android:layout_height="wrap_content"

        android:text="Button" />

    <Button

        android:id="@+id/button2"

        android:layout_width="match_parent"

        android:layout_height="wrap_content"

        android:text="Button" />

</LinearLayout>
layout_page3.xml
<?xml version="1.0" encoding="utf-8"?>

<LinearLayout xmlns:android="http://schemas.android.com/apk/res/android"

    xmlns:app="http://schemas.android.com/apk/res-auto"

    android:layout_width="match_parent"

    android:gravity="center"

    android:layout_height="match_parent"

    android:orientation="vertical">

    <android.support.v4.widget.NestedScrollView

        android:layout_width="match_parent"

        android:layout_height="match_parent"

        android:fillViewport="true">

        <LinearLayout

            android:layout_width="match_parent"

            android:layout_height="wrap_content"

            android:orientation="vertical" >

            <ImageView

                android:scaleType="fitXY"

                android:id="@+id/imageView3"

                android:layout_width="match_parent"

                android:layout_height="wrap_content"

                app:srcCompat="@drawable/a3" />

            <ImageView

                android:scaleType="fitXY"

                android:id="@+id/imageView2"

                android:layout_width="match_parent"

                android:layout_height="wrap_content"

                app:srcCompat="@drawable/a1" />

            <ImageView

                android:scaleType="fitXY"

                android:id="@+id/imageView7"

                android:layout_width="match_parent"

                android:layout_height="wrap_content"

                app:srcCompat="@drawable/a2" />

            <ImageView

                android:scaleType="fitXY"

                android:id="@+id/imageView"

                android:layout_width="match_parent"

                android:layout_height="wrap_content"

                app:srcCompat="@drawable/a5" />

            <ImageView

                android:scaleType="fitXY"

                android:id="@+id/imageView6"

                android:layout_width="match_parent"

                android:layout_height="wrap_content"

                app:srcCompat="@drawable/a4" />

        </LinearLayout>

    </android.support.v4.widget.NestedScrollView>

</LinearLayout>
注:图片放在drawable下面。
第三十五篇-AppBarLayout的使用的更多相关文章
- Android UI开发第三十五篇——AppCompat实现Action Bar
每一位Android开发者对Action Bar这种设计都不陌生了,毕竟它已经发布了至少两年了.Android团队发布Action Bar设计规范时同时放出了ActionBar的Api来支持这种设计. ...
- Python之路(第三十五篇) 并发编程:操作系统的发展史、操作系统的作用
一.操作系统发展史 第一阶段:手工操作 —— 真空管和穿孔卡片 第一代之前人类是想用机械取代人力,第一代计算机的产生是计算机由机械时代进入电子时代的标志,从Babbage失败之后一直到第二次世界大 ...
- 第三十五篇 类的内置属性(attr属性),包装和授权,__getattr__
双下划线开头的attr方法,都是类内置的方法. 一. 如果没有在类里定义这三个方法,调用的时候就调用类内置的默认的方法 class Too: pass # 类没有定义这三个属性,就用系统默认的方法 t ...
- 第三十五篇 入门机器学习——Juptyer Notebook中的常用快捷键
1.运行当前Cell:Ctrl + Enter 2.运行当前Cell并在其下方插入一个新的Cell:Alt + Enter 3.运行当前Cell并选中其下方的Cell:Shift + ...
- C++第三十五篇 -- 写第一个驱动开发程序
VS2017+WDK+VMware12+Win10环境配置完毕,接下来写第一个驱动程序. 1.新建一个KMDF的程序. 2.配置项目属性. 3.编译项目.一般这里应该成功,我一台电脑成功了,另一台电脑 ...
- 第三十五篇:vue3,(组合式api的初步理解)
好家伙, 来一波核心概念:数据劫持是响应式的核心 1.由set up开始 (1)vue3中的一个新的配置项,值为一个函数. (2)组件中所用的到的:数据,方法,计算属性均要配置在set up中. (3 ...
- Android UI开发第三十九篇——Tab界面实现汇总及比较
Tab布局是iOS的经典布局,Android应用中也有大量应用,前面也写过Android中TAb的实现,<Android UI开发第十八篇——ActivityGroup实现tab功能>.这 ...
- JAVA之旅(三十五)——完结篇,终于把JAVA写完了,真感概呐!
JAVA之旅(三十五)--完结篇,终于把JAVA写完了,真感概呐! 这篇博文只是用来水经验的,写这个系列是因为我自己的java本身也不是特别好,所以重温了一下,但是手比较痒于是就写出了这三十多篇博客了 ...
- 《手把手教你》系列技巧篇(三十五)-java+ selenium自动化测试-单选和多选按钮操作-下篇(详解教程)
1.简介 今天这一篇宏哥主要是讲解一下,如何使用list容器来遍历多选按钮.大致两部分内容:一部分是宏哥在本地弄的一个小demo,另一部分,宏哥是利用JQueryUI网站里的多选按钮进行实战. 2.d ...
随机推荐
- python爬虫之win7Mongod安装使用
1.下载地址:https://www.mongodb.com/download-center#community 下载完成以后下一步下一步安装. 安装路径 还需要建立一个数据库存储位置C:\mongo ...
- 集合之TreeMap(含JDK1.8源码分析)
一.前言 前面所说的hashMap和linkedHashMap都不具备统计的功能,或者说它们的统计性能的时间复杂度都不是很好,要想对两者进行统计,需要遍历所有的entry,时间复杂度比较高,此时,我们 ...
- DBX error:Driver could not be properly initialized .... 解决办法
系统: win7 64位+ MySql 将libmysql.dll和Dbxmys.dll 拷到 C:\Windows\SysWOW64 目录. ( 64位系统) 32位则拷到 c:\wind ...
- tomcat 和jboss区别
参考http://blog.csdn.net/sz_bdqn/article/details/6762175
- MyISAM索引和InnoDB索引的区别
首先你要知道: 无论是Myisam和Innodb引擎,如果在建表的时候没有显示的定义一行主键列的话,他内部都会自动创建一个隐藏的主键索引: 主键索引以外的索引假设称为次索引:首先Myisam和Inno ...
- How to flash Havoc on enchilada
update fastboot and adb fastboot oem unlock adb debug enchilada reboot to fastboot fastboot devices ...
- Calendar代替Date常用方法小记
业务逻辑中遇到日期的相关操作,整理一下小做总结 日期操作离不开 java.util.Calendar 和 java.util.Date ,实体类中日期字段设计也可能用到java.sql.Date.但目 ...
- HDU 4344-Mark the Rope-大数素因子分解
注意只有一个素因子的情况. #include <cstdio> #include <algorithm> #include <cstring> using name ...
- 基准对象object中的基础类型----数字 (二)
object有如下子类: CLASSES object basestring str unicode buffer bytearray classmethod complex dict enumera ...
- git 提交报错 : The file will have its original line endings in your working directory.
报错现象 git add . 的时候发现此报错 报错分析 看情况应该是不同系统对换行的识别不到位导致的 就常识来说文件是在windows下生成的所以换行和 linux 确实不同可能是因为这个导致的 ...