
rabbitMQ模式
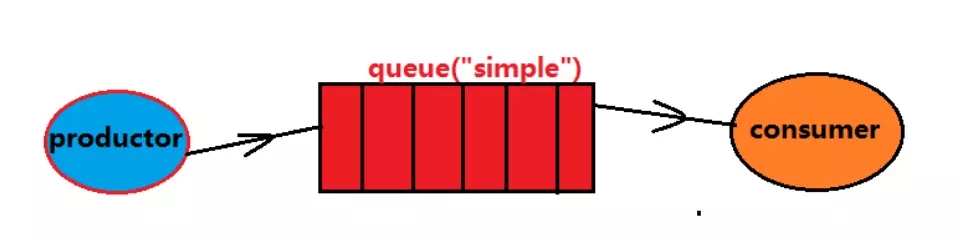
消费者监听队列,如果队列中有消息,就消费掉,消息被拿走后,自动从队列删除
(隐患,消息可能没有被消费者正确处理,已经消失了,无法恢复)
应用场景:聊天室
案例:
1>.首先准备依赖
<dependency>
     <groupId>org.springframework.boot</groupId>
     <artifactId>spring-boot-starter-amqp</artifactId>
</dependency>
2>.写一个test类
public class SimpleTest {
   //模拟生产者将消息放入队列
   @Test
   public void send() throws Exception{
       /*1 创建连接工厂
        * 2 配置共创config
        * 3 获取连接
        * 4获取信道
        * 5 从信道声明queue
        * 6 发送消息
        * 7 释放资源
        */
       ConnectionFactory factory=new ConnectionFactory();
       factory.setHost("106.23.34.56");
       factory.setPort(5672);
       factory.setVirtualHost("/tb");
       factory.setUsername("admin");
       factory.setPassword("123456");
       //从工厂获取连接
       Connection conn=factory.newConnection();
       //从连接获取信道
       Channel chan=conn.createChannel();
       //利用channel声明第一个队列
       chan.queueDeclare("simple", false, false, false, null);
       //queue String类型,表示声明的queue对列的名字
       //durable Boolean类型,表示是否持久化
       //exclusive Boolean类型:当前声明的queue是否专注;true当前连接创建的
       //任何channle都可以连接这个queue,false,新的channel不可使用
       //autoDelete Boolean类型:在最后连接使用完成后,是否删除队列,false
       //arguments Map类型,其他声明参数
       //发送消息
       String msg="helloworld,nihaoa";
       chan.basicPublish("", "simple", null, msg.getBytes());
       //exchange String类型,交换机名称,简单模式使用默认交换""
       //routingkey String类型,当前的消息绑定的routingkey,简单模式下,与队列同名即可
       //props BasicProperties类型,消息的属性字段对象,例如BasicProperties
       //可以设置一个deliveryMode的值0 持久化,1 表示不持久化,durable配合使用
       //body byte[] :消息字符串的byte数组
   }
   //模拟消费端
   @Test
   public void receive() throws Exception{
ConnectionFactory factory=new ConnectionFactory();
factory.setHost("106.23.34.56");
factory.setPort(5672);
factory.setVirtualHost("/tb");
factory.setUsername("admin");
factory.setPassword("123456");
//从工厂获取连接Connection conn=factory.newConnection();//从连接获取信道Channel chan=conn.createChannel();chan.queueDeclare("simple", false, false, false, null);//创建一个消费者QueueingConsumer consumer= new QueueingConsumer(chan);chan.basicConsume("simple", consumer);//监听队列while(true){//获取下一个delivery,delivery从队列获取消息Delivery delivery = consumer.nextDelivery();String msg=new String(delivery.getBody());System.out.println(msg);}}}
2.work模式
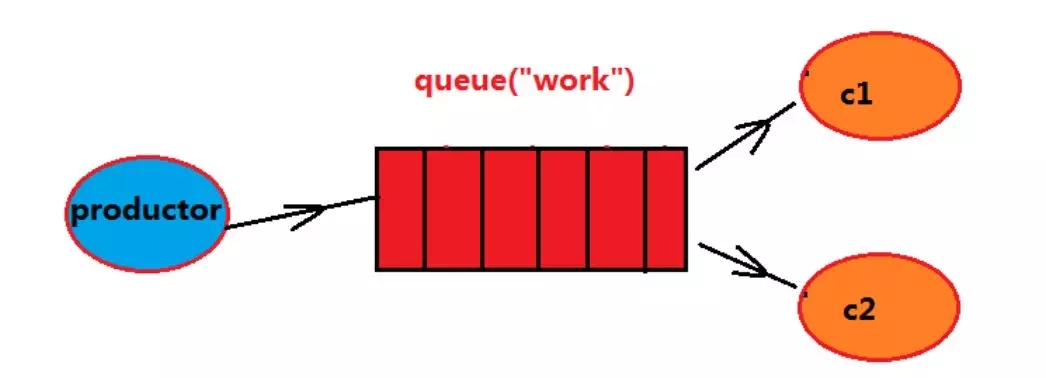
生产者将消息放入队列
多个消费者同时监听同一个队列,消息如何被消费?
C1,C2共同争抢当前消息队列的内容,谁先拿到消息,谁来负责消费
应用场景:红包;大型项目中的资源调度过程(直接由最空闲的系统争抢到资源处理任务)
案例:
1>首先写一个工具类
public class ConnectionUtil {

 public static Connection getConn(){
   try{
     ConnectionFactory factory=new ConnectionFactory();
     factory.setHost("106.33.44.179");
     factory.setPort(5672);
     factory.setVirtualHost("/tb");
     factory.setUsername("admin");
     factory.setPassword("123456");

     //从工厂获取连接
     Connection conn=factory.newConnection();
     return conn;
   }catch(Exception e){
     System.out.println(e.getMessage());
     return null;
   }

 }
}
2>写test类
public class WorkTest {
 @Test
 public void send() throws Exception{
   //获取连接
   Connection conn = ConnectionUtil.getConn();
   Channel chan = conn.createChannel();
   //声明队列
   chan.queueDeclare("work", false, false, false, null);
   for(int i=0;i<100;i++){
     String msg="1712,hello:"+i+"message";
     chan.basicPublish("", "work", null, msg.getBytes());
     System.out.println("第"+i+"条信息已经发送");
   }
   chan.close();
   conn.close();
 }
 @Test
 public void receive1() throws Exception{
   //获取连接,获取信道
   Connection conn = ConnectionUtil.getConn();
   Channel chan = conn.createChannel();
   chan.queueDeclare("work", false, false, false, null);
   //同一时刻服务器只发送一条消息给同一消费者,消费者空闲,才发送一条
   chan.basicQos(1);
   //定义消费者
   QueueingConsumer consumer=new QueueingConsumer(chan);
   //绑定队列和消费者的关系
   //queue
   //autoAck:消息被消费后,是否自动确认回执,如果false,不自动需要手动在
   //完成消息消费后进行回执确认,channel.ack,channel.nack
   //callback
   //chan.basicConsume(queue, autoAck, callback)
   chan.basicConsume("work", false, consumer);
   //监听
   while(true){
     Delivery delivery=consumer.nextDelivery();
     byte[] result = delivery.getBody();
     String msg=new String(result);
     System.out.println("接受到:"+msg);
     Thread.sleep(50);
     //返回服务器,回执
     chan.basicAck(delivery.getEnvelope().getDeliveryTag(), false);
   }
 }
 @Test
 public void receive2() throws Exception{
   //获取连接,获取信道
   Connection conn = ConnectionUtil.getConn();
   Channel chan = conn.createChannel();
   chan.queueDeclare("work", false, false, false, null);
   //同一时刻服务器只发送一条消息给同一消费者,消费者空闲,才发送一条
   chan.basicQos(1);
   //定义消费者
   QueueingConsumer consumer=new QueueingConsumer(chan);
   //绑定队列和消费者的关系
   //queue
   //autoAck:消息被消费后,是否自动确认回执,如果false,不自动需要手动在
   //完成消息消费后进行回执确认,channel.ack,channel.nack
   //callback
   //chan.basicConsume(queue, autoAck, callback)
   chan.basicConsume("work", false, consumer);
   //监听
   while(true){
     Delivery delivery=consumer.nextDelivery();
     byte[] result = delivery.getBody();
     String msg=new String(result);
     System.out.println("接受到:"+msg);
     Thread.sleep(150);
     //返回服务器,回执
     chan.basicAck(delivery.getEnvelope().getDeliveryTag(), false);
   }
 }

}
3 publish/fanout发布订阅
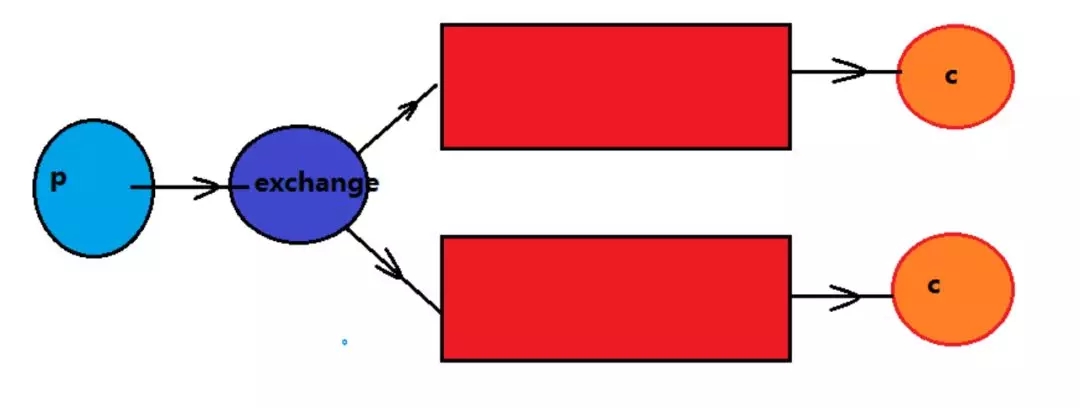
生产者将消息交给交换机
有交换机根据发布订阅的模式设定将消息同步到所有的绑定队列中;
后端的消费者都能拿到消息
应用场景:邮件群发,群聊天,广告
案例:
public class FanoutTest {
 //交换机,有类型,发布订阅:fanout
 //路由模式:direct
 //主题模式:topic
 @Test
 public void send() throws Exception {
   //获取连接
   Connection conn = ConnectionUtil.getConn();
   Channel chan = conn.createChannel();
   //声明交换机
   //参数意义,1 交换机名称,2 类型:fanout,direct,topic
   chan.exchangeDeclare("fanoutEx", "fanout");
   //发送消息
   for(int i=0;i<100;i++){
     String msg="1712 hello:"+i+"msg";
     chan.basicPublish("fanoutEx", "", null, msg.getBytes());
     System.out.println("第"+i+"条信息已经发送");
   }
 }

 @Test
 public void receiv01() throws Exception{
   //获取连接
   Connection conn = ConnectionUtil.getConn();
   Channel chan = conn.createChannel();
   //生命队列
   chan.queueDeclare("fanout01", false, false, false, null);
   //声明交换机
   chan.exchangeDeclare("fanoutEx", "fanout");
   //绑定队列到交换机
   //参数 1 队列名称,2 交换机名称 3 路由key
   chan.queueBind("fanout01", "fanoutEx", "");
   chan.basicQos(1);
   //定义消费者
   QueueingConsumer consumer=new QueueingConsumer(chan);
   //消费者与队列绑定
   chan.basicConsume("fanout01",false, consumer);
   while(true){
     Delivery delivery= consumer.nextDelivery();
     System.out.println("一号消费者接收到"+
     new String(delivery.getBody()));
     chan.basicAck(delivery.getEnvelope().
         getDeliveryTag(), false);
   }
 }
 @Test
 public void receiv02() throws Exception{
   //获取连接
   Connection conn = ConnectionUtil.getConn();
   Channel chan = conn.createChannel();
   //生命队列
   chan.queueDeclare("fanout02", false, false, false, null);
   //声明交换机
   chan.exchangeDeclare("fanoutEx", "fanout");
   //绑定队列到交换机
   //参数 1 队列名称,2 交换机名称 3 路由key
   chan.queueBind("fanout02", "fanoutEx", "");
   chan.basicQos(1);
   //定义消费者
   QueueingConsumer consumer=new QueueingConsumer(chan);
   //消费者与队列绑定
   chan.basicConsume("fanout02",false, consumer);
   while(true){
     Delivery delivery= consumer.nextDelivery();
     System.out.println("二号消费者接收到"+new String(delivery.getBody()));
     chan.basicAck(delivery.getEnvelope().getDeliveryTag(), false);
   }
 }
}
4 routing路由模式
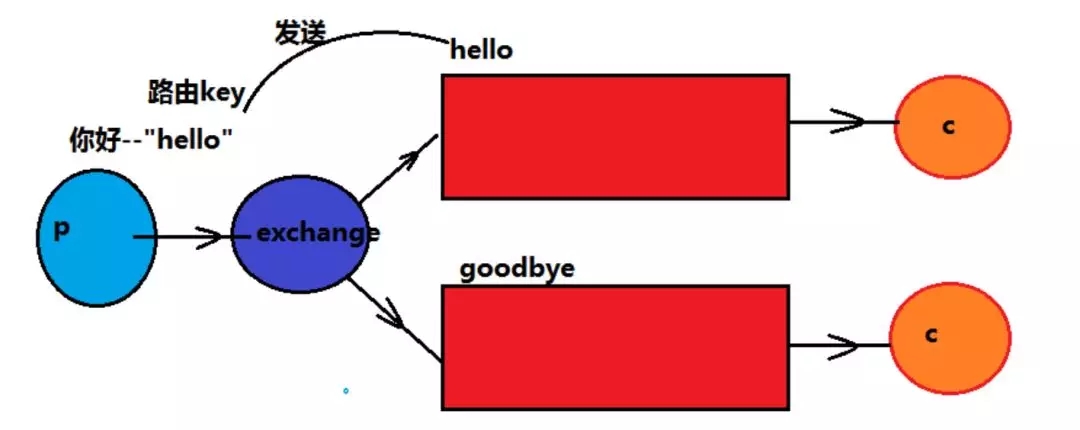
生产者发送消息到交换机,同时绑定一个路由Key,交换机根据路由key对下游绑定的队列进行路
由key的判断,满足路由key的队列才会接收到消息,消费者消费消息
应用场景: 项目中的error报错
案例:
public class RoutingTopicTest {

 @Test
 public void routingSend() throws Exception{
   //获取连接
   Connection conn = ConnectionUtil.getConn();
   Channel chan = conn.createChannel();
   //声明交换机
   //参数意义,1 交换机名称,2 类型:fanout,direct,topic
   chan.exchangeDeclare("directEx", "direct");
   //发送消息
   String msg="路由模式的消息";
   chan.basicPublish("directEx", "jt1713",
       null, msg.getBytes());
 }
 @Test
 public void routingRec01() throws Exception{
   System.out.println("一号消费者等待接收消息");
   //获取连接
   Connection conn = ConnectionUtil.getConn();
   Channel chan = conn.createChannel();
   //声明队列
   chan.queueDeclare("direct01", false, false, false, null);
   //声明交换机
   chan.exchangeDeclare("directEx", "direct");
   //绑定队列到交换机
   //参数 1 队列名称,2 交换机名称 3 路由key
   chan.queueBind("direct01", "directEx", "jt1712");
   chan.basicQos(1);
   //定义消费者
   QueueingConsumer consumer=new QueueingConsumer(chan);
   //消费者与队列绑定
   chan.basicConsume("direct01",false, consumer);
   while(true){
     Delivery delivery= consumer.nextDelivery();
     System.out.println("一号消费者接收到"+
     new String(delivery.getBody()));
     chan.basicAck(delivery.getEnvelope().
         getDeliveryTag(), false);
   }
 }
 @Test
 public void routingRec02() throws Exception{
   System.out.println("二号消费者等待接收消息");
   //获取连接
   Connection conn = ConnectionUtil.getConn();
   Channel chan = conn.createChannel();
   //声明队列
   chan.queueDeclare("direct02", false, false, false, null);
   //声明交换机
   chan.exchangeDeclare("directEx", "direct");
   //绑定队列到交换机
   //参数 1 队列名称,2 交换机名称 3 路由key
   chan.queueBind("direct02", "directEx", "jt1711");
   chan.basicQos(1);
   //定义消费者
   QueueingConsumer consumer=new QueueingConsumer(chan);
   //消费者与队列绑定
   chan.basicConsume("direct02",false, consumer);
   while(true){
     Delivery delivery= consumer.nextDelivery();
     System.out.println("二号消费者接收到"+
     new String(delivery.getBody()));
     chan.basicAck(delivery.getEnvelope().
         getDeliveryTag(), false);
   }
 }
}
5 topic主题模式
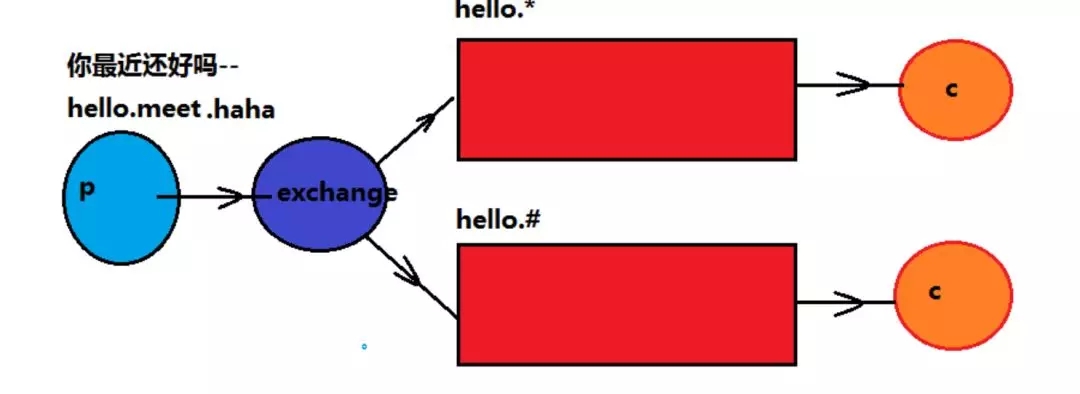
*号代表单个词语
#代表多个词语
其他的内容与routing路由模式一致
案例:
public class RoutingTopicTest {


 @Test
 public void routingRec02() throws Exception{
   System.out.println("二号消费者等待接收消息");
   //获取连接
   Connection conn = ConnectionUtil.getConn();
   Channel chan = conn.createChannel();
   //声明队列
   chan.queueDeclare("direct02", false, false, false, null);
   //声明交换机
   chan.exchangeDeclare("directEx", "direct");
   //绑定队列到交换机
   //参数 1 队列名称,2 交换机名称 3 路由key
   chan.queueBind("direct02", "directEx", "jt1711");
   chan.basicQos(1);
   //定义消费者
   QueueingConsumer consumer=new QueueingConsumer(chan);
   //消费者与队列绑定
   chan.basicConsume("direct02",false, consumer);
   while(true){
     Delivery delivery= consumer.nextDelivery();
     System.out.println("二号消费者接收到"+
     new String(delivery.getBody()));
     chan.basicAck(delivery.getEnvelope().
         getDeliveryTag(), false);
   }
 }

 @Test
 public void topicSend() throws Exception{
   //获取连接
   Connection conn = ConnectionUtil.getConn();
   Channel chan = conn.createChannel();
   //声明交换机
   //参数意义,1 交换机名称,2 类型:fanout,direct,topic
   chan.exchangeDeclare("topicEx", "topic");
   //发送消息
   String msg="主题模式的消息";
   chan.basicPublish("topicEx", "jt1712.add.update",
       null, msg.getBytes());
 }
 @Test
 public void topicRec01() throws Exception{
   System.out.println("一号消费者等待接收消息");
   //获取连接
   Connection conn = ConnectionUtil.getConn();
   Channel chan = conn.createChannel();
   //声明队列
   chan.queueDeclare("topic01", false, false, false, null);
   //声明交换机
   chan.exchangeDeclare("topicEx", "topic");
   //绑定队列到交换机
   //参数 1 队列名称,2 交换机名称 3 路由key
   chan.queueBind("topic01", "topicEx", "jt1712");
   chan.basicQos(1);
   //定义消费者
   QueueingConsumer consumer=new QueueingConsumer(chan);
   //消费者与队列绑定
   chan.basicConsume("topic01",false, consumer);
   while(true){
     Delivery delivery= consumer.nextDelivery();
     System.out.println("一号消费者接收到"+
     new String(delivery.getBody()));
     chan.basicAck(delivery.getEnvelope().
         getDeliveryTag(), false);
   }
 }
 @Test
 public void topicRec02() throws Exception{
   System.out.println("二号消费者等待接收消息");
   //获取连接
   Connection conn = ConnectionUtil.getConn();
   Channel chan = conn.createChannel();
   //声明队列
   chan.queueDeclare("topic02", false, false, false, null);
   //声明交换机
   chan.exchangeDeclare("topicEx", "topic");
   //绑定队列到交换机
   //参数 1 队列名称,2 交换机名称 3 路由key
   chan.queueBind("topic02", "topicEx", "jt1712.#");
   chan.basicQos(1);
   //定义消费者
   QueueingConsumer consumer=new QueueingConsumer(chan);
   //消费者与队列绑定
   chan.basicConsume("topic02",false, consumer);
   while(true){
     Delivery delivery= consumer.nextDelivery();
     System.out.println("二号消费者接收到"+
     new String(delivery.getBody()));
     chan.basicAck(delivery.getEnvelope().
         getDeliveryTag(), false);
   }
 }
}
rabbitMQ模式的更多相关文章
- RabbitMQ入门-Topic模式
上篇<RabbitMQ入门-Routing直连模式>我们介绍了可以定向发送消息,并可以根据自定义规则派发消息.看起来,这个Routing模式已经算灵活的了,但是,这还不够,我们还有更加多样 ...
- RabbitMQ基本操作
更加详细的 链接https://www.cnblogs.com/dwlsxj/p/RabbitMQ.html RabbitMQ基础知识 一.背景 RabbitMQ是一个由erlang开发的AMQP(A ...
- 队列模式&主题模式
# RabbitMQ 消息中间件 **Advanced Message Queuing Protocol (高级消息队列协议** The Advanced Message Queuing Protoc ...
- RabbitMQ图解
一.MQ对比 二.RabbitMQ模式 三.队列模式 四.公平分发 五.主题模式
- RabbitMQ之集群搭建
1.RabbitMQ集群模式RabbitMQ集群中节点包括内存节点(RAM).磁盘节点(Disk,消息持久化),集群中至少有一个Disk节点. 2.普通模式(默认) 对于普通模式,集群中 ...
- 28、springboot整合RabbitMQ(2)
1.监听 1.1.监听队列 如订单系统和库存系统 订单系统下订单之后将消息存放在消息队列中 库存系统需要时刻进行监听消息队列的内容,有新的订单就需要进行库存相关的操作 此时模拟监听消息队列中的Bo ...
- SpringBoot与消息(RabbitMQ)
1. JMS和AMQP JMS(Java Message Service): ActiveMQ是JMS实现; AMQP(Advanced Message Queuing Protocol) 兼容JMS ...
- CentOS7安装rabbitmq集群(二进制)
一.RabbiMQ简介 RabbiMQ是用Erang开发的,集群非常方便,因为Erlang天生就是一门分布式语言,但其本身并不支持负载均衡. RabbiMQ模式 RabbitMQ模式大概分为以下三种: ...
- Java RabbitMQ配置和使用,基于SpringBoot
package rabbitmq.demo; import com.rabbitmq.client.AMQP; import org.junit.Test; import org.junit.runn ...
随机推荐
- Linux下的java虚拟机性能监控与故障处理命令
java包中提供了很多监控JVM的工具类,作为java程序员必须得掌握常用的几个工具,下面是几个常用的JVM性能监控与故障处理工具的介绍与使用. 1.jstack 该命令用于生成当前时刻虚拟机的线程快 ...
- Python系列:五、异常处理-技术流ken
至今为止还没有进一步的谈论过错误信息,不过在你已经试验过的那些例子中,可能已经遇到过一些.Python 中(至少)有两种错误:语法错误和异常( syntax errors 和 exceptions ) ...
- Swagger中配置了@ApiModelProperty的allowableValues属性但不显示的问题
现在用Swagger来生成API文档的例子已经非常多了,今天碰到开发同事问了一个问题,帮着看了一下,主要还是配置方法的问题,所以记录一下.如果您也碰到了同样的问题,希望本文对您有用. 问题描述 @Ap ...
- ElasticSearch集群环境搭建
一 .单机部署 1.下载安装包.解压 2.在window下运行bin/elasticsearch.bat 3.访问localhost:9200 页面显示结果 { "name" : ...
- C#基础知识回顾:1.由WeakReference想到对象的创建与销毁
.Net Framework中,把资源分为托管资源和非托管资源两大类, 托管资源指可以通过.Net Frame垃圾回收器进行回收的资源,主要是指分配在托管堆上你的内存资源,这类资源的回收是不需要人工干 ...
- Java学习笔记之——继承
父类(基类):动物 子类:猫.狗.狼.老虎 如果子类继承于父类,则会自动拥有父类的所有非私有属性和方法,不会继承构造方法 父类和子类要满足一种关系:子类是父类的一种 Java中只支持单继承:一个子类只 ...
- Hibernate(十三)迫切内连接fetch
迫切内连接fetch 内连接和迫切内连接的区别: 其主要区别就在于封装数据,因为他们查询的结果集都是一样的,生成底层的SQL语句也是一样的. 1.内连接:发送就是内连接的语句,封装的时候将属于各自对象 ...
- Java中的深克隆和浅克隆
为什么要克隆 首先思考一个问题, 为什么需要克隆对象? 直接new一个对象不行吗? 克隆的对象可能包含一些已经修改过的属性, 而new出来的对象的属性都还是初始化时候的值, 所以当需要一个新的对象来保 ...
- K8S 调度器,预选策略,优选函数
Kubernetes Scheduler 提供的调度流程分三步: 预选策略(predicate) 遍历nodelist,选择出符合要求的候选节点,Kubernetes内置了多种预选规则供用户选择. 优 ...
- vuejs自定义过滤器根据搜索框输入的值,筛选复杂的列表数据
如题所示,自定义过滤器根据搜索框输入的值,筛选复杂的列表数据.如图所示: html代码: <input type="text" placeholder="姓名/账号 ...