打包一个UWP APP
Before packaging your app
- Test your app. Before you package your app for store submission, make sure it works as expected on all device families that you plan to support. These device families may include desktop, mobile, Surface Hub, XBOX, IoT devices, or others.
- Optimize your app. You can useVisual Studio’s profiling and debugging tools to optimize the performance of your UWP app. For example, the Timeline tool for UI responsiveness, the memory Usage tool, the CPU Usage tool, and more. For more information about these tools, see Run diagnostic tools without debugging.
- Check .NET Native compatibility (for VB and C# apps). With the UWP, there is now a new native compiler that will improve the runtime performance of your app. With this change, it is highly recommended that you test your app in this compilation environment. By default, the Release build configuration enables the .NET native toolchain, so it is important to test your app with this Release configuration and check that your app behaves as expected. Some common debugging issues that can happen with .NET Native are explained in more detail here.
Configure an app package
The app manifest file (package.appxmanifest) has the properties and settings that are required to create your app package. For example, properties in the manifest file describe the image to use as the tile of your app and the orientations that your app supports when a user rotates the device.
Visual Studio has a manifest designer that makes it easy for you to update the manifest file without editing the raw XML of the file.
Visual Studio can associate your package with the Store. When you do this, some of the fields in the Packaging tab of the manifest designer are automatically updated.
Configure a package with the manifest designer
- In Solution Explorer, expand the project node of your UWP app.
- Double-click the Package.appxmanifest file. If the manifest file is already open in the XML code view, Visual Studio prompts you to close the file.
Now you can decide how to configure your app. Each tab contains information that you can configure about your app and links to more information if necessary.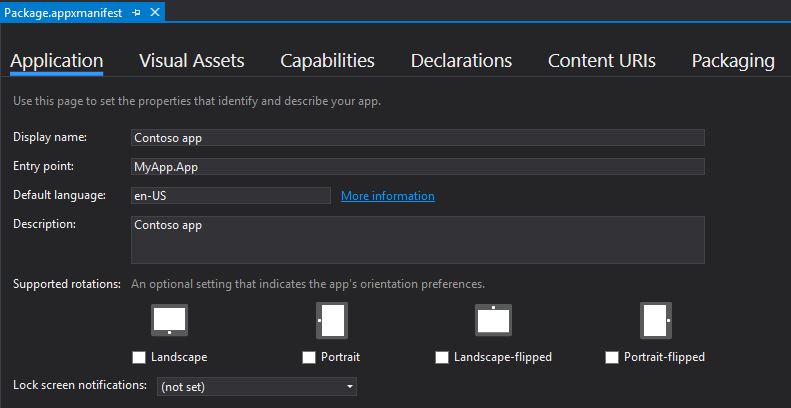
Check that you have all the images that are required for a UWP app on the Visual Assets tab.
From the Packaging tab, you can enter publishing data. This is where you can choose which certificate to use to sign your app. All UWP apps must be signed with a certificate. In order to sideload an app package, you need to trust the package. The certificate must be installed on that device to trust the package. For more information about sideloading, see Enable your device for development.
Save your file after you have made the necessary edits for your app.
Create an app package
To distribute an app through the Store you must create an appxupload package. You can do that by using the Create App Packages wizard. Follow these steps to create a package suitable for store submission with Microsoft Visual Studio 2015.
To create your app package
- In Solution Explorer, open the solution for your UWP app project.
Right-click the project and choose Store->Create App Packages. If this option is disabled or does not appear at all, check that the project is a UWP project.
The Create App Packages wizard appears.
Select Yes in the first dialog asking if you want to build packages to upload to the Windows Store, then click Next.
If you choose No here, Visual Studio will not generate the required .appxupload package you need for store submission. If you only want to sideload your app to run it on internal devices, then you can select this option. For more information about sideloading, see Enable your device for development.
Sign in with your developer account to the Windows Dev Center. (If you don't have a developer account yet, the wizard will help you create one.)
Select the app name for your package, or reserve a new one if you have not already reserved one with the Windows Dev Center portal.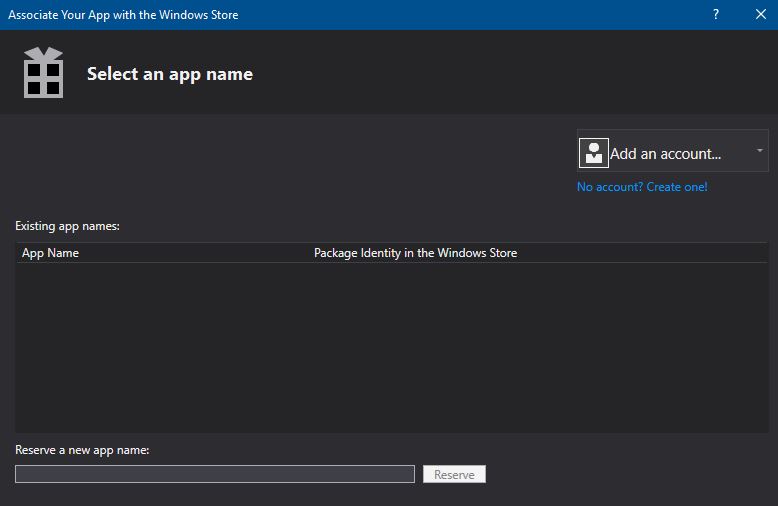
Make sure you select all three architecture configurations (x86, x64, and ARM) in the Select and Configure Packages dialog. That way your app can be deployed to the widest range of devices. In the Generate app bundle listbox, select Always. This makes the store submission process much simpler because you will only have one file to upload (.appxupload). The single bundle will contain all the necessary packages to deploy to devices with each processor architecture.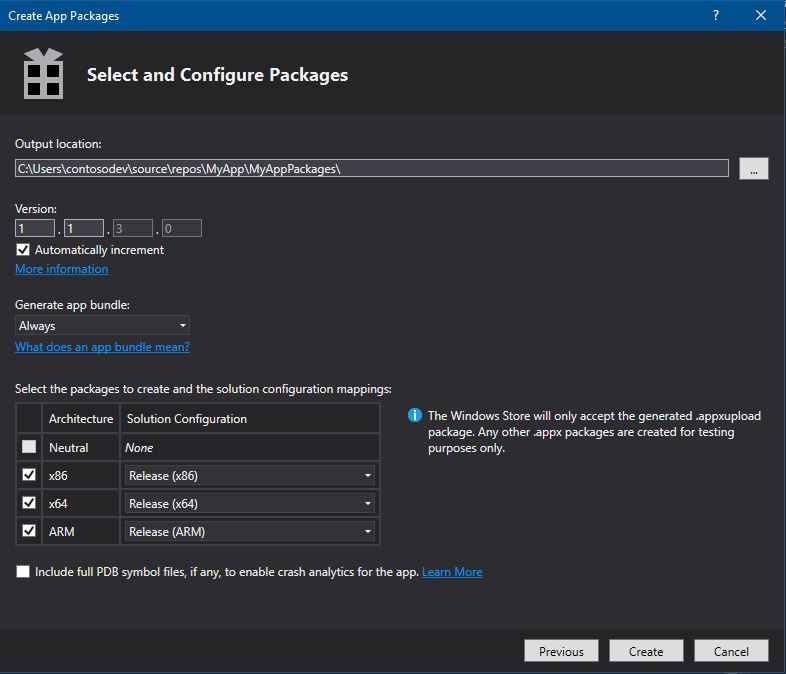
- It is a good idea to include full PDB symbol files for the best crash analytics experience from the Windows Dev Center. You can learn more about debugging with symbols by visiting Debugging with Symbols.
- Now you can configure the details to create your package. When you're ready to publish your app, you'll upload the packages from the output location.
- Click Create to generate your appxupload package.
Now you will see this dialog.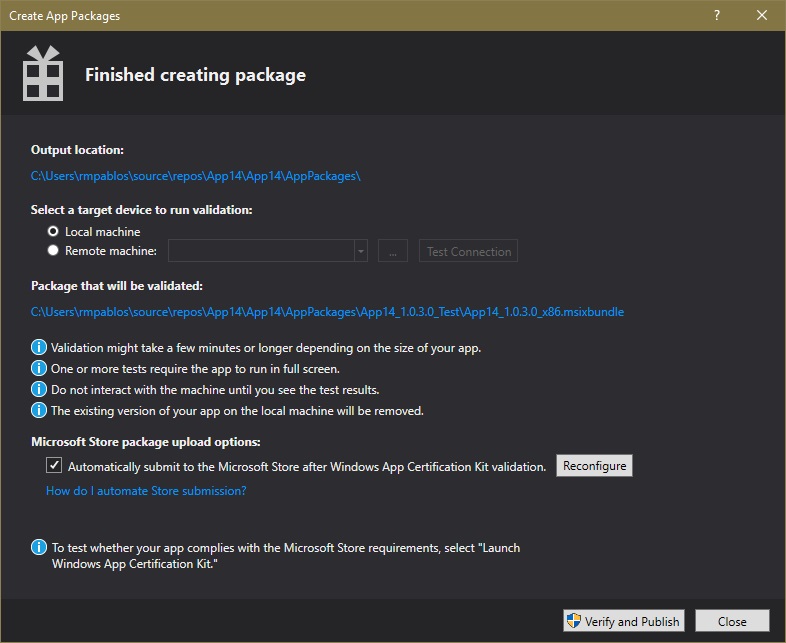
Validate your app before you submit it to the Store for certification on a local or remote machine. (You can only validate release builds for your app package and not debug builds.)
To validate locally, leave the Local machine option selected and click Launch Windows App Certification Kit. For more information about testing your app with the Windows App Certification Kit, see Windows App Certification Kit.
The Windows App Certification Kit performs tests and shows you the results. See Windows App Certification Kit tests.
If you have a remote Windows 10 that you want to use for testing, you will need to install the Windows App Certification Kit manually on that device. The next section will walk you through these steps. After you've done that, then you can select Remote machine and click Launch Windows App Certification Kit to connect to the remote device and run the validation tests.
After WACK has finished and your app has passed, you are ready to upload to the store. Make sure you upload the correct file. It can be found in the root folder of your solution \[AppName]\AppPackages and it will end with the .appxupload file extension. The name will be of the form [AppName]_[AppVersion]_x86_x64_arm_bundle.appxupload.
Validate your app package on a remote Windows 10 device
- Enable your Windows 10 device for development by following the Enable your device for development instructions. Important You cannot validate your app package on a remote ARM device for Windows 10.
- Download and install the remote tools for Visual Studio. These tools are used to run the Windows App Certification Kit remotely. You can get more information about these tools including where to download them by visiting Run Windows Store apps on a remote machine.
- Download the required Windows App Certification Kit and then install it on your remote Windows 10 device.
- On the Package Creation Completed page of the wizard, choose the Remote Machine option button, and then choose the ellipsis button next to the Test Connection button. Note The Remote Machine option button is available only if you selected at least one solution configuration that supports validation. For more information about testing your app with the WACK, see Windows App Certification Kit.
- Specify a device form inside your subnet, or provide the Domain Name Server (DNS) name or IP address of a device that's outside of your subnet.
- In the Authentication Mode list, choose None if your device doesn't require you to log onto it by using your Windows credentials.
- Choose the Select button, and then choose the Launch Windows App Certification Kit button. If the remote tools are running on that device, Visual Studio connects to it and then performs the validation tests. See Windows App Certification Kit tests.
Sideload your app package
With UWP app packages, you cannot simply install an app to your device like Desktop apps. Typically, you download these apps from the Store and that is how they are installed on your device. But you can sideload apps to your device without submitting them to the Store. This lets you install them and test them out using the app package (.appx) that you have created. If you have an app that you don’t want to sell in the Store, like a line-of-business (LOB) app, you can sideload that app so that other users in your company can use it.
The following list provides requirements for sideloading your app.
- You must enable your device for development.
- To sideload your app on a Windows 10 Mobile device, you must use the WinAppDeployCmd.exe tool.
Sideload an app to a desktop, laptop, or tablet
Copy the folders for the version that you want to install to the target device.
If you've created an app bundle, then you will have a folder based on the version number and a _test folder. For example these two folders (where the version to install is 1.0.2):
- C:\Projects\MyApp\MyApp\AppPackages\MyApp_1.0.2.0
- C:\Projects\MyApp\MyApp\AppPackages\MyApp_1.0.2.0_Test
If you don't have an app bundle, then you can just copy the folder for the correct architecture and the corresponding test folder. For example these two folders.
- C:\Projects\MyApp\MyApp\AppPackages\MyApp_1.0.2.0_x64
- C:\Projects\MyApp\MyApp\AppPackages\MyApp_1.0.2.0_x64_Test
- On the target device, open the test folder. For example, C:\Projects\MyApp\MyApp\AppPackages\MyApp_1.0.2.0_Test
Right-click on the Add-AppDevPackage.ps1 file, then choose Run with PowerShell and follow the prompts.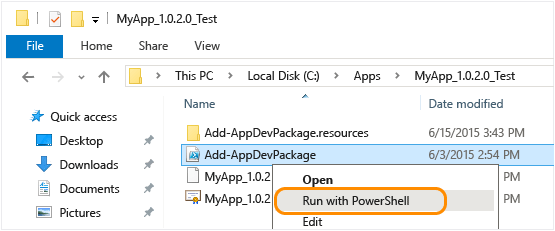
When the app package has been installed, you will see this message in your PowerShell window: Your app was successfully installed.
Note To open the shortcut menu on a tablet, touch the screen where you want to right-click, hold until a complete circle appears, then lift your finger. The shortcut menu appears after you lift your finger.
- Click the Start button and then type the name of your app to launch it.
打包一个UWP APP的更多相关文章
- 利用 Win32 启动和检测 UWP App 的方法
一种启动和检测 UWP 应用的方法 背景 我们发布过多款 UWP 平台的同类型 App ,最近有一个需求:用传统 Win32 程序启动我们的 UWP 程序.因为我们的每一个UWP App在客户机器上都 ...
- 创建一个UWP 打包签名
Create a certificate for package signing 2017/2/8 3 min to read [ Updated for UWP apps on Windows 10 ...
- xamarin.forms uwp app部署到手机移动设备进行测试,真机调试(device portal方式部署)
最近学习xamarin.刚好 手上有一个lumia 930.所以试一试把uwp app部署到手机上,并真机调试一把. 目前环境: 1.开发pc电脑是win10,版本1607.加入了insider,所以 ...
- Cordova 打包 Android release app 过程详解
Cordova 打包 Android release app 过程详解 时间 -- :: SegmentFault 原文 https://segmentfault.com/a/119000000517 ...
- 如何用 React Native 创建一个iOS APP?(三)
前两部分,<如何用 React Native 创建一个iOS APP?>,<如何用 React Native 创建一个iOS APP (二)?>中,我们分别讲了用 React ...
- UWP app HelloWorld 的创建
步骤 1:在 Visual Studio 中创建新项目 启动 Visual Studio 2015 RC.将出现 Visual Studio 2015 RC 起始页. (从现在开始,我们将 Visua ...
- BEGINNING SHAREPOINT® 2013 DEVELOPMENT 第7章节--打包并部署SP2013 Apps 打包并公布App
BEGINNING SHAREPOINT® 2013 DEVELOPMENT 第7章节--打包并部署SP2013 Apps 打包并公布App 如今既然你理解了一个app的四个主要部分, ...
- 在Xbox和Hololens 上部署、调试UWP App
在Windows 10 Device 上,UWP App可以快速部署进行调试.PC(平板)和Phone就不用多说,网上的文章比较多.今天专门介绍一下怎么在Xbox One和HoloLens上部署调试U ...
- 如何设计和实现一个web app
web app简介 web app其实不算是什么新鲜的东西,相比于传统的web和传统的app,web app这种web和app相结合的产物有的优点如下: 1. 开发上web app更有便捷性,ios开 ...
随机推荐
- 跨平台Redis可视化工具Web Redis Manager
一.简介 最近因为工作需要,使用了一些单机版Redis的界面化管理工具,使用过程中那惨痛的体验真的只有用过的人才能体会:为此本人和小伙伴准备动手一个Redis可视化工具,但是因为小伙伴最近工作比较忙, ...
- UVA12253 简单加密法 Simple Encryption
这题到现在还是只有我一个人过?太冷门了吧,毕竟你谷上很少有人会去做往年ACM比赛的题 题面意思很简单,每次给出\(K_1\),让你求一个\(K_2\)满足\(K_1^{K_2}\equiv K_2(\ ...
- 【php增删改查实例】第二十四节 - 文件上传在项目中的具体应用
文件上传在项目中,一般有两个用武之地,分别为设置用户的头像和上传附件.本节我们演示如果进行用户头像的上传. 因为一个用户单独并且唯一对应了一个头像,是一对一的关系,所以我们需要去给tm_users表添 ...
- 断路器(Curcuit Breaker)模式
在分布式环境下,特别是微服务结构的分布式系统中, 一个软件系统调用另外一个远程系统是非常普遍的.这种远程调用的被调用方可能是另外一个进程,或者是跨网路的另外一台主机, 这种远程的调用和进程的内部调用最 ...
- .NET Core 中正确使用 HttpClient 的姿势
为了更方便在服务端调用 HTTP 请求,微软在 .NET Framework 4.x 的时候引入了 HttpClient.但 HttpClient 有很多严重问题,一直饱受诟病,比如 InfoQ 的这 ...
- python线程中的全局变量与局部变量
在python多线程开发中,全局变量是多个线程共享的数据,局部变量是各自线程的,非共享的. 如下几种写法都是可以的: 第一种:将列表当成参数传递给线程 from threading import Th ...
- H5 audio标签
37-audio标签 注意点: audio标签的使用和video标签的使用基本一样, video中能够使用的属性在audio标签中大部分都能够使用, 并且功能都一样 只不过有3个属性不能用, heig ...
- 小L记单词
题目描述 小L最近在努力学习英语,但是对一些词组总是记不住,小L小把这些词组中每一个单词的首字母都记一下,这样形成词组的缩写,通过这种方式小L的学习效率明显提高. 输入 输入有多行,每组测试数据占一行 ...
- Mysql的使用,常用的SQL语句
一.启动mysql服务 启动mysql服务: systemctl start mysqld.service root用户登录mysql: 修改root 密码: alter user 'root'@'l ...
- semantic-ui 容器与栅格
semantic中可以指定one-sixteen这16个单词来指定网格column所占的长度.也就是说,在网页中,一行最多只有16个column,超过16个之后,自动移到下一行. 栅格可以使用i,di ...