iOS蓝牙BLE4.0通信功能
概述
详细
一、蓝牙常见名称和缩写
BLE:(Bluetooth low energy)蓝牙4.0设备因为低耗电
BLE:(Bluetooth low energy)蓝牙4.0设备因为低耗电
Central:中心设备,发起蓝牙连接的设备(一般是指手机)
Peripheral:外设,被蓝牙连接的设备(一般是运动手环)
Service and Characteristic:服务和特征,每个设备会提供服务和特征,类似于服务端的API,但是结构不同,每个设备会有很多服务,每个服务中包含很多特征,这些特征的权限一般分为读(read),写(write),通知(notify)几种,就是我们连接设备后具体需要操作的内容
Description:描述,每个Characteristic可以对应一个或者多个Description用于描述Characteristic的信息或属性
二、蓝牙基础知识
1、CoreBluetooth框架的核心其实是俩东西
Peripheral
Central
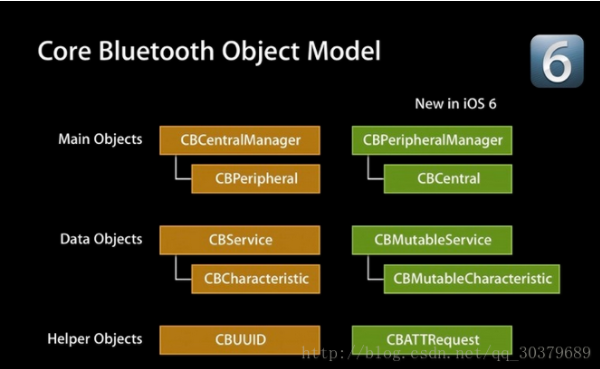
2、这两组api分别对应不同的业务常见
左侧叫中心模式,就是以你的app作为中心,连接其他的外设的场景
右侧称为外设模式,使用外设连接其他中心设备操作的场景
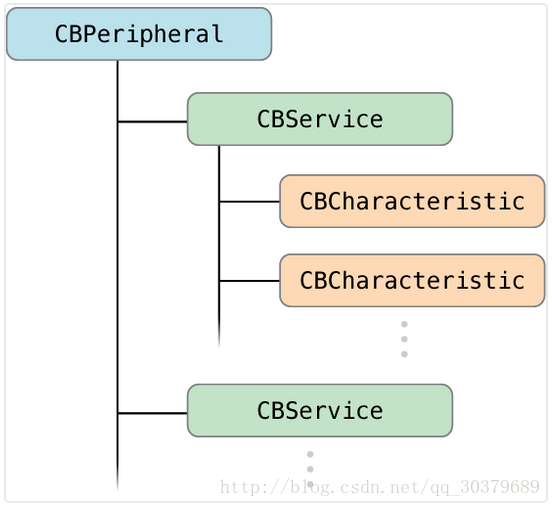
3、服务和特征(service and characteristic)
每个设备都会有1个or多个服务
每个服务里都会有1个or多个特征
特征就是具体键值对,提供数据的地方
每个特征属性分为:读,写,通知等等
外设,服务,特征的关系
三、BLE中心模式流程
1、建立中心角色
2、扫描外设(Discover Peripheral)
3、连接外设(Connect Peripheral)
4、扫描外设中的服务和特征(Discover Services And Characteristics)
4.1 获取外设的services
4.2 获取外设的Characteristics,获取characteristics的值
4.3 获取Characteristics的Descriptor和Descriptor的值
5、利用特征与外设做数据交互
6、订阅Characteristic的通知
7、断开连接(Disconnect)
四、准备工作
1、一台苹果设备,进行真机测试
2、一个蓝牙模块或者外设
五、程序实现
项目代码截图:
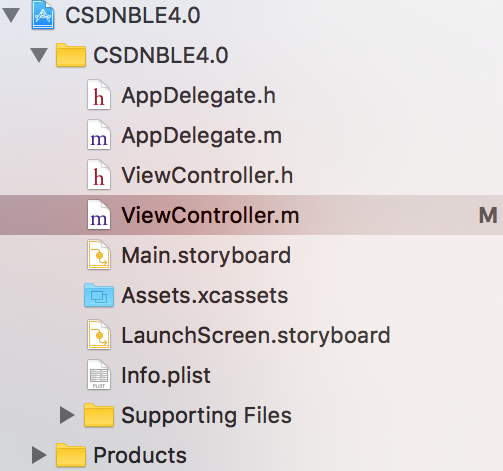
以下是实现的过程:
1、导入依赖库、声明委托、定义变量
#import "ViewController.h"

#import <CoreBluetooth/CoreBluetooth.h>

#define mBLEName @"ZJ2"

@interface ViewController () <CBCentralManagerDelegate, CBPeripheralDelegate>

//手机设备

@property (nonatomic, strong) CBCentralManager *mCentral;

//外设设备

@property (nonatomic, strong) CBPeripheral *mPeripheral;

//特征值

@property (nonatomic, strong) CBCharacteristic *mCharacteristic;

//服务

@property (nonatomic, strong) CBService *mService;

//描述

@property (nonatomic, strong) CBDescriptor *mDescriptor;

@end
2、程序开始时初始化设备
- (CBCentralManager *)mCentral

{

    if (!_mCentral) {

        _mCentral = [[CBCentralManager alloc] initWithDelegate:self

                                                         queue:dispatch_get_main_queue()

                                                       options:nil];

    }

    return _mCentral;

}

- (void)viewDidLoad

{

    [super viewDidLoad];

    //中心管理者初始化

    [self mCentral];

}
3、当程序退出时,记得断开连接
- (void)viewDidDisappear:(BOOL)animated

{

    [super viewDidDisappear:animated];

    // 停止扫描

    if([self.mCentral isScanning]){

        NSLog(@"stopScan");

        [self.mCentral stopScan];

    }

    //停止连接

    if(nil != self.mPeripheral && self.mPeripheral.state == CBPeripheralStateConnecting){

        NSLog(@"cancelPeripheralConnection");

        [self.mCentral cancelPeripheralConnection:self.mPeripheral];

    }

}
4、扫描外设
//只要中心管理者初始化,就会触发此代理方法

- (void)centralManagerDidUpdateState:(CBCentralManager *)central

{

    switch (central.state) {

        case CBManagerStateUnknown:

            NSLog(@"CBManagerStateUnknown");

            break;

        case CBManagerStateResetting:

            NSLog(@"CBManagerStateResetting");

            break;

        case CBManagerStateUnsupported:

            NSLog(@"CBManagerStateUnsupported");

            break;

        case CBManagerStateUnauthorized:

            NSLog(@"CBManagerStateUnauthorized");

            break;

        case CBManagerStatePoweredOff:

            NSLog(@"CBManagerStatePoweredOff");

            break;

        case CBManagerStatePoweredOn:

        {

            NSLog(@"CBManagerStatePoweredOn");

            //搜索外设

            [self.mCentral scanForPeripheralsWithServices:nil // 通过某些服务筛选外设

                                                  options:nil]; // dict,条件

        }

            break;

        default:

            break;

    }

}
5、连接外设
//发现外设后调用的方法

- (void)centralManager:(CBCentralManager *)central // 中心管理者

 didDiscoverPeripheral:(CBPeripheral *)peripheral // 外设

     advertisementData:(NSDictionary *)advertisementData // 外设携带的数据

                  RSSI:(NSNumber *)RSSI // 外设发出的蓝牙信号强度

{

    NSLog(@"搜索到设备名:%@,设备ID:%@",peripheral.name,peripheral.identifier);

    //(ABS(RSSI.integerValue) > 35)

    //发现完之后就是进行连接

    if([peripheral.name isEqualToString:mBLEName]){

        self.mPeripheral = peripheral;

        self.mPeripheral.delegate = self;

        [self.mCentral connectPeripheral:peripheral options:nil];

    }

}
6、获取服务
//中心管理者连接外设成功

- (void)centralManager:(CBCentralManager *)central // 中心管理者

  didConnectPeripheral:(CBPeripheral *)peripheral // 外设

{

    NSLog(@"设备连接成功,设备名:%@", peripheral.name);

    //7、外设发现服务,传nil代表不过滤

    [self.mPeripheral discoverServices:nil];

}

// 外设连接失败

- (void)centralManager:(CBCentralManager *)central didFailToConnectPeripheral:(CBPeripheral *)peripheral error:(NSError *)error

{

    NSLog(@"设备连接失败,设备名:%@", peripheral.name);

}

// 丢失连接

- (void)centralManager:(CBCentralManager *)central didDisconnectPeripheral:(CBPeripheral *)peripheral error:(NSError *)error

{

    NSLog(@"设备丢失连接,设备名:%@", peripheral.name);

}
7、获取服务中的特征
//发现外设的服务后调用的方法

- (void)peripheral:(CBPeripheral *)peripheral didDiscoverServices:(NSError *)error

{

    // 是否获取失败

    if (error) {

        NSLog(@"设备获取服务失败,设备名:%@", peripheral.name);

        return;

    }

    for (CBService *service in peripheral.services) {

        self.mService = service;

        NSLog(@"设备获取服务成功,服务名:%@,服务UUID:%@,服务数量:%lu",service,service.UUID,peripheral.services.count);

        //外设发现特征

        [peripheral discoverCharacteristics:nil forService:service];

    }

}
8、获取特征中的值和描述
//从服务中发现外设特征的时候调用的代理方法

- (void)peripheral:(CBPeripheral *)peripheral didDiscoverCharacteristicsForService:(CBService *)service error:(NSError *)error

{

    if(error){

        NSLog(@"设备获取特征失败,设备名:%@", peripheral.name);

        return;

    }

    /**

    CBCharacteristicPropertyRead													= 0x02,

    CBCharacteristicPropertyWriteWithoutResponse									= 0x04,

    CBCharacteristicPropertyWrite													= 0x08,

    CBCharacteristicPropertyNotify													= 0x10,

     */

    for (CBCharacteristic *cha in service.characteristics) {

        if(cha.properties & CBCharacteristicPropertyWrite){

            NSLog(@"CBCharacteristicPropertyWrite");

            NSLog(@"%lu",cha.properties & CBCharacteristicPropertyWrite);

            self.mCharacteristic = cha;

        }else if(cha.properties & CBCharacteristicPropertyWriteWithoutResponse){

            NSLog(@"CBCharacteristicPropertyWriteWithoutResponse");

        }else if(cha.properties & CBCharacteristicPropertyRead){

            NSLog(@"CBCharacteristicPropertyRead");

        }else if(cha.properties & CBCharacteristicPropertyNotify){

            NSLog(@"CBCharacteristicPropertyNotify");

        }else if(cha.properties & CBCharacteristicPropertyIndicate){

            NSLog(@"CBCharacteristicPropertyIndicate");

        }

        NSLog(@"设备获取特征成功,服务名:%@,特征值名:%@,特征UUID:%@,特征数量:%lu",service,cha,cha.UUID,service.characteristics.count);

        //获取特征对应的描述 会回调didDiscoverDescriptorsForCharacteristic

        [peripheral discoverDescriptorsForCharacteristic:cha];

        //获取特征的值 会回调didUpdateValueForCharacteristic

        [peripheral readValueForCharacteristic:cha];

    }

    if(nil != self.mCharacteristic){

        //打开外设的通知,否则无法接受数据

        [peripheral setNotifyValue:YES forCharacteristic:self.mCharacteristic];

    }

}
9、读取特征中的值和描述
//更新特征值的时候调用,可以理解为获取蓝牙发回的数据

- (void)peripheral:(CBPeripheral *)peripheral didUpdateValueForCharacteristic:(CBCharacteristic *)characteristic error:(NSError *)error

{

    NSString *value = [[NSString alloc] initWithData:characteristic.value encoding:NSASCIIStringEncoding];

    NSLog(@"特征名:%@,特征值:%@",characteristic,value);

    if([value isEqualToString:@"open"]){

    }else if([value isEqualToString:@"close"]){

    }

}
10、状态改变和发现描述
//通知状态改变时调用

-(void)peripheral:(CBPeripheral *)peripheral didUpdateNotificationStateForCharacteristic:(CBCharacteristic *)characteristic error:(NSError *)error{

    if(error){

        NSLog(@"特征名:%@,改变通知状态失败",characteristic);

    }

    NSLog(@"特征名:%@,改变了通知状态",characteristic);

}

//发现外设的特征的描述数组

- (void)peripheral:(CBPeripheral *)peripheral didDiscoverDescriptorsForCharacteristic:(nonnull CBCharacteristic *)characteristic error:(nullable NSError *)error

{

    if(error){

        NSLog(@"设备获取描述失败,设备名:%@", peripheral.name);

        return;

    }

    for (CBDescriptor *descriptor in characteristic.descriptors) {

        self.mDescriptor = descriptor;

        [peripheral readValueForDescriptor:descriptor];

        NSLog(@"设备获取描述成功,描述名:%@",descriptor);

    }

}
11、发送数据
//发送数据

-(void)sendDataToBLE:(NSString *)data{

    NSData* myData = [data dataUsingEncoding:NSUTF8StringEncoding];

    [self.mPeripheral writeValue:myData // 写入的数据

               forCharacteristic:self.mCharacteristic // 写给哪个特征

                            type:CBCharacteristicWriteWithResponse];// 通过此响应记录是否成功写入

}

-(void)peripheral:(CBPeripheral *)peripheral didWriteValueForCharacteristic:(CBCharacteristic *)characteristic error:(NSError *)error{

    NSLog(@"数据发送成功");

}
六、运行效果
从电脑串口助手可以看到,发送了两次的D3数据,手机也收到了两次11的数据
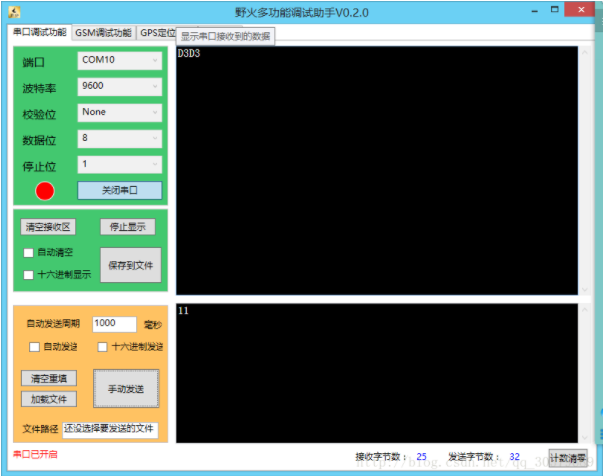
这里使用的是蓝牙模块Risym cc2541和苹果手机实现两者的通信功能,根据BLE中心模式流程走就可以了
下面是手机设备NSLog打印输出的结果,从连接到发送数据和接收数据的过程。
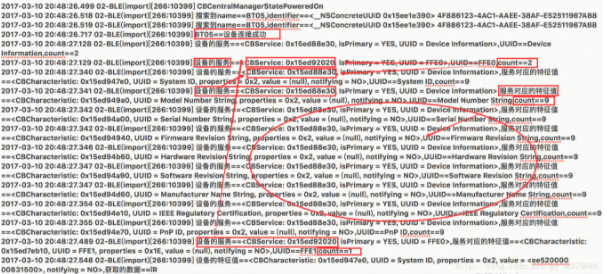
(查看大图)
可以发现连接成功后,设备有两个服务,第一个服务对应有九个特征值,第二个服务对应有一个特征值,验证了上面的原理是正确的
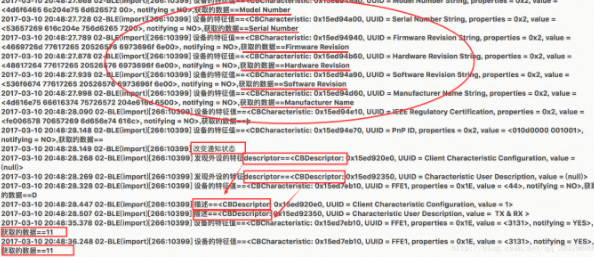
(查看大图)
七、其他补充
CSDN博客地址:http://blog.csdn.net/qq_30379689/article/details/61413950
CSDN课程地址:http://edu.csdn.net/course/detail/4534
注:本文著作权归作者,由demo大师发表,拒绝转载,转载需要作者授权
iOS蓝牙BLE4.0通信功能的更多相关文章
- iOS蓝牙4.0开发
文/starfox寒流(简书作者)原文链接:http://www.jianshu.com/p/974d165f78b5著作权归作者所有,转载请联系作者获得授权,并标注“简书作者”. iOS 蓝牙4.0 ...
- iOS蓝牙4.0
iOS的蓝牙用到了 CoreBluetooth 框架 首先导入框架 #import <CoreBluetooth/CoreBluetooth.h> 我们需要一个管理者来管理蓝牙设备,CB ...
- iOS蓝牙4.0协议简单介绍
iOS开发蓝牙4.0的框架是CoreBluetooth,本文主要介绍CoreBluetooth的使用,关于本文中的代码片段大多来自github上的一个demo,地址是myz1104/Bluetooth ...
- https://github.com/coolnameismy/BabyBluetooth github上的一个ios 蓝牙4.0的库并带文档和教程
The easiest way to use Bluetooth (BLE )in ios,even bady can use. 简单易用的蓝牙库,基于CoreBluetooth的封装,并兼容ios和 ...
- CoreBluetooth——IOS蓝牙4.0使用心得
原文链接:http://m.blog.csdn.net/article/details?plg_nld=1&id=51014318&plg_auth=1&plg_uin=1&a ...
- iOS 蓝牙4.0开发
背景: 1.iOS的蓝牙不能用来传输文件.2.iOS与iOS设备之间进行数据通信,使用gameKit.framework3.iOS与其他非iOS设备进行数据通信,使用coreBluetooth.fra ...
- iOS蓝牙4.0开发(BLE)
智能设备 和 app 通过 BLE通讯的两种模型 模型一:设备提供数据,app 展示数据: 比如小米手环 模型二:app提供数据,设备接收: 模型与corebluetooth的对应关系: 模型一:智能 ...
- delphiXE开发蓝牙BLE4.0程序时遇到的notification问题
IDE环境delphiXE8 蓝牙硬件ST17H26 service:0xfee7 chareter:0xfec9 const u16 my_OEMServiceUUID=0xfee7;const u ...
- 蓝牙BLE4.0的LL层数据和L2CAP层数据的区分与理解
一直搞不太清楚蓝牙BLE协议,不知道LL层和L2CAP层是如何划分的,后来博士给我讲了讲就理解了,写下来,做个记录: 1. 我们知道,除了蓝牙5.1新出的CTE,所有的BLE都是如下类型的包: 对于连 ...
随机推荐
- .NET:CLR via C# User-Mode Constructs
The CLR guarantees that reads and writes to variables of the following data types are atomic: Boolea ...
- 转: gob编解码
要让数据对象能在网络上传输或存储,我们需要进行编码和解码.现在比较流行的编码方式有JSON,XML等.然而,Go在gob包中为我们提供了另一种方式,该方式编解码效率高于JSON.gob是Golang包 ...
- u-boot支持yaffs映像烧写的补丁
u-boot的nand flash驱动有两个版本,似乎是以u-boot1..5为分界点的,之前的版本使用的是自己写的nand flash驱动,而后面的版本使用的是linux内核中nand flash的 ...
- [14] 齿轮(Gear Wheel)图形的生成算法
顶点数据的生成 bool YfBuildGearwheelVertices ( Yreal radius, Yreal assistRadius, Yreal height, Yuint slices ...
- IIS HTTP 错误 404.17 - Not Found 解决方法
错误提示如下图: 出现这种情况的原因通常是因为先安装了Framework,后安装的IIS: 运行cmd,输入: C:\Windows\Microsoft.NET\Framework\V4.0.30 ...
- libcurl使用easy模式阻塞卡死等问题的完美解决---超时设置
libcurl使用时疑难问题: 在使用libcurl时, jwisp发现, curl_easy_perform是阻塞的方式进行下载的, curl_easy_perform执行后,程序会在这里阻塞等待下 ...
- 基于zabbix的Redis、Sentinel、Slave多实例自动发现监控
约定 保证whereis redis-cli 能够正确返回redis-cli程序的路径 保证 redis的配置文件在模板宏{$REDIS_SERVER_CONFIG_PATH}的路径,并且后缀名 为. ...
- 第二章 Jackson属性名转换+属性忽略
@Data @JsonIgnoreProperties(ignoreUnknown = true) public class MyRecord { private boolean succeed; p ...
- 网站流量分析指标-PV/UV/PR/IP
网站数据分析,经常会统计一个页面或者一个网站或者其他情况的PV/UV.下面简单说一下,这些量PV/UV/PR/IP. 1.PV PV(page view),即页面浏览量,或点击量.通常是衡量一个网络新 ...
- 变量声明置顶规则、函数声明及函数表达式和函数的arguments属性初始化
一.变量声明和变量赋值: if (!("a" in window)) { ; } alert(a);//a为? 你可能认为alert出来的结果是1,然后实际结果是“undefine ...