geoserver的rest服务介绍,搭建java程序
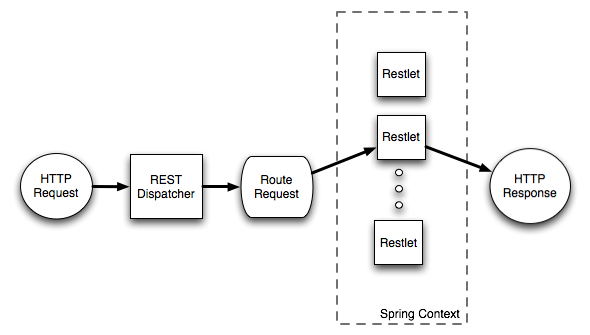
在geoserver中使用 Restlet 来提供所有的rest服务,并且geoserver中所有的在/rest目录下的请求都被看作为一个restful server,下图就是rest服务的调用过程
当新建一个项目的时候需要新建一个 pom.xml到meven项目中
<project xmlns="http://maven.apache.org/POM/4.0.0"

   xmlns:xsi="http://www.w3.org/2001/XMLSchema-instance"

   xsi:schemaLocation="http://maven.apache.org/POM/4.0.0 http://maven.apache.org/maven-v4_0_0.xsd ">

  <modelVersion>4.0.0</modelVersion>

  <groupId>org.geoserver</groupId>

  <artifactId>hello_rest</artifactId>

  <packaging>jar</packaging>

  <version>1.0-SNAPSHOT</version>

  <name>hello_rest</name>

  <dependencies>

    <dependency>

      <groupId>org.geoserver</groupId>

      <artifactId>gs-rest</artifactId>

      <version>2.8-SNAPSHOT</version> <!-- change this to the proper GeoServer version -->

    </dependency>

    <dependency>

      <groupId>org.geoserver</groupId>

      <artifactId>gs-main</artifactId>

      <version>2.8-SNAPSHOT</version> <!-- change this to the proper GeoServer version -->

      <classifier>tests</classifier>

      <scope>test</scope>

    </dependency>

    <dependency>

      <groupId>junit</groupId>

      <artifactId>junit</artifactId>

      <version>4.11</version>

      <scope>test</scope>

    </dependency>

    <dependency>

      <groupId>com.mockrunner</groupId>

      <artifactId>mockrunner</artifactId>

      <version>0.3.6</version>

     <scope>test</scope>

    </dependency>

  </dependencies>

  <build>

    <plugins>

      <plugin>

        <artifactId>maven-compiler-plugin</artifactId>

        <configuration>

          <source>1.8</source>

          <target>1.8</target>

        </configuration>

     </plugin>

   </plugins>

  </build>

</project>

建立项目的时候需要继承一个类,以及实现其中的方法
The class org.geoserver.rest.AbstractResource is a convenient base class available when creating new resources. Create a new class called HelloResource in the package org.geoserver.hellorest, which extends from AbstractResource.
package org.geoserver.hellorest;

import java.util.List;

import org.geoserver.rest.AbstractResource;

import org.geoserver.rest.format.DataFormat;

import org.restlet.data.Request;

import org.restlet.data.Response;

public class HelloResource extends AbstractResource {

   @Override

   protected List<DataFormat> createSupportedFormats(Request request, Response response) {

      return null;

   }

}
The first method to implement is createSupportedFormats(). The purpose of this method is to create mapping from an extension, to a particular format. For now the goal will be to return the text “Hello World” when a ”.txt” extension is requested by the client.
import java.util.ArrayList;

import org.geoserver.rest.format.StringFormat;

...

@Override

protected List<DataFormat> createSupportedFormats(Request request, Response response) {

   List<DataFormat> formats = new ArrayList();

   formats.add(new StringFormat( MediaType.TEXT_PLAIN ));

   return formats;

}
The next step is to override the handleGet() method. This method is called when a GET request is made for the resource.
@Override

public void handleGet() {

   //get the appropriate format

   DataFormat format = getFormatGet();

   //transform the string "Hello World" to the appropriate response

   getResponse().setEntity(format.toRepresentation("Hello World"));

}
The above makes use of the getFormatGet() method, whose purpose is to determine the extension being requested by the client, and look up the appropriate format for it. In this case when the client requests the ”.txt” extension, the StringFormat setup in the previous step will be found.
创建一个application context
The next step is to create an application context that tells GeoServer about the resource created in the previous section. Create the directory src/main/resources under the root of the hello_rest module:
[hello_rest]% mkdir src/main/resources
Add the following applicationContext.xml file to the src/main/resources directory under the root of thehello_rest module.
 <!DOCTYPE beans PUBLIC "-//SPRING//DTD BEAN//EN" "http://www.springframework.org/dtd/spring-beans.dtd">

 <beans>

    <bean id="hello" class="org.geoserver.hellorest.HelloResource"/>

    <bean id="helloMapping" class="org.geoserver.rest.RESTMapping">

       <property name="routes">

          <map>

            <entry>

              <key><value>/hello.{format}</value></key>

              <value>hello</value>

            </entry>

         </map>

      </property>

    </bean>

</beans>
There are two things to note above. The first is the hello bean which is an instance of the HelloResourceclass created in the previous section. The second is the helloMapping bean, which defines a template for the uri in which the resource will be accessed. The above mapping specifies that the resource will be located at /rest/hello.{format} where format is the representation being requested by the client. As implemented hello.txt is the only supported representation
geoserver的rest服务介绍,搭建java程序的更多相关文章
- linux(ubuntu) 搭建java程序运行环境
一:简介 ubuntu 系统的和linux差不多,我们需要在系统上搭建java程序运行环境,需要安装jdk,mysql这两个软件,tomcat是绿色版,直接通过taz -zxvf tomcat 就可以 ...
- Java基础知识强化之网络编程笔记25:Android网络通信之 Future接口介绍(Java程序执行超时)
1. Future接口简介 在Java中,如果需要设定代码执行的最长时间,即超时,可以用Java线程池ExecutorService类配合Future接口来实现. Future接口是Java标准API ...
- 将springboot打包成的jar文件做成windows服务,解决java程序自启动问题
https://blog.csdn.net/weixin_40411331/article/details/80193376 https://blog.csdn.net/qq_33188180/art ...
- 将Java程序作成exe文件的几种方法【转载】
看到网上有同志的介绍将Java程序作成exe文件的方法,写的不错,但是也许是这篇文章完成的时间比较早,许多内容已经不合适了.我在这里补充几条: 一.exe4j 说明:exe4j可以将Jar文件制作成e ...
- 搭建java开发环境
windows 去Oracle官网下载exe文件,双击安装. 修改系统环境变量(我的电脑 -> 属性 -> 高级 -> 环境变量). JAVA_HOME: D:\Java\jdk1. ...
- java程序运行时内存分配详解
java程序运行时内存分配详解 这篇文章主要介绍了java程序运行时内存分配详解 ,需要的朋友可以参考下 一. 基本概念 每运行一个java程序会产生一个java进程,每个java进程可能包含一个 ...
- 从安装linux(centos7.6)系统到部署springboot java程序到k8s(大纲)
本文说明从安装linux系统开始,一直到在k8s运行springboot程序全过程 本文假设在自己电脑操作,因此linux系统使用vmware虚拟机,linux发行版使用centos 7.6.1810 ...
- Java魔法堂:以Windows服务的形式运行Java程序
一.前言 由于防止维护人员误操作关闭Java控制台程序,因此决定将其改造为以Windows服务的形式运行.弄了一个上午总算搞定了,下面记录下来,以供日后查阅. 二.Java Service Wrapp ...
- 【转】介绍Jython,第一部分:轻轻松松写JAVA程序
本文转自:http://www.ibm.com/developerworks/cn/education/java/j-jython1/index.html 关于本教程 本教程介绍哪些内容? 这个两部分 ...
随机推荐
- ECCV 2018 | 旷视科技提出GridFace:通过学习局部单应变换实现人脸校正
全球计算机视觉三大顶会之一 ECCV 2018(European Conference on Computer Vision)即将于 9 月 8 -14 日在德国慕尼黑拉开帷幕,旷视科技有多篇论文被此 ...
- java内存模型(二)深入理解java内存模型的系列好文
深入理解java内存模型(一)--基础 深入理解java内存模型(二)--重排序 深入理解java内存模型(三)--顺序一致性 深入理解java内存模型(四)--volatile 深入理解java内存 ...
- Selenium如何定位动态id的元素?
怎么定位这类型的元素呢? 根据其他属性定位如果有其他固定属性,最先考虑的当然是根据元素的其他属性来定位,定位方式那么多,何必在这一棵树上吊死.. 根据相对关系定位根据其附近的父节点.子节点.兄弟节点定 ...
- myeclipse2016-ci破解疑难杂症问题整理
感谢网上的各位大神,在你们的基础,我又整理了下安装成功的心得,破解不成功时一定注意下红色字体内容,避免被坑,都是教训. 试了网上N种破解工具+方法,Myeclipse 2016装了很多遍(本人官网下载 ...
- Eclipse launch configuration----Eclipse运行外部工具
虽然我们已经有了像 Eclipse 这样高级的 IDE,但是我们有时候也是需要在开发的时候使用 Windows 的命令行,来运行一些独立的程序.在两个程序中切换来切换去是很麻烦的.所以 Eclipse ...
- JSTL-taglib
JSTL(JSP Standard Tag Lib) 目录: Core Fmt Function SimpleTagSupport(jsp 自定义标签) Tag File Core <%@ ta ...
- UI5-文档-1-前言
主要是将SAP UI5官网文档做下了解,相关内容请查阅:https://sapui5.hana.ondemand.com/#/topic 设置您的开发环境并阅读我们的教程.它们使用交互式格式中的实际示 ...
- 低版本eclipse离线集成svn步骤,亲测有效!!!
1.下载svn离线版的插件: 百度云盘链接:http://pan.baidu.com/s/1eSnMoHO 密码:6oef 2.解压出来的额目录如下: 3.将features和plugins里面的ja ...
- webserive学习记录3-eclipse创建webservice
在用J2EE版的ECLIPSE学习WEBSERVICE的时候发现原来直接用该ECLIPSE就可以创建webservice,然后就自己动手用ECLIPSE自带的功能来建立WEBSERVICE服务端和客户 ...
- Graylog安装配置
ES集群健康检测:curl -sXGET http://localhost:9200/_cluster/health?pretty=true | grep "status" | a ...