Spring Boot整合JPA、Redis和Swagger2
好久没有总结了,最近也一直在学习。今天就把spring boot与其它技术的整合做个小总结,主要是jpa、redis和swagger2。公司里有用到这些,整合起来也很简单。
首先,新建一个Spring Boot 的项目,我这里用的是之前一篇Spring Boot学习笔记---Spring Boot 基础及使用idea搭建项目
是同一个项目。这里我就不重新建项目了。
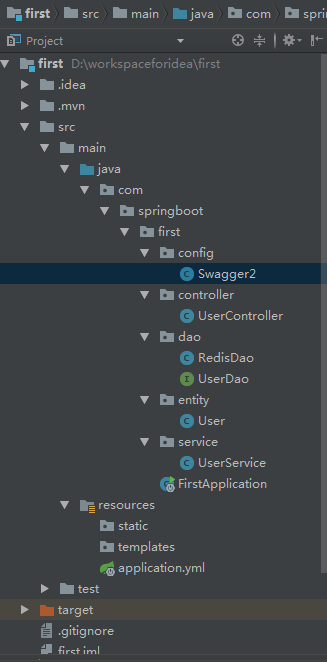
项目目录
1.Spring Boot整合JPA
JPA我用的不是很多,但是在学习springboot和cloud的时候,都是用的jpa进行数据库的操作,如果感觉兴趣可以去学习一下。
1. 添加依赖
<dependency>

			<groupId>org.springframework.boot</groupId>

			<artifactId>spring-boot-starter-web</artifactId>

		</dependency>

		<dependency>

			<groupId>org.springframework.boot</groupId>

			<artifactId>spring-boot-starter-test</artifactId>

			<scope>test</scope>

		</dependency>

		<dependency>

			<groupId>org.springframework.boot</groupId>

			<artifactId>spring-boot-starter-data-jpa</artifactId>

		</dependency>

		<dependency>

			<groupId>mysql</groupId>

			<artifactId>mysql-connector-java</artifactId>

			<version>5.1.38</version>

			<scope>runtime</scope>

		</dependency>
2.配置数据源
之前项目的配置文件是application.properties格式的,这里我换成了application.yml格式的文件。作用是一样的。
    spring:

      datasource:

        driver-class-name: com.mysql.jdbc.Driver

        url: jdbc:mysql://localhost:3306/spring-cloud?useUnicode=true&characterEncoding=utf8&characterSetResults=utf8

        username: root

        password: 1111

      jpa:

        hibernate:

          ddl-auto: create #第一次建表 create 后面用update

        show-sql: true
3.创建实体对象,jpa根据注解自动建表
 package com.springboot.first.entity;

import javax.persistence.*;

/**

 * @Package main.java.com.jpa.jpastart.entity

 * @Description: 用户

 * @auther MZ

 * @create 2018/5/30 21:11

 */

@Entity

public class User {

    @Id

    @GeneratedValue(strategy = GenerationType.IDENTITY)

    private Long id;

    @Column(nullable = false, unique = true)

    private String username;

    @Column

    private String password;

    //……省略

}
4.创建Dao层
package com.springboot.first.dao;

import com.springboot.first.entity.User;

import org.springframework.data.jpa.repository.JpaRepository;

/**

 *

 */

public interface UserDao extends JpaRepository<User, Long> {

    User findByUsername(String username);

}
5.创建service层
package com.springboot.first.service;

import com.springboot.first.dao.UserDao;

import com.springboot.first.entity.User;

import org.springframework.beans.factory.annotation.Autowired;

import org.springframework.stereotype.Service;

import java.util.List;

/**

 * @Package main.java.com.jpa.jpastart.service

 * @Description: 用户service

 * @auther MZ

 * @create 2018/5/30 21:21

 */

@Service

public class UserService {

    @Autowired

    private UserDao userDao;

    public User findUserByName(String username) {

        return userDao.findByUsername(username);

    }

}
6.创建controller层
package com.springboot.first.controller;
import com.springboot.first.entity.User;
import com.springboot.first.service.UserService;
import io.swagger.annotations.ApiOperation;
import org.springframework.beans.factory.annotation.Autowired;
import org.springframework.web.bind.annotation.*;
import java.util.List;
/**
* @Package main.java.com.jpa.jpastart.controller
* @Description: 控制器
* @auther MZ
* @create 2018/5/30 21:23
*/
@RequestMapping("/user")
@RestController
public class UserController {
@Autowired
UserService userService;
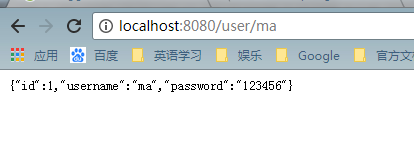
@GetMapping("/{username}")
public User getUser(@PathVariable("username") String username) {
return userService.findUserByName(username);
}
}
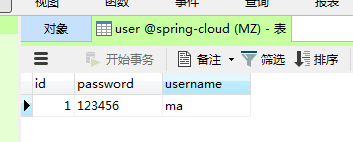
7.运行项目,查看结果,表建好后,可以插入几条测试数据,方便查看。
2.Spring Boot整合Redis
关于redis的安装,可以参考Redis学习-redis概述
1.添加依赖
<dependency>

			<groupId>org.springframework.boot</groupId>

			<artifactId>spring-boot-starter-data-redis</artifactId>

		</dependency>
2.添加配置信息
spring:

    redis:

        host: localhost

        port: 6379

        password:

        database: 1

        pool:

            max-active: 8

            max-wait: -1

            max-idle : 500
3.添加RedisDao类,通过注解@Repository注入Spring IoC容器中。
package com.springboot.first.dao;

import org.springframework.beans.factory.annotation.Autowired;

import org.springframework.data.redis.core.StringRedisTemplate;

import org.springframework.data.redis.core.ValueOperations;

import org.springframework.stereotype.Repository;

import java.util.concurrent.TimeUnit;

/**

 * @Package com.springboot.first.dao

 * @Description: redis测试

 * @auther MZ

 * @create 2018/5/31 20:56

 */

@Repository

public class RedisDao {

    @Autowired

    private StringRedisTemplate template;

    public void setKey(String key, String value) {

        ValueOperations<String, String > ops = template.opsForValue();

        ops.set(key,value,1, TimeUnit.MINUTES);

    }

    public String getValue(String key) {

        ValueOperations<String, String> ops = this.template.opsForValue();

        return ops.get(key);

    }

}
4.在FirstApplicationTests 添加测试方法

package com.springboot.first;

import com.springboot.first.dao.RedisDao;

import org.junit.Test;

import org.junit.runner.RunWith;

import org.springframework.beans.factory.annotation.Autowired;

import org.springframework.boot.test.context.SpringBootTest;

import org.springframework.test.context.junit4.SpringRunner;

@RunWith(SpringRunner.class)

@SpringBootTest

public class FirstApplicationTests {

	@Test

	public void contextLoads() {

	}

	@Autowired

	RedisDao redisDao;

	@Test

	public void testRedis(){

		redisDao.setKey("name","ma");

		redisDao.setKey("age","24");

		System.out.println(redisDao.getValue("name"));

		System.out.println(redisDao.getValue("age"));

	}

}
5.运行

3.Spring Boot整合Swagger2,搭建Restful Api在线文档
Swagger是一个功能强大的在线API文档的框架,公司整合用来开发对外接口。
1.添加依赖
<dependency>

			<groupId>io.springfox</groupId>

			<artifactId>springfox-swagger2</artifactId>

			<version>2.6.1</version>

		</dependency>

		<dependency>

			<groupId>io.springfox</groupId>

			<artifactId>springfox-swagger-ui</artifactId>

			<version>2.6.1</version>

		</dependency>
2.配置Swagger2,新建一个java类,做为配置类。
package com.springboot.first.config;

import org.springframework.context.annotation.Bean;

import org.springframework.context.annotation.Configuration;

import springfox.documentation.builders.ApiInfoBuilder;

import springfox.documentation.builders.PathSelectors;

import springfox.documentation.builders.RequestHandlerSelectors;

import springfox.documentation.service.ApiInfo;

import springfox.documentation.spi.DocumentationType;

import springfox.documentation.spring.web.plugins.Docket;

import springfox.documentation.swagger2.annotations.EnableSwagger2;

/**

 * @Package com.springboot.first.config

 * @Description: swagger2配置

 * @auther MZ

 * @create 2018/6/1 21:12

 */

@Configuration

@EnableSwagger2

public class Swagger2 {

    @Bean

    public Docket createRestApi() {

        return new Docket(DocumentationType.SWAGGER_2)

                .apiInfo(apiInfo())

                .select()

                .apis(RequestHandlerSelectors.basePackage("com.springboot.first.controller"))

                .paths(PathSelectors.any())

                .build();

    }

    private ApiInfo apiInfo() {

        return new ApiInfoBuilder()

                .title("springboot利用swagger构建api文档")

                .description("学习使用,https://home.cnblogs.com/u/black-spike/")

                .termsOfServiceUrl("https://home.cnblogs.com/u/black-spike/")

                .version("1.0")

                .build();

    }

}
3.文档注解
Swagger2通过注解来生成API接口文档,文档信息包括接口名、请求方法、参数、返回信息等。通常情况下生成的API文档,以下接口可以满足基本的需求:
- @Api:修饰整个类,用于描述Controller类。
- @ApiOperation:描述类的方法,或者说一个接口。
- @ApiParam:单个参数描述。
- @ApiModel:用于对象来接收参数。
- @ApiProperty:用对象接收参数时,描述对象的一个字段。
- @ApiResponse:HTTP响应一个描述。
- @ApiResponses:HTTP响应的整体描述
- @APiIgnore:使用该注解,表述Swagger2忽略这个API。
- @ApiError:发生错误返回的信息。
- @ApiParamImplicit:一个请求参数。
11.@ApiParamsImplicit:多个请求参数。
4.在userservice中添加方法
public List<User> findAll() {

        return userDao.findAll();

    }
5.在UserController中添加一个RESTful风格的API接口
@ApiOperation(value = "用户列表", notes = "用户列表")

    @RequestMapping(value = {""}, method = RequestMethod.GET)

    public List<User> getUsers() {

        List<User> users = userService.findAll();

        return users;

    }
6.运行,在页面输入http://localhost:8080/swagger-ui.html

小结
一直学习,但是都没有好好的去总结。感觉这以后会用的到,到时候就方便一下了。
Spring Boot整合JPA、Redis和Swagger2的更多相关文章
- spring boot 系列之四:spring boot 整合JPA
上一篇我们讲了spring boot 整合JdbcTemplate来进行数据的持久化, 这篇我们来说下怎么通过spring boot 整合JPA来实现数据的持久化. 一.代码实现 修改pom,引入依赖 ...
- Spring Boot 整合 JPA 使用多个数据源
介绍 JPA(Java Persistence API)Java 持久化 API,是 Java 持久化的标准规范,Hibernate 是持久化规范的技术实现,而 Spring Data JPA 是在 ...
- Spring Boot2 系列教程(二十五)Spring Boot 整合 Jpa 多数据源
本文是 Spring Boot 整合数据持久化方案的最后一篇,主要和大伙来聊聊 Spring Boot 整合 Jpa 多数据源问题.在 Spring Boot 整合JbdcTemplate 多数据源. ...
- Spring Boot2 系列教程(二十四)Spring Boot 整合 Jpa
Spring Boot 中的数据持久化方案前面给大伙介绍了两种了,一个是 JdbcTemplate,还有一个 MyBatis,JdbcTemplate 配置简单,使用也简单,但是功能也非常有限,MyB ...
- 手把手教你Spring Boot整合Mybatis Plus和Swagger2
前言:如果你是初学者,请完全按照我的教程以及代码来搭建(文末会附上完整的项目代码包,你可以直接下载我提供的完整项目代码包然后自行体验!),为了照顾初学者所以贴图比较多,请耐心跟着教程来,希望这个项目D ...
- spring boot 整合JPA多数据源
上个文章介绍了spring boot在使用Mybatis持久化技术的时候如何使用多数据源,今天再补充一个使用spring data jpa实现多数据源的使用情况,JPA是一套数据库持久化规范,或者称之 ...
- Spring Boot从入门到精通之:二、Spring Boot整合JPA
springboot-jpa 开发工具 系统: windows10 开发工具: Intellij IDEA 2018.2.6 springboot: 2.0.6.RELEASE jdk: 1.8.0_ ...
- spring boot - 整合jpa
<dependency> <groupId>org.springframework.boot</groupId> <artifactId>spring- ...
- spring boot 整合JPA bean注入失败
有时候报的错误让你匪夷所思,找错误得学会找根.源头在哪里? 比如:我们刚开始看的错误就是 org.springframework.beans.factory.UnsatisfiedDependency ...
随机推荐
- P4777 【模板】扩展中国剩余定理(EXCRT)&& EXCRT
EXCRT 不保证模数互质 \[\begin{cases} x \equiv b_1\ ({\rm mod}\ a_1) \\ x\equiv b_2\ ({\rm mod}\ a_2) \\ ... ...
- P1075 质因数分解
P1075 质因数分解 题目描述 已知正整数 n 是两个不同的质数的乘积,试求出两者中较大的那个质数. 输入输出格式 输入格式: 一个正整数 n . 输出格式: 一个正整数 p ,即较大的那个质数. ...
- Hadoop生态圈-使用phoenix的API进行JDBC编程
Hadoop生态圈-使用phoenix的API进行JDBC编程 作者:尹正杰 版权声明:原创作品,谢绝转载!否则将追究法律责任.
- Hadoop生态圈-HBase性能优化
Hadoop生态圈-HBase性能优化 作者:尹正杰 版权声明:原创作品,谢绝转载!否则将追究法律责任.
- 服务器IP安全策略限制网络访问
https://jingyan.baidu.com/article/3c343ff714d4890d377963cd.html https://www.icbase.com/TestGetUrl.as ...
- 博世传感器调试笔记(二)加速度及陀螺仪传感器BMI160
一.功能参数简介bosch Sensortec公司推出的最新BMI160惯性测量单元将最顶尖的16位3轴超低重力加速度计和超低功耗3轴陀螺仪集成于单一封装.MI160采用14管脚LGA封装,尺寸为2. ...
- 【官方文档】Nginx负载均衡学习笔记(二)负载均衡基本概念介绍
简介 负载均衡(Server Load Balancer)是将访问流量根据转发策略分发到后端多台 ECS 的流量分发控制服务.负载均衡可以通过流量分发扩展应用系统对外的服务能力,通过消除单点故障提升应 ...
- RTSP服务器之————rtsp-server(轻量级RTSP / RTP流媒体服务器)
github:https://github.com/revmischa/rtsp-server 轻量级RTSP / RTP流媒体服务器
- Metrics.Net实践(2)在WEB中应用度量
Gauges 可以画出Http Request执行时间的波形图: actionInfo表示MVC中的Action,即按照action类型来分组 Metric.Context(this.actionIn ...
- 用JS获得QQ号码的昵称,头像,生日
有一个网址,可以返回我们要的内容. http://r.qzone.qq.com/cgi-bin/user/cgi_personal_card?uin=指定QQ号码 将会返回下列内容: _Callbac ...