Spring源码情操陶冶-任务定时器ConcurrentTaskScheduler
承接前文Spring源码情操陶冶#task:scheduled-tasks解析器,本文在前文的基础上讲解单核心线程线程池的工作原理
应用附例
承接前文的例子,如下
<!--define bean for schedule task-->

<bean id="taskBean" class="com.jing.test.spring.task.TaskBean"></bean>

<task:scheduled-tasks>

    <task:scheduled ref="taskBean" method="doInit" cron="0 0 0 ? * *"></task:scheduled>

    <task:scheduled ref="taskBean" method="doClear" cron="0 0 23 ? * *"></task:scheduled>

</task:scheduled-tasks>
即我们不配置task:scheduled-tasks的属性scheduler,则会采取org.springframework.scheduling.concurrent.ConcurrentTaskScheduler任务定时器。
实例化缘由
可以直接去看前文的ContextLifecycleScheduledTaskRegistrar#scheduleTasks()的一个代码片段,如下
protected void scheduleTasks() {

		****

		****

		// 如果不指定scheduler属性,则默认使用单线程池模型

        if (this.taskScheduler == null) {

            this.localExecutor = Executors.newSingleThreadScheduledExecutor();

            this.taskScheduler = new ConcurrentTaskScheduler(this.localExecutor);

        }

        ****

}
我们可以观察下该定时器所包含的线程池对象,调用的是JDK Executors的静态方法newSingleThreadScheduledExecutor()方法
public static ScheduledExecutorService newSingleThreadScheduledExecutor() {

        return new DelegatedScheduledExecutorService

            (new ScheduledThreadPoolExecutor(1));

    }
直接去看ScheduledThreadPoolExecutor构造函数
    public ScheduledThreadPoolExecutor(int corePoolSize) {

	    // 应用ThreadPoolExecutor的构造方法,这里很熟悉了

        super(corePoolSize, Integer.MAX_VALUE, 0, NANOSECONDS,

              new DelayedWorkQueue());

    }
从上面看出,创建的线程池类型为ScheduledThreadPoolExecutor,其内部情况如下
- 核心线程-1个
- 最大可创建线程-Integer.MAX_VALUE
- 空闲线程活动时间-0秒
- 线程队列-DelayedWorkQueue
- 拒绝策略-AbortPolicy(抛异常信息)
定时器执行入口
由前文得知,定时器会根据任务的类型执行TaskScheduler接口的scheduleAtFixedRate()或者scheduleWithFixedDelay()抑或是schedule()方法。为了方便理解,我们就拿schedule()方法入手
ConcurrentTaskScheduler#schedule()
	@Override

	public ScheduledFuture<?> schedule(Runnable task, Trigger trigger) {

		try {

			// jdk1.8不支持,jdk1.7支持

			if (this.enterpriseConcurrentScheduler) {

				return new EnterpriseConcurrentTriggerScheduler().schedule(decorateTask(task, true), trigger);

			}

			else {

				// ErrorHandler一般为LoggingErrorHandler,打印错误日志,也可以直接抛出异常

				ErrorHandler errorHandler = (this.errorHandler != null ? this.errorHandler : TaskUtils.getDefaultErrorHandler(true));

				return new ReschedulingRunnable(task, trigger, this.scheduledExecutor, errorHandler).schedule();

			}

		}

		catch (RejectedExecutionException ex) {

			throw new TaskRejectedException("Executor [" + this.scheduledExecutor + "] did not accept task: " + task, ex);

		}

	}
由上述代码可知,最后包装为ReschedulingRunnable类来调用schedule()方法,OK,在此之前我们必须好好观察下ReschedulingRunnable
ReschedulingRunnable
首先看下其UML类图
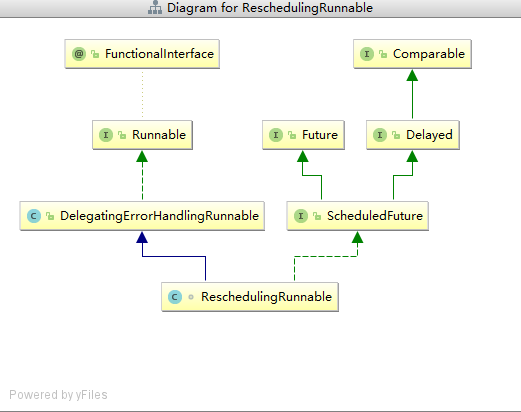
再看下其构造函数
	/**

	*  @param delegate ScheduledMethodRunnable.class Object

	*

	*  @param trigger 一般为CronTrigger

	*

	*  @param executor ScheduledThreadPoolExecutor.class Object

	*

	*  @param errorHandler 一般为LoggingErrorHandler.class Object

	*

	*/

	public ReschedulingRunnable(Runnable delegate, Trigger trigger, ScheduledExecutorService executor, ErrorHandler errorHandler) {

		// 由父类保存真实的Runnable对象

		super(delegate, errorHandler);

		this.trigger = trigger;

		this.executor = executor;

	}
- 然后直接看下
schedule()方法的代码
	public ScheduledFuture<?> schedule() {

		synchronized (this.triggerContextMonitor) {

			// 计算下一次执行的时间

			this.scheduledExecutionTime = this.trigger.nextExecutionTime(this.triggerContext);

			if (this.scheduledExecutionTime == null) {

				return null;

			}

			// 由上述的执行时间计算需要延迟的时间,精确到毫秒

			long initialDelay = this.scheduledExecutionTime.getTime() - System.currentTimeMillis();

			// 由ScheduledThreadPoolExecutor执行定时任务

			this.currentFuture = this.executor.schedule(this, initialDelay, TimeUnit.MILLISECONDS);

			return this;

		}

	}
- 为了理解方便,我们不直接跳至
ScheduledThreadPoolExecutor看源码,我们脑壳想想,肯定会调用其中的run()方法
	@Override

	public void run() {

		Date actualExecutionTime = new Date();

		// 调用委托类DelegatingErrorHandlingRunnable的run方法

		super.run();

		// 更新时间戳并回调shedule()方法使其能周期性执行任务

		Date completionTime = new Date();

		synchronized (this.triggerContextMonitor) {

			this.triggerContext.update(this.scheduledExecutionTime, actualExecutionTime, completionTime);

			if (!this.currentFuture.isCancelled()) {

				schedule();

			}

		}

	}
直接看下父类DelegatingErrorHandlingRunnable#run()方法
	@Override

	public void run() {

		try {

			this.delegate.run();

		}

		catch (UndeclaredThrowableException ex) {

			this.errorHandler.handleError(ex.getUndeclaredThrowable());

		}

		catch (Throwable ex) {

			this.errorHandler.handleError(ex);

		}

	}
上述的代码则会去执行委托类ScheduledMethodRunnable的run()方法,脑壳想想就是通过JDK的method.invoke(Object obj,Object.. args)方法执行我们自定义写的业务。并由errorHandler捕获异常进行善后,默认只是进行error级别的日志输出。
- 对此类作下小结
执行定时器最终调用
ScheduledThreadPoolExecutor#schedule()方法,并返回ScheduledFuture对象其
run()方法最终会调用ScheduledMethodRunnable对象来执行用户自定义的业务其
run()方法也会调用schedule()方法来重复执行第一点的步骤以达到定时执行的效果
ConcurrentTaskScheduler如何保证单线程活跃执行任务
我们从上文得知,其corePoolSize=1,最终原因我们需要从ScheduledThreadPoolExecutor这个继承了ThreadPoolExecutor通用线程池类来了解
ScheduledThreadPoolExecutor#schedule()
直接看下源码
    public ScheduledFuture<?> schedule(Runnable command,

                                       long delay,

                                       TimeUnit unit) {

        if (command == null || unit == null)

            throw new NullPointerException();

        // 直接返回ScheduledFutureTask对象

        RunnableScheduledFuture<?> t = decorateTask(command,

            new ScheduledFutureTask<Void>(command, null,

                                          triggerTime(delay, unit)));

        // 延迟执行策略,继续追踪

        delayedExecute(t);

        return t;

    }
继续追踪delayedExecute()方法
    private void delayedExecute(RunnableScheduledFuture<?> task) {

	    // 如果线程池关闭了则直接拒绝任务

        if (isShutdown())

            reject(task);

        else {

	        // 优先将任务放入DelayQueue队列

            super.getQueue().add(task);

            // 保护策略,避免添加到队列后线程池关闭了,尝试删除任务

            if (isShutdown() &&

                !canRunInCurrentRunState(task.isPeriodic()) &&

                remove(task))

                task.cancel(false);

            else

	            // 确保已有线程在跑

                ensurePrestart();

        }

    }
继续追踪ensurePrestart()方法
    void ensurePrestart() {

        int wc = workerCountOf(ctl.get());

        if (wc < corePoolSize)

            addWorker(null, true);

        else if (wc == 0)

            addWorker(null, false);

    }
由上述的源码我们可以得知
当线程池数小于执行的核心线程数
corePoolSize,则会创建线程,不管核心与否我们都可以得知一旦当前线程数>=核心线程数,则不会进行新线程的创建
ConcurrentTaskScheduler指定的corePoolSize=1,由第一点得知,永远只有一个线程存在于线程池中
ConcurrentTaskScheduler如何保证任务延迟指定时长后被执行
为了避免大片的源码影响我们的阅读以及理解,博主只在此处指出ConcurrentTaskScheduler所拥有DelayQueue队列的take()方法实现了延迟等待的效果
    public E take() throws InterruptedException {

        final ReentrantLock lock = this.lock;

        // 可重入同步锁,确保该方法线程安全

        lock.lockInterruptibly();

        try {

            for (;;) {

                E first = q.peek();

                // 队列无任务,那就处于休眠等待

                if (first == null)

                    available.await();

                else {

	                // 获取还需等待的时间

                    long delay = first.getDelay(NANOSECONDS);

                    if (delay <= 0)

                        return q.poll();

                    first = null; // don't retain ref while waiting

                    if (leader != null)

                        available.await();

                    else {

                        Thread thisThread = Thread.currentThread();

                        leader = thisThread;

                        try {

	                        // 等待相应的时间后才可放行,采取的是Condition的机制

                            available.awaitNanos(delay);

                        } finally {

                            if (leader == thisThread)

                                leader = null;

                        }

                    }

                }

            }

        } finally {

	        // 唤醒等待的线程或者等待的条件

            if (leader == null && q.peek() != null)

                available.signal();

            lock.unlock();

        }

    }
上述代码用到了可重入锁以及锁条件Condition的相关知识,后续会详细分析锁的相关知识。此处作下总结
ReentrantLock锁为可重入锁,即相同的线程可再次获取该锁,不必等待阻塞
ReentrantLock的Condition机制,其类似于Object.wait()机制其调用
available.awaitNanos(delay);方法使当前线程休眠指定的时间后,最终会调用q.poll()方法返回待处理的任务有兴趣的读者可自行阅读
ThreadPoolExecutor的runWorker()方法和getTask()方法,便可以彻底理解ScheduledThreadPoolExecutor的定时机制
小结
CocurrentTaskScheduler指定的单线程模型,会让任务按照FIFO的机制有序的被执行,这个模型不大适合多个任务的同时定时执行,会导致任务执行有一定的延迟性。所以建议与spring结合时配置task:scheduler并配置pool-size属性
Spring源码情操陶冶-任务定时器ConcurrentTaskScheduler的更多相关文章
- Spring源码情操陶冶#task:scheduled-tasks解析器
承接前文Spring源码情操陶冶#task:executor解析器,在前文基础上解析我们常用的spring中的定时任务的节点配置.备注:此文建立在spring的4.2.3.RELEASE版本 附例 S ...
- Spring源码情操陶冶-AbstractApplicationContext#finishBeanFactoryInitialization
承接前文Spring源码情操陶冶-AbstractApplicationContext#registerListeners 约定web.xml配置的contextClass为默认值XmlWebAppl ...
- Spring源码情操陶冶-AbstractApplicationContext#registerListeners
承接前文Spring源码情操陶冶-AbstractApplicationContext#onRefresh 约定web.xml配置的contextClass为默认值XmlWebApplicationC ...
- Spring源码情操陶冶-AbstractApplicationContext#onRefresh
承接前文Spring源码情操陶冶-AbstractApplicationContext#initApplicationEventMulticaster 约定web.xml配置的contextClass ...
- Spring源码情操陶冶-AbstractApplicationContext#initApplicationEventMulticaster
承接前文Spring源码情操陶冶-AbstractApplicationContext#initMessageSource 约定web.xml配置的contextClass为默认值XmlWebAppl ...
- Spring源码情操陶冶-AbstractApplicationContext#initMessageSource
承接前文Spring源码情操陶冶-AbstractApplicationContext#registerBeanPostProcessors 约定web.xml配置的contextClass为默认值X ...
- Spring源码情操陶冶-AbstractApplicationContext#registerBeanPostProcessors
承接前文Spring源码情操陶冶-AbstractApplicationContext#invokeBeanFactoryPostProcessors 瞧瞧官方注释 /** * Instantiate ...
- Spring源码情操陶冶-AbstractApplicationContext#invokeBeanFactoryPostProcessors
阅读源码有利于陶冶情操,承接前文Spring源码情操陶冶-AbstractApplicationContext#postProcessBeanFactory 约定:web.xml中配置的context ...
- Spring源码情操陶冶-AbstractApplicationContext#postProcessBeanFactory
阅读源码有利于陶冶情操,承接前文Spring源码情操陶冶-AbstractApplicationContext#prepareBeanFactory 约定:web.xml中配置的contextClas ...
随机推荐
- thinkphp5多图上传 js部分
在项目中常会用到多图上上传,那就需要多图上传后需要预览,并且能删掉传错(不想传)的图,然而 测试了半天 并不知道jq怎么写,parent()parents()用了半天无果,罢了,还是用原生js来写.这 ...
- java 10 中 var关键字用法
引用:https://mp.weixin.qq.com/s/n1tcJ0CywSi0j-YycGPwxg what java10引入了局部变量折断 var用于声明局部变量. 如var user=new ...
- 希尔排序(shell‘ sort)
希尔排序是1959 年由D.L.Shell 提出来的,相对直接排序有较大的改进.希尔排序又叫缩小增量排序 基本思想: 先将整个待排序的记录序列分割成为若干子序列分别进行直接插入排序,待整个序列中的记录 ...
- Tomact高并发&Servlet线程处理
Servlet/JSP技术和ASP.PHP等相比,由于其多线程运行而具有很高的执行效率.由于Servlet/JSP默认是以多线程模式执行的,所以,在编写代码时需要非常细致地考虑多线程的安全性问题.然而 ...
- Linux下的/etc/hosts文件
在Unix系统下面有一个/etc/hosts文件,在我的Mac上,这个文件的内容如下: ## # Host Database # # localhost is used to configure th ...
- Comparable接口和Comparator接口
1.一个类在设计之初就要实现对该类对象的排序功能,那么这个类要实现Comparable接口,实现public int compareTo(T t)方法.如代码中的Student类.对于实现Compar ...
- 面试常考---html篇
1.html5新特性,语义化 HTML5为我们提供了一系列的语义标签. 1.<section></section> 定义文档中的主体部分的节.段. 2.<article& ...
- (译文)学习ES6非常棒的特性-字符串常量基础
字符串常量基础 在ES2015之前我们是这么拼接字符串的: var result = 10; var prefix = "the first double digit number I le ...
- hibernate框架学习笔记1:搭建与测试
hibernate框架属于dao层,类似dbutils的作用,是一款ORM(对象关系映射)操作 使用hibernate框架好处是:操作数据库不需要写SQL语句,使用面向对象的方式完成 这里使用ecli ...
- 福州大学W班-Beta冲刺评分
作业链接 https://edu.cnblogs.com/campus/fzu/FZUSoftwareEngineering1715W/homework/1428 作业要求 1.博客具体要求 昨天的困 ...