Spring Security系列之极速入门与实践教程
@
1. Spring Security
Spring Security 是 Spring 家族中的一个安全管理框架,应用程序的两个主要区域是“认证”和“授权”(或者访问控制)。Spring Security是针对Spring项目的安全框架,也是Spring Boot底层安全模块默认的技术选型
这两个主要区域是Spring Security 的两个目标。
- “认证”(Authentication),是建立一个他声明的主体的过程(一
个“主体”一般是指用户,设备或一些可以在你的应用程序中执行动
作的其他系统)。 - “授权”(Authorization)指确定一个主体是否允许在你的应用程序
执行一个动作的过程。为了抵达需要授权的店,主体的身份已经有认
证过程建立。
2. 实验环境准备
环境准备:
- JDK 1.8
- SpringBoot2.2.1
- Maven 3.2+
- 开发工具
- IntelliJ IDEA
- smartGit
创建一个SpringBoot Initialize项目,详情可以参考我之前博客:SpringBoot系列之快速创建项目教程
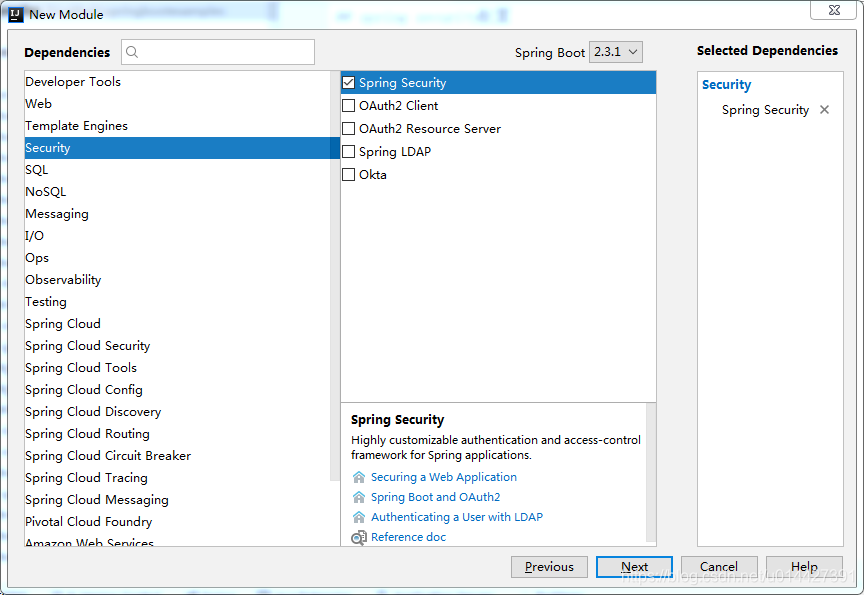
新建项目后,检查一下spring-boot-starter-security场景启动器是否配置成功,不需要写版本
<dependency>

            <groupId>org.springframework.boot</groupId>

            <artifactId>spring-boot-starter-security</artifactId>

        </dependency>
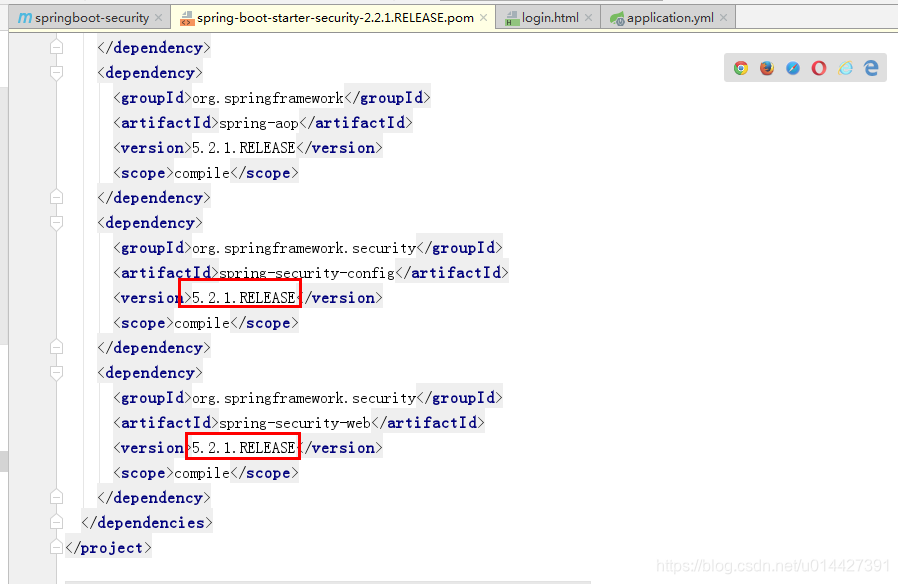
SpringBoot有版本仲裁机制,SpringBoot2.2.1的spring-boot-starter-security依赖的Spring security版本是5.2.1的
3. 日志级别修改
配置Spring Security日志级别,默认是info的,可以修改为debug
## logback配置

logging:

  level:

    org:

      springframework:

        security: info
4. 配置用户名/密码
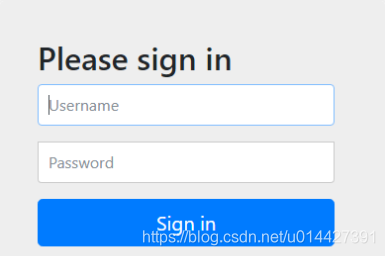
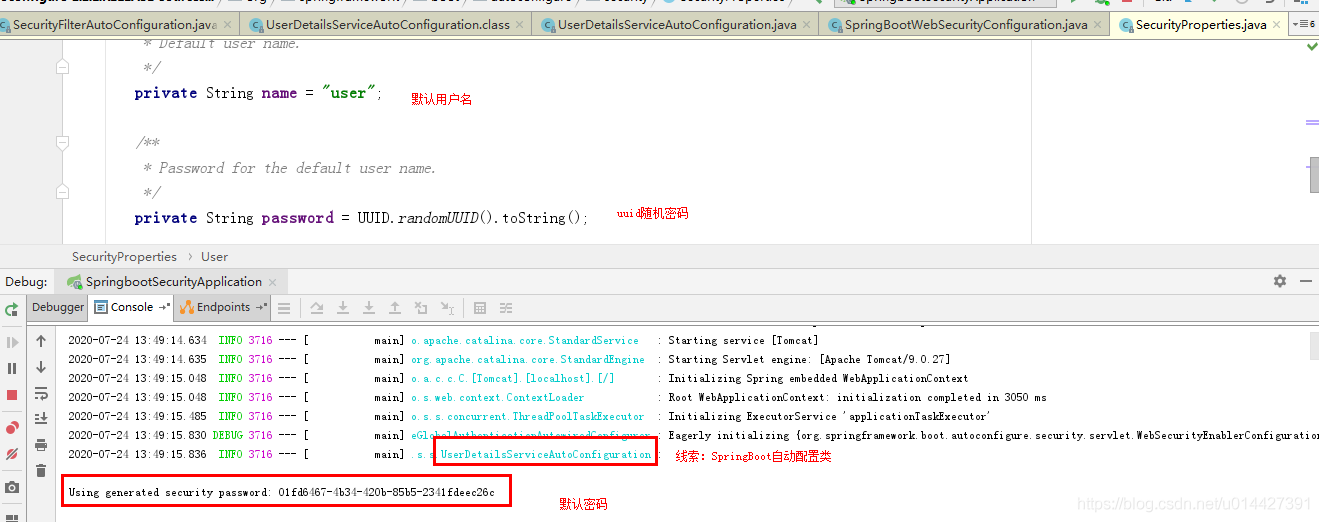
随便写个接口,访问时候,就会跳到如下图的登录页面,为什么?我们只是引入maven配置而已,然后账号密码是什么?其实这个是Spring Security的默认登录页面,页面代码是在jar包里的,默认的username是user,密码是随机生成的uuid格式的密码
密码会在控制台打印,根据线索,找到自动配置类
要修改默认密码,可以新建application.yml配置文件,加上如下配置
## spring security配置

spring:

  security:

    user:

      name: nicky

      password: 123
也可以新建Spring Security配置类,注意Spring Security5.2.1版本,配置密码要用BCryptPasswordEncoder加密,不过登录还是明文,Spring Security不同版本各有差别,详情配置还是参考官方文档
@Configuration

public class SecurityConfiguration extends WebSecurityConfigurerAdapter {

    @Override

    protected void configure(AuthenticationManagerBuilder auth) throws Exception {    //auth.inMemoryAuthentication()

        auth.inMemoryAuthentication()

                .withUser("nicky")

                .password(bcryptPasswordEncoder().encode("123"))

                .roles("admin");

    }

	@Bean

    public PasswordEncoder bcryptPasswordEncoder() {

        return new BCryptPasswordEncoder();

    }

}
| 加密方式 | security 4 | security 5 |
|---|---|---|
| bcrypt | password | {bcrypt}password |
| ldap | password | {ldap}password |
| MD4 | password | {MD4}password |
| MD5 | password | {MD5}password |
| noop | password | {noop}password |
| pbkdf2 | password | {pbkdf2}password |
| scrypt | password | {scrypt}password |
| SHA-1 | password | {SHA-1}password |
| SHA-256 | password | {SHA-256}password |
| sha256 | password | {sha256}password |
5. 数据库方式校验
拓展:如果要数据库方式校验用户名密码,可以自定义UserDetailsService方式:
@Override

    protected void configure(AuthenticationManagerBuilder auth) throws Exception {

        auth.userDetailsService(userDetailsService)

                .passwordEncoder(new CustomPasswordEncoder());

        auth.parentAuthenticationManager(authenticationManagerBean());

    }
UserDetailsServiceImpl.java
package com.example.springboot.oauth2.service;

import com.example.springboot.oauth2.entity.User;

import com.example.springboot.oauth2.mapper.UserMapper;

import lombok.extern.slf4j.Slf4j;

import org.springframework.beans.factory.annotation.Autowired;

import org.springframework.security.core.authority.SimpleGrantedAuthority;

import org.springframework.security.core.userdetails.UserDetails;

import org.springframework.security.core.userdetails.UserDetailsService;

import org.springframework.security.core.userdetails.UsernameNotFoundException;

import org.springframework.stereotype.Service;

import java.util.Arrays;

import java.util.List;

/**

 * <pre>

 *

 * </pre>

 *

 * <pre>

 * @author mazq

 * 修改记录

 *    修改后版本:     修改人:  修改日期: 2020/04/30 15:15  修改内容:

 * </pre>

 */

@Slf4j

@Service("userService")

public class UserDetailsServiceImpl implements UserDetailsService {

    @Autowired

    UserMapper userRepository;

    @Override

    public UserDetails loadUserByUsername(String username) throws UsernameNotFoundException {

        User user = userRepository.findByUsername(username);

        if(user == null){

            log.info("登录用户[{}]没注册!",username);

            throw new UsernameNotFoundException("登录用户["+username + "]没注册!");

        }

        return new org.springframework.security.core.userdetails.User(user.getUsername(), user.getPassword(), getAuthority());

    }

    private List getAuthority() {

        return Arrays.asList(new SimpleGrantedAuthority("ROLE_ADMIN"));

//        return Arrays.asList(Collections.emptyList());

    }

}
@Override

    protected void configure(HttpSecurity http) throws Exception {

        http   // 配置登录页并允许访问

                .formLogin().usernameParameter("username").passwordParameter("password").loginPage("/login").permitAll()

                // 配置Basic登录

                //.and().httpBasic()

                // 配置登出页面

                .and().logout().logoutUrl("/logout").logoutSuccessUrl("/")

                // 开放接口访问权限,不需要登录授权就可以访问

                .and().authorizeRequests().antMatchers("/oauth/**", "/login/**", "/logout/**").permitAll()

                // api接口需要admin管理员才能访问

                .antMatchers("/api/**").hasRole("admin")

                // 其余所有请求全部需要鉴权认证

                .anyRequest().authenticated()

                // 关闭跨域保护;

                .and().csrf().disable();

    }
6. 不拦截静态资源
配置文件,加上配置
@Override

    public void configure(WebSecurity web) throws Exception {

        //解决静态资源被拦截的问题

        web.ignoring().antMatchers("/asserts/**");

        web.ignoring().antMatchers("/favicon.ico");

    }
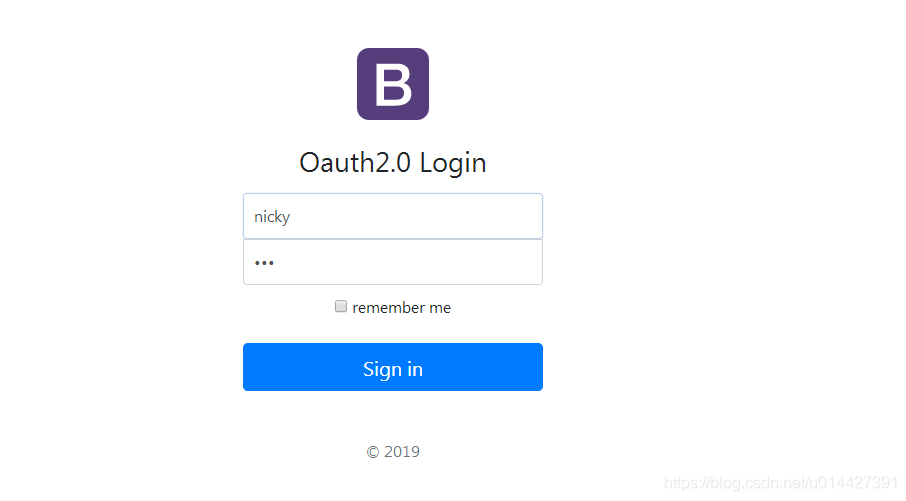
7. 自定义登录页面
引入Thymeleaf模板引擎:
<dependency>

            <groupId>org.springframework.boot</groupId>

            <artifactId>spring-boot-starter-web</artifactId>

        </dependency>

        <dependency>

            <groupId>org.springframework.boot</groupId>

            <artifactId>spring-boot-starter-thymeleaf</artifactId>

        </dependency>
关闭Thymeleaf模板引擎缓存,方便F9自动编译
spring:

  thymeleaf:

    cache: false
写个login接口,注意一定要GET方式,POST方式是Spring Security默认的校验接口,接口名称也是/login
@Controller

public class LoginController {

    @GetMapping(value = {"/login"})

    public ModelAndView toLogin() {

        return new ModelAndView("login");

    }

}
自定义登录页面,要用post方式,除非你自己写个校验接口,POST /login是Spring Security官方的校验接口,默认用户名参数为username,密码参数为password:
<!DOCTYPE html>

<html lang="zh" xmlns:th="http://www.thymeleaf.org">

	<head>

		<meta http-equiv="Content-Type" content="text/html; charset=UTF-8" />

		<meta name="viewport" content="width=device-width, initial-scale=1, shrink-to-fit=no" />

		<meta name="description" content="" />

		<meta name="author" content="" />

		<title>Signin Template for Bootstrap</title>

		<!-- Bootstrap core CSS -->

		<link href="../static/asserts/css/bootstrap.min.css" th:href="@{asserts/css/bootstrap.min.css}" rel="stylesheet" />

		<!-- Custom styles for this template -->

		<link href="../static/asserts/css/signin.css" th:href="@{asserts/css/signin.css}" rel="stylesheet"/>

	</head>

	<body class="text-center">

		<form class="form-signin" th:action="@{/login}" method="post">

			<img class="mb-4" th:src="@{asserts/img/bootstrap-solid.svg}" alt="" width="72" height="72" />

			<h1 class="h3 mb-3 font-weight-normal" >Oauth2.0 Login</h1>

			<label class="sr-only" >Username</label>

			<input type="text" class="form-control" name="username" required="" autofocus="" value="nicky" />

			<label class="sr-only" >Password</label>

			<input type="password" class="form-control" name="password" required="" value="123" />

			<div class="checkbox mb-3">

				<label>

          <input type="checkbox" value="remember-me"  /> remember me

        </label>

			</div>

			<button class="btn btn-lg btn-primary btn-block" type="submit">Sign in</button>

			<p class="mt-5 mb-3 text-muted"> 2019</p>

		</form>

	</body>

</html>
修改配置文件,.loginPage("/login")指定自定义的登录页面
 @Override

    protected void configure(HttpSecurity http) throws Exception {

        http   // 配置登录页并允许访问

                .formLogin().usernameParameter("username").passwordParameter("password").loginPage("/login").permitAll()

                // 配置Basic登录

                //.and().httpBasic()

                // 配置登出页面

                .and().logout().logoutUrl("/logout").logoutSuccessUrl("/")

                // 开放接口访问权限,不需要登录授权就可以访问

                .and().authorizeRequests().antMatchers("/oauth/**", "/login/**", "/logout/**").permitAll()

                // api接口需要admin管理员才能访问

                .antMatchers("/api/**").hasRole("admin")

                // 其余所有请求全部需要鉴权认证

                .anyRequest().authenticated()

                // 关闭跨域保护;

                .and().csrf().disable();

    }
8. Remember me
开启记住我功能,登陆成功以后,将cookie发给浏览器保存,以后访问页面带上这个cookie,只要通过检查就可以免登录
@Override

    protected void configure(HttpSecurity http) throws Exception {

      //开启记住我功能,登陆成功以后,将cookie发给浏览器保存,以后访问页面带上这个cookie,只要通过检查就可以免登录

        http.rememberMe().rememberMeParameter("remeber");

    }
ok,Spring Security的知识点比较多,详情请参考官方文档,本博客参考官方文档,做了简单记录,仅仅作为入门参考手册
代码例子下载:code download
Spring Security系列之极速入门与实践教程的更多相关文章
- CAS单点登录系列之极速入门于实战教程(4.2.7)
@ 目录 一. SSO简介 1.1 单点登录定义 1.2 单点登录角色 1.3 单点登录分类 二. CAS简介 2.1 CAS简单定义 2.2 CAS体系结构 2.3 CAS原理 三.CAS服务端搭建 ...
- SpringCloud系列之分布式配置中心极速入门与实践
SpringCloud系列之分布式配置中心极速入门与实践 @ 目录 1.分布式配置中心简介 2.什么是SpringCloud Config? 3.例子实验环境准备 4.Config Server代码实 ...
- spring security系列
参考文档: spring security 3 的Ajax (解决 Ajax登陆页面跳转)http://jackyrong.iteye.com/blog/1770629 Spring Securit ...
- Spring security oauth2最简单入门环境搭建
关于OAuth2的一些简介,见我的上篇blog:http://wwwcomy.iteye.com/blog/2229889 PS:貌似内容太水直接被鹳狸猿干沉.. 友情提示 学习曲线:spring+s ...
- Spring security 知识笔记【入门】
一.生成spring boot项目文件 二.pom文件如下 <?xml version="1.0" encoding="UTF-8"?> <p ...
- SpringBoot集成Spring Security(1)——入门程序
因为项目需要,第一次接触 Spring Security,早就听闻 Spring Security 功能强大但上手困难,学习了几天出入门道,特整理这篇文章希望能让后来者少踩一点坑(本文附带实例程序,请 ...
- 认证与授权】Spring Security系列之认证流程解析
上面我们一起开始了Spring Security的初体验,并通过简单的配置甚至零配置就可以完成一个简单的认证流程.可能我们都有很大的疑惑,这中间到底发生了什么,为什么简单的配置就可以完成一个认证流程啊 ...
- 【Spring Security】1.快速入门
1 导入Spring Security的相关依赖 <dependency> <groupId>org.springframework.boot</groupId> ...
- SpringBoot系列之Elasticsearch极速入门与实际教程
@ 目录 一.什么Elasticsearch? 二.Elasticsearch安装部署 2.1 Elasticsearch安装环境准备 2.2 Docker环境安装Elasticsearch 2.3 ...
随机推荐
- 弹性盒模型中flex-grow 和flex的区别
在flex弹性盒模型体系中,flex-grow和flex都有对子元素进行放大的作用,但是这两个属性在放大时的计算方法不同,在使用时候要注意,使用正确的放大属性,从而达到自己想要的效果. 先来看下两个属 ...
- VC单选按钮控件(Radio Button)用法(转)
先为对话框加上2个radio button,分别是Radio1和Radio2. 问题1:如何让Radio1或者Radio2默认选上?如何知道哪个被选上了? 关键是选上,“默认”只要放在OnInitDi ...
- 通用Mapper与分页插件的集成
SpringBoot 是为了简化 Spring 应用的创建.运行.调试.部署等一系列问题而诞生的产物,自动装配的特性让我们可以更好的关注业务本身而不是外部的XML配置,我们只需遵循规范,引入相关的依赖 ...
- mat-paginatoor控件
pageNumber是点击搜索查询后,跟新的变量值. import { MatPaginatorIntl } from '@angular/material'; const getRangeLabel ...
- 09 . Kubernetes之pv、pvc及使用nfs网络存储应用
PV,PVC概述 PV的全称是: PersistentVolume (持久化卷),是对底层的共享存储的一种抽象,PV由管理员进行创建和配置,它和具体的底层的共享存储技术的实现方式有关,比如Ceph.G ...
- html中map area 热区自适应的原生js实现方案
在做自适应网页的时候,如果在图片中使用了热区map.图片可以通过样式实现:图片大小随页面变化,但是MAP中每个area的坐标并不能通过css直接实现自适应.这篇文章就介绍通过原生js来实现:MAP中每 ...
- (一)ansible 安装配置
CentOS 7.5 一,安装 yum -y install ansible 二,配置hosts文件 /etc/ansible/hosts s1 ansible_ssh_port= ansible_s ...
- 洛谷 P2220 [HAOI2012]容易题 数论
洛谷 P2220 [HAOI2012]容易题 题目描述 为了使得大家高兴,小Q特意出个自认为的简单题(easy)来满足大家,这道简单题是描述如下: 有一个数列A已知对于所有的A[i]都是1~n的自然数 ...
- 关于点击input框唤醒键盘导致input被遮盖的问题
关于点击input框唤醒键盘导致input被遮盖的问题 这个问题相信大家在实际开发过程当中都有遇见,我自己也遇见过很多次.之前在百度上看见大多数的方法利用的都是键盘唤醒了之后,页面的实际高度会发生变化 ...
- Hadoop集群之浅析安全模式
集群启动顺序: NameNode启动 NameNode启动时,首先将镜像文件(Fsimage)载入内存,并执行编辑日志(Edits)中的各项操作.一旦在内存中成功建立文件系统元数据的映像,则创建一个新 ...