springboot、Thymeleaf、国际化的简单使用
1、项目体系结构
(1)知识体系
springboot:省去了很多繁琐的配置,如:视图解析器、前端控制器等
thymeleaf:获取controller数据逼能够进行展示
集合:用于存储数据,此练习没有连接数据库
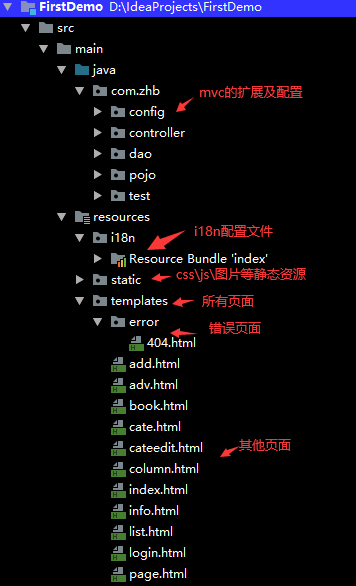
(2)项目结构
2、登录
(1)去登录页&登录
 @GetMapping("/user/login")

    public String toLogin(){

        return "login";

    }

    @PostMapping("/user/login")

    public String login(@RequestParam("username") String username,

                        @RequestParam("password") String password,

                        Model model,

                        HttpSession session){

        //业务

        if(!StringUtils.isEmpty(username)&&"1".equals(password)){

            session.setAttribute("loginUser",username);

            return "redirect:/index";

        }else {

            model.addAttribute("error","用户名或密码错误");

            return "login";

        }

    }
为了保证数据的安全在登录的时候采用的是post提交方式,由于没有与数据库连接,采用的是固定的密码。
(2)登录拦截器
有些资源在没有登录的情况下是不允许访问的,因此,需要添加拦截器对用户的访问加以限制:
// 注册拦截器

    @Override

    public void addInterceptors(InterceptorRegistry registry) {

        // 添加拦截的请求,并排除几个不拦截的请求

        registry.addInterceptor(new LoginHandlerInterceptor()).addPathPatterns("/**")

                .excludePathPatterns("/user/login","/css/*","/js/*","/images/*","/toadd");

    }
创建一个单独的类,实现HandlerInterceptor 接口:
public class LoginHandlerInterceptor implements HandlerInterceptor {
// 目标方法执行之前
@Override
public boolean preHandle(HttpServletRequest request, HttpServletResponse response, Object handler) throws Exception {
Object user = request.getSession().getAttribute("loginUser");
// 如果获取的request的session中的loginUser参数为空(未登录),就返回登录页,否则放行访问
if (user == null) {
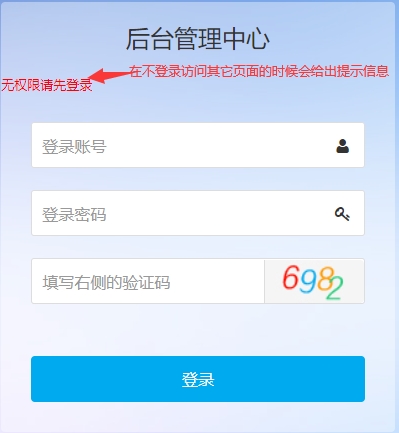
// 未登录,给出错误信息
request.setAttribute("error","无权限请先登录");
// 获取request返回页面到登录页
request.getRequestDispatcher("/user/login").forward(request, response);
return false;
} else {
// 已登录,放行
return true;
}
}
(3)测试
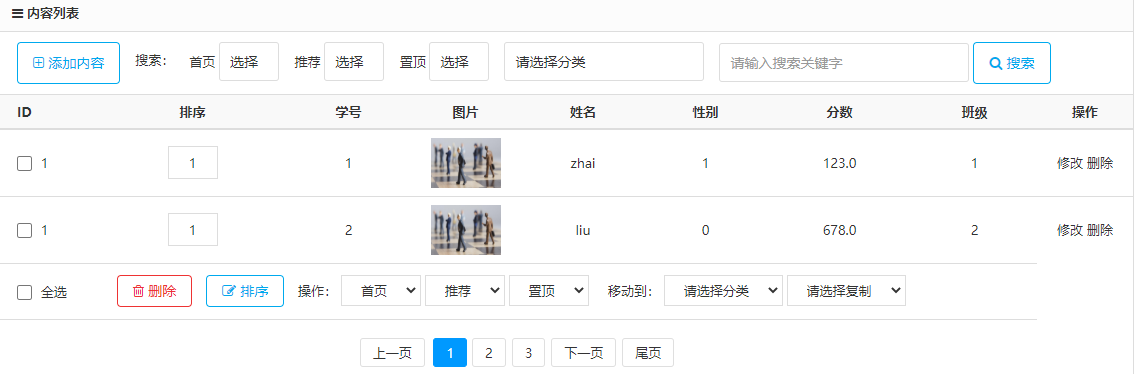
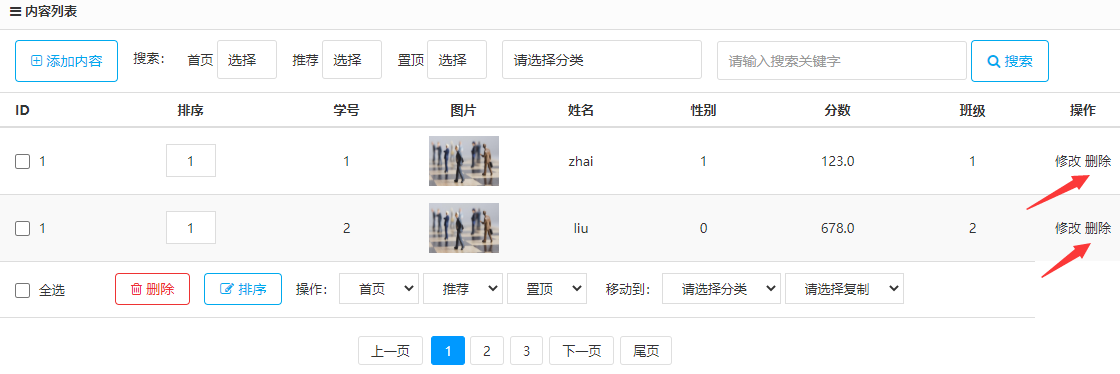
3、查询所有学生
(1)controller层代码:
    @RequestMapping("/studentslist")

    public String list(Model model){

        Collection<Student> students=studentDao.getAll();

        model.addAttribute("students",students);

        return "list";

    }
从dao层获取导数据以后将数据提供给list页面进行显示
(2)页面核心代码:牵涉到多条学生信息,需要用到each对数据进行遍历
<volist name="list" id="vo">

                <tr th:each="student:${students}">

                    <td style="text-align:left; padding-left:20px;"><input type="checkbox" name="id[]" value=""/>

                        1

                    </td>

                    <td><input type="text" name="sort[1]" value="1"

                               style="width:50px; text-align:center; border:1px solid #ddd; padding:7px 0;"/></td>

                    <td th:text="${student.studentno}"></td>

                    <td width="10%"><img src="data:images/11.jpg" alt="" width="70" height="50"/></td>

                    <td th:text="${student.sname}"></td>

                    <td th:text="${student.sex}"></td>

                    <td th:text="${student.point}"></td>

                    <td th:text="${student.classno}"></td>

                    <td>

                        <a th:href="@{/student/update/}+${student.studentno}">修改</a>

                        <a th:href="@{/student/delete/}+${student.studentno}">删除</a>

                    </td>

                </tr>
4、添加学生
(1)controller层
 @RequestMapping("/toadd")

    public String toAdd(Model model){

        Collection<Clas> clas=classDao.getClas();

        model.addAttribute("clas",clas);

        return "add";

    }

    @PostMapping("/addStudent")

    public String add(Student student){

        studentDao.save(student);

        return "redirect:/studentslist";

    }
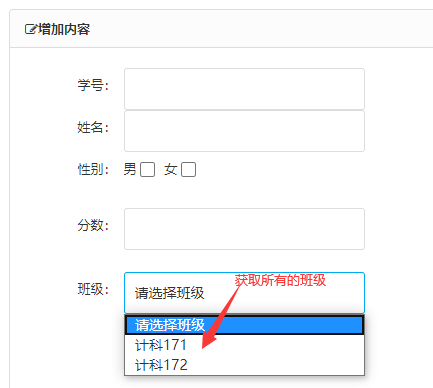
在去学生的添加页面的时候需要获取所有的班级名称,让用户从已有的班级中选择,避免出现添加一个学生而该学生所在的班级不存在的情况
在用户输入相关信息后就可以点击提交按钮进行提交了,是将表单数据提交给了controller层的add
(2)页面核心代码
 <div class="panel-head" id="add"><strong><span class="icon-pencil-square-o"></span>增加内容</strong></div>

    <div class="body-content">

        <form method="post" class="form-x" action="/addStudent">

            <div class="form-group">

                <div class="label">

                    <label>学号:</label>

                </div>

                <div class="field">

                    <input type="text" class="input w50" value="" name="studentno" data-validate="member:只能为数字"/>

                    <div class="tips"></div>

                </div>

                <div class="label">

                    <label>姓名:</label>

                </div>

                <div class="field">

                    <input type="text" class="input w50"  name="sname"/>

                    <div class="tips"></div>

                </div>

                <div class="form-group">

                    <div class="label">

                        <label>性别:</label>

                    </div>

                    <div class="field" style="padding-top:8px;">

                        男 <input id="ishome" value="1" name="sex" type="checkbox" />

                        女 <input id="isvouch" value="0"  name="sex" type="checkbox" />

                    </div>

                </div>

                <div class="label">

                    <label>分数:</label>

                </div>

                <div class="field">

                    <input type="text" class="input w50" value="" name="point" data-validate="member:只能为数字"/>

                    <div class="tips"></div>

                </div>

            </div>

            <if condition="$iscid eq 1">

                <div class="form-group">

                    <div class="label">

                        <label>班级:</label>

                    </div>

                    <div class="field">

                        <select  class="input w50" name="classno" >

                            <option>请选择班级</option>

                            <option th:each="c:${clas}" th:value="${c.classno}">[[${c.classname}]]</option>

                        </select>

                        <div class="tips"></div>

                    </div>

                </div>

            </if>

            <div class="form-group">

                <div class="label">

                    <label></label>

                </div>

                <div class="field">

                    <button class="button bg-main icon-check-square-o" type="submit"> 提交</button>

                </div>

            </div>

        </form>
为了数据的安全性同样采用post方式进行提交
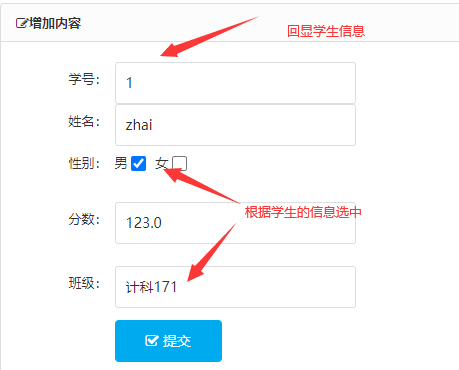
5、修改学生信息
(1)controller层
在去修改页面的时候需要进行数据的回显:被点击的学生的那一条信息以及所有的班级名称;班级名称和性别要根据被点击的学生的信息被选中
    @RequestMapping("/student/update/{studentno}")

    public String toupdate(@PathVariable("studentno") Integer studentno, Model model){

        Student student=studentDao.getStudentById(studentno);

        model.addAttribute("student",student);

        System.out.println(studentno);

        System.out.println(student);

        Collection<Clas> clas=classDao.getClas();

        model.addAttribute("clas",clas);

        return "update";

    }
(2)页面核心代码
<div class="body-content">

        <form method="post" class="form-x" action="/addStudent">

            <div class="form-group">

                <div class="label">

                    <label>学号:</label>

                </div>

                <div class="field">

                    <input type="text" class="input w50" th:value="${student.studentno}" name="studentno" data-validate="member:只能为数字"/>

                    <div class="tips"></div>

                </div>

                <div class="label">

                    <label>姓名:</label>

                </div>

                <div class="field">

                    <input type="text" class="input w50"  name="sname" th:value="${student.sname}"/>

                    <div class="tips"></div>

                </div>

                <div class="form-group">

                    <div class="label">

                        <label>性别:</label>

                    </div>

                    <div class="field" style="padding-top:8px;">

                        男 <input th:checked="${student.getSex()==1}" id="ishome" th:value="1" name="sex" type="checkbox" />

                        女 <input th:checked="${student.getSex()==0}" id="isvouch" th:value="0"  name="sex" type="checkbox" />

                    </div>

                </div>

                <div class="label">

                    <label>分数:</label>

                </div>

                <div class="field">

                    <input type="text" class="input w50" th:value="${student.point}" name="point" data-validate="member:只能为数字"/>

                    <div class="tips"></div>

                </div>

            </div>

            <if condition="$iscid eq 1">

                <div class="form-group">

                    <div class="label">

                        <label>班级:</label>

                    </div>

                    <div class="field">

                        <select  class="input w50" name="classno" >

                            <option>请选择班级</option>

                            <option th:each="c:${clas}" th:value="${c.classno}"

                                    th:selected="${student.classno==c.classno}">[[${c.classname}]]</option>

                        </select>

                        <div class="tips"></div>

                    </div>

                </div>

            </if>

            <div class="form-group">

                <div class="label">

                    <label></label>

                </div>

                <div class="field">

                    <button class="button bg-main icon-check-square-o" type="submit"> 提交</button>

                </div>

            </div>

        </form>

    </div>
6、删除学生信息
(1)controller层
 @RequestMapping("/student/delete/{studentno}")

    public String delete(@PathVariable("studentno") Integer studentno,Model model){

        studentDao.delete(studentno);

        return "redirect:/studentslist";

    }
(2)页面核心代码
   <td>

                        <a th:href="@{/student/update/}+${student.studentno}">修改</a>

                        <a th:href="@{/student/delete/}+${student.studentno}">删除</a>

                    </td>
根据学号删除学生信息
7、注销
(1)controller层
    @RequestMapping("/user/logout")

    public String logout(HttpSession session){

        session.invalidate();

        return "redirect:/index";

    }
(2)页面核心代码
     <a class="button button-little bg-red" th:href="@{/user/logout}">

        <span class="icon-power-off"></span> 退出登录</a>
8、错误页面
(1)新建目录并创建名称为404的html页面
<!DOCTYPE html>

<html lang="en">

<head>

    <meta charset="UTF-8">

    <title>Title</title>

</head>

<body>

<h2>404</h2>

</body>

</html>
(2)测试

9、国际化
(1)创建配置文件
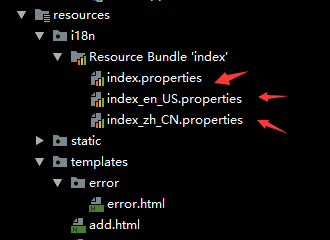
在配置文件中指定默认的i18n的配置文件:
#i18n

spring.messages.basename=i18n.index
在不进行文字切换的时候默认读取的是i18n的index配置文件
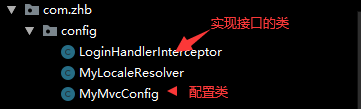
(2)扩展springmvc,实现接口覆盖默认的i18n的配置
//覆盖或改变默认的配置,扩展MVC

public class MyLocaleResolver implements LocaleResolver {

    //解析请求

    @Override

    public Locale resolveLocale(HttpServletRequest request) {

        String language = request.getParameter("language");

        //如果没有就是用默认的

        Locale locale = Locale.getDefault();

        if (!StringUtils.isEmpty(language)) {

            //分割为数组,国家和地区

            String[] split = language.split("_");

            locale = new Locale(split[0], split[1]);

        }

        return locale;

    }
接收来自页面的language的参数,根据参数来选择对应的i18n的配置文件
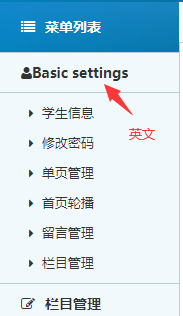
英文:
index.Basicsettings=Basic settings
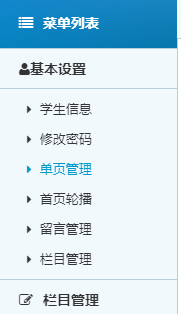
中文:
index.Basicsettings=基本设置
(3)页面核心代码
<a th:href="@{/index(language='zh_CN')}">中文</a>
<a th:href="@{/index(language='en_US')}">英文</a></li>
(4)显示效果
英文:
中文:
切换按钮:

10、其他
(1)扩展mvc
i18n:
//覆盖或改变默认的配置,扩展MVC

public class MyLocaleResolver implements LocaleResolver {

    //解析请求

    @Override

    public Locale resolveLocale(HttpServletRequest request) {

        String language = request.getParameter("language");

        //如果没有就是用默认的

        Locale locale = Locale.getDefault();

        if (!StringUtils.isEmpty(language)) {

            //分割为数组,国家和地区

            String[] split = language.split("_");

            locale = new Locale(split[0], split[1]);

        }

        return locale;

    }
拦截器:
public class LoginHandlerInterceptor implements HandlerInterceptor {

    // 目标方法执行之前

    @Override

    public boolean preHandle(HttpServletRequest request, HttpServletResponse response, Object handler) throws Exception {

        Object user = request.getSession().getAttribute("loginUser");

        // 如果获取的request的session中的loginUser参数为空(未登录),就返回登录页,否则放行访问

        if (user == null) {

            // 未登录,给出错误信息

            request.setAttribute("error","无权限请先登录");

            // 获取request返回页面到登录页

            request.getRequestDispatcher("/user/login").forward(request, response);

            return false;

        } else {

            // 已登录,放行

            return true;

        }

    }
(2)mvc配置
@Configuration//将类变成一个配置类

public class MyMvcConfig implements WebMvcConfigurer {

    @Bean//要注意方法名是固定的,Bean标记在方法上

    // 该方式将方法的返回值添加到容器中,容器中组件的ID默认是方法名

    public LocaleResolver localeResolver(){

        return new MyLocaleResolver();

    }

    // 注册拦截器

    @Override

    public void addInterceptors(InterceptorRegistry registry) {

        // 添加拦截的请求,并排除几个不拦截的请求

        registry.addInterceptor(new LoginHandlerInterceptor()).addPathPatterns("/**")

                .excludePathPatterns("/user/login","/css/*","/js/*","/images/*","/toadd");

    }

}
对i18n和拦截器进行配置
11、项目演示
springboot、Thymeleaf、国际化的简单使用的更多相关文章
- springboot+thymeleaf简单使用
关于springboot想必很多人都在使用,由于公司项目一直使用的是SpringMVC,所以自己抽空体验了一下springboot的简单使用. 环境搭建 springbooot的环境搭建可以说很灵活, ...
- org.springframework.expression.spel.SpelEvaluationException: EL1004E: Method call: Method service() cannot be found on com.my.blog.springboot.thymeleaf.util.MethodTest type
前言 本文中提到的解决方案,源码地址在:springboot-thymeleaf,希望可以帮你解决问题. 至于为什么已经写了一篇文章thymeleaf模板引擎调用java类中的方法,又多此一举的单独整 ...
- Java结合SpringBoot拦截器实现简单的登录认证模块
Java结合SpringBoot拦截器实现简单的登录认证模块 之前在做项目时需要实现一个简单的登录认证的功能,就寻思着使用Spring Boot的拦截器来实现,在此记录一下我的整个实现过程,源码见文章 ...
- SpringBoot 国际化配置,SpringBoot Locale 国际化
SpringBoot 国际化配置,SpringBoot Locale 国际化 ================================ ©Copyright 蕃薯耀 2018年3月27日 ht ...
- SpringBoot访问NoSQL和简单的Thymeleaf-Spring-Spring-boot整合
SpringBoot访问NoSQL SpringBoot访问Redis 在pom.xml添加boot-data-redis定义 <parent> <groupId>org.sp ...
- 配置和修改springboot默认国际化文件
SpringBoot默认国际化文件为:classpath:message.properties,如果放在其它文件夹中,则需要在application.properties配置属性spring.mess ...
- springboot+thymeleaf+pageHelper带条件分页查询
html层 <div> <a class="num"><b th:text="'共 '+ ${result.resultMap['pages ...
- SpringBoot thymeleaf使用方法,thymeleaf模板迭代
SpringBoot thymeleaf使用方法,thymeleaf模板迭代 SpringBoot thymeleaf 循环List.Map ============================= ...
- SpringBoot thymeleaf模板页面没提示,SpringBoot thymeleaf模板插件安装
SpringBoot thymeleaf模板插件安装 SpringBoot thymeleaf模板Html页面没提示 SpringBoot thymeleaf模板页面没提示 SpringBoot t ...
- SpringBoot thymeleaf模板版本,thymeleaf模板更换版本
SpringBoot thymeleaf模板版本 thymeleaf模板更换版本 修改thymeleaf模板版本 ================================ ©Copyright ...
随机推荐
- CODING DevOps 微服务项目实战系列第一课,明天等你
CODING DevOps 微服务项目实战系列第一课<DevOps 微服务项目实战:DevOps 初体验>将由 CODING DevOps 开发工程师 王宽老师 向大家介绍 DevOps ...
- beego 快速入门
原文链接:https://beego.me/quickstart 1.安装依赖 git clone http://github.com/astaxie/beego.git git clone http ...
- Codeforces Round #665 (Div. 2)A-C题解
A. Distance and Axis 题目:http://codeforces.com/contest/1401/problem/A 题解:对于n来说分两种情况,一是奇数,二则是偶数 ①奇数:对于 ...
- Java数据结构——循环链表
一.单向循环链表表中的最后一个节点的指针域指向头结点,整个链表形成一个环.其他的与单链表相同. (以下图片均来自网络,侵删) 插入操作 删除操作 简单实现 public class CiNode { ...
- 学生成绩管理系统(SSM+MySQL+JSP)
开发工具:Eclipse前端技术:基础:html+css+JavaScript框架:JQuery+H-ui后端技术:Spring+SpringMVC+mybatis模板引擎:JSP数据库:mysql ...
- Kubernetes入门(一)——Kubernetes v1.18.5 安装部署
Kubernetes的安装有两种方式:一是使用各个厂商封装的Kubernetes发行版,优点是可以一键安装部署,操作简单,缺点也很明显,若安装过程中某一步骤出现问题,很难定位处理:二是使用官方提供的k ...
- Python 带你一键生成朋友圈超火的九宫格短视频
1. 场景 如果你经常刷抖音和微信朋友圈,一定发现了最近九宫格短视频很火! 从朋友圈九宫格图片,到九宫格视频,相比传统的图片视频,前者似乎更有个性和逼格 除了传统的剪辑软件可以实现,是否有其他更加快 ...
- Python 快速验证代理IP是否有效
有时候,我们需要用到代理IP,比如在爬虫的时候,但是得到了IP之后,可能不知道怎么验证这些IP是不是有效的,这时候我们可以使用Python携带该IP来模拟访问某一个网站,如果多次未成功访问,则说明这个 ...
- 华为荣耀5X(畅玩版 全网通)USB调试模式如何开启教程(开发者模式 开发者选项打开)
作者:程序员小冰,CSDN博客:http://blog.csdn.net/qq_21376985, 前一段时间,公司买了一款华为荣耀畅玩版5X全网通,进行测试.发现 拿usb数据线连接PC电脑,无法进 ...
- 【学习中】Unity<中级篇> Schedule
章节 内容 签到 Unity3D 实战技术第二版视频教程(中级篇) 1.游戏引擎发展史 2.Unity发展史 3.3D图形学与必要组件 5月19日 4.核心类_GameObject类 5月19日 5. ...