轮播图js版&jQ版
JS版轮播图
html部分和css部分自己任意定
主要构成:
1,一个固定的框 超出框的部分隐藏
2,几张图片float:left
3,下部下原点,点击切换,切换到不同的张都有红色显示
4,左右两个大箭头按钮
JS代码
找到节点 添加事件
用原点的下标来切换图片
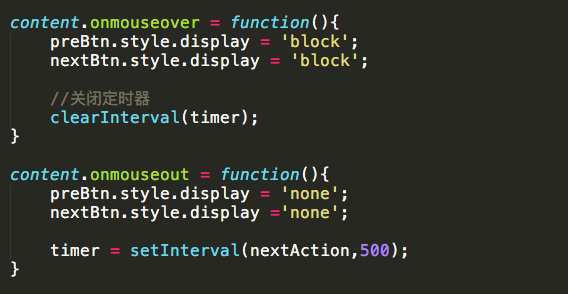
鼠标放在框上关闭定时器,不在框上开启定时器 自动播放
到此就算结束了,但是有bug, 会不停的切换下去,全白也会不停切换不,所以让下标等于最后的时候等于一就可以循环播放了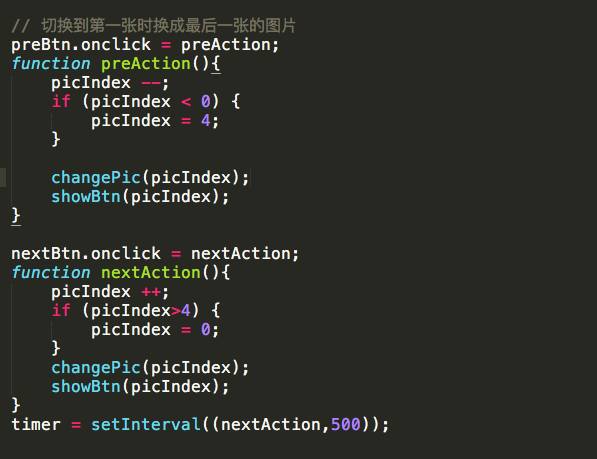
JQ版
html部分
css部分用的是css3 有一个新功能是trasition:all,时间 过渡效果
JQ部分 .siblings() 寻找元素的同胞元素进行操作
粘贴复制版:
JS方法
HTML
<body>
<div id="content">
<!-- 图片 -->
<div id="list">
<img src="data:images/1.jpeg" alt="">
<img src="data:images/2.jpeg" alt="">
<img src="data:images/3.jpeg" alt="">
<img src="data:images/4.jpeg" alt="">
<img src="data:images/5.jpeg" alt="">
</div>
<div id="buttons">
<span class="select"></span>
<span></span>
<span></span>
<span></span>
<span></span>
</div>
<span class="suibian" id="preBtn">‹</span>
<span class="suibian" id="nextBtn">›</span>
</div>
CSS部分:
/*外围容器*/
#content {
width: 600px;
height: 400px;
overflow: hidden;
position: relative;
margin: 100px auto;
}
/*图片容器*/
#list {
width: 3000px;
height: 400px;
position: absolute;
}
/*图片浮动*/
#list img {
width: 600px;
height: 400px;
float: left;
}
/*焦点图*/
#buttons {
position: absolute;
right: 40px;
bottom: 20px;
}
#buttons span {
width: 10px;
height: 10px;
background-color: rgba(150, 150, 150, 0.5);
border: 1px solid rgba(100, 100, 100, 0.8);
border-radius: 50%;
float: left;
margin: 5px;
cursor: pointer;
}
#buttons span:hover {
border: 1px solid rgba(180, 180, 180, 0.5);
background-color: rgba(255, 255, 255, 0.6);
}
#buttons .select {
border: 1px solid rgba(10, 10, 10, 0.5);
background-color: rgba(255, 255, 255, 0.6);
}
.suibian {
width: 30px;
height: 50px;
position: absolute;
background-color: rgba(50, 50, 50, .7);
border-radius: 3px;
color: rgba(255,255,255, 0.5);
font-size: 40px;
text-align: center;
line-height: 50px;
display: none;
}
#preBtn {
left: 0px;
top: 175px;
}
#nextBtn {
right: 0px;
top: 175px;
}
js部分
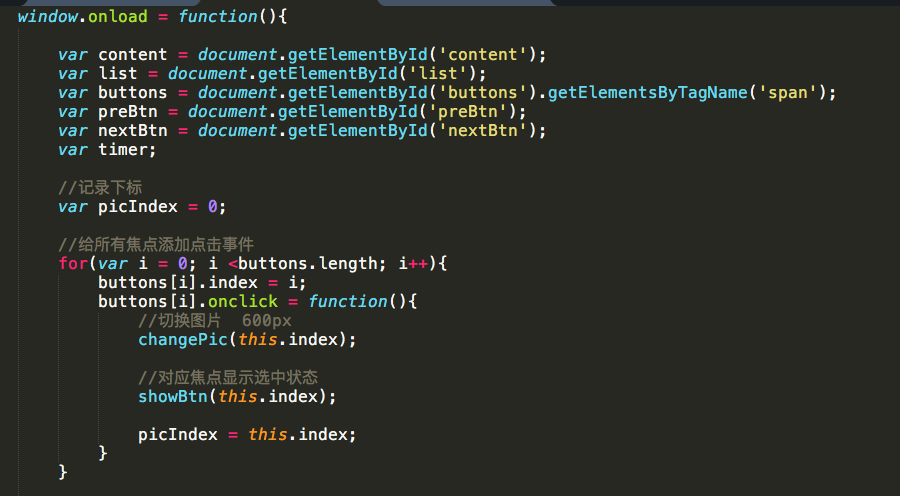
window.onload = function () {
var content = document.getElementById('content');
var list = document.getElementById('list');
var buttons = document.getElementById('buttons').getElementsByTagName('span');
var preBtn = document.getElementById('preBtn');
var nextBtn = document.getElementById('nextBtn');
var timer;
// 记录下标
var picIndex = 0;
// 给所有的焦点添加点击事件
for(var i = 0; i < buttons.length; i ++) {
// 添加下标的属性
buttons[i].index = i;
buttons[i].onclick = function () {
// (1)切换图片 600px
changePic(this.index);
// (2)对应焦点显示选中状态
showBtn(this.index);
picIndex = this.index;
}
}
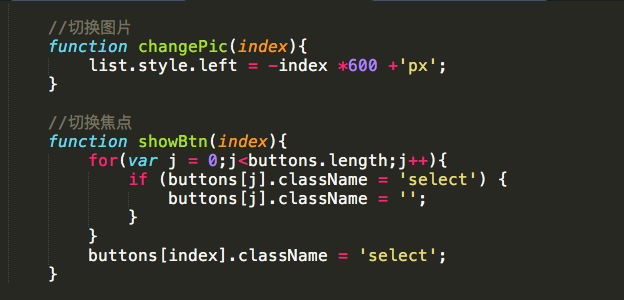
// 切换图片
function changePic(index) {
list.style.left = -index *600 + 'px';
}
// 切换焦点
function showBtn(index) {
for(var j = 0; j < buttons.length; j++) {
if (buttons[j].className == 'select') {
buttons[j].className = '';
}
}
buttons[index].className = 'select';
}
content.onmouseover = function () {
preBtn.style.display = 'block';
nextBtn.style.display = 'block';
// 关闭定时器
clearInterval(timer);
}
content.onmouseout = function () {
preBtn.style.display = 'none';
nextBtn.style.display = 'none';
timer = setInterval(nextAction, 1500);
}
// (1)通过选中的按钮的index属性
// (2)定义一个变量存储当前显示的下标
preBtn.onclick = preAction;
function preAction() {
picIndex --;
if (picIndex < 0) {
picIndex = 4;
}
changePic(picIndex);
showBtn(picIndex);
// // 切换到上一张
}
nextBtn.onclick = nextAction;
function nextAction() {
// 切换到下一张
picIndex ++;
if (picIndex > 4) {
picIndex = 0;
}
changePic(picIndex);
showBtn(picIndex);
}
timer = setInterval(nextAction, 1500);
}
------------------------------------------------------------
JQ方式
js部分:方法1
$(function () {
var i = 0; //图片的下标
var timer = null; //定时器
$('#change_prev').click(function () {
// 上一张
changePrev();
});
$('#change_next').click(function () {
// 下一张
changeNext();
});
function changeNext() {
i ++;
if (i == $('#pics li').length) {
i = 0;
}
show_pic(i);
}
function changePrev() {
i --;
if (i < 0 ) {
i = $('#pics li').length - 1;
}
show_pic(i);
}
function show_pic(index) {
$('#pics li').eq(index).fadeIn(300).siblings('li').fadeOut(300);
}
// 自动轮播
timer = setInterval(changeNext, 1000);
// 光标移入:关闭定时器
$('#pic_change').mouseover(function () {
// 关闭定时器
clearInterval(timer);
// 显示切换按钮
$(this).children().show();
});
$('#pic_change').mouseout(function () {
// 关闭定时器
timer = setInterval(changeNext, 1000);
// 显示切换按钮
$(this).children().hide();
});
});
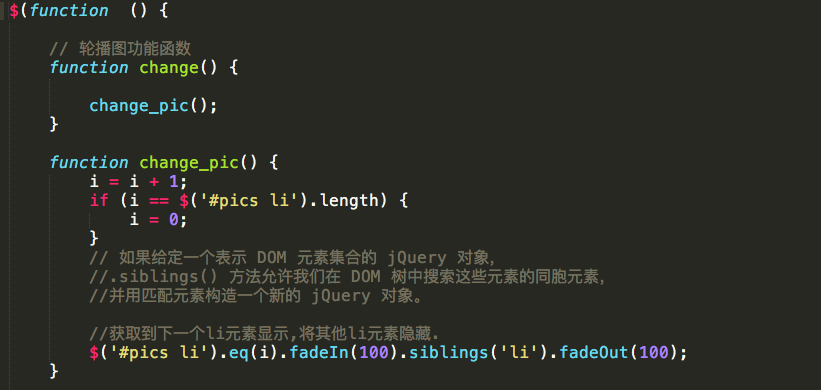
js部分方法2
// 轮播图功能函数
function change() {
change_pic();
}
function change_pic() {
i = i + 1;
if (i == $('#pics li').length) {
i = 0;
}
// 如果给定一个表示 DOM 元素集合的 jQuery 对象,
//.siblings() 方法允许我们在 DOM 树中搜索这些元素的同胞元素,
//并用匹配元素构造一个新的 jQuery 对象。
//获取到下一个li元素显示,将其他li元素隐藏.
$('#pics li').eq(i).fadeIn(100).siblings('li').fadeOut(100);
}
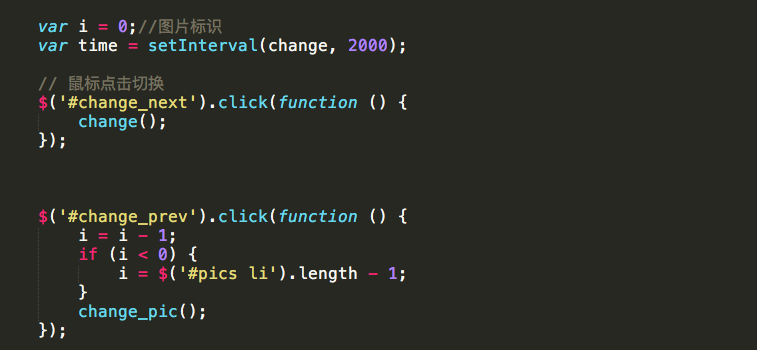
var i = 0;//图片标识
var time = setInterval(change, 2000);
// 鼠标点击切换
$('#change_next').click(function () {
change();
});
$('#change_prev').click(function () {
i = i - 1;
if (i < 0) {
i = $('#pics li').length - 1;
}
change_pic();
});
// 光标移动在界面上,停止定时器,显示左右切换标识
$('#pic_change').mouseover(function () {
//关闭定时器
clearInterval(time);
// 显示切换模块
$(this).children().show();
});
// 光标移出界面,开启定时器,隐藏左右切换标识
$('#pic_change').mouseout(function () {
//关闭定时器
time = setInterval(change, 2000);
// 隐藏切换模块
$(this).children().hide();
});
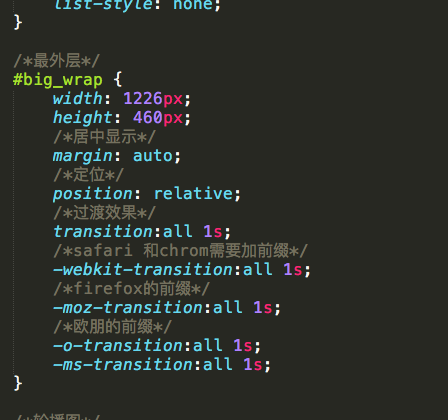
css部分
* {
margin: 0px;
padding: 0px;
list-style: none;
}
/*最外层*/
#big_wrap {
width: 1226px;
height: 460px;
/*居中显示*/
margin: auto;
/*定位*/
position: relative;
/*过渡效果*/
transition:all 1s;
/*safari 和chrom需要加前缀*/
-webkit-transition:all 1s;
/*firefox的前缀*/
-moz-transition:all 1s;
/*欧朋的前缀*/
-o-transition:all 1s;
-ms-transition:all 1s;
}
/*轮播图*/
#pic_wrap {
width: 1226px;
height: 460px;
/*隐藏超出部分的内容*/
overflow: hidden;
}
#pic_change {
/*1226-侧边栏的宽度*/
width: 976px;
height: 460px;
position: absolute;
left: 250px;
top: 0px;
}
#pic_change div {
width: 50px;
height: 50px;
color: white;
font-size: 50px;
margin-top: 205px;
/*默认隐藏*/
display: none;
}
#change_prev {
/*浮动*/
float: left;
}
#change_next {
float: right;
}
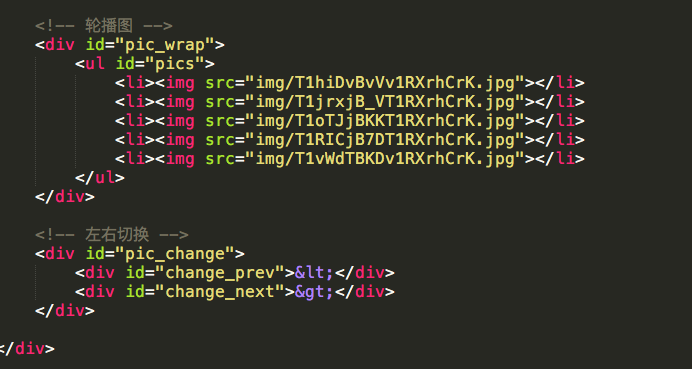
html部分
<!-- 轮播图 -->
<div id="pic_wrap">
<ul id="pics">
<li><img src="img/T1hiDvBvVv1RXrhCrK.jpg"></li>
<li><img src="img/T1jrxjB_VT1RXrhCrK.jpg"></li>
<li><img src="img/T1oTJjBKKT1RXrhCrK.jpg"></li>
<li><img src="img/T1RICjB7DT1RXrhCrK.jpg"></li>
<li><img src="img/T1vWdTBKDv1RXrhCrK.jpg"></li>
</ul>
</div>
<!-- 左右切换 -->
<div id="pic_change">
<div id="change_prev"><</div>
<div id="change_next">></div>
</div>
</div>
轮播图js版&jQ版的更多相关文章
- 轮播图--JS手写
轮播图基本每个网站都会有,也有很多的JQuery插件可以用,这里是用JS代码写的. @{ Layout = null; } <!DOCTYPE html> <html> < ...
- 轮播图--js课程
<!DOCTYPE html> <html lang="en"> <head> <meta charset="UTF-8&quo ...
- 小米官网轮播图js+css3+html实现
官网轮播: 我的轮播: 重难点: 1.布局 2.图片和右下角小圆点的同步问题 3.setInterval定时器的使用 4.淡入淡出动画效果 5.左右箭头点击时,图片和小圆点的效果同步 6.另一种轮播思 ...
- 轮播图适应代码jQ
(function(){ var i = 0; var time ; $('.page-size').html('1'); var obj = $('.xst-scroll>li'); var ...
- 轮播图js编写
//面向对象 function Left() { this.index = 0; this.lefthover = $('#left-content'); this.listenhover(); th ...
- 转:大气炫酷焦点轮播图js特效
使用方法 Step 1. 在html的标签内引入相关文件 <script type="text/javascript" src="js/myfocus-2.0.0. ...
- banner轮播图js
例子1: if(!$('.side_ul ul').is(":animated")){ var wli = $('.side_ul li').width()+ ...
- jQuery与原生js实现banner轮播图
jQuery与原生js实现banner轮播图: (jq需自己加载)(图片需自己加载) <!DOCTYPE html> <html> <head> <meta ...
- 基于JQ的简单左右轮播图
// 轮播图 主要实现思想: a.第一层div,设置overflow为hidden. b.里面是一个ul,每个li里面有个img或者为每个li设置背景图片也可以. c.li设置为左浮动,排成一行,还有 ...
随机推荐
- 深入浅出 Java Concurrency (24): 并发容器 part 9 双向队列集合 Deque[转]
有一段时间没有更新了.接着上节继续吧. Queue除了前面介绍的实现外,还有一种双向的Queue实现Deque.这种队列允许在队列头和尾部进行入队出队操作,因此在功能上比Queue显然要更复杂.下图描 ...
- iOS之CALayer属性简介
/* CoreAnimation - CALayer.h Copyright (c) 2006-2017, Apple Inc. All rights reserved. */ #import < ...
- js 实现页面局部(或图片)放大功能(vue)
方法: adjustStart1 (e) { e.preventDefault() let event = e.touches if (event.length === 2) { this.style ...
- Linux查看温度
step 1: centos $ sudo yum install lm_sensors ubuntu $ sudo apt-get install lm_sensors step2$ sudo se ...
- .Net Core微服务系列--服务发现
什么是服务发现 首先我们先思考一个问题,当我们在浏览器中输入一个域名比如baidu.com,然后发生了什么才能让我们访问到百度的网页?简单来说,浏览器会首先从主机的hosts文件中查看是否有baidu ...
- [编织消息框架][netty源码分析]3 EventLoop 实现类SingleThreadEventLoop职责与实现
eventLoop是基于事件系统机制,主要技术由线程池同队列组成,是由生产/消费者模型设计,那么先搞清楚谁是生产者,消费者内容 SingleThreadEventLoop 实现 public abst ...
- Tengine 如何查找 server 块
概述 本文的目标读者是Tengine/Nginx 研发或者运维同学,如果自己对这块逻辑非常清楚,那可以略过,如果在配置或者开发 Tengine/Nginx 过程中,有如下疑问的同学,本文或许能解答你多 ...
- agc034
A:题意:你有一个1 * n的网格,有些地方是障碍.你有两个人,分别要从a到b和从c到d,一次只能向右跳1步或者两步.求是否可行. 解:先判断有没有2个连续的障碍,然后判断是否能错车. #includ ...
- 安卓手机--键盘谈起后 fixed背景图片被键盘顶起的问题
参考文章: vue写法: <div class="main" :style="{ height: bodyHeight + 'px' }"> < ...
- JSP - (Java Server Pages) - Java服务器界面
JSP简介: 在HTML中嵌入Java脚本代码,由应用服务器中的JSP引擎来编译和执行嵌入的Java脚本代码,然后将生成的整个页面信息返回给客户端: 一个JSP页面包含:静态内容(HTML静态文本), ...