【Spring】Spring Session的简单搭建与源码阅读
搭建一个简单的Spring Session例子
引入依赖包
    <dependencies>

        <dependency>

            <groupId>org.springframework.data</groupId>

            <artifactId>spring-data-redis</artifactId>

            <version>1.7.10.RELEASE</version>

        </dependency>

        <dependency>

            <groupId>redis.clients</groupId>

            <artifactId>jedis</artifactId>

            <version>2.8.2</version>

        </dependency>

        <dependency>

            <groupId>org.springframework.session</groupId>

            <artifactId>spring-session</artifactId>

            <version>1.2.2.RELEASE</version>

        </dependency>

        <dependency>

            <groupId>org.springframework</groupId>

            <artifactId>spring-webmvc</artifactId>

            <version>4.2.5.RELEASE</version>

        </dependency>

        <dependency>

            <groupId>org.springframework</groupId>

            <artifactId>spring-web</artifactId>

            <version>4.2.5.RELEASE</version>

        </dependency>

        <dependency>

            <groupId>org.springframework</groupId>

            <artifactId>spring-core</artifactId>

            <version>4.2.5.RELEASE</version>

        </dependency>

        <dependency>

            <groupId>javax.servlet</groupId>

            <artifactId>javax.servlet-api</artifactId>

            <version>3.0.1</version>

        </dependency>

        <dependency>

            <groupId>biz.paluch.redis</groupId>

            <artifactId>lettuce</artifactId>

            <version>3.5.0.Final</version>

        </dependency>

    </dependencies>
注册Spring IoC、Spring Session和一些Servlet
<?xml version="1.0" encoding="UTF-8"?>

<web-app xmlns:xsi="http://www.w3.org/2001/XMLSchema-instance"

    xmlns="http://java.sun.com/xml/ns/javaee"

    xsi:schemaLocation="http://java.sun.com/xml/ns/javaee http://java.sun.com/xml/ns/javaee/web-app_2_5.xsd"

    id="WebApp_ID" version="2.5">

    <display-name>Spring-Session-Redis</display-name>

    <context-param>

        <param-name>contextConfigLocation</param-name>

        <param-value>

                classpath*:spring-session.xml

            </param-value>

    </context-param>

    <filter>

        <filter-name>springSessionRepositoryFilter</filter-name>

        <filter-class>org.springframework.web.filter.DelegatingFilterProxy</filter-class>

    </filter>

    <filter-mapping>

        <filter-name>springSessionRepositoryFilter</filter-name>

        <url-pattern>/*</url-pattern>

    </filter-mapping>

    <listener>

        <listener-class>org.springframework.web.context.ContextLoaderListener</listener-class>

    </listener>

    <servlet>

        <description></description>

        <display-name>SessionTestServlet</display-name>

        <servlet-name>SessionTestServlet</servlet-name>

        <servlet-class>com.nicchagil.SessionTestServlet</servlet-class>

    </servlet>

    <servlet-mapping>

        <servlet-name>SessionTestServlet</servlet-name>

        <url-pattern>/SessionTestServlet</url-pattern>

    </servlet-mapping>

</web-app>
最简单的Spring Session的Bean配置
<?xml version="1.0" encoding="UTF-8"?>

<beans xmlns="http://www.springframework.org/schema/beans"

    xmlns:xsi="http://www.w3.org/2001/XMLSchema-instance" xmlns:context="http://www.springframework.org/schema/context"

    xmlns:mvc="http://www.springframework.org/schema/mvc"

    xsi:schemaLocation="http://www.springframework.org/schema/beans

    http://www.springframework.org/schema/beans/spring-beans-3.0.xsd

    http://www.springframework.org/schema/context

    http://www.springframework.org/schema/context/spring-context-3.0.xsd

    http://www.springframework.org/schema/mvc

    http://www.springframework.org/schema/mvc/spring-mvc-3.0.xsd">

    <context:annotation-config />

    <!-- Jedis连接工厂 -->

    <bean id="jedisConnectionFactory"

        class="org.springframework.data.redis.connection.jedis.JedisConnectionFactory">

        <property name="hostName" value="nick-huang.example" />

        <property name="port" value="6379" />

    </bean>

    <bean id="redisHttpSessionConfiguration"

        class="org.springframework.session.data.redis.config.annotation.web.http.RedisHttpSessionConfiguration">

        <property name="maxInactiveIntervalInSeconds" value="1800" />

    </bean>

</beans>
一个测试的Servlet
package com.nicchagil;

import java.io.IOException;

import java.util.logging.Logger;

import javax.servlet.ServletException;

import javax.servlet.http.HttpServlet;

import javax.servlet.http.HttpServletRequest;

import javax.servlet.http.HttpServletResponse;

import javax.servlet.http.HttpSession;

/**

 * Servlet implementation class SessionTestServlet

 */

public class SessionTestServlet extends HttpServlet {

    private static final long serialVersionUID = 1L;

    private Logger logger = Logger.getLogger("SessionTestServlet");

    /**

     * Default constructor.

     */

    public SessionTestServlet() {

        // TODO Auto-generated constructor stub

    }

    /**

     * @see HttpServlet#doGet(HttpServletRequest request, HttpServletResponse response)

     */

    protected void doGet(HttpServletRequest request, HttpServletResponse response) throws ServletException, IOException {

        HttpSession session = request.getSession();

        String username = request.getParameter("username");

        if (username != null && username.length() > 0) {

            session.setAttribute("username", username);

        }

        response.getWriter().append("Served at: ").append(request.getContextPath()).append(", userName : " + session.getAttribute("username"));

    }

    /**

     * @see HttpServlet#doPost(HttpServletRequest request, HttpServletResponse response)

     */

    protected void doPost(HttpServletRequest request, HttpServletResponse response) throws ServletException, IOException {

        // TODO Auto-generated method stub

        doGet(request, response);

    }

}
测试
启动,用浏览器访问该Servlet:http://127.0.0.1:8080/SessionTestServlet?username=123,然后不带参数可能获取用户名:http://127.0.0.1:8080/SessionTestServlet。
看下Redis,有没有持久化Session:
[root@blog ~]# /opt/redis-3.2.1/src/redis-cli

127.0.0.1:6379> keys *

1) "spring:session:sessions:expires:5b29c067-a4b1-4d51-98b2-be084703fc78"

2) "spring:session:sessions:5b29c067-a4b1-4d51-98b2-be084703fc78"

3) "spring:session:expirations:1497195000000"
接下来看下实现原理。
委托过滤器代理类,DelegatingFilterProxy
这个类不在Spring Session中,但它是我们上述例子配置的入口。
它是委托过滤器代理类,可以看到它的继承与实现关系:DelegatingFilterProxy -> GenericFilterBean -> Filter,其中GenericFilterBean的init()调用DelegatingFilterProxy的initFilterBean()。
initFilterBean()的作用是获取委托的过滤器,并调用委托过滤器的doFilter(),这个过滤器是springSessionRepositoryFilter。

Spring Session主要配置类,RedisHttpSessionConfiguration
说到springSessionRepositoryFilter,那么它在哪里实例化的呢?我们先看看RedisHttpSessionConfiguration。
RedisHttpSessionConfiguration,这是一个配置类,它注册了一些Spring Session所需的Bean。我们通过以下的xml显式注册一个配置Bean:
    <bean id="redisHttpSessionConfiguration"

        class="org.springframework.session.data.redis.config.annotation.web.http.RedisHttpSessionConfiguration">

        <property name="maxInactiveIntervalInSeconds" value="1800" />

    </bean>
这个类的继承关系是:RedisHttpSessionConfiguration -> SpringHttpSessionConfiguration,SpringHttpSessionConfiguration有个方法叫springSessionRepositoryFilter,这里就是注册springSessionRepositoryFilterBean的地方。关于@Configuration、@Bean方式注册Bean,请点击这里。
Session存储过滤器,SessionRepositoryFilter
它的继承关系是SessionRepositoryFilter -> OncePerRequestFilter -> Filter。
OncePerRequestFilter的名字说明了其作用,看doFilter方法可知,它通过request中的一个Attribute判断是否已做过滤,以保证对于每次请求只做一次此过滤逻辑。如果此请求是首次进入此过滤,则调用SessionRepositoryFilter.doFilterInternal。
SessionRepositoryFilter.doFilterInternal,将Servlet容器传入的Request和Response包装成自己封装的Request和Response,然后传给下一任Filter,后续的Filter和Servlet都使用Spring Session封装的Request和Response,此Request和Response分别继承HttpServletRequestWrapper、HttpServletResponseWrapper,并作了自己业务的覆盖。
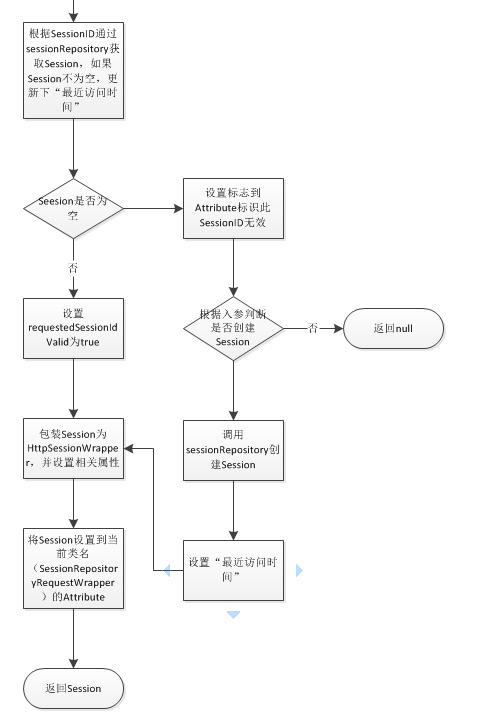
HTTP请求包装类,SessionRepositoryRequestWrapper
SessionRepositoryRequestWrapper根据自身业务,覆盖了许多方法,这里不多讨论,简单举例,比如getSession(boolean):

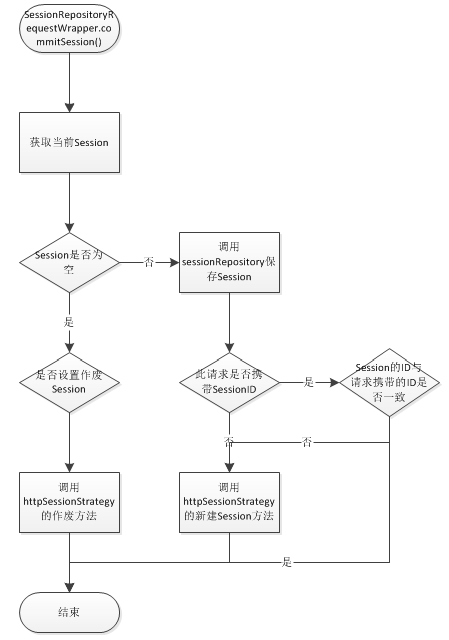
commitSession():
Http请求与Session的关系策略,HttpSessionStrategy
HttpSessionStrategy接口定义了几个方法,另外有几个实现类,这里只讨论一部分:
// 从request获取请求的SessionID,比如SessionID有可能放在Cookie或请求头中

String getRequestedSessionId(HttpServletRequest request);

// 当新Session被创建且应通知客户端新SessionID时此方法会被调用。此方法的实现可能为Cookie或响应头设置新SessionID,当然也可以设置其他信息

void onNewSession(Session session, HttpServletRequest request,

        HttpServletResponse response);

// 当Session销毁时且需通知客户端该SessionID不再有效时会调用此方法。此方法的实现可能为从Cookie或响应头移除SessionID。

void onInvalidateSession(HttpServletRequest request, HttpServletResponse response);
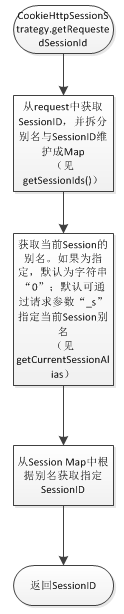
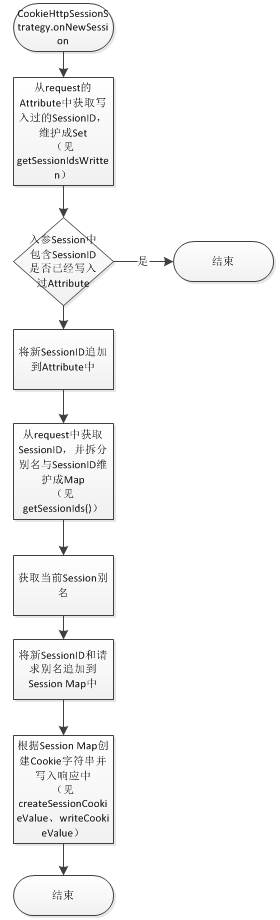
Cookie方式,CookieHttpSessionStrategy
getRequestedSessionId:
onNewSession:
onInvalidateSession:

HTTP请求头方式,HeaderHttpSessionStrategy
HeaderHttpSessionStrategy相对简单,根据头键值x-auth-token,从请求中读取sessionID,或设置响应头。
值得注意的是,销毁Session时onInvalidateSession设置响应头x-auth-token的值为空。
Session持久化,SessionRepository
这是持久化Session的接口,定义有几个方法:
// 创建能被此实现持久化的新Session。

S createSession();

// 持久化Session

void save(S session);

// 根据ID查询Session

S getSession(String id);

// 删除Session

void delete(String id);
【Spring】Spring Session的简单搭建与源码阅读的更多相关文章
- 利用IDEA搭建JDK源码阅读环境
利用IDEA搭建JDK源码阅读环境 首先新建一个java基础项目 基础目录 source 源码 test 测试源码和入口 准备JDK源码 下图框起来的路径就是jdk的储存位置 打开jdk目录,找到sr ...
- 【深入浅出 Yarn 架构与实现】1-2 搭建 Hadoop 源码阅读环境
本文将介绍如何使用 idea 搭建 Hadoop 源码阅读环境.(默认已安装好 Java.Maven 环境) 一.搭建源码阅读环境 一)idea 导入 hadoop 工程 从 github 上拉取代码 ...
- win7+idea+maven搭建spark源码阅读环境
1.参考. 利用IDEA工具编译Spark源码(1.60~2.20) https://blog.csdn.net/He11o_Liu/article/details/78739699 Maven编译打 ...
- Mac搭建Hadoop源码阅读环境
1.本次Hadoop源码阅读环境使用的阅读工具是idea,Hadoop版本是2.7.3.需要安装的工具包括idea.jdk.maven.protobuf等 2.jdk,使用的版本是1.8版,在jdk官 ...
- Spring-Session实现Session共享实现原理以及源码解析
知其然,还要知其所以然 ! 本篇介绍Spring-Session的整个实现的原理.以及对核心的源码进行简单的介绍! 实现原理介绍 实现原理这里简单说明描述: 就是当Web服务器接收到http请求后,当 ...
- 搭建 Spring 源码阅读环境
前言 有一个Spring源码阅读环境是学习Spring的基础.笔者借鉴了网上很多搭建环境的方法,也尝试了很多,接下来总结两种个人认为比较简便实用的方法.读者可根据自己的需要自行选择. 方法一:搭建基础 ...
- Spring源码阅读 源码环境搭建(一)
ring 源码阅读的搭建(一) 一 下载spring源码 进入官方网页:https://spring.io/projects/spring-framework 进入相关的github位置,下载zip包 ...
- Sping学习笔记(一)----Spring源码阅读环境的搭建
idea搭建spring源码阅读环境 安装gradle Github下载Spring源码 新建学习spring源码的项目 idea搭建spring源码阅读环境 安装gradle 在官网中下载gradl ...
- Spring源码阅读环境搭建
目录 安装gradle 导入Spring源码 创建测试模块my-test 其他问题 spring-aspects模块构建时报错 本文思维导图 本文将粗略的搭建一个Spring源码的阅读环境,为后面的源 ...
随机推荐
- HDFS分布式文件系统(The Hadoop Distributed File System)
The Hadoop Distributed File System (HDFS) is designed to store very large data sets reliably, and to ...
- node下使用jquery
node使用jquery的两种方式 在node下,使用jquery有两种方法: 使用jsdom模拟一个window对象 使用cheerio,cheerio只实现了jquery的dom部分功能,相当于j ...
- intellij idea强制更新索引
intellij idea使用时间长了,许多包安了又卸.卸了又安,导致索引文件有些不正常. 删除~/.Intellij Idea/下的index和cache即可彻底更新.
- maven groupID 和 ArtifactID的区别与作用
GroupID是项目组织唯一的标识符,实际对应JAVA的包的结构,是main目录里java的目录结构. ArtifactID就是项目的唯一的标识符,实际对应项目的名称,就是项目根目录的名称.一般Gro ...
- 多级菜单系统安装维护shell脚本实现企业级案例
演示效果: 1.一级菜单 2.二级菜单 3.执行操作 脚本参考: #!/bin/bash #author lic(oldboy linux student) #date 1304 DISK_NO=&q ...
- C语言lseek()函数:移动文件的读写位置
相关函数:dup, open, fseek 头文件:#include <sys/types.h> #include <unistd.h> 定义函数:off_t lseek ...
- UNIX 家族及Linux
Unix成长为一个非私有的操作系统,是因为1956年的AT&T公司受命于联邦去经营电报电话服务.当然也可以开发软件,甚至那个软件可以有”合理”收费的许可证,但是这个公司却被禁止从事任何和计算机 ...
- Tensorflow 相关概念
一.概述 人工智能:artificial intelligence 权重: weights 偏差:biases 图中包含输入( input).塑形( reshape). Relu 层( Relulay ...
- 【Oracle】Oracle自定义的函数与过程
本篇主要内容如下: 6.1 引言 6.2 创建函数 6.3 存储过程 6.3.1创建过程 6.3.2调用存储过程 6.3.3 AUTHID 6.3.4 PRAGMA AUTONOMOUS_TRANSA ...
- SourceTree 代码库管理工具
1.SourceTree 简介 SourceTree 是拥有可视化界面的项目版本控制软件,适用于 git 项目管理,window.mac 均可用. 官网下载地址 SourceTree 其它下载地址 S ...