
iOS开发——UI篇OC篇&UICollectionView详解+实例
UICollectionView详解+实例
实现步骤:
一、新建两个类
- 1.继承自UIScrollView的子类,比如HMWaterflowView
- * 瀑布流显示控件,用来显示所有的瀑布流数据
- 2.继承自UIView的子类,比如HMWaterflowViewCell
- * 代表着瀑布流数据中的一个单元(一个格子)
- 3.总结
- HMWaterflowView和HMWaterflowViewCell的关系实际上类似于
- UITableView和UITableViewCell的关系
二、设计HMWaterflowView的接口
- 1.模仿UITableView的接口来设计
- * 设计一套数据源和代理方法
三、HMWaterflowView的实现
- 1.reloadData
- * 作用:刷新数据
- * 步骤:
- 1> 清空以前残余的数据
- 2> 计算所有新数据对应的frame
- 2.layoutSubviews
- * 作用:显示和移除子控件
- * 步骤:
- 1> 检测每一个数据对应的frame在不在屏幕上(用户能不能看见)
- 2> 如果这个数据对应的frame在屏幕上:向数据源索要这个数据对应的cell,添加这个cell到HMWaterflowView中显示
- 3> 如果这个数据对应的frame不在屏幕上:从HMWaterflowView中移除这个数据对应的cell,并将这个cell添加到缓存池中
本章通过先总体介绍UICollectionView及其常用方法,再结合一个实例,了解如何使用UICollectionView。
UICollectionView 和 UICollectionViewController 类是iOS6 新引进的API,用于展示集合视图,布局更加灵活,可实现多列布局,用法类似于UITableView 和 UITableViewController 类。
使用UICollectionView 必须实现UICollectionViewDataSource,UICollectionViewDelegate,UICollectionViewDelegateFlowLayout这三个协议。
下面先给出常用到的一些方法。(只给出常用的,其他的可以查看相关API)
     #pragma mark -- UICollectionViewDataSource

     //定义展示的UICollectionViewCell的个数
     -(NSInteger)collectionView:(UICollectionView *)collectionView numberOfItemsInSection:(NSInteger)section
     {
         ;
     }

     //定义展示的Section的个数
     -(NSInteger)numberOfSectionsInCollectionView:(UICollectionView *)collectionView
     {
         ;
     }

     //每个UICollectionView展示的内容
     -(UICollectionViewCell *)collectionView:(UICollectionView *)collectionView cellForItemAtIndexPath:(NSIndexPath *)indexPath
     {
         static NSString * CellIdentifier = @"GradientCell";
         UICollectionViewCell * cell = [collectionView dequeueReusableCellWithReuseIdentifier:CellIdentifier forIndexPath:indexPath];

         cell.backgroundColor = [UIColor colorWithRed:(( * indexPath.row) /  * indexPath.row)/ * indexPath.row)/255.0) alpha:1.0f];
         return cell;
     }

     #pragma mark --UICollectionViewDelegateFlowLayout

     //定义每个UICollectionView 的大小
     - (CGSize)collectionView:(UICollectionView *)collectionView layout:(UICollectionViewLayout*)collectionViewLayout sizeForItemAtIndexPath:(NSIndexPath *)indexPath
     {
         , );
     }

     //定义每个UICollectionView 的 margin
     -(UIEdgeInsets)collectionView:(UICollectionView *)collectionView layout:(UICollectionViewLayout *)collectionViewLayout insetForSectionAtIndex:(NSInteger)section
     {
         , , , );
     }

     #pragma mark --UICollectionViewDelegate

     //UICollectionView被选中时调用的方法
     -(void)collectionView:(UICollectionView *)collectionView didSelectItemAtIndexPath:(NSIndexPath *)indexPath
     {
         UICollectionViewCell * cell = (UICollectionViewCell *)[collectionView cellForItemAtIndexPath:indexPath];
         cell.backgroundColor = [UIColor whiteColor];
     }

     //返回这个UICollectionView是否可以被选择
     -(BOOL)collectionView:(UICollectionView *)collectionView shouldSelectItemAtIndexPath:(NSIndexPath *)indexPath
     {
         return YES;
     }
下面通过一个例子具体介绍下。(例子来自网络。但是是通过第三方获得的,无法取得链接。还望见谅。)
iOS CollectionView的出现是一大福利,再也不用用TableView来定义复杂的多栏表格了,用法与Table类似,只是Cell必须自己添加,无默认模式
由于CollectionView没有默认的Cell布局,所以一般还是自定义方便又快捷
一、自定义Cell
1、新建类CollectionCell继承自UICollectionViewCell
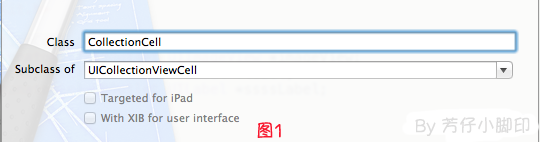
2、新建Xib,命名为CollectionCell.xib
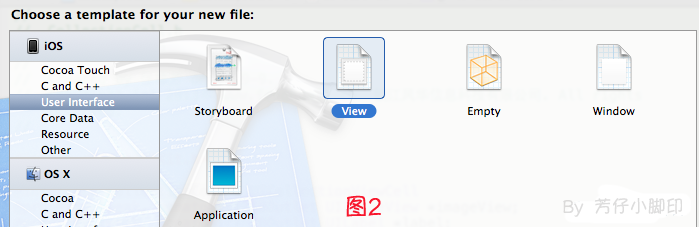
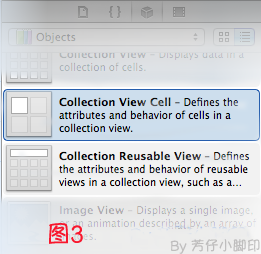
a.选中CollectionCell.xib删掉默认的View,从控件中拖一个Collection View Cell(图3)到画布中,设置大小为95*116;
b.选中刚刚添加的Cell,更改类名为CollectionCell,如图4

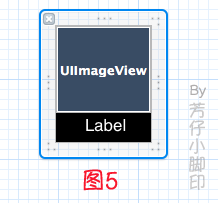
c.在CollectionCell.xib的CollectionCell中添加一个ImageView和一个Label(图5)
d.创建映射, 图6,图7
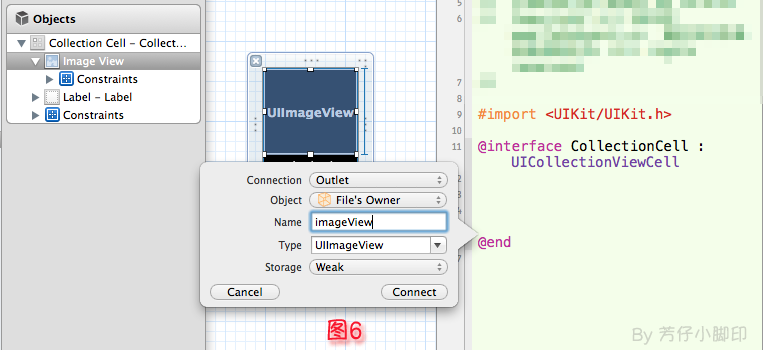
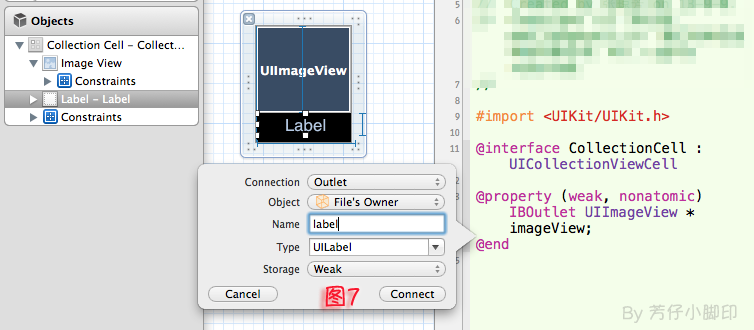
e.选中CollectionCell.m , 重写init方法
     - (id)initWithFrame:(CGRect)frame
     {
         self = [super initWithFrame:frame];
         if (self)
         {
             // 初始化时加载collectionCell.xib文件
             NSArray *arrayOfViews = [[NSBundle mainBundle] loadNibNamed:@"CollectionCell" owner:self options:nil];

             // 如果路径不存在,return nil
             )
             {
                 return nil;
             }
             // 如果xib中view不属于UICollectionViewCell类,return nil
             ] isKindOfClass:[UICollectionViewCell class]])
             {
                 return nil;
             }
             // 加载nib
             self = [arrayOfViews objectAtIndex:];
         }
         return self;
     }
f.选中CollectionCell.xib 修改其identifier为CollectionCell。
二、定义UICollectionView;
1、拖动一个Collection View到指定ViewController的View上
2、连线dataSource和delegate,并创建映射,命名为CollectionView
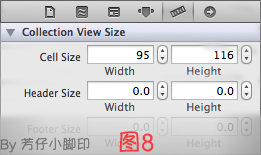
3、选中CollectionView的标尺,将Cell Size的Width和Height改成与自定义的Cell一样的95*116,图8
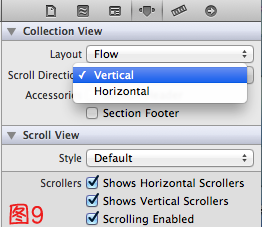
4、选中CollectionView的属性,可以修改其属性,比如是垂直滑动,还是水平滑动,选择Vertical或Horizontal
5、选中CollectionViewCell,修改Class,继承自CollectionCell
5、在ViewDidLoad方法中声明Cell的类,在ViewDidLoad方法中添加,此句不声明,将无法加载,程序崩溃
其中,CollectionCell是这个Cell的标识(之前几步已经定义过了。 )
[self.collectionView registerClass:[CollectionCell class] forCellWithReuseIdentifier:@"CollectionCell"];
6、在ViewController.h中声明代理
- @interface ViewController : UIViewController<UICollectionViewDataSource,UICollectionViewDelegate>
7、在.m文件中实现代理方法
     //每个section的item个数
     -(NSInteger)collectionView:(UICollectionView *)collectionView numberOfItemsInSection:(NSInteger)section
     {
         ;
     }

     -(UICollectionViewCell *)collectionView:(UICollectionView *)collectionView cellForItemAtIndexPath:(NSIndexPath *)indexPath
     {

         CollectionCell *cell = (CollectionCell *)[collectionView dequeueReusableCellWithReuseIdentifier:@"CollectionCell" forIndexPath:indexPath];

         //图片名称
         NSString *imageToLoad = [NSString stringWithFormat:@"%d.png", indexPath.row];
         //加载图片
         cell.imageView.image = [UIImage imageNamed:imageToLoad];
         //设置label文字
         cell.label.text = [NSString stringWithFormat:@"{%ld,%ld}",(long)indexPath.row,(long)indexPath.section];

         return cell;
     }
8 。效果如图10

点击某项后跳转事件与UITableView类似,实现代理方法
-(void)collectionView:(UICollectionView *)collectionView didSelectItemAtIndexPath:(NSIndexPath *)indexPath
即可,不赘述
iOS开发——UI篇OC篇&UICollectionView详解+实例的更多相关文章
- iOS开发——UI精选OC篇&UIApplication,UIWindow,UIViewController,UIView(layer)简单介绍
UIApplication,UIWindow,UIViewController,UIView(layer)简单介绍 一:UIApplication:单例(关于单例后面的文章中会详细介绍,你现在只要知道 ...
- iOS开发——UI高级OC篇&自定义控件之调整按钮中子控件(图片和文字)的位置
自定义控件之调整按钮中子控件(图片和文字)的位置 其实还有一种是在storyBoard中实现的,只需要设置对应空间的左右间距: 这里实现前面两种自定义的方式 一:imageRectForContent ...
- iOS开发——网络实用技术OC篇&网络爬虫-使用青花瓷抓取网络数据
网络爬虫-使用青花瓷抓取网络数据 由于最近在研究网络爬虫相关技术,刚好看到一篇的的搬了过来! 望谅解..... 写本文的契机主要是前段时间有次用青花瓷抓包有一步忘了,在网上查了半天也没找到写的完整的教 ...
- ios开发——实用技术篇OC篇&iOS的主要框架
iOS的主要框架 阅读目录 Foundation框架为所有的应用程序提供基本系统服务 UIKit框架提供创建基于触摸用户界面的类 Core Data框架管着理应用程序数据模型 Core ...
- iOS开发——高级技术OC篇&运行时(Runtime)机制
运行时(Runtime)机制 本文将会以笔者个人的小小研究为例总结一下关于iOS开发中运行时的使用和常用方法的介绍,关于跟多运行时相关技术请查看笔者之前写的运行时高级用法及相关语法或者查看响应官方文档 ...
- iOS开发——运行时OC篇&使用运行时获取系统的属性:使用自己的手势修改系统自带的手势
使用运行时获取系统的属性:使用自己的手势修改系统自带的手势 有的时候我需要实现一个功能,但是没有想到很好的方法或者想到了方法只是那个方法实现起来太麻烦,一或者确实为了装逼,我们就会想到iOS开发中最牛 ...
- iOS开发——网络实用技术OC篇&网络爬虫-使用java语言抓取网络数据
网络爬虫-使用java语言抓取网络数据 前提:熟悉java语法(能看懂就行) 准备阶段:从网页中获取html代码 实战阶段:将对应的html代码使用java语言解析出来,最后保存到plist文件 上一 ...
- iOS 开发之 -- UDID和UUID的详解
老实说,搞了几年的ios开发了,对基础的概念,还是不牢固,整天都是为了赶进度而码代码,这里记录一下这两者的区别: UDID的全名为 Unique Device Identifier :设备唯一标识符. ...
- iOS开发——高级技术&本地化与国际化详解
本地化与国际化详解 效果如下: 英语: 中文: 具体实现如下: ...
随机推荐
- 浅谈HTTP中Get、Post、Put与Delete的区别
Http定义了与服务器交互的不同方法,最基本的方法有4种,分别是GET,POST,PUT,DELETE.URL全称是资源描述符,我们可以这样认为:一个URL地址,它用于描述一个网络上的资源,而HTTP ...
- Building QT projects from the command line
/************************************************************************ * Building QT projects fro ...
- LeetCode Pascal's Triangle II (杨辉三角)
题意:给出杨辉三角的层数k,返回最后一层.k=0时就是只有一个数字1. 思路:滚动数组计算前一半出来,返回时再复制另一半.简单但是每一句都挺长的. 0ms的版本: class Solution { p ...
- 打印web页面指定区域的三种方法
本文和大家分享一下web页面实现指定区域打印功能的三种方法,一起来看下吧. 第一种方法:使用CSS 定义一 个.noprint的class,将不打印的内容放入这个class内. 代码如下: <s ...
- Java [leetcode 20]Valid Parentheses
题目描述: Given a string containing just the characters '(', ')', '{', '}', '[' and ']', determine if th ...
- 剑指Offer:连续子数组的最大和
题目: 输入一个整型数组, 数组里有正数也有负数. 数组中的一个或连续的多个整数组成一个子数组. 求所有子数组的和的最大值. 要求时间复杂度为O(n) #include <stdio.h> ...
- iOS开发中提交带有中文或特殊字符串的参数
iOS开发中,与后台进行数据交换是一个很常见的场景. 在web开发中,对于我们提交的地址,浏览器会负责进行decode,但是在ios中,必须要自己手动来实现.否则我们拼接出的网址在包括中文.特殊字符串 ...
- ASP.NET MVC 入门10、Action Filter 与 内置的Filter实现(实例-防盗链)
于ASP.NET MVC Preview5. 前一篇中我们已经了解了Action Filter 与 内置的Filter实现,现在我们就来写一个实例.就写一个防盗链的Filter吧. 首先继承自Filt ...
- 一个可能是pip的一个BUG
今天重新安装了Python,把Python的安装位置改为 D:\Program Files\Python\Python34\ 用pip 安装 Django 的时候出现一下错误 >pip inst ...
- javascript活动对象的理解——伪单例模式
在自己研究javascript各种设计模式的过程中,偶然写出的一段代码让自己理解的更深刻了,之所以称之为伪单例模式,是因为这段代码造成的结果很想单例模式,但是实际上是活动对象捣乱所造成的误会. 代码很 ...